49
91
22
92
35
93
1
88
87
90
85
7
86
23
83
8
82
74
89
5
76
84
75
24
81
77
2
6
80
73
79
78
32
125
126
25
EXPLODED DRAWING C
Model No. NETL30914.0 R0614A
Страница 1: ...future reference www iconeurope com USER S MANUAL CUSTOMER SERVICE UNITED KINGDOM Call 0330 123 1045 From Ireland 053 92 36102 Website www iconsupport eu E mail csuk iconeurope com Write ICON Health F...
Страница 2: ...EXPLODED DRAWING 47 ORDERING REPLACEMENT PARTS Back Cover RECYCLING INFORMATION Back Cover NORDICTRACK is a registered trademark of ICON Health Fitness Inc This drawing shows the locations of the war...
Страница 3: ...other appliance should be on the same circuit When replacing the fuse in the power cord adapter insert an ASTA approved BS1362 13 amp fuse into the fuse carrier 12 If an extension cord is needed use o...
Страница 4: ...40 F 60 C Do not operate the television in temperatures below 23 F 5 C or above 90 F 32 C 29 To protect the treadmill and television dur ing lightning storms unplug the power cord from the wall outlet...
Страница 5: ...tall er s attention to your local codes guidelines for proper earthing and in particular speci fies that the cable ground shall be connected to the earthing system of the building as close to the poin...
Страница 6: ...If you have questions after reading this manual please see the front cover of this manual To help us assist you please note the product model number and serial number before contacting us The model n...
Страница 7: ...his manual The number following the key number is the quantity used for assembly Note If a part is not in the hardware kit check to see whether it is preattached Extra parts may be included 8 x 3 4 Sc...
Страница 8: ...e included hex key one adjustable wrench one Phillips screwdriver To avoid damaging parts do not use power tools 1 2 Make sure that the power cord is unplugged Identify the Right Extension Leg 91 Atta...
Страница 9: ...Covers into place yet Then remove and save the four indicated 5 16 x 2 Screws 2 89 90 84 3 2 2 84 5 Carefully slide the Upright Crossbar 76 between the Uprights 84 Attach the Upright Crossbar with fou...
Страница 10: ...ead Screws have flatter heads Attach the Tray 79 to the Upright Crossbar 76 with four 8 x 3 4 Screws 5 Start all four Screws and then tighten them 6 5 84 Tie B 76 5 79 Hole 7 Attach the two Handrails...
Страница 11: ...with two of the 5 16 x 2 Screws 2 that you removed in step 3 two 5 16 Star Washers 8 and two 10 x 3 4 Screws 6 Start all four Screws and then tighten them Then tighten the other two 5 16 x 2 Screws 2...
Страница 12: ...near the Handrails 74 See the inset drawing Connect the Upright Wire 83 to the console wire F The connec tors should slide together easily and snap into place If they do not turn one connector and try...
Страница 13: ...il Top Cover Slide the Left Handrail Top and Bottom Covers forward against the console assembly D as shown Tighten all four Screws Attach the Right Handrail Top and Bottom Covers 81 82 to the right Ha...
Страница 14: ...OW TO LOWER THE TREADMILL FOR USE on page 39 56 15 52 4 9 I 14 Raise the Frame 52 to the position shown Have a second person hold the Frame until step 15 is completed Orient the Storage Latch 56 so th...
Страница 15: ...r M4 x 12mm Screws 130 that you removed in step 16 Remove and discard the two indicated screws J 18 Attach the Upper TV Bracket Cover 132 to the TV Bracket 131 with two 8 x 3 4 Screws 5 17 17a 18 131...
Страница 16: ...tighten them Be careful not to over tighten the Screws 20 135 1 Console Assembly TV Assembly 5 5 19 Remove and discard the four indicated screws K Remove and save the four indicated 5 16 x 3 4 Screws...
Страница 17: ...84 89 21 22 Make sure that all parts are properly tightened before you use the treadmill If there are sheets of plastic on the treadmill decals remove the plastic To protect the floor or carpet place...
Страница 18: ...nnect one end of a 75 ohm CATV cable to the 75 ohm output jack on your external source 2 Plug in the power cord of your external source See your external source user s manual for proper earthing instr...
Страница 19: ...eo input jack on the TV as shown below HOW TO CONNECT A DVD OR BLU RAY PLAYER OR OTHER DEVICE USING AN HDMI CABLE 1 Connect one end of an HDMI cable to your DVD or Blu ray player or other device 2 Plu...
Страница 20: ...tures above 122 F 50 C or below 14 F 10 C Do not excessively bend or stretch the sensor when using or storing the heart rate monitor To clean the sensor use a damp cloth and a small amount of mild soa...
Страница 21: ...power cord into the socket on the treadmill 2 Plug the power cord into an appropriate outlet that is properly installed and earthed in accordance with all local codes and ordinances DANGER Improper co...
Страница 22: ...treadmill console offers an array of fea tures designed to make your workouts more effective and enjoyable When you use the manual mode you can change the speed and incline of the treadmill with the t...
Страница 23: ...is selected see step 4 on page 30 For simplicity all instructions in this section refer to kilometers HOW TO USE THE TOUCH SCREEN The console features a tablet with a full color touch screen The follo...
Страница 24: ...and other features that the console offers To use the manual mode see page 24 To use an onboard workout see page 26 To use a set a goal workout see page 27 To use a pulse workout see page 28 To use an...
Страница 25: ...cline you must first calibrate the incline system see step 4 on page 33 5 Monitor your progress with the displays The console offers sev eral display modes The display mode that you select will determ...
Страница 26: ...the off position and unplug the power cord IMPORTANT If you do not do this the treadmill s electrical components may wear prematurely HOW TO USE AN ONBOARD WORKOUT 1 Insert the key into the console S...
Страница 27: ...touch the End Workout button Note The calorie goal is an estimate of the number of calories that you will burn during the workout The actual number of calories that you burn will depend on various fa...
Страница 28: ...exercising remove the key from the console See step 8 on page 26 HOW TO USE A PULSE WORKOUT Pulse workouts automatically control the speed and incline of the treadmill to keep your heart rate near a t...
Страница 29: ...Fit buttons on the console To compete in a race that you have previously scheduled touch the Compete button To view your Workout History touch the Track button To use a set a goal workout touch the Se...
Страница 30: ...uch the US Metric button to view the selected unit of measurement Change the unit of measure ment if desired Then touch the back button on the screen 5 Select a timezone Touch the Timezone button Sele...
Страница 31: ...rrect pass code is entered IMPORTANT If you forget your passcode enter the following master passcode to unlock the console 1985 12 Set a safety screen timeout The console features an automatic screen...
Страница 32: ...he workout buttons will not function Note If you have questions after following these instructions go to support iFit com for assistance HOW TO USE THE MAINTENANCE MODE 1 Select the settings main menu...
Страница 33: ...n HOW TO USE THE WIRELESS NETWORK MODE The console features a wireless network mode that allows you to set up a wireless network connection 1 Select the settings main menu See step 1 on page 30 2 Sele...
Страница 34: ...the back button on the screen HOW TO OPERATE THE DIGITAL TV You can control the digital TV with the buttons on the console with the buttons on the top of the digital TV or with the remote control see...
Страница 35: ...e control 1 Access the settings main menu See step 1 on page 30 2 Select the entertainment mode In the settings main menu touch the Entertainment button to enter the entertainment mode 3 Set default s...
Страница 36: ...ngs Press the Fav button to select the Favorite List of channels See step 4 on page 37 to create a favorite channels list HOW TO REPLACE THE BATTERIES IN THE REMOTE CONTROL To replace the batteries fi...
Страница 37: ...n nels saved in the TV memory Select a checkbox in the Skip column and press Enter to have the TV not use a channel Select a checkbox in the Favorite column to add the channel to your favorite channel...
Страница 38: ...if no signal is detected for 10 minutes Select No Operation Power Off to have the TV shut off if no buttons are pressed on the remote con trol on screen control or console TV control for 3 hours When...
Страница 39: ...et place a mat under the treadmill Keep the treadmill out of direct sunlight Do not leave the treadmill in the storage position in temperatures above 85 F 30 C HOW TO MOVE THE TREADMILL Before moving...
Страница 40: ...dmill frame near the power cord If the switch protrudes as shown the switch has tripped To reset the power switch wait for five minutes and then press the switch back in SYMPTOM The power turns off du...
Страница 41: ...e the key from the console SYMPTOM The walking belt slows when walked on a If an extension cord is needed use only a 3 con ductor 14 gauge 1 mm2 cord that is no longer than 5 ft 1 5 m b If the walking...
Страница 42: ...he tread mill for a few minutes Repeat until the walking belt is properly tightened SYMPTOM The digital TV is not receiving a signal a Make sure that the correct input source is selected See step 2 on...
Страница 43: ...icture are missing the picture moves around the screen or the picture disappears the signal may be weak Change the direction or position of the antenna to improve reception Make sure the digital TV se...
Страница 44: ...c Exercise If your goal is to strengthen your cardiovascular system you must perform aerobic exercise which is activity that requires large amounts of oxygen for prolonged periods of time For aerobic...
Страница 45: ...eft Frame Cover 45 1 Magnet 46 1 Clip 47 1 Reed Switch 48 1 Controller 49 2 8 Star Washer 50 1 Controller Bracket 51 1 Drive Roller Pulley 52 1 Frame 53 4 Tie 54 1 Drive Motor 55 1 Motor Belt 56 1 Sto...
Страница 46: ...4 x 1 1 2 Bolt 111 2 1 4 Nut 112 1 Adjustment Handle 113 1 Handle Cap 114 4 Cushion Bushing 115 2 Cushion Rod Bracket 116 1 Cushion Rod 117 2 Cushion Wheel 118 8 Cushion Plate 119 4 Cushion Spring 12...
Страница 47: ...2 20 38 44 5 5 5 5 5 5 51 52 17 17 50 48 5 5 5 5 18 18 13 5 13 49 5 5 20 20 37 11 11 122 123 121 120 37 119 118 118 118 118 119 37 118 118 119 118 118 119 37 124 124 11 122 123 11 122 123 11 122 123 1...
Страница 48: ...5 36 36 36 36 5 5 66 65 67 34 35 14 63 15 34 63 64 28 64 35 28 5 5 5 5 5 5 72 71 68 68 5 5 5 5 116 33 117 115 111 33 112 110 117 115 114 33 110 111 114 113 69 70 139 EXPLODED DRAWING B Model No NETL30...
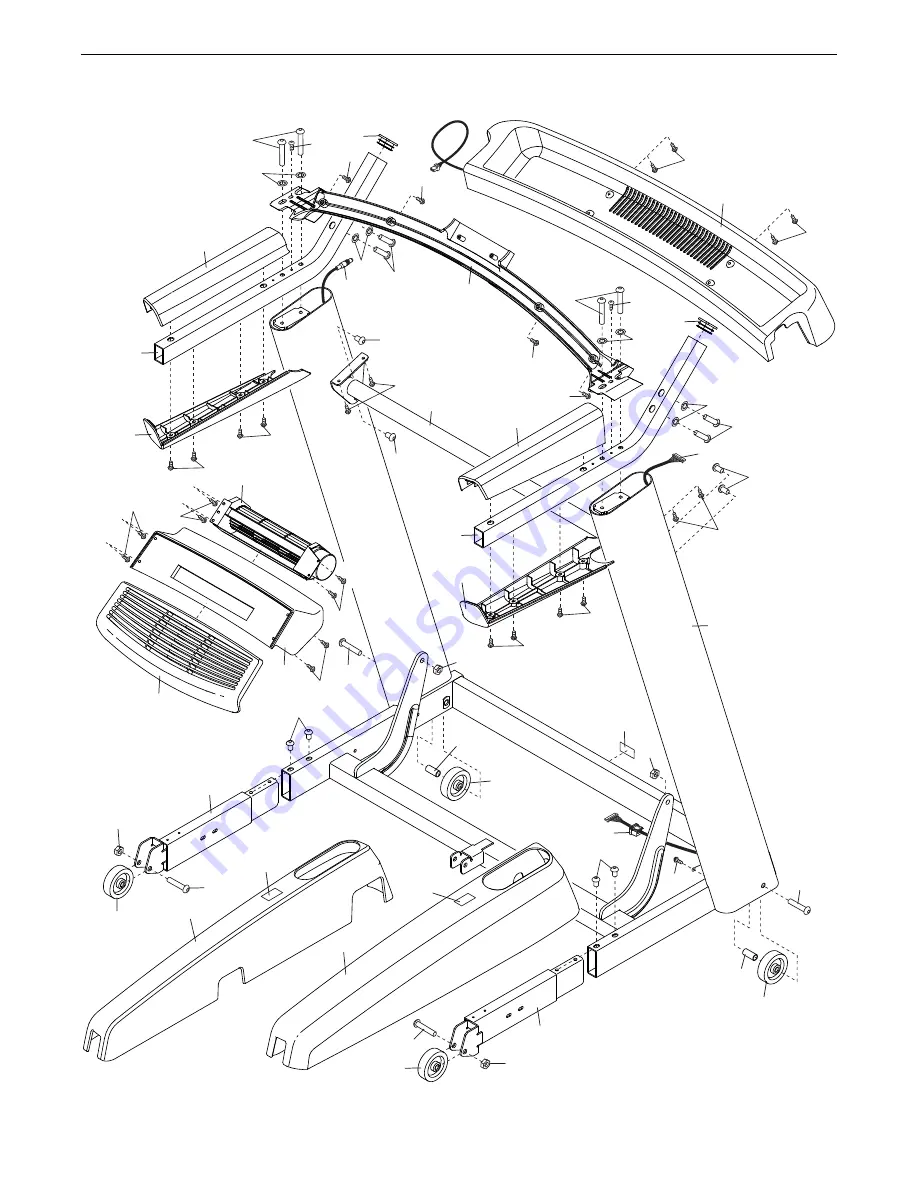
Страница 49: ...35 22 93 1 88 87 90 85 7 87 88 86 1 23 35 85 83 8 23 82 74 89 85 1 5 76 84 1 75 24 24 74 81 77 2 8 5 5 5 5 6 8 2 2 80 73 77 79 8 1 24 24 2 5 6 78 32 32 32 32 125 126 25 5 5 EXPLODED DRAWING C Model N...
Страница 50: ...11 11 11 107 5 106 105 5 5 5 5 5 105 99 99 29 29 104 102 103 11 11 11 11 101 11 11 100 96 29 29 29 11 98 97 11 11 11 94 11 11 95 95 11 11 29 11 11 107 11 EXPLODED DRAWING D Model No NETL30914 0 R0614...
Страница 51: ...51 108 109 133 134 16 130 1 1 131 5 5 132 5 135 EXPLODED DRAWING E Model No NETL30914 0 R0614A...
Страница 52: ...f you require more information about safe and correct disposal methods please contact your local city office or the establishment where you purchased this product RECYCLING INFORMATION To order replac...