NordicTrack ASR 700 Скачать руководство пользователя страница 12

12

HOW TO USE THE ELLIPTICAL EXERCISER

HOW TO PLUG IN THE POWER SUPPLY

Plug one end of the included power supply into the
jack on the front of the elliptical exerciser (see the
drawing on page 4 for the location of the jack). Plug
the other end of the power supply into an appropriate
outlet that is properly installed in accordance with all
local codes and ordinances.

Note: The console can also be operated with four 1.5V
“D” batteries (not included); alkaline batteries are rec-
ommended. 

IMPORTANT: If the elliptical exerciser

has been exposed to cold temperatures, allow it to
warm to room temperature before inserting batter-
ies into the Console. If you do not do this, the
console displays or other electronic components
may become damaged. 

To insert batteries into the

console, remove the two screws, which are marked
with a battery symbol, from the back of the console,
and remove the battery cover. Insert four batteries into
the console. Orient the batteries as shown by the
markings inside the battery compartment. Then, reat-
tach the battery cover.

HOW TO MOVE THE ELLIPTICAL EXERCISER

Due to the size and weight of the elliptical exercis-
er, moving it requires two persons.

Stand in front of

the elliptical exerciser, hold the upright, and place one
foot against one of the front wheels. Pull on the
upright and have a second person lift the rear of the
track until the elliptical exerciser will roll on the front
wheels. Carefully move the elliptical exerciser to the
desired location, and then lower it to the floor.

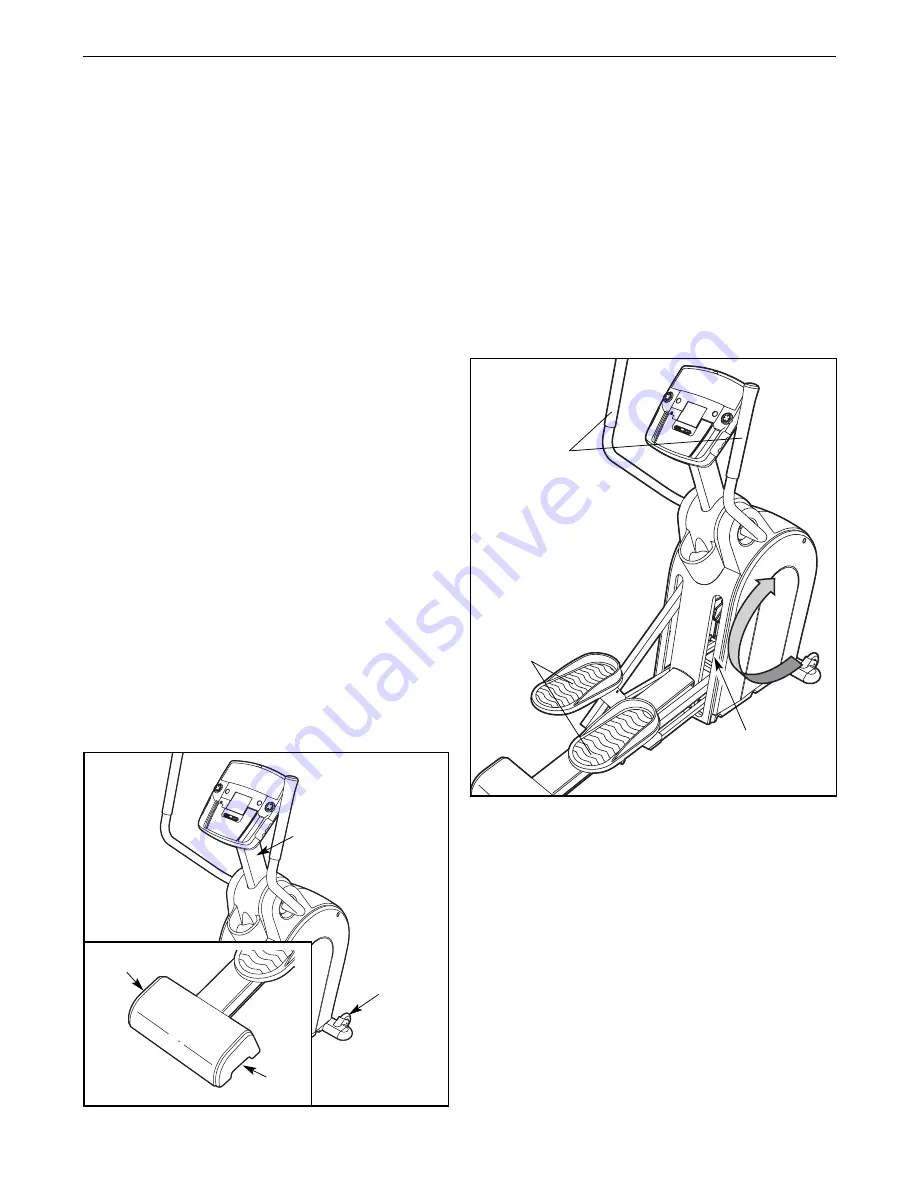
HOW TO EXERCISE ON THE ELLIPTICAL
EXERCISER

To mount the elliptical exerciser, hold the handlebars
and step onto the pedal that is in the lower position.
Then, step onto the other pedal. Push the pedals until
they begin to move with a continuous motion. 

Note:

The crank arms can turn in either direction. It is
recommended that you turn the crank arms in the
direction shown by the arrow below; however, for
variety, you can turn the crank arms in the oppo-
site direction. 

To dismount the elliptical exerciser, wait until the ped-
als come to a complete stop. 

Note: The elliptical

exerciser does not have a free wheel; the pedals
will continue to move until the flywheel stops.

When the pedals are stationary, step off the higher
pedal first. Then, step off the lower pedal.

HOW TO LEVEL THE ELLIPTICAL EXERCISER

If the elliptical exerciser rocks slightly on your floor
during use, turn one or both of the leveling feet
beneath the base or beneath the front stabilizer until
the rocking motion is eliminated. If the elliptical exer-
ciser flexes during use, turn the leveling foot beneath
the center of the frame.

Place

your foot

here

Pull on
upright

Pedals

Crank Arm

Handlebars

Lift

here

Lift here

Содержание ASR 700

Страница 1: ...oducts prizes fitness tips and much more USER S MANUAL QUESTIONS As a manufacturer we are commit ted to providing complete customer satisfaction If you have questions or if parts are damaged or missin...

Страница 2: ...DERING REPLACEMENT PARTS Back Cover LIMITED WARRANTY Back Cover 2 NordicTrack is a registered trademark of ICON IP Inc WARNING DECAL PLACEMENT The warning decal shown here has been applied in the loca...

Страница 3: ...lbs 124 kg 8 Wear appropriate exercise clothes when exercising do not wear loose clothes that could become caught on your elliptical exer ciser Always wear athletic shoes for foot protection 9 Hold t...

Страница 4: ...ve ques tions after reading this manual please see the front cover of this manual To help us assist you note the product model number and serial number before con tacting us The model number and the l...

Страница 5: ...rea and remove the packing materials Do not dispose of the packing materials until assembly is completed Assembly requires the included hex keys and your own Phillips screwdriver adjustable wrench and...

Страница 6: ...he position shown While a second person tips the Frame 1 backward attach the Stabilizer to the Frame with the two M10 x 120mm Patch Screws 58 2 Identify the Right Handlebar 36 which is marked with an...

Страница 7: ...drawing in the Upright Tie the lower end of the wire tie to the Wire Harness 46 Next pull the upper end of the wire tie upward out of the top of the Upright Then untie and discard the wire tie Tip Do...

Страница 8: ...ft Link Arm 25 Leave the Link Tube inside the left Link Arm and then position the Left Pedal Leg 24 and the left Link Arm as shown Apply a small amount of the included grease to a Barrel Nut 56 Insert...

Страница 9: ...7 7 7 Insert the axle of the Roller 27 through the right Link Arm 25 make sure that the Roller is on the inner side of the Link Arm Attach the Roller with an M10 x 15mm Patch Screw 71 and an M10 x 22m...

Страница 10: ...10 9 Attach the Ramp Cover 7 to the Ramp 2 with six 8 x 1 2 Screws 79 9 79 79 79 7 10 While a second person tips the Frame 1 for ward tighten a Foot 9 into the underside of the Frame 10 2 9 1...

Страница 11: ...ssembly is completed To protect the floor or carpet from damage place a mat under the elliptical exerciser Plug the power supply into the socket at the front of the elliptical exerciser see HOW TO PLU...

Страница 12: ...ot against one of the front wheels Pull on the upright and have a second person lift the rear of the track until the elliptical exerciser will roll on the front wheels Carefully move the elliptical ex...

Страница 13: ...he advantage you will have The console keeps track of the four highest scores for each game compete with other users or try to top your own high score iFit Interactive Workout System The console also...

Страница 14: ...aled The upper right corner of the display will show the approximate number of calories you have burned The upper right corner of the display will also show your heart rate when you use the hand grip...

Страница 15: ...continue to hold the handgrip pulse sensor the display will show your heart rate for up to 30 seconds If the display does not show your heart rate make sure that your hands are positioned as described...

Страница 16: ...flash If a different resistance level and or target rpm is programmed for the next segment the resistance level and or the target rpm will flash in the display for a few seconds to alert you The resi...

Страница 17: ...If a different resistance level and or target rpm is programmed for the next segment the resistance level and or target rpm will flash in the display for a few seconds to alert you The resistance of t...

Страница 18: ...g pace will affect the speed of the blocks the faster you pedal the more slowly the blocks will fall giving you extra time to position and orient the blocks The game will con tinue until any part of a...

Страница 19: ...laster is hit it will be disabled and another laser blaster will appear in its place there are a total of four laser blasters If you vaporize the entire squadron of drones a new squadron will appear A...

Страница 20: ...FIT slot A moment after you select a workout the voice of a personal trainer will begin guiding you through your workout iFIT workouts function in the same way as classic workouts To use the workout s...

Страница 21: ...bat teries into the Console If you do not do this the console displays or other electronic components may become damaged To replace the batteries remove the two screws which are marked with a bat tery...

Страница 22: ...ur goal is to strengthen your cardiovascular system you must perform aerobic exercise which is activity that requires large amounts of oxygen for prolonged periods of time For aerobic exercise adjust...

Страница 23: ...lles Stretch With one leg in front of the other reach forward and place your hands against a wall Keep your back leg straight and your back foot flat on the floor Bend your front leg lean forward and...

Страница 24: ...24 NOTES...

Страница 25: ...atch Screw 52 2 M8 x 50mm Hex Screw 53 2 Large Snap Ring 54 2 Small Snap Ring 55 2 M6 x 14mm Flat Head Screw 56 2 Barrel Nut 57 6 M6 x 18mm Patch Screw 58 2 M10 x 120mm Patch Screw 59 2 M10 x 20mm Pat...

Страница 26: ...26 EXPLODED DRAWING A Model No NTEL00607 0 R0308A 4 5 6 7 17 33 35 35 40 66 67 66 66 66 66 66 79 79 66 66 66 79 67 66 81 81 81 81 66 82 82 67 81 81...

Страница 27: ...15 15 15 15 28 28 28 28 29 29 48 39 30 30 31 31 32 32 34 34 37 38 25 41 42 43 36 44 44 9 9 45 45 46 47 14 49 50 50 51 78 52 52 53 53 54 54 55 55 56 56 57 57 58 59 59 74 73 73 74 71 71 60 77 77 61 61 7...

Страница 28: ...onsible or liable for indirect special or consequential damages arising out of or in con nection with the use or performance of the product or damages with respect to any economic loss loss of propert...

Отзывы: