NordicTrack 2300 Treadmill Скачать руководство пользователя страница 31

PROBLEM: The incline of the treadmill does not change correctly 

SOLUTION:

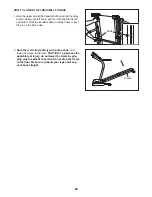
a. With the key in the console, press one of the Incline buttons. 

While the incline is changing, re-

move the key.

After a few seconds, re-insert the key. The treadmill will automatically rise to the

maximum incline level and then return to the minimum level. This will recalibrate the incline system. 

31

Содержание 2300 Treadmill

Страница 1: ...ow Write the serial number in the space above for reference Visit our website at www nordictrack com new products prizes fitness tips and much more QUESTIONS As a manufacturer we are com mitted to providing complete customer satisfaction If you have questions or if parts are damaged or missing PLEASE CONTACT OUR CUSTOMER SERVICE DEPARTMENT DIRECTLY CALL TOLL FREE 1 888 825 2588 Mon Fri 6 a m 6 p m...

Страница 2: ...DJUSTMENT 10 HOW TO FOLD AND MOVE THE TREADMILL 27 TROUBLESHOOTING 29 CONDITIONING GUIDELINES 32 PART LIST 34 ORDERING REPLACEMENT PARTS 35 LIMITED WARRANTY Back Cover Note An EXPLODED DRAWING is attached in the center of this manual NordicTrack is a registered trademark of ICON IP Inc 2 ...

Страница 3: ...e to use a properly functioning surge suppressor could result in damage to the con trol system of the treadmill If the control sys tem is damaged the walking belt may change speed accelerate or stop unexpectedly which may result in a fall and serious injury 13 Keep the power cord and the surge suppres sor away from heated surfaces 14 Never move the walking belt while the power is turned off Do not...

Страница 4: ...the power cord immediately after use before cleaning the treadmill and before performing the main tenance and adjustment procedures de scribed in this manual Never remove the motor hood unless instructed to do so by an authorized service representative Servicing other than the procedures in this manual should be performed by an authorized service representative only 29 The treadmill is intended fo...

Страница 5: ...ing this manual please see the front cover of this man ual To help us assist you please note the product model number and serial number before contacting us The model number of the treadmill is NTL12905 5 The serial number can be found on a decal attached to the treadmill see the front cover of this manual for the lo cation Before reading further please familiarize yourself with the parts that are...

Страница 6: ...Some small parts may have been pre assembled If a part is not in the parts bag check to see if it has been pre assembled To avoid damaging plastic parts do not use power tools for assembly 6 1 Tek Screw 82 4 Console Bolt 72 4 Extension Leg Bolt 87 4 Star Washer 67 8 Plastic Spacer 101 4 Extension Leg Nut 106 4 1 Make sure that the power cord is unplugged With the help of a second person carefully ...

Страница 7: ...assembly with four Console Bolts 72 and four Star Washers 67 only one side is shown Start all four Console Bolts before tightening any of them 72 67 85 Console Assembly 4 3 Remove the band securing the Upright Wire Harness 73 to the right Upright 85 Have a second person hold the console assembly near the right Upright Connect the Upright Wire Harness 73 to the wires ex tending from the console ass...

Страница 8: ... the storage position see HOW TO FOLD AND MOVE THE TREADMILL on page 27 Hold the cylinder end of the Shock 114 near the bracket in the center of the crossbar on the Frame 55 See the two small inset drawings Using your fingernail or the end of a screwdriver press on the end of the Shock Clip 108 to loosen it from the Shock 114 Next rotate the Shock Clip and pull it out of the Shock Be careful to av...

Страница 9: ...sure that all parts are properly tightened before you use the treadmill Keep the included hex key in a secure place the hex key is used to adjust the walking belt see page 30 To protect the floor or carpet from damage place a mat under the treadmill 7 Remove the Shock Clip 108 from the lower end of the Shock 114 Next press the Incline increase and decrease buttons until the ball on the bracket is ...

Страница 10: ...ld malfunc tion or break down grounding provides a path of least resistance for electric current to reduce the risk of elec tric shock This product is equipped with a cord having an equipment grounding conductor and a grounding plug Plug the power cord into a surge suppressor and plug the surge suppressor into an appropriate outlet that is properly installed and grounded in accordance with all loc...

Страница 11: ...o your portable stereo home stereo computer or VCR and play special iFIT MP3 CD and video programs iFIT MP3 programs CDs and video cassettes are available separately iFIT programs au tomatically control the speed and incline of the treadmill as a personal trainer guides you through every step of your workout high energy music provides added moti vation To purchase and download iFIT MP3 pro grams g...

Страница 12: ...ht the word ODOMETER in the main menu and then press the Enter button When the Enter button is pressed the display will show the total number of miles run by User 1 and User 2 since the treadmill was purchased The display will also show the trip distance the dis tance run during a recent period of time such as the most recent month for User 1 and User 2 To reset the trip distance first highlight U...

Страница 13: ... display will re main lit and show a variety of graphics Highlight DEMO MODE and then press the Enter button Next highlight OFF to turn off the demo mode LOGO to display a logo ROAD to display an an imation of a runner on a road or PROGRAMS to display segments of various programs Then press the Enter button To reselect the main menu highlight EXIT and then press the Enter button HOW TO USE THE MAN...

Страница 14: ...orkout an additional column will appear in the graph as you increase or decrease the speed setting the height of the column will increase or de crease The display can also show an animation of a runner on a road As you increase or decrease the speed setting the runner will run at a faster or slower speed When the manual mode is selected the console offers eight display modes The display mode that ...

Страница 15: ...um speed press the button a second time To turn on the fan at high speed press the button a third time To se lect the auto fan mode press the button a fourth time When the auto fan mode is selected the speed of the fan will automatically increase or de crease as the speed of the walking belt increases or decreases To turn off the fan press the Fan button again Note If the fan is left on when the w...

Страница 16: ...lect the desired display mode If the first or second display mode is selected a graph of the speed settings of the program will ap pear in the display A small arrow below the graph will indicate your progress At the end of the first one minute segment of the program a series of tones will sound If a different speed setting and or incline setting is pro grammed for the second segment the speed set ...

Страница 17: ...o select a Custom program press the Custom button once or twice If the Custom program has not yet been de fined the display will show a program time of three minutes If the program time is more than three minutes see HOW TO USE A CUS TOM PROGRAM on page 18 Each Custom program is divided into one minute segments One speed setting and one incline set ting can be programmed for each segment Press the...

Страница 18: ...s pressed the tread mill will automatically adjust to the first speed and incline settings that you programmed previously Hold the handrails and begin walking Select a display mode and monitor your progress with the display The Custom program will function in the same way as a preset program see step 5 on page 16 If desired you can redefine to the program while using it To change the speed or incl...

Страница 19: ...tart button to start the program A moment after the button is pressed the walking belt will begin to move Hold the handrails and begin walking Select a display mode and monitor your progress with the display When a Heart Rate program is selected the con sole offers two display modes Press the Display button to select the desired display mode Regardless of which display mode you select a graph of t...

Страница 20: ...am press the Start but ton The walking belt will begin to move at 1 mph When the console compares your heart rate to the current target heart rate setting the speed or in cline of the treadmill may automatically change If Heart Rate program 1 is selected the program will continue until you stop it by pressing the Stop button If Heart Rate program 2 is selected the program will continue until the s...

Страница 21: ...truction A below If your stereo has a 3 5 mm LINE OUT jack see instruction B If your stereo has only a PHONES jack see instruction C A Plug one end of a long 3 5 mm to RCA stereo audio cable available at electronics stores into the input jack on the console Plug the other end of the cable into the AUDIO OUT jack on your stereo B See the drawing above Plug one end of a long 3 5 mm to 3 5 mm stereo ...

Страница 22: ...r available at electronics stores Next remove the wire that is currently plugged into the LINE OUT jack on your stereo and plug the wire into the unused side of the Y adapter Plug the Y adapter into the LINE OUT jack on your stereo Note While the Y adapter is plugged into the LINE OUT jack do not plug your headphones into the headphone jack on the console HOW TO CONNECT YOUR COMPUTER A Plug one en...

Страница 23: ...ted to your MP3 player CD player or VCR See HOW TO CONNECT THE TREADMILL TO USE IFIT PROGRAMS on pages 21 to 23 To pur chase and download iFIT MP3 programs go to www iFIT com To purchase iFIT CDs or videocas settes call the toll free telephone number on the front cover of this manual Follow the steps below to use an iFIT MP3 CD or video program Insert the key into the console See HOW TO TURN ON TH...

Страница 24: ...ill begin to move at 1 mph When the next chirp is heard the speed and or in cline will change to the next settings of the program When the program ends the walking belt will slow to a stop Note To use another MP3 CD or video program press the Stop button or remove the key and go to step 1 on page 23 Note If the speed and or incline of the treadmill does not change when a chirp is heard Make sure t...

Страница 25: ...ge 14 Press the Display button repeatedly to select the desired display mode When the on screen countdown ends the program will begin and the walking belt will begin to move Hold the handrails and begin walking During the program an electronic chirping sound will alert you when the speed and or incline of the treadmill is about to change CAUTION Always listen for the chirp and be prepared for spee...

Страница 26: ...button repeatedly To exit the information mode remove the key from the console THE OPTIONAL CHEST PULSE SENSOR An optional chest pulse sensor adds even more fea tures to the console The chest pulse sensor offers hands free operation and enables you to use the two heart rate programs To purchase the optional chest pulse sensor call the toll free telephone number on the front cover of this manual HO...

Страница 27: ...ligned with the hole in the catch Then carefully release the latch knob Make sure that the pin is fully inserted into the catch To protect the floor or carpet from damage place a mat under the treadmill Keep the treadmill out of direct sunlight Do not leave the treadmill in the stor age position in temperatures above 85 Fahrenheit HOW TO MOVE THE TREADMILL Before moving the treadmill convert the t...

Страница 28: ... it Pivot the treadmill down until the frame is past the pin on the latch knob 2 Hold the metal frame firmly with both hands and lower the frame to the floor CAUTION To decrease the possibility of injury do not lower the frame by grip ping only the plastic foot rails Do not drop the frame to the floor Make sure to bend your legs and keep your back straight Knob Frame ...

Страница 29: ...as tripped To reset the circuit breaker wait for five minutes and then press the switch to the reset position PROBLEM The power turns off during use SOLUTION a Check the reset off circuit breaker see the drawing above If the circuit breaker has tripped wait for five minutes and then press the switch to the reset position b Make sure that the power cord is plugged in If the power cord is plugged in...

Страница 30: ...power cord insert the key and run the treadmill for a few minutes Repeat until the walking belt is properly tightened c If the walking belt still slows when walked on please see the front cover of this manual PROBLEM The walking belt is off center or slips when walked on SOLUTION a If the walking belt is off center remove the key and UNPLUG THE POWER CORD If the walking belt has shifted to the lef...

Страница 31: ... key in the console press one of the Incline buttons While the incline is changing re move the key After a few seconds re insert the key The treadmill will automatically rise to the maximum incline level and then return to the minimum level This will recalibrate the incline system 31 ...

Страница 32: ...ctivity that requires large amounts of oxygen for prolonged periods of time This increases the demand on the heart to pump blood to the muscles and on the lungs to oxygenate the blood For aerobic exercise adjust the speed and incline of the treadmill until your heart rate is near the highest number in your training zone WORKOUT GUIDELINES Each workout should include the following three parts A War...

Страница 33: ...illes Stretch With one leg in front of the other reach forward and place your hands against a wall Keep your back leg straight and your back foot flat on the floor Bend your front leg lean forward and move your hips toward the wall Hold for 15 counts then relax Repeat 3 times for each leg To cause further stretching of the achilles ten dons bend your back leg as well Stretches Calves achilles ten ...

Страница 34: ... Lower 42 1 Transformer 43 1 Controller 44 6 3 4 Screw 45 1 Belly Pan 46 1 Static Decal 47 1 Power Cord Assembly 48 1 Incline Wire Harness 49 1 Hex Key 50 1 Tie Holder 51 1 Releasable Tie 52 8 Plastic Tie 53 1 Front Roller Bushing 54 1 Right Foot Rail 55 1 Frame 56 1 Roller Ground Wire 57 2 Platform Nut 58 1 Idler Washer 59 1 Idler Pulley 60 2 Rear Roller Lock Washer 61 2 Rear Roller Washer 62 2 R...

Страница 35: ...e M F 1 User s Manual These parts are not illustrated Specifications are subject to change without notice ORDERING REPLACEMENT PARTS To order replacement parts see the front cover of this manual When ordering parts please be prepared to provide the following information the MODEL NUMBER of the product NTL12905 5 the NAME of the product NordicTrack C2300 treadmill the SERIAL NUMBER of the product s...

Страница 36: ... 13 12 60 49 62 61 54 37 40 41 7 7 45 7 43 51 23 50 52 21 22 57 57 23 47 104 44 44 44 64 23 56 44 109 109 29 28 68 58 69 74 75 20 112 59 66 102 94 48 65 6 27 39 39 27 2 2 2 2 3 4 8 8 8 4 8 8 8 2 2 2 2 3 53 110 111 111 91 91 91 90 109 109 23 115 96 99 30 30 32 32 96 9 24 EXPLODED DRAWING Model No NTL12905 5 R0806A ...

Страница 37: ...07 98 81 82 81 82 105 78 70 78 113 80 95 99 7 99 99 99 99 72 71 67 73 72 71 72 67 72 83 83 83 99 99 99 99 99 97 97 87 67 106 87 67 106 79 79 84 92 46 7 7 80 81 82 101 101 101 101 81 82 101 81 82 101 113 114 108 86 77 7 7 EXPLODED DRAWING Model No NTL12905 5 R0806A ...

Страница 38: ...ion and your continued satisfaction HOW TO GET PARTS AND SERVICE Simply call our Customer Service Department at 1 888 825 2588 and tell them your name and address and the serial number of your Product They will tell you how to get a part replaced or if neces sary arrange for service where your Product is located or advise you how to ship the Product for service Before ship ping always obtain a Ret...

Отзывы: