


Stufa camino / Chimney stove / Kaminofen
FALO
42
Istruzioni uso e manutenzione / Instructions for installation / Aufstell- und Bedienungsanleitung
– IT – EN – DE – Rev.00
15. MONTAGGIO
DELLE
CERAMICHE
/
THE
ASSEMBLY
OF
CERAMICS
/
KACHELNBAUANLEITUNGEN
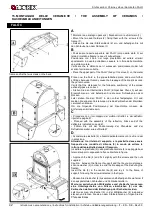
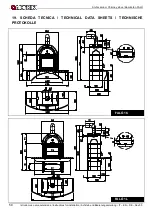
A
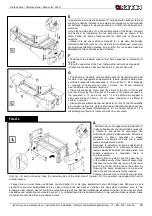
•
Montare i due sostegno panca (2), fissandoli con le viti al telaio (1).
• Mount the two seat holders (2), fixing them with the screws to the
frame (1).
• Setzen Sie die zwei Stützen-Bank (2) ein, und befestigen Sie mit
den Schrauben an dem Rahmen (1).
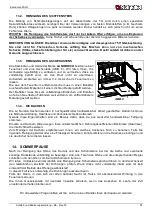
B
• Posizionare la parte superiore del FALO’ (corpo della stufa 3) sul
telaio di metallo e fissare le due viti sulla schiena.
Posizionare ora il Falo’ nel luogo prestabilito ed evitare ulteriori
spostamenti in quanto potrebbero causare la rottura delle maioliche
una volta montate.
Verificare che le distanze per il successivo posizionamento dei tubi
scarico fumi siano corrette.
• Place the upper part of the FALO’ (body of the stove 3) on the metal
frame and fix the two screws on the back.
Place now the Falo’ in the pre-established place and avoid further
shiftings because this may cause the breakage of the majolicas once
they are mounted.
Verify that the distances for the following positioning of the smoke
exhaust pipes are correct.
• Stellen Sie den Oberteil des FALO’ (Körper des Ofens 3) auf den
Eisenrahmen ein und befestigen Sie die zwei Schrauben an dem
Rücken.
Jetzt stellen Sie den FALO’ in den vorher festgelegten Ort und
meiden Sie anderen Verstellungen, die das Zerbrechen der Majoliken
verursachen können.
Um die folgende Positionierung der Rauchrohre müssen die
Entfernungen korrekte sein.
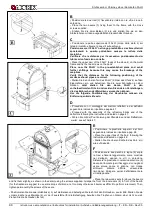
C
• Procedere con il montaggio dei mattoni refrattari e dei deflettori
riportati a pagina 47.
• Proceed with the assembly of the refractory bricks and of the
deflectors indicated on page 47.
• Führen Sie mit der Positionierung der Ofensteine und der
Deflektoren weiter, wie auf Seite 47.
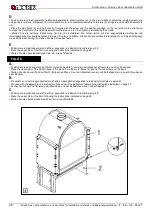
D
• Accostare la piastrella (4) e fissarla delicatamente con le viti e i dadi
in dotazione.
Attenzione: tra il telaio di supporto e la piastrella deve essere
frapposta una rondella di silicone (5) in modo da evitare la
rottura della piastrella durante il fissaggio.
Incastrare la piastrella (6) nella piastrella centrale (4) e appoggiarla al
telaio di supporto seguendo le frecce riportate in figura.
• Approach the tile (4) and fix it slightly with the screws and the nuts
supplied.
Caution: between the frame of support and the tile you must place a
silicone washer (5) in order to avoid the breakage of the tile during the
fixation.
Insert the tile (6) in the central tile (4) and lay it to the frame of
support, following the arrows indicated in the figure.
• Rücken Sie die Kachel (4) zusammen und befestigen Sie sie fein mit
den ausgestatteten Schrauben und Schraubenmuttern.
Warnung: zwischen den Stützerahme und die Kachel muss man
eine Unterlegscheibe von Silikon einschieben (5) um das
Zerbrechen während der Befestigung der Kachel zu meiden.
Jetzt muss man die Kachel (6) in der Mittlerkachel (4) ineinander
stecken und lehnen Sie sie an dem Stützerahmen an; folgen Sie die
Pfeile des Bildes.
FALÒ C