background image


20

Parts List 


KEY NO.


PART NO.


C m ( P C S )


DESCRIPTION


1


2120-01


1


MAIN FRAME


8


2120-08


1


SENSOR


9


2120-09


2


M3 X 8mm MACHINE SCREW


10


2120-10


1


REAR STABILIZER


11


2120-11


2


REAR STABILIZER INSERT


12


2120-12


2


REAR STABILIZER END CAP


13


2120-13


2


M8 X45mm ALLEN HEAD BOLT


14


2120-14


2


M8 LOCKNUT


15


2120-15


2


PIVOT PIN


16


2120-16


1


RUNNING MAT


17


2120-17


1


FRAME BOARD


18


2120-18


9


3/16" X 7/8" SHEET METAL SCREW


19


2120-19


1


FRONT ROLLER


20


2120-20


1


MAGNET


21


2120-21


2


M3 X 6mm MACHINE SCREW


22


2120-22


1


FRONT ROLLER PIVOT SHAFT


23


2120-23


1


FRONT ROLLER SPACER


24


2120-24


1


M6 X 20mm MACHINE SCREW


25


2120-25


1


12mm X 17mm FLAT WASHER


26


2120-26


1


FRONT ROLLER GUARD (L)


27


2120-27


1


FRONT END CAP


28


2120-28


1


SHROUD


29


2120-29


3


M4 X 12mm SHEET METAL SCREW


30


2120-30


1


REAR ROLLER


31


2120-31


1


REAR ROLLER PIVOT SHAFT


33


2120-33


2


REAR END PLATE


34


2120-34


2


M6 X 50mm ADJUSTMENT SCREW


35


2120-35


2


6.4mm X 13mm FLAT WASHER


36


2120-36


2


NON SLIP FOOTPAD


37


2120-37


1


LEFT HANDLE BAR POST


38


2120-38


1


RIGHT HANDLE BAR POST


39


2120-39


2


MOVING WHEEL


40


2120-40


2


MS X 45mm HEX HEAD BOLT


41


2120-41


2


M8 LOCKNUT


42


2120-42


1


LEFT HANDLE BAR FOAM GRIP (L=220mm)


43


2120-43


1


RIGHT HANDLE BAR FOAM GRIP (L=200mm)


44


2120-44


1


HANDLE BAR END CAP


47


2120-47


1


MIDDLE WIRE


48


2120-48


2


HANDLE BAR POST SPACER


49


2120-49


2


8,3mm X 23mm FLAT WASHER


50


2120-50


2


M8 X 20mm HEX HEAD BOLT


51


2120-51


2


FIXING KNOB


52


2120-52


1


FRONT STABILIZER


53


2120-53


2


FRONT STABILIZER FOOT STOP


54


2120-54


2


M6 X 40mm MACHINE SCREW


55


2120-55


2


M6 LOCKNUT


56


2120-56


1


TOP COMPUTER WIRE


57


2120-57


1


FRONT HANDLE BAR


58


2120-58


2


FOAM GRIP (L=345mm)


59


2120-59


2


M4 X 12mm SELF TAPPING SCREW


60


2120-60


1


COMPUTER & CONSOLE


61


2120-61


1


WATER BOTTLE


62


2120-62


1


LEFT REAR ROLLER GUARD


63


2120-63


1


RIGHT REAR ROLLER GUARD


64


2120-64


2


M5 X 10mm MACHINE SCREW


Содержание 102112

Страница 1: ...1 ...

Страница 2: ...t clothing Do not wear loose clothing Do not wear shoes with leather soles or high heels Tie all long hair back Do not rock the unit from side to side Care should be taken when mounting and dismounting the unit Do not place any liquid on any part of the treadmill Do not use any accessories that aren t specifically recommended by the manufacturer these might cause injuries or cause the unit to fail...

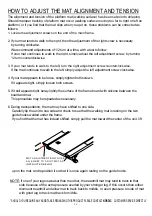
Страница 3: ...enance advice provided for you SHOULD YOU REQUIRE ANY ASSISTANCE REGARDING THIS PRODUCT PLEASE CONTACT NORDIC CUSTOMER SERVICE DIRECTLY FIXING KNOB REMOVE TO FOLD UP TREADMILL INCLINE ADJUSTMENT PIN MAIN FRAME TRANSPORT WHEEL MAT ADJUSTING BOLTS ADJUST MAT TENSION TO CENTRALIZE MAT RUNNING MAT NON SLIP FOOTPAD FOLD TREADMILL UP AND STAND VERTICALLY AGAINST A WALL FOR STORAGE HANDLE BAR POST HANDLE...

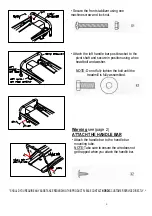
Страница 4: ...ck from the packaging underneath the treadmill Do not place the poly foam too far under the treadmill around half the block under the treadmill is sufficient ATTACH THE HANDLE BAR POSTS Warning see page 2 First attach the Right Side Handle Bar Post Place the handle bar post spacer onto the pivot shaft welded on the right side of the main frame Attach the right handle bar post bracket to the pivot ...

Страница 5: ...hine screw and lock nut X1 Connect the sensor wire plug to the middle wire socket Place the handle bar post spacer onto the pivot shaft welded on the left side of the main frame Attach the left handle bar post to the other end of the front stabilizer as shown Make sure the moving wheel on the handle bar post point downward SHOULD YOU REQUIRE ANY ASSISTANCE REGARDING THIS PRODUCT PLEASE CONTACT NOR...

Страница 6: ... and washer NOTE Do not fully tighten the bolt until the treadmill is fully assembled Warning see page 2 ATTACH THE HANDLE BAR Attach the handle bar to the handle bar mounting tube NOTE Take care to ensure the wire does not get trapped when you attach the handle bar SHOULD YOU REQUIRE ANY ASSISTANCE REGARDING THIS PRODUCT PLEASE CONTACT NORDIC CUSTOMER SERVICE DIRECTLY ...

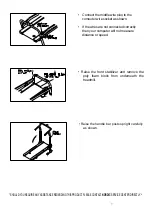
Страница 7: ...ectly then your computer will not measure distance or speed Raise the front stabilizer and remove the poly foam block from underneath the treadmill Raise the handle bar posts upright carefully as shown SHOULD YOU REQUIRE ANY ASSISTANCE REGARDING THIS PRODUCT PLEASE CONTACT NORDIC SERVICE CENTER DIRECTLY ...

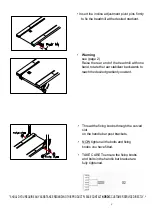
Страница 8: ...zer backwards to reach the desired gradient you want Thread the fixing knobs through the curved slot on the handle bar post brackets NOW tighten all the bolts and fixing knobs you have fitted TAKE CARE To ensure the fixing knobs and bolts in the handle bar bracket are fully tightened SHOULD YOU REQUIRE ANY ASSISTANCE REGARDING THIS PRODUCT PLEASE CONTACT NORDIC CUSTOMER SERVICE DIRECTLY ...

Страница 9: ...nto position Fit the front cover onto the main frame securely by using sheet metal screw When the cover is in position secure using a sheet metal screw through the hole in the side of the cover NOW tighten the sheet metal screws you inserted in the top of the main frame SHOULD YOU REQUIRE ANY ASSISTANCE REGARDING THIS PRODUCT PLEASE CONTACT NORDIC CUSTOMER SERVICE DIRECTLY ...

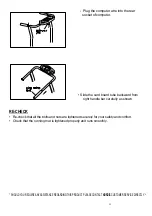
Страница 10: ...machine screws Insert two batteries AA size 1 5 V into the computer Attach the computer in position on the computer console Place the water bottle in position on the computer console SHOULD YOU REQUIRE ANY ASSISTANCE REGARDING THIS PRODUCT PLEASE CONTACT NORDIC CUSTOMER SERVICE DIRECTLY ...

Страница 11: ...ght handle bar carefully as shown RE CHECK Re check that all the bolts and nuts are tightened securely for your safety and comfort Check that the running mat is tightened properly and runs smoothly SHOULD YOU REQUIRE ANY ASSISTANCE REGARDING THIS PRODUCT PLEASE CONTACT NORDIC CUSTOMER SERVICE DIRECTLY ...

Страница 12: ...your left foot from the staging platform yet The mat may turn quite easily in which case increase the resistance level using the dial on the right handlebar until it is at a comfortable level 6 When you become familiar and comfortable with how easily the mat turns simply follow your right foot with your left in a normal walking manner Continue to grip the handles at this stage 7 As you gain confid...

Страница 13: ...cline adjustment pins out firmly whilst supporting the weight of the treadmill Insert the pins into the desired position on both sides and push the stabilizer up until it rests against the underside of the pin SHOULD YOU REQUIRE ANY ASSISTANCE REGARDING THIS PRODUCT PLEASE CONTACT NORDIC CUSTOMER SERVICE DIRECTLY ...

Страница 14: ... to be loose simply tighten both screws If it appears tight simply loosen both screws 5 If it still appears tight spray lightly the surface of the frame board with silicone between the board and mat This procedure may be repeated as necessary 6 During transportation the mat may have shifted to one side Carefully tip the unit to one side and check to see that the walking mat is resting on the two g...

Страница 15: ...the other foot from the walking platform and place it on the other foot pad You should now be in the starting position IN AN EMERGENCY In an emergency take hold of the handrails and place your feet on the side rails provided CARE AND MAINTENANCE Use a warm damp cloth with mild detergent to keep your 240M treadmill clean Do not clean between the mat and running board The Silicon lubricant is needed...

Страница 16: ... both sides to secure the main frame in position HOW TO UNFOLD 240M TREADMILL 1 Loosen the fixing knobs both sides 2 Lower main frame gently to the floor Tighten the fixing knobs both sides to secure the main frame in position SHOULD YOU REQUIRE ANY ASSISTANCE REGARDING THIS PRODUCT PLEASE CONTACT NORDIC SERVICE DIRECTLY ...

Страница 17: ...ODE Press the MODE key to switch your computer to the desired setting Your computer will change modes in the following order Time Speed Distance Calorie SET To set the value of time distance or calories that you want to count down from RESET To reset the values of time distance and calories to zero SHOULD YOU REQUIRE ANY ASSISTANCE REGARDING THIS PRODUCT PLEASE CONTACT NORDIC SERVICE DIRECTLY ...

Страница 18: ...he estimated number of calories used during the workout S this is only an estimate it may be helpful to compare the number of calories burned during different sessions Count down Counts from the preset level to zero When the calorie level returns to zero the computer automatically start to count up Auto on off If no signal is transmitted to the computer for several minutes the computer will automa...

Страница 19: ...19 ...

Страница 20: ...FT 33 2120 33 2 REAR END PLATE 34 2120 34 2 M6 X 50mm ADJUSTMENT SCREW 35 2120 35 2 6 4mm X 13mm FLAT WASHER 36 2120 36 2 NON SLIP FOOTPAD 37 2120 37 1 LEFT HANDLE BAR POST 38 2120 38 1 RIGHT HANDLE BAR POST 39 2120 39 2 MOVING WHEEL 40 2120 40 2 MS X 45mm HEX HEAD BOLT 41 2120 41 2 M8 LOCKNUT 42 2120 42 1 LEFT HANDLE BAR FOAM GRIP L 220mm 43 2120 43 1 RIGHT HANDLE BAR FOAM GRIP L 200mm 44 2120 44...

Страница 21: ...walk briskly up hills and stairs without being too out of breath once at the top you recover quickly As you can see there are great advantages in being fit CAUTION DO NOT TRY TO DO TOO MUCH TO QUICKLY START GRADUALLY AND BUILD UP IF YOU BECOME ILL IF YOU ARE UNDER DOCTOR CARE OR OVER 35 AND NOT CURRENTLY EXERCISING REGULARLY THEN WE WOULD ADVISE YOU NOT TO START TO EXERCISE WITHOUT CONSULTING YOUR...

Страница 22: ...nter Telefonnummer finner du nedenfor Nesten samtlige av de spørsmål eller problemer som måtte oppstå kan løses ved å snakke med en av Nordic Fitness sine serviceansvarlige For tekniske og brukermessige spørsmål kontakt Nordic Fitness AS Strandveien 33 3050 Mjøndalen Servicesenter 32 27 27 27 Hovedkontor 32 27 27 00 Telefaks 32 27 27 01 Epost post nordicfitness no Denne manualen er ment som et hje...

Отзывы: