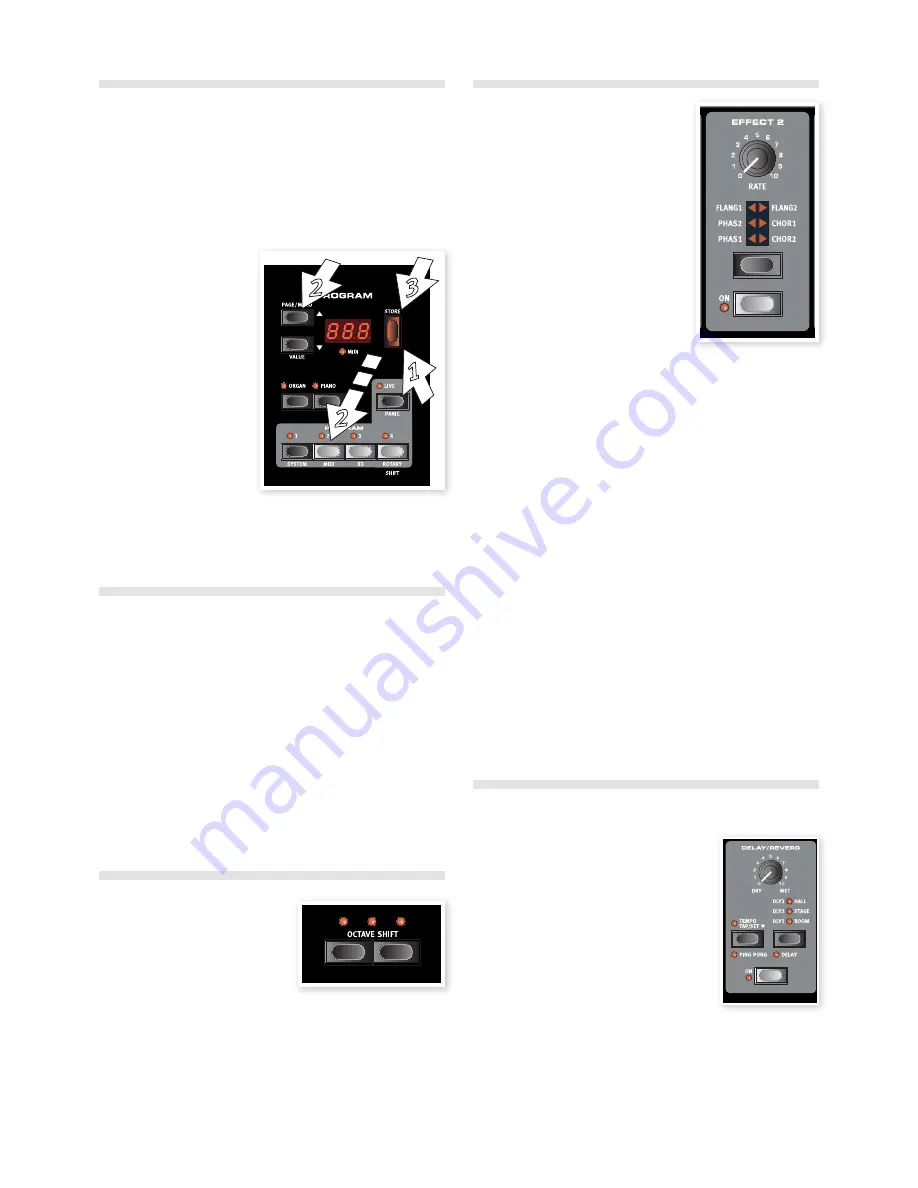
Storing a program
If .you .are .happy .with .a .change .to .a .program .that .you .have .made, .you .
should .probably .store .the .program .
1
.Press .the .Store .button .
The .program .number .in .the .LED .starts .flashing .
2
Select .a .new .location .where .you .want .to .store .the .program . .
Use .the .Up/Down .buttons .
and .the .program .buttons .to .
navigate .to .a .new .program .
location .if .you .do .not .want .to .
overwrite .the .original .program .
3
Press .the .Store .button .a .
second .time .to .confirm .
your .choice .
The .edited .program .has .now .
replaced .the .previous .one .in .
the .location .you .specified .
M
M
ToMcancelMtheMprocedure,M
pressMtheMShiftMbuttonM
beforeMyouMpressMStoreMtheMsecondMtime.
M
M
WithMMemoryMProtectMsetMtoMOff,MaMdoubleMtapMonMtheMStoreMbuttonM
willMstoreMaMProgramMinMitsMoriginalMlocation.
The Live buffer
The .special .Live .buffers .can .be .described .as .a .“live .program .memory” . .
If .you .activate .the .Live .button, .all .changes .to .the .panel .settings .you .
make .will .be .continuously .saved .in .the .active .Live .program .(1-4) . .If .you .
switch .the .power .off, .or .select .another .program, .the .settings .are .still .
stored .in .the .Live .memory, .so .when .you .power .up .next .time .(or .return .
to .the .Live .memory) .all .settings .will .be .exactly .as .they .were .when .you .
left .them .
If .the .Live .memory .is .selected .and .you .decide .you .wish .to .store .the .
settings .permanently .as .a .program .you .can .do .so .using .the .stan-
dard .methods .(see .above) . .You .can .also .store .programs .into .the .Live .
memory .location, .in .which .case .the .program .settings .will .replace .the .
current .Live .memory .settings .
Octave Shift
Press .either .of .the .Octave .Shift .but-
tons .to .shift .the .pitch .up .or .down .in .
whole .octaves .within .the .instrument’s .
note .range . .
Each .instrument .has .a .finite .note .range, .read .more .about .this .on .page .
15 . .This .means .that .upper .keys .may .become .silent .if .you .transpose .
upwards .
Adding effects
1
Select .the .program .number .1 .1 .which .
is .a .Grand .Piano .with .a .hint .of .reverb . .
2
Turn .on .Effect .2 .(the .On .LED .should .
be .lit) .and .press .repeatedly .on .the .
Effect .2 .selector .
The .effect .options .are .indicated .with .the .
selector .LEDs .and .changes .in .a .cyclical, .
clockwise .fashion .for .each .time .the .selec-
tor .is .pressed . .
Some .of .the .effects .have .three .options .that .
indicate .the .depth .of .the .effect . .Flang 1 .is .
the .shallowest .version, .Flang .2 .is .a .more .
pronounced .effect .and .when .both .the .Flang .1 .and .Flang .2 .LEDs .are .lit, .
you .have .selected .the .most .dramatic .flanger .effect . .
3
Turn .the .effect .rate .knob . .
This .changes .the .rate .of .the .active .effect .
4
Hold .Shift .and .press .repeatedly .on .the .effect .selector .
This .allows .you .to .reverse .through .the .effect .selections .
5
Turn .off .the .effect .
If .you .now .continue .to .press .on .the .effect .selector .after .the .effect .is .
turned .off, .the .effect .setting .will .change .even .though .the .effect .is .not .
active .
Activate an amplifier emulation
1
Press .the .Speaker/Comp .button .to .activate .the .Amp .emulation .
The .Speaker/Comp .LED .will .be .lit .
2
Press .repeatedly .on .the .selector .to .cycle .through .the .various .options .
The .knob .controls .the .drive .for .the .three .amps .and .the .rotary .simulator, .
and .the .amount .when .the .compressor .is .selected .
The Delay
1
Activate .the .delay/reverb .
2
Hold .Shift .and .press .the .reverb .selector .
button . .The .Delay .LED .lights .up .
3
Tap .the .desired .tempo .on .the .Tempo .Tap .
button .
4
You .can .also .set .the .delay .time .by .hold-
ing .the .Tempo .Tap .button .and .adjust .the .
tempo .with .the .Up/Down .buttons .
5
Adjust .the .number .of .repeats .(Dly1, .Dly2 .
etc .) .by .pressing .the .selector .button .repeatedly .
This finishes our little tour; we hope that you now have the
initial knowledge on how to operate most of the functions on
the panel. There is another Quick Tour in the Sound Manager
chapter.
10 | Nord ElEctro 4 HP/SW USEr MaNUal oS v1.x
Содержание Electro 4 HP
Страница 36: ......


