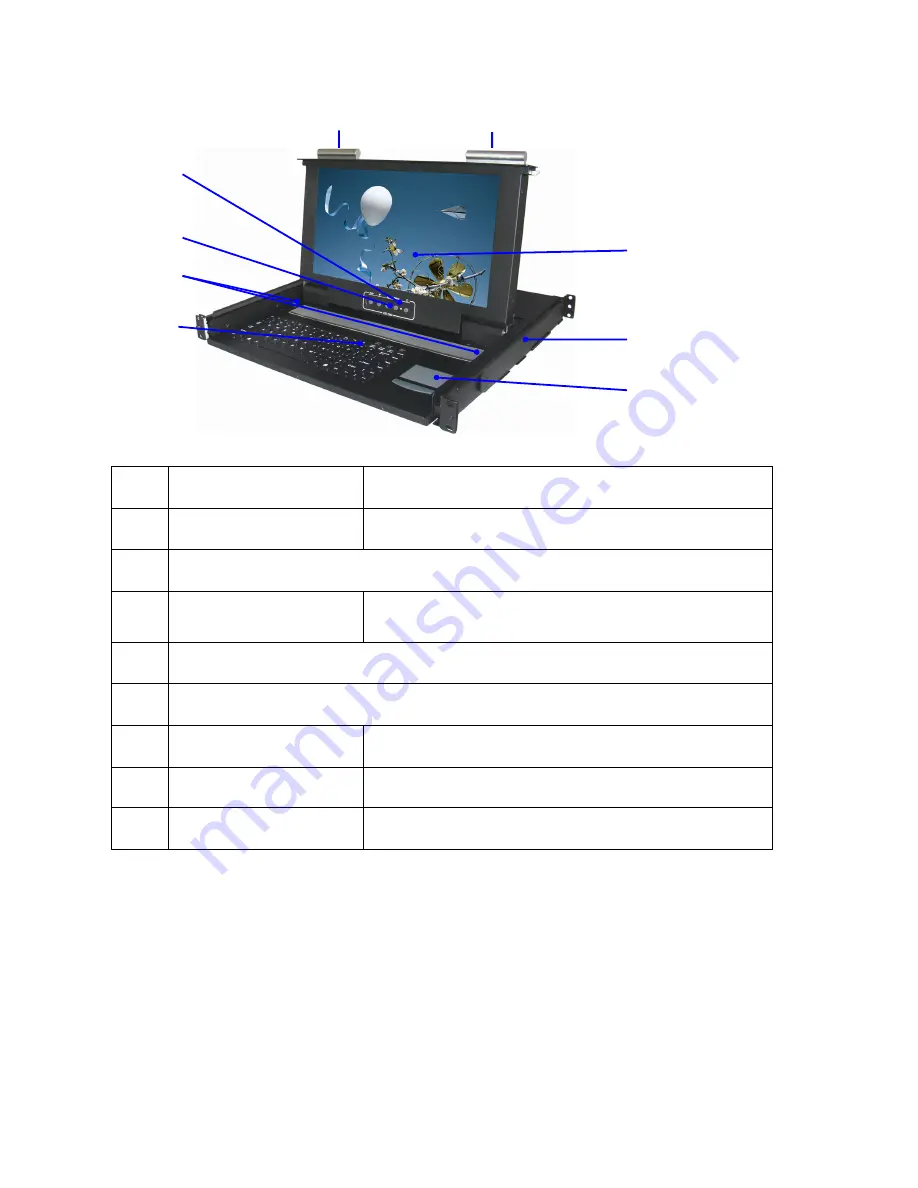
Norco KVM-1501WS Скачать руководство пользователя страница 6

- 6 - 


1.6 Front 

View 


NO Part 

Function 

Description 

Handle 

Moving toward inside direction unlock then pull out 

2 LCD 

display 

3 LCD 

OSD 

button 

LCD button to control Screen Display position and 
image setting. 

4 Keyboard 

5 Touchpad 

LED 

LCD Power indicator 

Mounting bracket 

Install into rack cabinet. 

Lock button 

Auto lock / release when lcd pull up and down 


Содержание KVM-1501WS

Страница 1: ...1 LCD Drawer User Manual...

Страница 2: ...ead this manual carefully and install and operate the equipment according to the manual to avoid damage to this product its accessories Product package includes following items 1 15 6 LCD KVM Drawer 1...

Страница 3: ...ent 4 1 3 1 Host Requirement 4 1 3 2 Cables 4 1 4 Product Specifications 5 1 5 LCD Specifications 5 1 6 Front View 6 1 7 Rear View 7 2 Installation 8 2 1 Rack Installation 8 2 2 Standard Installation...

Страница 4: ...ngle main control terminal using the widescreen LCD KVM Console 1 avoids the cost of keyboard mouse and monitor of each host 2 saves work space 3 saves power 4 saves the trouble of moving from one com...

Страница 5: ...Terminal USB For USB KB Mouse VGA resolution 1366 x 768 75Hz Power supply AC100 240V 50 60Hz Housing Metal housing Weight 13 5Kg 15 5Kg Dimension W x H x D 446 4 x 44 x 406 4 mm 1 5 LCD Specification...

Страница 6: ...unlock then pull out 2 LCD display 3 LCD OSD button LCD button to control Screen Display position and image setting 4 Keyboard 5 Touchpad 6 LED LCD Power indicator 7 Mounting bracket Install into rac...

Страница 7: ...ck switch turn on off equipment main power 3 PS2 Keyboard Connect to server or KVM 4 DB15 VGA PORT Connect to server or KVM 5 PS2 Keyboard Connect to server or KVM 6 USB Port Connect to server or KVM...

Страница 8: ...and use screws which contain in the package to fix into the rack 2 Adjust the rear mounting bracket L type to fit your rack then use screws to fix Note 1 Locking nuts provided are used on rack without...

Страница 9: ...Please Shutdown the Power of Equipment Needs to be Connected Please Pay Attention to Earthing of Equipment A Plug the VGA PS 2 or USB port in corresponding ports between the host and KVM B Plug AC po...

Страница 10: ...w the installation drawing and instructions for standard installation 1 Make sure to power off all equipment to be connected and existing equipment 2 Switching slide switch on USB position 3 Use an US...

Страница 11: ...CD Display MENU Activate OSD menu select a menu and press MENU key to confirm the selection and enter the submenu Press this key to increase setting or scroll up the menu bar Press this key to Decreas...

Страница 12: ...get dark or bright Color Adjust Set favorite color of red green and blue Color Temp Set color to 9300 6500 5800 Srgb USER Back Go back MENU Image setting Clock Adjust frequency to fill display Phase A...

Страница 13: ...image V Position It can be moved to up or down side of image Back Go back MENU OSD Menu OSD H Position It can be moved to left or right side of OSD OSD V Position It can be moved to up or down side o...

Страница 14: ...will display the OSD in German Espanol Go back MENU Unsimplified chinese will display the OSD in Unsimplified chinese Simplified chinese will display the OSD in simplified chinese Japan will display...

Страница 15: ...rtification Please observe following two conditions in operation that 1 The equipment will not generate any harmful interruption 2 If the equipment is interrupted it may cause unnecessary operations C...

Отзывы: