background image

13

NL

HANDLEIDING

VOORWOORD

We bedanken u voor uw aankoop van dit product. Het is voor u ontworpen volgens de hoogste 

kwaliteitsnormen. Lees de handleiding zorgvuldig voordat u het apparaat gebruikt en bedient. 

Neem alle waarschuwingen in acht. Als het apparaat aan iemand anders wordt doorgegeven, dan 

moet deze handleiding er worden bijgeleverd. Bewaar deze handleiding bij voor toekomstig gebruik.

BEOOGD GEBRUIK

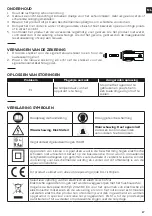
•  Deze luchtpomp is enkel bedoeld voor gebruik op 12 volt DC of 230 volt AC. 

•  Deze luchtpomp is ontworpen om fietsbanden, sportuitrusting, luchtmatrassen, strandspeelgoed 

en andere opblaasbare objecten op te pompen. 

•  Dit apparaat is enkel ontworpen voor privégebruik en is niet geschikt voor professioneel gebruik.

•  De fabrikant kan niet aansprakelijk worden gesteld voor schade als gevolg van een oneigenlijk 

gebruik, een verkeerde bediening of het niet naleven van deze handleiding.

VEILIGHEIDSINSTRUCTIES

WAARSCHUWING! Lees de handleiding die bij dit product wordt geleverd zorgvuldig door. Een 

verkeerd gebruik van het apparaat kan schade aan eigendommen en apparatuur of persoonlijk 

letsel veroorzaken.

1.  Gebruik het apparaat niet met een beschadigde kabel of stekker of als het apparaat defect is, is 

gevallen of op gelijk welke wijze is beschadigd. Controleer het apparaat en zijn accessoires vóór 

elk gebruik. Gooi het apparaat weg als het beschadigd is.

2.  Controleer de stekkers voor de sigarettenaansteker en het stopcontact en de voedingskabel 

regelmatig op beschadigingen. De voedingskabel kan niet worden vervangen. Als de 

voedingskabel beschadigd is dan moet het apparaat worden weggegooid.

3.  Pomp objecten niet sterker op dan wordt aanbevolen door de fabrikant. 

4.  Laat de luchtpomp of zijn onderdelen niet nat worden.

5.  Gebruik de luchtpomp niet in natte of vochtige omstandigheden.

6.  Alleen gebruiken in goed geventileerde ruimtes.

7.  Houd de luchtpomp altijd uit de buurt van ontvlambare objecten of vloeistoffen.

8.  Laat de luchtpomp niet onbeheerd achter terwijl deze in werking is.

9.  Schakel het apparaat uit na gebruik. 

10.  Ontkoppel steeds de voeding van het apparaat als het niet wordt gebruikt.

11.  Laat kinderen deze luchtpomp nooit bedienen. Een goed toezicht is noodzakelijk wanneer deze 

luchtpomp wordt gebruikt in de nabijheid van kinderen.

12.  De luchtpomp is geen speelgoed. Altijd buiten bereik van kinderen en huisdieren houden.

13.  Gebruik deze luchtpomp niet in extreem warme omstandigheden.

14.  Gebruik dit product niet voor andere doeleinden dan het oppompen van objecten. Als u dit wel 

doet, kan dit leiden tot persoonlijk letsel.

15.  Probeer deze luchtpomp niet te demonteren of te modificeren.

16.  Als de luchtpomp abnormale geluiden maakt of oververhit raakt, schakel deze dan onmiddellijk 

uit en laat hem minimaal 30 minuten afkoelen.

17.  Gebruik de luchtpomp niet langer dan 10 minuten continu. Laat de luchtpomp 10 minuten 

afkoelen voordat u deze opnieuw gebruikt.

18.  Controleer de luchtpomp vóór elk gebruik. Als er onderdelen zijn gebarsten, gebroken of 

beschadigd, dan moeten deze worden hersteld door een gekwalificeerde technieker.

19.  Stel de luchtpomp nooit bloot aan regen, vorst of temperaturen boven 40 °C of onder -30 °C. 

Als de temperatuur lager is dan 0 °C, warm het apparaat dan op door het onbelast te laten 

draaien om het controlesysteem te activeren.

20. Nooit gebruiken op mensen of dieren.

21.  Zorg ervoor dat het snoer niet in contact komt met hete voorwerpen, olie of scherpe randen.

22. Draag de luchtpomp niet bij de luchtslang of de voedingskabel om schade te voorkomen.

23. 

Waarschuwing! 

Voor uw eigen veiligheid mag u alleen accessoires en onderdelen gebruiken die 

worden vermeld in de handleiding, of die zijn aanbevolen door de fabrikant.

24. Gebruik de luchtpomp alleen met de meegeleverde accessoires. 

Содержание 03.95.060

Страница 1: ...SORE MULTIUSO 12V 230V COMPRESSOR MULTIUSOS 12V 230V FR Manuel d utilisation et informations sur la sécurité NL Handleiding en veiligheidsinformatie DE Hinweise zur Bedienung und Sicherheit ES Manual e información en materia de seguridad EN Manual and security information IT Manuale e informazioni di sicurezza PT Manual e informações de segurança Art 2389389 NO7198 ...

Страница 2: ......
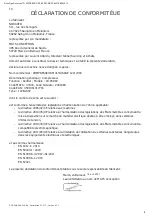
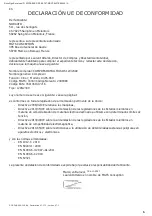
Страница 3: ...2V 230V dont le numéro de série est le suivant est conforme à l ensemble des législations d harmonisation de l Union applicable la directive 2006 42 CE relative aux machines la directive 2014 35 UE relative à l harmonisation des législations des États membres concernant la mise à disposition sur le marché du matériel électrique destiné à être employé dans certaines limites de tension la directive ...

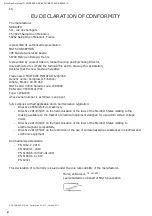
Страница 4: ...89 EAN code 3501361317716 Type 12V 230V whose serial number is as follows see page 1 fully complies with all applicable Union harmonisation legislation Directive 2006 42 CE on machinery Directive 2014 35 UE on the harmonisation of the laws of the Member States relating to the making available on the market of electrical equipment designed for use within certain voltage limits Directive 2014 30 UE ...

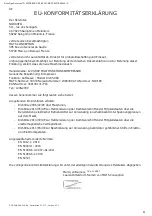
Страница 5: ...2389389 ATU Nummer NO7198 EAN Nummer 3501361317716 Typ 12V 230V dessen Seriennummer wie folgt lautet siehe Seite 1 die geltenden EU Richtlinien erfüllen Richtlinie 2006 42 CE über Maschinen Richtlinie 2014 35 UE zur Harmonisierung der Rechtsvorschriften der Mitgliedstaaten über die Bereitstellung elektrischer Betriebsmittel zur Verwendung innerhalb bestimmter Spannungsgrenzen auf dem Markt Richtli...

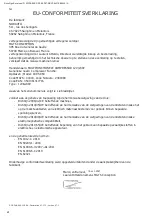
Страница 6: ... 3501361317716 Type 12V 230V waarvan het serienummer als volgt is zie bladzijde 1 voldoet aan de gehele van toepassing zijnde harmonisatiewetgeving van de Unie Richtlijn 2006 42 CE betreffende machines Richtlijn 2014 35 UE betreffende de harmonisatie van de wetgevingen van de lidstaten inzake het op de markt aanbieden van elektrisch materiaal bestemd voor gebruik binnen bepaalde spanningsgrenzen R...

Страница 7: ... Tipo 12V 230V cuyo número de serie es el siguiente véase la página 1 es conforme con toda la legislación de armonización pertinente de la Unión Directiva 2006 42 CE relativa a las máquinas Directiva 2014 35 UE sobre la armonización de las legislaciones de los Estados miembros en materia de comercialización de material eléctrico destinado a utilizarse con determinados límites de tensión Directiva ...

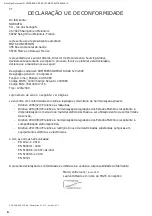
Страница 8: ...1317716 Tipo 12V 230V cujo número de série é o seguinte ver página 1 se encontra em conformidade com toda a legislação comunitária de harmonização aplicável Diretiva 2006 42 CE relativa às máquinas Diretiva 2014 35 UE relativa à harmonização da legislação dos Estados Membros respeitante à disponibilização no mercado de material elétrico destinado a ser utilizado dentro de certos limites de tensão ...

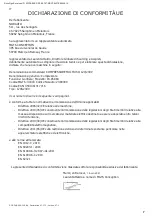
Страница 9: ...N 3501361317716 Tipo 12V 230V il cui numero di serie è il seguente vedi pagina 1 è conforme a tutte le normative di armonizzazione dell Unione applicabili Direttiva 2006 42 CE relativa alle macchine Direttiva 2014 35 UE concernente l armonizzazione delle legislazioni degli Stati membri relative alla messa a disposizione sul mercato del materiale elettrico destinato a essere adoperato entro taluni ...

Страница 10: ...ecommandations du fabricant 4 Le gonfleur ou ses composants ne doivent pas être mouillés 5 N utilisez pas le gonfleur dans des endroits mouillés ou humides 6 Utilisez le uniquement dans des endroits bien ventilés 7 Gardez à tout moment le gonfleur à l écart des zones liquides inflammables 8 Ne laissez pas le gonfleur sans surveillance lorsqu il est en marche 9 Après utilisation éteignez l appareil...

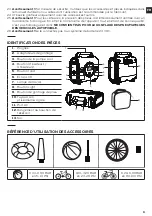
Страница 11: ...ité n est pas homologué et donc NE CONVIENT PAS POUR LE GONFLAGE DES PNEUMATIQUES DES VEHICULES AUTOMOBILE 26 Avertissement Ne le connectez pas à un système de batterie 24 V DC IDENTIFICATION DES PIÈCES 1 Poignée 1 2 3 4 6 8 9 7 10 11 12 5 13 2 Adaptateurs de gonflage 3 Bouton de la pompe à air 4 Bouton Utilisateur 1 Utilisateur 2 5 Bouton rond 6 Écran LCD 7 Lampe de travail 8 Bouton Light 9 Bouto...

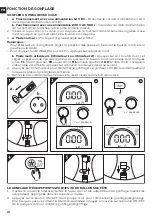
Страница 12: ...isateur 2 Appuyez sur le bouton User et réglez la pression de l un des 4 pneus en tournant le bouton rond Les pneus sont marqués ainsi FL avant gauche FR avant droit RL arrière gauche et RR arrière droit Lorsque la valeur cible est atteinte appuyez sur le bouton rond pour passer au suivant 4 Appuyez sur l interrupteur pour démarrer le gonflage Le gonfleur s arrête automatiquement lorsque la pressi...

Страница 13: ...e N 2389389 NO7198 Tension de fonctionnement DC 12 V DC Diamètre du cylindre 30 mm Tension de fonctionnement et fréquence de travail AC 230 V AC 50 Hz Performance DC 0 2 0 BAR en 3 15 AC 0 2 0 BAR en 2 40 Pression maximale 8 3 BAR en 120 PSI 8 4 KG CM2 Vitesse maximale de rotation de l arbre 4500 tr min Ampérage max 15 A Poids 2 94 kg Accessoires 6 adaptateurs de gonflage fusible 15 A sac Bruit Lp...

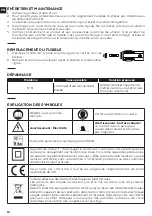
Страница 14: ...LICATION DES SYMBOLES Référez vous au mode d emploi Porter une protection oculaire Avertissement Électricité Avertissement Surface chaude Le contact avec la peau peut causer des brûlures Ne touchez pas l appareil 94 Niveau de puissance acoustique garanti 94dB Appareil de classe II dans lequel la protection contre les chocs électriques ne repose pas uniquement sur l isolation de base mais dans lequ...

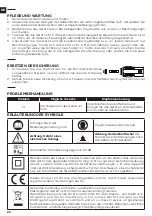
Страница 15: ...te of vochtige omstandigheden 6 Alleen gebruiken in goed geventileerde ruimtes 7 Houd de luchtpomp altijd uit de buurt van ontvlambare objecten of vloeistoffen 8 Laat de luchtpomp niet onbeheerd achter terwijl deze in werking is 9 Schakel het apparaat uit na gebruik 10 Ontkoppel steeds de voeding van het apparaat als het niet wordt gebruikt 11 Laat kinderen deze luchtpomp nooit bedienen Een goed t...

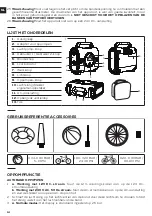
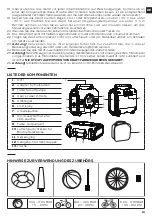
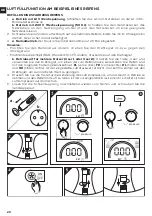
Страница 16: ... 6 Lcd indicator 7 Werklamp 8 Lichtknop 9 Oppompen knop 10 Luchtslang Stekker sigarettenaansteker 11 AC aansluiting 12 Opbergvak ventieldop 13 Tas GEBRUIKSREFERENTIE ACCESSOIRES 0 34 0 90 BAR 5 13 PSI 1 60 3 20 BAR 23 46 PSI 6 20 6 90 BAR 90 100 PSI OPPOMPFUNCTIE AUTOBAND OPPOMPEN 1 a Werking met 12V DC stroom Sluit de 12V voedingskabel aan op de 12V DC stroomaansluiting b Werking met 230 V AC 50 ...

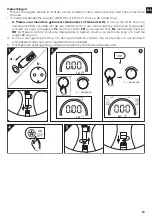
Страница 17: ... van de vier banden in door aan de ronde knop te draaien De banden worden als volgt aangeduid FL vooraan links FR vooraan rechts RL achteraan links en RR achteraan rechts Zodra de doelwaarde is bereikt drukt u op de ronde knop om naar de volgende te gaan 4 Druk op de oppompen knop om het oppompen te starten De luchtpomp zal automatisch uitschakelen zodra de vooraf ingestelde druk is bereikt 5 Ontk...

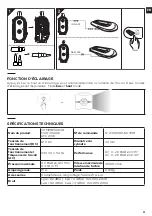
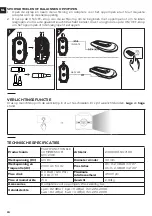
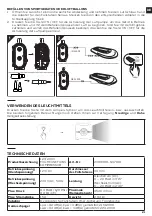
Страница 18: ...TINGSFUNCTIE Druk op de lichtknop om de werklamp in of uit te schakelen Er zijn twee lichtstanden Lage en hoge stand TECHNISCHE SPECIFICATIES Productnaam MULTIFUNCTIONELE COMPRESSOR 12V 230V Artikelnr 2389389 NO7198 Werkspanning DC 12V DC Diameter cilinder 30 mm Werkspanning en frequentie AC 230V AC 50 Hz Prestaties DC 0 2 0 BAR in 3 15 AC 0 2 0 BAR in 2 40 Max druk 8 3 BAR 120 PSI 8 4 KG CM2 Maxi...

Страница 19: ... een koele omgeving om af te koelen VERKLARING SYMBOLEN Raadpleeg de handleiding Draag gehoorbescherming Waarschuwing Elektriciteit Waarschuwing Heet oppervlak Aanraken kan brandwonden veroorzaken Niet aanraken 94 Gegarandeerd geluidsvermogen 94 dB Apparaten van klasse II Apparaten waarin de bescherming tegen elektrische schokken niet uitsluitend berust op de basisisolatie maar waarin aanvullende ...

Страница 20: ...berprüfen Sie den Stecker für die Bordnetzsteckdose den Netzstecker und das Netzkabel regelmäßig auf Beschädigungen Das Netzkabel lässt sich nicht ersetzen Sollte das Netzkabel Beschädigungen aufweisen ist das Gerät umweltgerecht zu entsorgen 3 Befüllen Sie aufblasbare Produkte nur mit solchen Luftmengen die die Empfehlungen der Hersteller nicht überschreiten 4 Sorgen Sie dafür dass weder das Gerä...

Страница 21: ...häden am Gerät zu vermeiden 23 Achtung Verwenden Sie zu Ihrer eigenen Sicherheit nur Zubehörteile die in dieser Bedienungsanleitung erwähnt oder vom Hersteller empfohlen werden 24 Betreiben Sie das Gerät ausschließlich mit den beiliegenden Zubehörteilen 25 Achtung Bei Fahrzeugen ist die Überprüfung des Reifendrucks mit einem geeichten Manometer vorgeschrieben Das Manometer des Geräts ist trotz sei...

Страница 22: ...den Uhrzeigersinn Möchten Sie die Einheit BAR PSI oder KG CM2 ändern drücken Sie auf den Drehregler b Betriebsart für mehrere Nutzer User 1 oder User 2 Drücken Sie die Taste User und verwenden Sie den Drehregler um einen der vier Reifendrücke einzustellen Die Reifen sind mit den folgenden Kürzeln gekennzeichnet FL vorne links FR vorne rechts RL hinten links and RR hinten rechts Ist der eingestellt...

Страница 23: ... DES LEUCHTMITTELS Drücken Sie die Taste mit dem Lampen Symbol um das Leuchtmittel ein bzw auszuschalten Die beiden folgenden Beleuchtungsmodi stehen Ihnen zur Verfügung Niedrige und Hohe Helligkeitseinstellung TECHNISCHE DATEN Produktbezeichnung 12V 230V MULTIFUNKTIONS KOMPRESSOR Art Nr 2389389 NO7198 Betriebsspannung Gleichspannung 12 V DC Durchmesser des Füllstutzens 30 mm Betriebsspannung Wech...

Страница 24: ...g F1 Die Temperatur des Geräts ist hoch Unterbrechen Sie den Betrieb und bringen Sie das Gerät an einen kühleren Ort an dem es abkühlen kann ERLÄUTERUNG DER SYMBOLE Schlagen Sie in der Bedienungsanleitung nach Tragen Sie einen Gehörschutz Achtung Gefahr eines elektrischen Schlags Achtung Heiße Oberfläche Der Kontakt kann Verbrennungen nach sich ziehen Nicht berühren 94 Garantierter Schallleistungs...

Страница 25: ...nas húmedas o mojadas 6 Utilícelo únicamente en zonas bien ventiladas 7 Mantenga el inflador alejado de zonas inflamables y líquidos en todo momento 8 No deje el inflador desatendido mientras lo utilice 9 Apague la unidad tras su uso 10 Desconecte la alimentación cuando no esté en uso 11 No permita que los niños manipulen ni utilicen el inflador Es necesaria una supervisión atenta si hay niños alr...

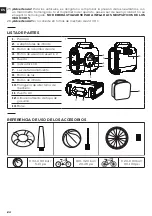
Страница 26: ...rtencia No lo conecte en tomas de mechero de 24 V DC LISTA DE PARTES 1 Palanca 1 2 3 4 6 8 9 7 10 11 12 5 13 2 Adaptadores de inflado 3 Botón de la bomba de aire 4 Botón de usuario 1 usuario 2 5 Rueda 6 Indicador LCD 7 Luz de funcionamiento 8 Botón de luz 9 Botón de inflado 10 Manguera de aire toma de mechero 11 Puerto AC 12 Almacenamiento de tapa de gasolina 13 Bolso REFERENCIA DE USO DE LOS ACCE...

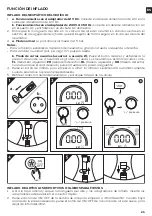
Страница 27: ...ios usuario 1 o usuario 2 Pulse el botón de User y establezca la presión de uno de los 4 neumáticos girando la rueda Los neumáticos están marcados como FL delantero izquierdo FR delantero derecho RL trasero izquierdo y RR trasero derecho Cuando alcance el valor deseado pulse la rueda para pasar al siguiente 4 Pulse el botón de inflado para empezar a inflar El inflador se detendrá automáticamente c...

Страница 28: ...de artículo 2389389 NO7198 Tensión de funcionamiento DC 12 V DC Diámetro del cilindro 30 mm Tensión y frecuencia de funcionamiento AC 230 V AC 50 Hz Rendimiento CC 0 2 0 bar en 3 15 CA 0 2 0 bar en 2 40 Presión máx 8 3 bar 120 psi 8 4 kg cm2 Velocidad máxima del eje giratorio 4500 rpm Amperaje máx 15 A Peso 2 94 kg Accesorios 6 adaptadores de inflado fusible de 15 A bolsa Ruido LpA 82 dB A KpA 3 d...

Страница 29: ...GNIFICADO DE LOS SÍMBOLOS Consulte el manual de instrucciones Lleve protección auditiva Advertencia Electricidad Advertencia Superficie caliente El contacto puede producir quemaduras No tocar 94 Nivel de potencia de sonido garantizada a 94 dB Dispositivo de clase II dispositivos cuya protección contra las descargas eléctricas no se basa únicamente en el aislamiento sino que cuenta con medidas de s...

Страница 30: ...mable areas liquids at all times 8 Do not leave the inflator unattended while in operation 9 After using turn off the unit 10 Always disconnect power when not in use 11 Never allow children to handle and operate this inflator Close supervision is necessary when this inflator is being used near children 12 The inflator is not a toy Keep away from children and pets at all times 13 Do not use this in...

Страница 31: ...o AC port and plug it to home AC socket 2 Screw the air hose to tire air valve by twisting it clockwise until it is securely attached to the tire air valve 3 a Normal mode The original display is set 2 5 Bar Notes To make a change set tyre pressure by rotating the round knob left or right To change the unit BAR PSI or KG CM2 press the round knob b Multi user mode User 1 or User 2 Press the User bu...

Страница 32: ...QUIPMENT OR PARTY BALLOONS 1 Open the side cover and take out the air hose and inflating adapters Insert the appropriate adapters into the quick connector 2 Press the air pump ON OFF button to start inflating deflating Once you have reached your desired situation press the air pump ON OFF button again to stop inflating deflating DEFLATE INFLATE ...

Страница 33: ... CARE AND MAINTENANCE 1 Keep the inflator clean and dry 2 To clean use slightly damp cotton fabrics Do not use acetone or abrasive cleaners 3 Always store in protective pouch bag to guard against damage 4 Do not submerge in water or other liquids Do not store in a damp places and direct sunlight 5 Check the product and its accessories frequently before use If the product does not work check that t...

Страница 34: ...sulation there being no provision for protective earthing or reliance upon installation conditions This product meets all the basic EU regulatory requirements relevant to it Selective collection of waste electrical and electronic equipment Electrical equipment must not be disposed of with household waste Pursuant to European Directive 2012 19 EU on waste electrical and electronic equipment and its...

Страница 35: ...rodotti oltre i limiti indicati dai produttori 4 Non far bagnare la pompa di gonfiaggio o i suoi componenti 5 Non utilizzare l apparecchio in un ambiente bagnato o umido 6 Utilizzare l apparecchio solo in aree ben ventilate 7 Tenere sempre la pompa di gonfiaggio lontana da aree o liquidi infiammabili 8 Non lasciare la pompa di gonfiaggio incustodita durante l utilizzo 9 Dopo l uso spegnere l unità...

Страница 36: ...ADDICE AL GONFIAGGIO DEGLI PNEUMATICI DEI VEICOLI A MOTORE 26 Attenzione Non collegare l unità alla presa di un accendisigari da 24 volt DC ELENCO DEI COMPONENTI 1 Impugnatura 1 2 3 4 6 8 9 7 10 11 12 5 13 2 Adattatori di gonfiaggio 3 Pulsante della pompa ad aria 4 Pulsante Utente 1 Utente 2 5 Manopola girevole 6 Display LCD 7 si accende la luce di lavoro 8 Pulsante di accensione della luce 9 Puls...

Страница 37: ... pneumatico ruotando la manopola girevole a sinistra o a destra Per modificare l unità BAR PSI o KG CM2 premere la manopola girevole b Modalità multi utente Utente 1 o Utente 2 Premere il Pulsante User e impostare la pressione dei 4 pneumatici ruotando la manopola girevole I pneumatici sono indicati con FL sx anteriore FR dx anteriore RL sx posteriore e RR dx posteriore Quando la pressione raggiun...

Страница 38: ... DI ILLUMINAZIONE Premere il pulsante di accensione spegnimento della luce di servizio Ci sono due modalità di illuminazione Modalità Bassa e Intensa SPECIFICHE TECNICHE Nome prodotto COMPRESSORE MULTIUSO 12V 230V N prodotto 2389389 NO7198 Tensione di esercizio DC 12V DC Diametro cilindro 30 mm Frequenza e tensione di esercizio AC 230 V AC 50 Hz Prestazioni DC 0 2 0 BAR in 3 15 AC 0 2 0 BAR in 2 4...

Страница 39: ...re il manuale di istruzioni Indossare un dispositivo di protezione dell udito Avvertenza Elettricità Avvertenza Superficie calda Il contatto può causare ustioni Non toccare 94 Livello di potenza sonora garantito 94 dB Apparecchio di Classe II l apparecchio in questione è dotato di protezione contro le scosse elettriche basata non solo sul semplice isolamento delle parti elettriche ma con l adozion...

Страница 40: ...ecomendações do fabricante 4 Não permita que a bomba de ar ou os seus componentes fiquem molhados 5 Não utilize a bomba de ar em áreas molhadas ou húmidas 6 Utilize apenas em áreas bem ventiladas 7 Mantenha a bomba de ar sempre afastada de áreas inflamáveis líquidos 8 Não deixe a bomba de ar sem supervisão quando este estiver ligada 9 Após a utilização desligue a unidade 10 Desligue sempre a alime...

Страница 41: ...logado e por isso NÃO DEVE SER UTILIZADO PARA O ENCHIMENTO DOS PNEUS DOS VEÍCULOS AUTOMÓVEIS 26 Advertência Não ligue diretamente a uma tomada de isqueiro de 24 V DC LISTA DE PEÇAS 1 Manípulo 1 2 3 4 6 8 9 7 10 11 12 5 13 2 Adaptadores de insuflação 3 Botão da bomba de ar 4 Botão de Utilizador 1 Utilizador 2 5 Manípulo redondo 6 Indicador LCD 7 Luz de trabalho 8 Botão de luz 9 Botão de inflar 10 T...

Страница 42: ...ssão do pneu girando o manípulo redondo para a esquerda ou direita Para alterar a unidade BAR PSI ou KG CM2 prima o manípulo redondo b Modo multi utilizadores Utilizador 1 ou Utilizador 2 prima o botão de User e defina a pressão de um dos 4 pneus girando o manípulo redondo Os pneus têm as seguintes marcações FL esquerdo frente FR direito frente RL esquerdo traseiro e RR direito traseiro Assim que ...

Страница 43: ... para ligar desligar a luz de trabalho Existem dois modos de luz modo de Baixa e Alta intensidade ESPECIFICAÇÕES TÉCNICAS Nome do produto COMPRESSOR MULTIUSOS 12V 230V Item n º 2389389 NO7198 Tensão de funcionamento DC 12 V DC Diâmetro do cilindro 30 mm Tensão e frequência de funcionamento AC 230 V AC 50 Hz Desempenho DC 0 2 0 BAR em 3 15 AC 0 2 0 BAR em 2 40 Pressão máx 8 3 BAR 120 PSI 8 4 KG CM2...

Страница 44: ...EXPLICAÇÃO DOS SÍMBOLOS Consulte o manual de instruções Usar proteção auricular Aviso Eletricidade Aviso Superfície quente O contacto pode provocar queimaduras Não toque 94 Nível garantido de potência sonora 94 dB Aparelho de Classe II o aparelho no qual a proteção contra choques elétricos não depende apenas do isolamento básico mas em que são fornecidas precauções de segurança adicionais tais com...

Страница 45: ...ERLECHT BELGIQUE A T U Auto Teile Unger Handels GmbH Co KG Dr Kilian Str 11 D 92637 Weiden i d OPf Deutschland Noroto España SAU Centre Comercial Alban Carretera de Ademuz km 2 9 46100 BURJASSOT Norauto Italia SPA Corso Savona 85 10024 MONCALIERI Norauto Portugal LDA Av dos Cavaleiros n 49 Alfragide 2794 057 CARNAXIDE www norauto com www atu eu Made in P R C Fabricado en na R P C Fabriqué en R P C...

Отзывы: