background image

NHM-1

CCS Technical Documentation

Page 64

 Copyright 

Nokia. All rights reserved.

Issue 1  11/03

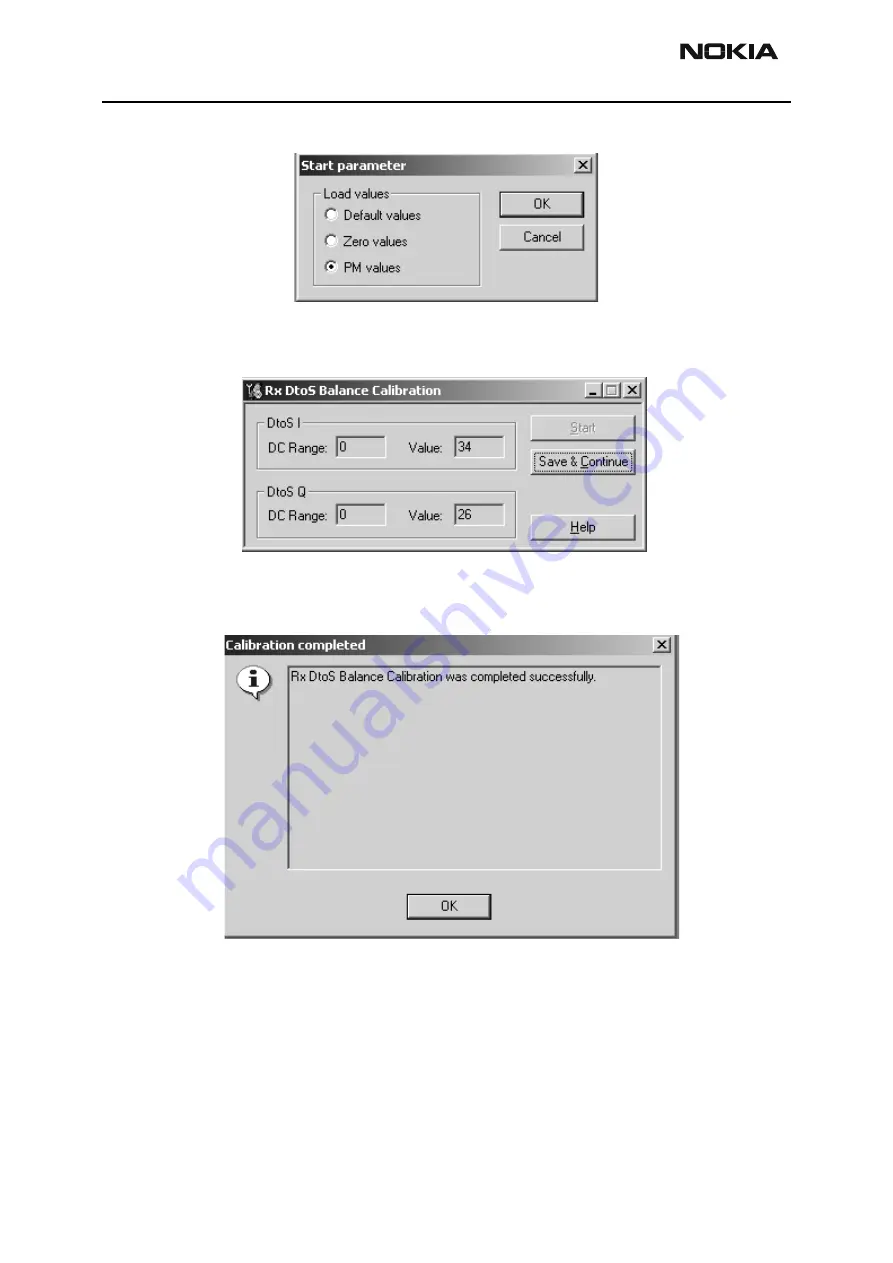
Press “

Load PM Values

” start tuning with values already saved to the phone

Tuning values and ADC readings are shown and tuning automatically moves to the next 
band ( GSM 1800) when you press “

Save & Continue

Tuning values and ADC readings are shown and tuning is completed when you press 

“Save & Continue”

Close the “RX DtoS Balance Calibration” – dialog to end tuning

Содержание NHM-1 Series

Страница 1: ...CCS Technical Documentation NHM 1 Series Transceivers Issue 1 11 03 Copyright Nokia All rights reserved Service Software Instructions and Service Concepts ...

Страница 2: ...NHM 1 Companyconfidential Service Software Instructions and Service Concepts CCS Technical Documentation Page 2 Copyright Nokia All rights reserved Issue 1 11 03 This page left intentionally blank ...

Страница 3: ...OS Flash Device choose following connection settings 27 B For FPS 8 Flash Prommer choose following connection settings 27 How to Update Flash Support Files for FPS 8 and FLS 4S 29 Before Installation 29 Installing the Flash Support Files 29 How to Update The FPS 8 Flash Prommer SW 33 FPS 8 Activation and Deactivation 35 Activation 35 Deactivation 37 JBV 1 Docking Station SW 38 Before Installation ...

Страница 4: ...5 TX I Q Tuning 65 TX Power Level Tuning 69 WDCMA RF Tuning 73 WCDMA RF Tunings 73 WCDMA RF Channel Filter Tuning 73 WCDMA Temperature Sensor Calibration 74 WCDMA RX AGC Tuning 75 WCDMA RX Band Response Tuning 76 WCDMA TX PA Bias Current Tuning 77 WCDMA TX AGC Tuning 78 WCDMA TX Power Detector Tuning 81 WCDMA TX Band Response Tuning 83 WCDMA RF Testing Using Local Mode 84 WCDMA TX Control 84 WCDMA...

Страница 5: ...into dynami cally loaded modules DLLs Supported Operating Systems Windows 98 2000 ME and NT 4 0 SP4 Hardware requirements for using Phoenix Minimum Processor 233 MHz RAM memory 64 MB Disk space 50 100 MB Recommended for Windows 2000 Processor 700 MHz RAM memory 512 MB Disk space 50 100 MB Introduction This section briefly describes how to install the Phoenix software and includes some basic inform...

Страница 6: ...ed Phoenix is now ready to be used also with FPS 8 flash prommer and other tools The Phoenix Service Software installation contains Service software support for all phone models included in the package Flash update package files for FPS 8 and FLS 4S programming devices All needed drivers for DK2 dongle FLS 4S point of sales flash device USB devices Separate installation packages for flash update f...

Страница 7: ... 7 Files for type label printing Validation file for the Faultlog repair data reporting system All product specific configuration files for Phoenix software components Please refer to Service Manual and Technical Bulletins for more informa tion concerning phone model specific service tools and equipment setup ...

Страница 8: ...red to be able to install Phoenix depending on the Operating System If uninstalling or rebooting is needed at any point you will be prompted by the Install Shield program If at any point during installation you get this message Dongle is not found and installa tion can t continue Possible reasons may be defective or too old PKD 1Dongle five digit serial number Don gle when used with FPS 8 Prommer ...

Страница 9: ...pyright Nokia All rights reserved Page 9 Click Next in Welcome dialog to continue Choose destination folder it is recommended to use the default folder C Program Files Nokia Phoenix Choose Next to continue You may choose another location by selecting Browse not recommended ...

Страница 10: ...hnical Documentation Page 10 Copyright Nokia All rights reserved Issue 1 11 03 Setup copies the components progress of the setup is shown Please wait Drivers will be installed and updated please wait the process may take several minutes ...

Страница 11: ...ential NHM 1 Issue 1 11 03 Copyright Nokia All rights reserved Page 11 to complete If the operating system does not require rebooting Windows 2000 XP the PC com ponents are registered right away Click Finish to finalize Phoenix is ready for use ...

Страница 12: ...ystem used requires restarting your computer Windows 98 SE ME the Install Shield Wizard will tell you about it Select Yes to reboot the PC imme diatelly and No to reboot the PC manually afterwards After the reboot components are registered and Phoenix is ready for use Note that Phoe nix doesn t work if components are not registered ...

Страница 13: ...be used right away FPS 8 can be used after updating Flash Update Package files to it If reboot is not needed components are registered after copying them If restarting of your computer is not needed Click Finish to exit the setup Phoenix is now ready for use Now the installation of Phoenix Service SW is ready and it can be used after Installing Phone model specific Phone Data Package for Phoenix C...

Страница 14: ...hard disk Close all other programs Run the application file e g phoenix_service_sw_a10_2003_33_5_22 exe Newer version of Phoenix will be installed Driver versions are checked and updated if necessary When you update the Phoenix from old to new version e g update from 2003_9_2_3 to 2003_33_5_22 the update will take place automatically without uninstallation f you try to update the Phoenix with the ...

Страница 15: ...opyright Nokia All rights reserved Page 15 How to Uninstall Phoenix Uninstallation can be done manually from Windows Control Panel Add Remove Pro grams Choose Phoenix Service Software and click Add Remove Choose Remove to uninstall Progress of the uninstallation is shown ...

Страница 16: ...rights reserved Issue 1 11 03 If the operating system does not require rebooting select Finish to complete If the operating system used requires rebooting Install Shield Wizard will tell you about it Select Yes to reboot the PC immediatelly and No to reboot the PC manu ally afterwards ...

Страница 17: ...before completely reinstalling Phoenix Note that the original installation package e g phoenix_service_sw_a10_2003_33_5_22 exe must be found on your PC when you run the repair setup Run Windows Control Panel Add Remove Programs choose Phoenix Service Soft ware and click Add Remove In the following view choose Repair Phoenix will reinstall components and register them procedure is the same as in up...

Страница 18: ...llel port of your computer Install Phoenix Service SW Download the installation package eg RH 18_dp_v_XX_XX_MCUSWx_xx exe to your computer e g C TEMP Close all other programs Run the application file eg RH 18_dp_v_XX_XX_MCUSWx_xx exe and follow instructions on the screen Please note that very often the Phoenix Service SW and the Phone Specific Data Package for Phoenix come in pairs meaning that ce...

Страница 19: ...roduct Specific Run the RH 18_dp_v_XX_XX_MCUSWx_xx exe to start installation When you choose Next the files needed for installation will be extracted Please wait Choose Next to continue From this view you can see the contents of the Data Package Read the text carefully There should be information about the Phoenix version needed with this data package ...

Страница 20: ...ocumentation Page 20 Copyright Nokia All rights reserved Issue 1 11 03 Choose Next Confirm location and choose Next to continue Install Shield checks where the Phoenix application is installed and the directory is shown Choose Next to continue ...

Страница 21: ... Technical Documentation Company confidential NHM 1 Issue 1 11 03 Copyright Nokia All rights reserved Page 21 Choose Next to start copying the files Phone model specific files will be installed please wait ...

Страница 22: ...ish to complete installation You now have all phone model specific files installed in your Phoenix Service SW Now Phoenix can be used to for example flash phones and print type labels after Configuring users Managing connections FLS 4S can be used right away FPS 8 can be used after updating Flash Update Package files to it ...

Страница 23: ...f you want to uninstall the version you have on your PC Answer OK to uninstall Cancel if you don t want to uninstall Older versions of data packages do not need to be uninstalled Older versions of data packages don t need to be uninstalled unless instructions to do so are given in the readme txt of the data package and bulletins concerning the release Please read all related documents carefully On...

Страница 24: ...ll rights reserved Issue 1 11 03 How to configure Users Start Phoenix Service SW and Login To add new user choose Edit If user ID is already configured choose your own user ID from the list and choose OK Choose Add to continue Type in your name and Initials to fields and choose OK ...

Страница 25: ...CS Technical Documentation Company confidential NHM 1 Issue 1 11 03 Copyright Nokia All rights reserved Page 25 User has now been created choose OK you are now able to login with this username choose OK ...

Страница 26: ...tions From File Menu Existing connections can be selected edited deleted and new ones created by using this dialog A connection can be created either manually or by using a Connection Wizard To add new connection choose Add and select if you want to create it manually or by using the Wizard Choose Next to continue In the next dialogs you will be asked to select some settings for the connection ...

Страница 27: ...his always To check please go to Windows Control Panel FLS Virtual Port Configuration To check please go to Windows Control Panel FLS Virtual Port Configuration B For FPS 8 Flash Prommer choose following connection settings Media FPS 8 Port Num COM Port where FPS 8 is connected COMBOX_DEF_MEDIA FBUS Choose Finish to complete If you use the Wizard connect the tools and a phone to your PC and the wi...

Страница 28: ... can be used after closing the Manage Connections window Selected connection will be shown on the right hand bottom corner of the screen To use the selected connection connect the phone to Phoenix with correct service tools make sure that it is switched on and select Scan Product When the Product is found Phoenix will load product support and when everything is ready name of the loaded product sup...

Страница 29: ... Phoenix installarion always includes the latest flash update package files for FLS 4S FPS 8 Separate installation package is for flash support files is available and the files can be updated according to this instruction if updates appear between Phoenix data package releases Installing the Flash Support Files If you are not using separate installation package you can skip this section and contin...

Страница 30: ... really want to downgrade unistall newer files manually from Control Panel and then re run the installation again If an older version exists on your PC and it needs to be updated Choose Next to continue installation It is highly recommended to install the files to the default destination folder C Pro gram Files Nokia Phoenix Choose Next to continue You may choose another location by selecting Brow...

Страница 31: ...tion Company confidential NEM 1 Issue 1 11 03 Copyright Nokia All rights reserved Page 31 recommended Installation continues Choose Finish to complete procedure FLS 4S can be used right after Flash Update Package is installed ...

Страница 32: ...NEM 1 Company confidential CCS Technical Documentation Page 32 Copyright Nokia All rights reserved Issue 1 11 03 FPS 8 must be updated by using Phoenix ...

Страница 33: ...rvice Software Select FPS 8 FPS 8C maintenance from Flashing menu When new FPS 8 flash update package is installed to computer you will be asked to update the files to your FPS 8 Prommer Select Yes to update files Update procedure takes a couple of minutes please wait until you are notified that update has been successfull Choose OK and close FPS8 Maintenance UI 02 0 0 ...

Страница 34: ...te FPS 8 sw can also be updated by pressing Update button and selecting appropriate fps8upd ini file under C Program Files Nokia Phoenix Flash directory All files can be loaded separately to FPS 8 To do this just press right mouse button in Flash box files window and select file type to be loaded More information and help can be found from the Help dialog ...

Страница 35: ... box must be first deactivated Activation Before FPS 8 can be successfully used for phone programming it must be first activated Fill in first FPS 8 activation request sheet in the FPS 8 sales package and follow the instructions in the sheet When activation file is received e g 00000 in copy it to C Program Files Nokia Phoenix BoxActivation Directory on your computer This directory is created when...

Страница 36: ...ved Issue 1 11 03 Select Activate from the FPS8 8C Maintenance UI The activation file you saved to C ProgramFiles Nokia Phoenix BoxActivation directory will be shown e g 00000 in check that it is correct Box will be activated when you choose Open Turn FPS 8 power off and on to complete activation ...

Страница 37: ...All rights reserved Page 37 Deactivation Start Phoenix Service Software Select FPS 8 FPS 8C maintenance from Flashing menu Select Deactivate from the FPS8 8C Maintenance UI Confirm Deactivation by choosing Yes Box will be deactivated Turn FPS 8 power off and on to complete deactivation ...

Страница 38: ...t service functions The JBV 1 Docking Station contains Software Firmware which can be updated You need the following equipment to be able to update JBV 1 software PC with USB connection Operating System supporting USB Not Win 95 or NT USB Cable Can be purchased from shops or suppliers providing PC hard ware and accessories JBV 1 Docking Station External Power Supply 11 16V Before Installation Down...

Страница 39: ...DO NOT CONNECT THE USB CABLE JBV 1 TO YOUR COMPUTER YET Run Jbv1_update zip file and start SW Installation by double clicking Setup exe Files needed for JBV 1 Package setup Program will be extracted Installation begins please read the information shown and Choose Next to continue Use suggested destination folder where JBV 1 SW Package will be installed and choose ...

Страница 40: ...S Technical Documentation Page 40 Copyright Nokia All rights reserved Issue 1 11 03 Next to continue Select Full Installation and choose Next to continue Program Folder will be created Choose Next to continue Software files will be ...

Страница 41: ...umentation Company confidential NEM 1 Issue 1 11 03 Copyright Nokia All rights reserved Page 41 installed After successful installation choose Finish to complete NOW YOU CAN CONNECT THE USB CABLE JBV 1 TO YOUR COM PUTER ...

Страница 42: ...er to JBV 1 11 16V DC from external power supply then connect USB Cable between JBV 1 USB connector and PC Windows will detect connected USB cable and detect drivers for new HW Follow the instructions and allow Windows to search and install the best drivers avail able After this procedure the actual JBV 1 SW update can begin ...

Страница 43: ...on your computer please update the JBV 1 USB Driver Please see the readme txt file under C Program Files Nokia JBV 1 Firmware Update JBV 1USB driver folder for instruc tions on how to update the JBV 1 USB Driver After you have installed or updated the JBV 1 USB driver the actual JBV 1 SW update can begin Go to folder C Program Files Nokia JBV 1 Firmware Update JBV 1 Firmware Update and start JBV 1...

Страница 44: ...NEM 1 Company confidential CCS Technical Documentation Page 44 Copyright Nokia All rights reserved Issue 1 11 03 This page left intentionally blank ...

Страница 45: ...et the required connection method to the top of the priority list and Apply Select Flashing and choose either FPS 8 Flash or FLS 4 Flash depending on connection method The Flash window will open To restore the user data after the phone has been flashed select Restore User Phone If you wish to delete all the user data and return the phone to manufactured state select Phone as Manufactured Select th...

Страница 46: ...by the FPS 8 then the software package is first transferred to the FPS 8 this process may be slow in which case it is recommended that the parallel port is configured in ECP mode If you do not know how to change the parallel port mode con tact your local support Erasing of the phone memory is then carried out Finally the software package is programmed into the phone and the user data if requested ...

Страница 47: ...M 1 phones Power to JBV 1 must be supplied from an external DC power supply not FPS 8 prommer Maximum input voltage is 16 V DC nominal input for tunings is 12V DC Item Type Description Code 1 JBV 1 Docking station 0770298 2 MJF 11 Docking station adapter 0770288 3 SCB 3 DC DC cable 0730114 4 XRF 1 Antenna cable 0730085 5 PCS 1 DC power cable 0730012 6 DAU 9S Service MBUS cable 0730108 7 PKD 1 Soft...

Страница 48: ...on for EM Calibration Connect DC Cable SCB 3 between JBV 1 and Vin of Phone for Charger calibration Connect 12 15 V from Power Supply to JBV 1 NOTE Check that connection is F BUS doesn t work with M BUS Select Tuning Energy Management Calibration Energy Management values to be calibrated are checked Select Read from Phone to show current values in phone memory and to check that the communication w...

Страница 49: ...one NOTE Only values of checked tunings Battery size Battery Temperature etc will be saved Close the Energy Management Calibration dialog to end tuning Choose OK note that the phone in the JBV 1 switches off and must be switched on manually Parameter Min Max ADC gain 25400 29000 DC offset 50 50 BSI gain 970 1100 BTEMP gain 2075 2275 VBAT gain 10000 11000 VBAT offset 2300 2900 VCHAR 58000 62000 ICH...

Страница 50: ...NHM 1 Company confidential CCS Technical Documentation Page 50 Company confidential Nokia Corporation Issue 1 11 03 This page left intentionally blank ...

Страница 51: ...t be done to ensure that phone is not registering only to WCDMA mode Avoid unnecessary tuning factory tuning values are always the most accurate ones Views in this document may change as the service software is devel oped Please refer to the Phoenix help files phone model specific ser vice manual and bulletins for help Service Tool Concept for RF Tunings RF tunings can be carried out in MJS 43 Mod...

Страница 52: ...S 43 Module Jig MJS 43 input voltages Maximum 5 VDC Nominal input for RF tunings is 4 2 V DC Minimum 3V DC Item Type Description Code 1 MJS 43 Module jig 0770324 2 PCS 1 DC power cable 0730012 3 XRF 1 RF antenna cable 0730085 4 DAU 9S Service MBUS cable 0730108 5 PKD 1 Software protection key Dongle 0750018 ...

Страница 53: ...ut voltages Maximum 16 VDC Nominal input for RF tunings is 12 V DC Item Type Description Code 1 JBV 1 Docking station 0770298 2 MJF 11 Docking station adapter 0770288 3 SCB 3 DC DC cable 0730114 4 XRF 1 Antenna cable 0730085 5 PCS 1 DC power cable 0730012 6 DAU 9S Service MBUS cable 0730108 7 PKD 1 Software protection key Dongle 0750018 ...

Страница 54: ...lter in GSM Phones Rx Channel select filter is tuned only in one band Single calibration for both bands Select Tuning GSM Rx Channel select filter calibration Press Tune to start the tuning Values will be saved to phone when Save to Phone tick box is checked If Save to Phone tick box is not checked the values are not saved to the phone when you stop the tuning or exit the dialog Tuning values must...

Страница 55: ...n starts at EGSM GSM900 then continues RX Calibra tion at GSM1800 band AFC tuning is done while EGSM GSM900 band RX Calibration is per formed Remember to take jig and cable attenuations into account Select Tuning GSM Rx calibration Press Start to begin Set RF generator to required frequency OK Tuning values and ADC readings are shown and tuning automatically moves to the next ...

Страница 56: ...ing values and ADC readings are shown and tuning is completed when you press Save Continue EGSM GSM900 Typical value Limits AFC value 12 350 350 AFC slope 123 50 350 RSSI A1 67 54 74 RSSI A2 73 60 80 RSSI A3 79 66 86 RSSI A4 85 72 92 RSSI A5 91 76 96 RSSI A6 95 82 102 RSSI A7 101 88 108 RSSI A8 107 94 114 RSSI A9 113 100 120 RSSI A10 119 106 126 RSSI A11 125 112 132 RSSI A12 131 118 138 RSSI A13 1...

Страница 57: ...he RX Calibration dialog to end tuning GSM1800 Typical value Limits RSSI A1 63 54 74 RSSI A2 69 60 80 RSSI A3 74 66 86 RSSI A4 80 72 92 RSSI A5 86 76 96 RSSI A6 92 82 102 RSSI A7 98 88 108 RSSI A8 104 94 114 RSSI A9 110 100 120 RSSI A10 116 106 126 RSSI A11 122 112 132 RSSI A12 128 118 138 RSSI A13 134 124 144 RSSI A14 140 130 150 RSSI A15 146 136 156 ...

Страница 58: ...tarts at EGSM GSM900 then continues at GSM1800 band NOTE Remember to do RX calibration before doing Rx Band Filter Response Compensation Remember to take jig and cable attenuations into account Select Tuning GSM Rx Band Filter Response Compensation Select Manual tuning and Start You will be asked to supply 9 different RF frequencies to the phone Set first required frequency and level OK ...

Страница 59: ...echnical Documentation NHM 1 Issue 1 11 03 Copyright Nokia All rights reserved Page 59 Set 2nd required frequency and level OK Set 3rd required frequency and level OK Set 4th required frequency and level OK ...

Страница 60: ... CCS Technical Documentation Page 60 Copyright Nokia All rights reserved Issue 1 11 03 Set 5th required frequency and level OK Set 6th required frequency and level OK Set 7th required frequency and level OK ...

Страница 61: ...evel OK Typical values and limits in Rx Band Filter Response Compensation EGSM900 Channel Input frequency MHz Measured level difference dB Limits dB 965 923 26771 0 516 10 5 975 925 26771 0 875 5 5 987 927 66771 1 469 5 5 1009 932 06771 1 656 5 5 37 942 46771 0 094 5 5 90 953 06771 1 781 5 5 114 957 86771 0 719 5 5 124 959 86771 0 625 5 5 136 962 26771 2 141 10 5 ...

Страница 62: ...n Rx Band Filter Response Compensation GSM1800 Tuning values and ADC readings are shown and tuning completed when you press Save Continue Close the RX Band Filter Response Compensation dialog to end tuning Channel Input frequency MHz Measured level difference dB Limits dB 497 1802 26771 0 672 10 5 512 1805 26771 0 109 5 5 535 1809 86771 0 781 5 5 606 1824 06771 0 781 5 5 700 1842 86771 0 266 5 5 7...

Страница 63: ...RF signal not needed RX Dtos Balance Calibration starts at EGSM GSM900 then continues at GSM1800 band This Calibration is used for calibrating DSP control words values Select Tuning GSM Rx DtoS Balance Calibration NOTE No RF input is allowed to feed when calibrating Choose OK and Start tuning begins automatically at the EGSM900 band Press Start ...

Страница 64: ...ning with values already saved to the phone Tuning values and ADC readings are shown and tuning automatically moves to the next band GSM 1800 when you press Save Continue Tuning values and ADC readings are shown and tuning is completed when you press Save Continue Close the RX DtoS Balance Calibration dialog to end tuning ...

Страница 65: ...hase difference TX I Q tuning starts GSM900 then continues RX Calibration at GSM1800 band Remember to take jig and cable attenuations into account Select Tuning GSM TX IQ Tuning Select Start The tuning is done by setting each of the sliders to desired value The sliders can be changed only when the tuning is ongoing The order of tuning should be same as the order of the sliders e g the Tx I DC Offs...

Страница 66: ...ights reserved Issue 1 11 03 Use PgUp or PgDn keys Set spectrum analyzer to required settings OK Tune LO leak to minimum with TXI TXQ DC offset control f0 on spectrum analyzer screen Tune wrong sideband to minimum using Amplitude Phase difference controls f0 68kHz ...

Страница 67: ...es the next band GSM 1800 when you press Save Con tinue Parameter Valeu Limit I DC Offset 2 5 0 5 6 6 Q DC Offset 2 5 0 5 6 6 Amplitude differ ence 0 2 0 2 1 1 Phase difference 88 0 92 0 80 100 A_wr i t e B_bl ank C E N T E R 8 9 7 4 0 0 0 MH z S P A N 2 0 0 0 k H z 2 0 s S WP 3 k H z V B W 3 k H z R B W 1 0 d B R E F 3 2 0 d B m A T T 4 0 d B GS MP OW Th u Au g 30 1 1 43 4 5 2001 REF OFS 11 5 dB ...

Страница 68: ...SM900 band above Repeat the same steps as for EGSM900 band Typical TX IQ Tuning Values and tuning limits GSM1800 Tuning values and ADC readings will be shown and tuning will be completed when you press Save Continue Choose OK to close the TX I Q Tuning dialog I DC Offset 3 0 0 0 6 6 Q DC Offset 1 5 1 0 6 6 Amplitude differ ence 0 5 0 0 1 1 Phase difference 90 0 97 0 80 100 ...

Страница 69: ...00 band The power level tuning is made for both high and low PA Modes In GSM1800 band only for high PA mode Select Tuning GSM Tx power level tuning Remember to take jig and cable attenuations into account Select Start Tuning is started automatically from the EGSM 900 band High PA mode The coefficient table lists the power level coefficient target dBm and DAC value for each power level The tuned po...

Страница 70: ...uning value can be adjusted with and keys Typical values GSM900 Tune base level and power levels BASE 19 15 and 5 to target level When tuning values are correct choose Save Continue If all coefficients are within Power level PA high mode 5 0 650 0 710 15 0 190 0 210 19 0 160 0 170 Base 0 140 0 150 ...

Страница 71: ...nd 7 Levels 5 6 are not used base level tuning not needed When tuning values are correct choose Save Continue If coefficients are within specified limits tuning will continue on the EGSM 1800 band Note that In GSM1800 band PA mode is not changed because tuning is only made in High mode Repeat the same steps as for the EGSM900 band above Power level PA low mode 7 0 500 0 540 15 0 190 0 210 19 0 160...

Страница 72: ...ne base level and power levels 15 11 and 0 to target level Typical values GSM1800 If values shown are within limits select Save Continue Values are saved to phone memory Close the TX Power Level Tuning dialog to end tuning Power level PA high mode 0 0 650 0 710 11 15 0 190 0 210 Base 0 140 0 150 ...

Страница 73: ... band response TX bias current setting TX AGC tuning TX power detector tuning TX band response To run these with Phoenix SW the phone must be in local mode with WCDMA system selected WCDMA RF Channel Filter Tuning This does not require any external instruments Run this component from the Phoenix menu Tunings WCDMA RF channel filter calibration This is the initial view Press Tune to start calibrati...

Страница 74: ... at room temperature Run this component from the Phoenix menu Tunings WCDMA Temperature sensor calibration This is the initial view Press Tune to run the calibration Note By pressing Read the saved value can be read from PM The value stored is a DC voltage from the temperatur sensor in TEX It s value is the dif ference between the expected value for room temperature so it can be either Save tuned ...

Страница 75: ...e calibration values are then calculated and stored into PM Note With the Read button you can check the values stored in PM Definitions of the parameters saved are RX chain gain This is the overall receiver gain error compared to expected value in dB s LNA mid gain error This is the difference in LNA s gain step compared to expected value in dB s LNA low gain error This is the difference in LNA s ...

Страница 76: ...nix menu Tunings WCDMA RX band response calibration Press Start then Tune The calibration routine will define the signal generator settings for you Set frequency and settings to defined values and allow the tuning to continue by pressing OK After this low and high frequency compensation values for RX band response will be sored into PM when you press Yes to save changes Note With the Read button y...

Страница 77: ...Phoenix menu Tunings WCDMA TX PA bias tuning Press Start After pressing the OK button record the lowest current consumption of the phone Increase the PA Bias DAC value with the arrow buttons until the tuned current has increased by the 25mA target Press Finish and save the tuning value for PA bias The tuning value sets the IPA1 current output from UEM that determines the bias current of the second...

Страница 78: ... When running for the first time use defaults Press OK Connect the analyser into the WCDMA RF test connector The phone will send a power ramp sequence at 1950Mhz at 7 different power levels The actual signal is at 1950 3MHz since the transmitter is modulated with a 300kHz IQ sinewave Set the analyser to 1950 3MHz 100kHz RBW sweeptime 2 0 ms video triggering used with trace averaging Set the ref le...

Страница 79: ...run the ramp for 2nd AGC stage Fill the power levels from the 2nd ramp into TXA 2 table and press Enter After filling in the measured power levels for both AGC stages TXA1 for TEX and TXA2 for HEX Phoenix calculates set of coefficients and parameter to build a Example shown using an Agilent E4406A VSA ...

Страница 80: ...NHM 1 CCS Technical Documentation Page 80 Copyright Nokia All rights reserved Issue 1 11 03 model for TX AGC behaviour Store them into PM ...

Страница 81: ... of a power meter thermal sensor or vector signal analyser The wideband mean power should be measured in a 5MHz BW Calibration is started from the Phoenix menu Tunings WCDMA Power detector calibration Press Start Tune the output power with the slider to 21 dBm The power can be set with either the slider or the arrow keys on the keyboard Press Accept ...

Страница 82: ...Page 82 Copyright Nokia All rights reserved Issue 1 11 03 In the 2nd phase the output power is tuned to 11 dBm Press Accept The tuned coefficients V0 and V1 are calculated Note With the Read button you can check the values stored in PM ...

Страница 83: ...eter thermal sensor or vector signal analyser Calibration is started from the Phoenix menu Tunings WCDMA TX Band Response Calibration Press Start Tune the power 21 dBm at mid low and high channels using the arrow buttons Press Accept after tuning is complete Save values to PM when tuning is complete Note With the Read button you can check the values stored in PM ...

Страница 84: ... can be run Also WCDMA signal code settings scrambling and chanelisation codes can be modified WCDMA TX control can be activated from Phoenix menu Testing WCDMA Tx Control Manual mode DA converter setting for AGC s in TEX and HEX 0 1023 DA converter for PA bias control 0 15 DA converter setting for DC DC converter 112 512 112 DAC 1 5 V DC DC output voltage 512 DAC 3 3V When sweeping is used here t...

Страница 85: ...nd type can be selected here Here the uplink data and control channelization code numbers and weighting can be adjusted 0 15 Code classes for those define the bit rates spreading factors e g DPDCH code class 6 stands for spreading factor 60 and 8 in DPCCH is for SF 256 These SF s are used in 12 2 kpbs uplink voice channel Uplink channel number can be changed in here 9612 9888 NOTE When settings ar...

Страница 86: ...rator into the antenna connector and set AGC Mode to algorithm in the Rx control window Press Start Select RSSI in measurement mode Press Start Measure The result should be in dBm There are also other measurement modes available In manual mode the LNA with 3 different gain steps and BB AGC can be controlled AFC DA converter can be adjusted 0 2047 1024 middle value NOTE If TX control is activated t...

Отзывы: