background image

Navi Bars

GB 20

Viewing images received from an external 
device       

General 

The 260 T is equipped with a built-in Bluetooth module that makes
it possible to receive, watch and save digital images transmitted
from an external device. The device must be equipped with Blue-
tooth Standard Version 1.5 and "Object Push Profile". No cables are
necessary as the transmission is wireless. The distance between the
transmitting device and the 260 T should not exceed 10 meters to
ensure good transmission.

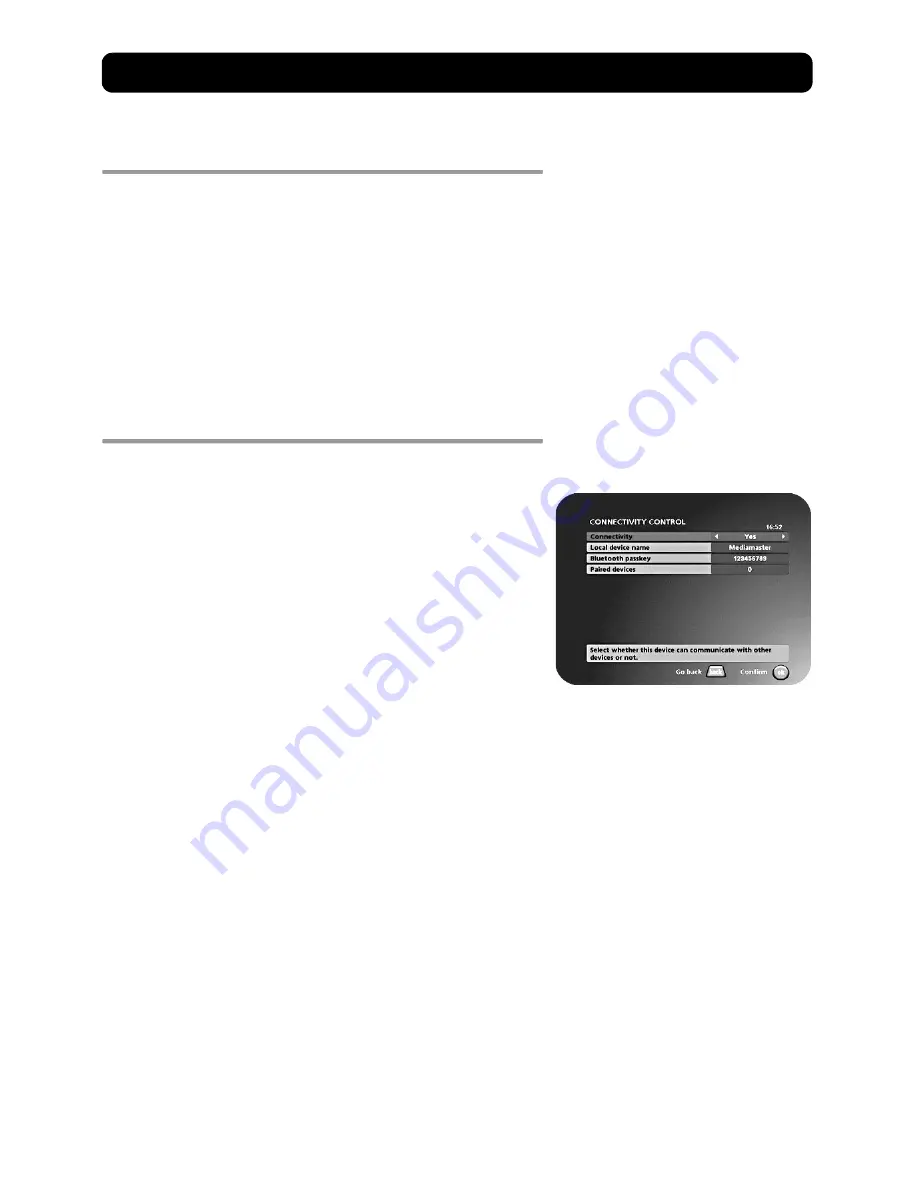
Before the 260 T can start to receive images, some settings have to
be made. 

Control folder 

 Connections 

Connectivity 

Yes

  The Bluetooth function is enabled and it is possible to receive

images. 

No

  The Bluetooth function is disabled and it is not possible to

receive images. 

If you have selected "

Yes

", the external device should be able to

find a suitable Bluetooth receiver to send images to and thus, it
should be able to find the 260 T. If it does not find it, it may be be-
cause "

No

" has been selected. 

Local device name 

The 260 T is called “Mediamaster” on this line. This is also the name
the external device will find during its search procedure. You can
enter another name with the number buttons on the remote con-
trol. Press any number button and a keyboard will be shown on the
screen. 

For more information on how to enter a new name, see “How to en-
ter a specific name” on page 17. 

Bluetooth passkey 

The first time you want to send an image to the 260 T, a passkey has
to be entered in the transmitting device. By default, this passkey is
set to 123456789. It is highly recommended that this passkey be
changed immediately. The length of the passkey must be a mini-
mum of 8 and a maximum of 16 characters. 

An example of one reason why you would want to change your
passkey is that if your neighbour also has a 260 T and neither of you
have changed the passkey, you may send images to each other’s re-
ceivers.

Содержание Mediamaster 260T

Страница 1: ...User Guide ...

Страница 2: ...oitteiden käsittely se perustuu äänitaajuusvalintasignalointiin DTMF FR Par la présente Nokia déclare que ce récepteur numérique le Mediamaster 260 T satisfait aux conditions requises essentielles et est conforme aux autres dispositions applicables de la Directive 1999 5 EC Ce terminal est destiné à être connecté aux réseaux téléphoniques publics commutés analogiques RTPC dans lesquels l adressage...

Страница 3: ... in Navi Bars 21 Control folder Timer 23 Control folder System info 24 Control folder CA Menu 24 Settings folder Channel 24 Settings folder TV 25 Settings folder Access 26 Settings folder Time 27 Settings folder SW software update 27 Settings folder Reinstall 28 Games folder 28 Guides 28 PVR Personal Video Recording 29 About hard disk recording 29 Different ways of recording 29 Pause recording 30 ...

Страница 4: ...around the Mediamaster for sufficient ventilation Do not cover the Mediamaster s ventilation openings with items such as newspapers tablecloths curtains etc Do not place the Mediamaster on top of a heat emitting unit Do not place naked flame sources such as lit candles on the Mediamaster Use a soft cloth and a mild solution of washing up liquid to clean the casing Do not expose the Mediamaster to ...

Страница 5: ...ed information about current and forthcoming programmes if transmitted guide Will show an Electronic programme Guide EPG ok To confirm choices and to select a highlighted item Cursor up down buttons To move up down in the menus Cursor left right buttons Change settings in menus P P Change channels up and down one at a time back Step back one level at a time within menus without changing any settin...

Страница 6: ... to release a CA module that has been inserted to put the Mediamaster into and take it out of standby mode to change channels and to move through menus Lid open the lid in order to insert the CA module and the smart card Indicator 1 DIGITAL AUDIO RCA connector S PDIF digital output for connecting to a Hi fi system AUDIO L R RCA connectors stereo output for a connection to an analogue Hi fi system ...

Страница 7: ...and smart cards are only distributed by Service Providers and special distributors not by Nokia After inserting a card leave it in the slot permanently Do not re move it again unless you are asked to do so This is important if your Service Provider were to want to download new information to the smart card as the card has to be in the slot Inserting a CA module with a smart card In the left hand s...

Страница 8: ...t the bottom of the remote control Insert the 2 AAA 1 5 V batteries as shown in the diagram Make sure that you observe the and markings indicated inside Replace the cover About digital transmission Digital Radio and TV signals can be blocked by buildings mountains and the terrain Depending on if the receiver is located in a depres sion in the ground behind a mountain or in a concrete building the ...

Страница 9: ...g the roof aerial Some outdoor aerials are directed towards an analogue trans mitter The aerial must be directed towards a digital TV trans mitter It is not always advisable to position the aerial as high as possi ble If problems arise experiment with different aerial heights Indoor and window mounted aerials This type of aerial may be enough if the reception conditions are very good If an indoor ...

Страница 10: ...ble from the VCR to the AUX SCART socket on the Mediamaster Connect the RF cable from the RF output on the VCR to the TV aer ial input on the TV Connect the TV aerial to the RF input socket on the VCR Connecting a Hi fi system Connect an RCA stereo cable from the AUDIO L R sockets on the Mediamaster to the LINE AUX SPARE or EXTRA input sockets on your Hi fi system If available you can connect a si...

Страница 11: ...the previous menu by pressing back Use the cursor up down button to move upwards and down wards from one line to another Use the cursor left right button to change settings You also use the number buttons on the remote control to enter numeric values Plug in your Mediamaster and the First time installation menu appears Press ok to continue Language Select the desired menu language using the cursor...

Страница 12: ...ssing ok When the search procedure has ended a message will tell you how many TV and radio channels have been found Press ok to continue Time adjustment The time is adjusted by using cursor up down 1 2 an hour at a time You can also adjust the minutes by using cursor left right Press ok to finish the first time installation ...

Страница 13: ...ider When you change channels with the P P button a programme information banner is displayed for a few seconds For more infor mation on setting the duration of the banner see Banner time out on page 16 You can also press info while watching TV to dis play the banner The programme information may include the current time a channel list the channel number and name the names of the current and the n...

Страница 14: ... the different page options shown on any page by pressing the cursor left right button After highlighting a page number press ok to go to that page By pressing 0 you can alternate between the last two pages that you have most recently viewed Press info to hide everything on a teletext page apart from its headline Sometimes a teletext page may contain subpages When sub pages are available they are ...

Страница 15: ...urrently highlighted bookmark When scrolling TV or radio channels the programmes can be marked with the following symbols a new channel you have not previously visited the channel is scrambled the channel is locked by the user Info displays extended information when available for a pro gramme or function in the Navi Bars focus opt displays a more detailed information about the TV or radio channel ...

Страница 16: ... is not available no subtitling will be shown but the first available language for event information is selected Main audio language Select the preferred language for audio If this language is not available the first available language is selected Menu language Select the language for the menus Channel list icons In order to make the bookmark lists for TV and Radio channels shorter you can choose ...

Страница 17: ... choose Add De lete Channels from the menu You can create up to eight separate favourite lists for TV and radio channels How to enter a specific name This procedure is the same whether you are entering a name for the first time or are changing an existing name Move to a new character position using the cursor left right but ton If you make a mistake you can remove characters to the left of the cur...

Страница 18: ...s added to or removed from the list by pressing info The square on the right hand side of a line will be empty to denote a re moved channel and will contain an x for added channels Three different symbols can be shown beside the channel name a new channel that you have not previously visited the chan nel is scrambled the channel is locked by the user Move to the desired channel s using the cursor ...

Страница 19: ...a channel that you have not previously visited the channel is scrambled the channel is locked by the user Select the channel that you want to lock or unlock and press info Repeat the procedure for each channel that you want to lock When you lock a channel on any list the channel will automatically be locked on all other lists Press opt if you want to preview the channel A locked channel will be in...

Страница 20: ...uetooth receiver to send images to and thus it should be able to find the 260 T If it does not find it it may be be cause No has been selected Local device name The 260 T is called Mediamaster on this line This is also the name the external device will find during its search procedure You can enter another name with the number buttons on the remote con trol Press any number button and a keyboard w...

Страница 21: ...download many images after each other They will all be saved in a temporary folder on the hard disk until you are ready When the images are downloaded they may be treated in different ways depending on which button you press If you press the wrong button by mistake just press back and give another command 1 When the downloading is ready and you press back You will be asked if you want to save the ...

Страница 22: ...also select to automatically show the images from an Al bum a so called slide view The images will now be shown one by one with the time interval you selected see Settings on page 21 First select an Album Press ok If you want all images to be shown in the slide view select Mark all If you only want some of the images to be included in the slide view step to each image with the cursor left right an...

Страница 23: ...n Channel Then choose Channel to select the desired TV Radio channel Date yy mm dd Enter the date using the number buttons If you enter an incorrect digit you can erase it using cursor left Start and Stop time hh mm Set the start and stop times us ing the number buttons The different start times can never overlap If you try to enter a start or stop time within a period of time that is already occu...

Страница 24: ...e asked to enter your access code The access code is set to 1234 at the factory A channel search procedure can be performed in different ways Automatic Manual or Advanced manual search Automatic search Highlight the line and press ok to start searching for channels Manual search When you perform a Manual search you first need to enter some pa rameters for the channel search to work The information...

Страница 25: ...the new channel or back if you not want to save it Settings folder TV To open this menu you will be asked to enter your access code The access code is set to 1234 at the factory You can adjust the audio video settings for your receiver Press opt to view the TV picture on the screen TV screen format Select your TV screen format The 4 3 format is the standard format for most TV screens Select 16 9 f...

Страница 26: ...number from the right part of the RF modulator output channel line Channels found during the first time installation will not be able to select When you change the RF channel number you must also change to the same value on the TV If you do not there will be no picture and sound Settings folder Access To open this menu you will be asked to enter your access code The access code is set to 1234 at t...

Страница 27: ...ss code is set to 1234 at the factory The time is adjusted using the cursor up down button half an hour at a time You can also adjust the minutes using the cursor left right button Settings folder SW software update In order to keep the Mediamaster up to date it is occasionally pos sible to download new versions of the system software New soft ware may include new or improved features for existing...

Страница 28: ...ed select a game and press info to get instructions on how to play it Press ok to start a game Press back to finish a game Guides Electronic Programme Guide EPG By pressing the guide button you get access to the Mediamaster TV guide or Radio guide when you are listening to radio channels which will give you different programme information In the EPG you may find information about the coming pro gr...

Страница 29: ...ecording or a normal recording only the chan nel you are watching for the moment can be recorded for exam ple you cannot watch channel 4 and record channel 8 at the same time A big benefit that the built in hard disk possesses but an ana logue video recorder lacks is the possibility for you to start watching the playback of a programme while the record ing of the same programme is still in progres...

Страница 30: ... turned off and automatically stored in the Erasable Bookmark in the Recordings folder The name of the recording is Pause Rec More about using the button during a Pause recording As mentioned above a second press on the button will start the playback of an ongoing Pause recording But if you do not want to be 10 minutes behind the live transmis sion of the programme It is possible to have a quick l...

Страница 31: ...rding will automatically stop at the end of that programme Event next the next programme will be recorded automatically 4 Go to timer will show the Timer settings menu An ongoing recording event will be indicated with rec in the upper right corner of the screen This type of recording is automatically stored in the Perma nent Bookmark in the Recordings folder The name of the re cording will be an a...

Страница 32: ...s the opt button 4 Select which Bookmark you want to move the recording to 5 You can also create new folders within the Bookmarks Rename and delete recordings 1 Open the Bookmark and select recording 2 Press the opt button 3 Select rename and give the recording a new name 4 Select delete to delete the recording Playback of a recording You can affect the way the playback is performed Different spee...

Страница 33: ...on Within the recording bookmarks you can get information about the different recordings by selecting a recording and pressing info Delete all recordings From the Settings bookmark in the Recordings folder you can delete all of the recordings you have made ...

Страница 34: ...dity 25 to 90 rel humidity Operating distance for remote control max 10 meters Dimensions w x d x h 250 x 275 x 80 mm Transmission standards DVB MPEG 2 OFDM RF input modulator output In Output connectors IEC female male RF input frequency 174 300 474 862 MHz RF input power level 78 to 30 dBm RF impedance 75 Ohm Frequency range Loop through 47 862 MHz Frequency range RF modulator 470 862 MHz Output...

Страница 35: ...nate this Agreement at any time by returning at Your own costs this Nokia digital TV receiver and all related materials provided by Nokia Your end user rights automatically and immediately terminate without notice from Nokia if You fail to comply with any provision of this Agreement In such an event You must immediately return at Your own cost this Nokia digital TV receiver and all related materia...

Страница 36: ...Nokia is a registered trademark of Nokia Corporation www nokia com 00003357 00 ...

Отзывы: