background image

Nokia 800 Manual do usuário

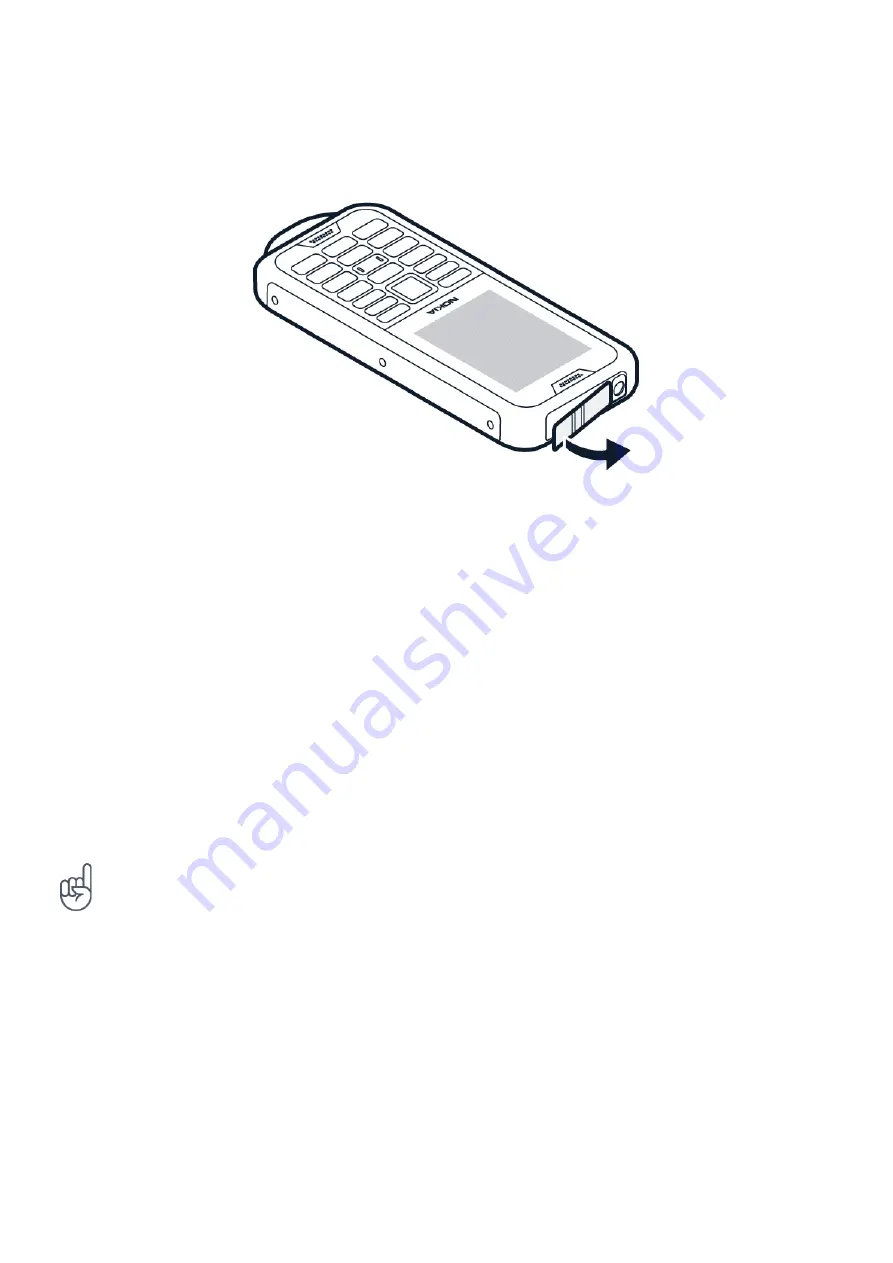
Charge the battery

1. Plug the charger into a wall outlet.

2. Open the top cover of the phone: put your fingernail in the seam between the phone and

the cover and pull the cover down.

3. Connect the charger to the phone. When done, unplug the charger from the phone, then

from the wall outlet.

4. Press the cover firmly back in place to prevent dust or water entering the phone and

damaging it.

If the battery is completely discharged, it may take several minutes before the charging
indicator is displayed.

Dica:

você poderá utilizar o carregamento USB quando uma tomada não estiver disponível. A

eficiência da fonte de carrregamento do USB varia significativamente e pode demorar muito
tempo para que o carregamento seja iniciado e o dispositivo comece a funcionar. Verifique se
o seu computador está ligado.

Save power

To save power:

1. Charge wisely: always charge the battery

fully.

2. Select only the sounds that you need:

mute unnecessary sounds, such as keypad

sounds.

3. Use a wired headset, rather than the

loudspeaker.

© 2020 HMD Global Oy. Todos os direitos reservados.

11

Содержание 800

Страница 1: ...Nokia 800 Manual do usuário Edição 2020 11 01 pt BR ...

Страница 2: ...o seguro do seu dispositivo e da bateria leia os itens Para sua segurança e Informações de segurança e do produto no livreto impresso ou em www nokia com support antes de usar o dispositivo Para saber como começar a usar seu novo telefone leia o guia de acesso rápido 2020 HMD Global Oy Todos os direitos reservados 2 ...

Страница 3: ...e your phone 13 Change the volume 13 Write text 13 Acessibilidade 14 5 Conecte se com amigos e familiares 15 Calls 15 Contacts 15 Send messages 16 Send mail 16 6 Personalizar seu telefone 17 Change the tones 17 Change the look of your home screen 17 7 Câmera 18 Photos 18 Videos 18 8 Internet e conexões 20 Browse the web 20 Bluetooth 20 Wi Fi 20 2020 HMD Global Oy Todos os direitos reservados 3 ...

Страница 4: ...manager 27 Memory 27 12 Security and privacy 28 Security settings 28 13 Informações de segurança e demais informações sobre o produto 29 For your safety 29 Serviços de rede e custos 32 Chamadas de emergência 32 Cuide do seu dispositivo 32 Reciclagem 33 Símbolo de lata de lixo com uma cruz em cima 34 Battery and charger information 34 Crianças 35 Dispositivos médicos 35 Dispositivos médicos implant...

Страница 5: ...ispositivo contra conteúdo prejudicial 35 Veículos 36 Ambientes com risco de explosão 36 Informações sobre certificação SAR 36 Sobre o gerenciamento de direitos digitais 37 Copyrights and other notices 38 2020 HMD Global Oy Todos os direitos reservados 5 ...

Страница 6: ...e This user guide applies to the following models TA 1186 TA 1176 TA 1189 TA 1180 The keys and parts of your phone are 1 Call key 2 Multi function key 3 Left selection key 4 Scroll key 5 Earpiece 6 Flashlight 7 USB connector 8 Headset connector 9 Flash 10 Camera 2020 HMD Global Oy Todos os direitos reservados 6 ...

Страница 7: ...place credit cards or other magnetic storage media near the device because info stored on them may be erased Some of the accessories mentioned in this user guide such as charger headset or data cable may be sold separately The strap with the utility clip available only in selected markets must be used only for carrying the phone Usage for any other purposes is prohibited Do not use the strap witho...

Страница 8: ...s may damage the card and the device and corrupt data stored on the card Open the card tray 1 With your phone facing down put your fingernail in the slot above the SIM and memory card tray cover and pull the cover down 2 Push the tray opener pin in the tray hole and slide the tray out 2020 HMD Global Oy Todos os direitos reservados 8 ...

Страница 9: ...same time when the device is not being used but while one SIM card is active for example making a call the other may be unavailable 3 Slide the tray back in the slot 4 Press the cover firmly back in place to prevent dust or water entering the phone and damaging it Switch on your phone Press and hold the power key until the phone vibrates Select which SIM card to use 1 Press the scroll key and sele...

Страница 10: ...ur SIM card contact your network service provider Screen lock The screen lock helps you protect your phone against unauthorized use You can set your phone to ask for the screen lock code that you define Keep the code secret and in a safe place separate from your phone If you forget the code and your phone is locked your phone will require service Additional charges may apply and all the personal d...

Страница 11: ... discharged it may take several minutes before the charging indicator is displayed Dica você poderá utilizar o carregamento USB quando uma tomada não estiver disponível A eficiência da fonte de carrregamento do USB varia significativamente e pode demorar muito tempo para que o carregamento seja iniciado e o dispositivo comece a funcionar Verifique se o seu computador está ligado Save power To save...

Страница 12: ...h off after a short time 5 Lower the screen brightness 6 When applicable use network connections such as Bluetooth selectively switch the connections on only when you are using them 7 Turn off Wi Fi hotspot when internet sharing is not needed 2020 HMD Global Oy Todos os direitos reservados 12 ...

Страница 13: ...ouble hearing your phone ringing in noisy environments or calls too loud You can change the volume to your liking To change the volume during a call press the scroll key up or down To change the volume of your media apps ringtones alerts and alarms press the scroll key and select Settings Scroll right to Personalization and select Sound Volume To change the volume when listening to the radio or mu...

Страница 14: ...and hold a number key The writing method may vary between applications ACESSIBILIDADE Você pode alterar várias configurações para facilitar o uso do telefone Aumentar ou diminuir o tamanho da fonte Deseja ter fontes maiores no seu telefone 1 Toque em Configurações Acessibilidade 2 Toque em Tamanho da fonte Para aumentar ou diminuir o tamanho da fonte arraste o controle deslizante de Nível de taman...

Страница 15: ...scroll key and select Contacts 2 Select New and whether to save the contact to the phone memory or the SIM card 3 Write the name and phone number of the contact 4 Select SAVE Copy contacts Copy contacts between your SIM card and the phone To copy contacts between your phone and SIM card in the contacts list select Options Copy contacts and select whether to copy contacts from the phone or SIM card...

Страница 16: ...need to remove a character press the back key 4 Select Send If asked select which SIM to use SEND MAIL You can use your phone to read and reply to mail when you re on the go Add a mail account When you use the E Mail app for the first time you are asked to set up your e mail account 1 Press the scroll key and select E Mail 2 Select Next and type in your name and e mail address 3 Select Next and ty...

Страница 17: ...and press the scroll key CHANGE THE LOOK OF YOUR HOME SCREEN You can change the look of your phone with wallpapers Choose a new wallpaper 1 Press the scroll key and select Settings 2 Scroll right to Personalization and select Display Wallpaper 3 Select Camera to take a new photo for the wallpaper Wallpaper to select from pre defined wallpapers or Gallery to choose a wallpaper from the photos on yo...

Страница 18: ... 2 Toque em O botão mostra a configuração do timer Para alterá lo toque nele novamente View a photo you have taken To view the photo right after taking it select Preview To view the photo later on the home screen press the scroll key and select Gallery VIDEOS You don t need a separate video camera record video memories with your phone Record a video Besides taking photos you can also record videos...

Страница 19: ... usuário Watch the recorded video To view the video right after recording select Preview To watch the video later on the home screen press the scroll key and select Video 2020 HMD Global Oy Todos os direitos reservados 19 ...

Страница 20: ...elect Browsing privacy 3 Select Clear browsing history BLUETOOTH Connect your phone with Bluetooth to other devices Switch on Bluetooth 1 Press the scroll key and select Settings Network Connectivity Bluetooth 2 Switch Bluetooth to On 3 Select Nearby devices to find a new device or Paired devices to find a device you have paired your phone with previously WI FI Switch on Wi Fi 1 Press the scroll k...

Страница 21: ...i Fi hotspot 1 Press the scroll key and select Settings Network Connectivity Internet sharing 2 If you have a dual SIM phone select which SIM to use for sharing 3 Turn Wi Fi hotspot on You can now for example switch Wi Fi on in your laptop and connect it to the phone s Wi Fi hotspot 2020 HMD Global Oy Todos os direitos reservados 21 ...

Страница 22: ...eadset acts as an antenna Troubleshooting tip if the radio does not work make sure that the headset is properly connected Press the scroll key and select FM Radio TURN ON To search for available radio stations select Stations Options Scan stations To save a radio station select Stations Options Add to favorites To switch to a saved station select Stations Favorites and the station To adjust the vo...

Страница 23: ... in full screen select Full Screen To adjust the volume select Options Volume To share the video with a friend select Options Share and select to share using e mail messaging or Bluetooth for example Tip Not all video formats are supported RECORDER Record a sound clip 1 Press the scroll key and select Recorder 2 To record select New and press the scroll key 3 To stop recording select Done 2020 HMD...

Страница 24: ...at just scroll to the alarm and select TURN ON The alarm sounds at the time you have specified Countdown timer If you need an alarm but don t want to create one in the alarm clock use the countdown timer You can for example time something that s cooking in the kitchen 1 Press the scroll key and select Clock 2 Scroll right to Timer 3 Select SET and use the scroll key to set the needed time 4 Select...

Страница 25: ...calculator Make a calculation 1 Press the scroll key and select Calculator 2 Enter the first factor of your calculation use the scroll key to select the operation and enter the second factor 3 Press the scroll key to get the result of the calculation NOTES Write a note 1 Press the scroll key and select Note New 2 Write the note and select Save To share the note select Options Share and the sharing...

Страница 26: ...t of available measurements and select the one you want to convert from 4 Scroll to the second measurement press the scroll key and select the measurement you want to convert to 5 Use the number keys to enter the value you want to convert The converter shows the converted value automatically 2020 HMD Global Oy Todos os direitos reservados 26 ...

Страница 27: ...on the memory card if inserted 5 Drag and drop items between your phone and computer FILE MANAGER Need to find those important files quickly Open the File manager Find your files To find your files quickly press the scroll key and select File Manager To find items on your phone select Internal To find items on your memory card select SD Card MEMORY When needed you can check how much used and how m...

Страница 28: ... as credenciais da conta do Google e toque em Avançar ou toque em Ou criar uma nova conta 3 Siga as instruções mostradas no telefone Adicionar uma conta do Google ao telefone 1 Toque em Configurações Contas Adicionar conta Google Se for solicitado confirme o método de bloqueio do dispositivo 2 Digite as credenciais da conta do Google e toque em Avançar ou toque em Ou criar uma nova conta 3 Siga as...

Страница 29: ...or proibido ou quando houver a possibilidade de oferecer perigo ou causar interferência Por exemplo quando estiver a bordo de uma aeronave em hospitais ou próximo a equipamentos médicos combustíveis produtos químicos ou áreas de detonação Respeite todas as instruções em áreas restritas SEGURANÇA AO VOLANTE EM PRIMEIRO LUGAR Respeite todas as leis aplicáveis Sempre mantenha as mãos desocupadas para...

Страница 30: ...enho SERVIÇO AUTORIZADO Somente técnicos autorizados devem instalar ou consertar este produto BATERIAS CARREGADORES E OUTROS ACESSÓRIOS Utilize apenas baterias carregadores e outros acessórios aprovados pela HMD Global Oy para uso com este dispositivo Não conecte produtos incompatíveis 2020 HMD Global Oy Todos os direitos reservados 30 ...

Страница 31: ...estiver em uso SAR Este dispositivo atende às diretrizes de exposição à radiofrequência quando usado em posição normal junto ao ouvido ou quando posicionado a pelo menos 1 5 cm 5 8 polegadas do corpo Os valores máximos de SAR específicos podem ser encontrados na seção Informações sobre certificação SAR deste manual do usuário Para obter mais informações acesse www sar tick com Porta celulares supo...

Страница 32: ...s do telefone estiverem bloqueadas desbloqueie as Vá para um local com intensidade de sinal adequada 1 Pressione a tecla Encerrar repetidamente até a tela inicial ser exibida 2 Digite o número de emergência oficial do seu local atual Os números de chamada de emergência variam de acordo com o local 3 Pressione a tecla de chamada 4 Forneça as informações necessárias com a maior precisão possível Não...

Страница 33: ...e impedir o funcionamento adequado Mantenha o dispositivo longe de ímãs ou campos magnéticos Para proteger seus dados importantes armazene os em pelo menos dois locais separados como seu dispositivo cartão de memória ou computador ou anote as informações importantes Durante a operação prolongada o dispositivo poderá se aquecer Na maioria dos casos isso é normal Para evitar o superaquecimento o dis...

Страница 34: ...porarily Accidental short circuiting can happen when a metallic object touches the metal strips on the battery This may damage the battery or the other object Do not dispose of batteries in a fire as they may explode Obey local regulations Recycle when possible Do not dispose as household waste Do not dismantle cut crush bend puncture or otherwise damage the battery in any way If a battery leaks d...

Страница 35: ...em Sempre manter o dispositivo sem fio a uma distância superior a 15 3 cm 6 polegadas do dispositivo médico Não transportar o dispositivo sem fio em um bolso junto ao tórax Manter o dispositivo sem fio no lado oposto ao do dispositivo médico Desligar o dispositivo sem fio se houver qualquer suspeita de interferência Seguir as instruções do fabricante do dispositivo médico implantado Se você tiver ...

Страница 36: ...pamento celular em seu carro está montado e funcionando corretamente Não guarde nem transporte materiais inflamáveis ou explosivos no mesmo compartimento em que guarda o dispositivo suas peças ou seus acessórios Não coloque o dispositivo nem os acessórios na área de acionamento dos airbags AMBIENTES COM RISCO DE EXPLOSÃO Desligue o dispositivo em ambientes com risco de explosão como ao lado de bom...

Страница 37: ...ualidade disponível Siga as instruções de distância de separação até que o envio seja concluído Durante o uso geral os valores de SAR normalmente ficam bem abaixo dos valores mencionados acima Isso ocorre porque para fins de eficiência do sistema e para minimizar a interferência na rede a potência de operação de seu dispositivo móvel é automaticamente reduzida quando a potência total não é necessá...

Страница 38: ...s a policy of continuous development HMD Global reserves the right to make changes and improvements to any of the products described in this document without prior notice HMD Global does not make any representations provide a warranty or take any responsibility for the functionality content or end user support of third party apps provided with your device By using an app you acknowledge that the a...

Отзывы: