7
CONFIDENTIAL
Copyright © 2007 NOKIA. All rights reserved.
60 Navigator RM-22
Page
(44)
ISSUE 4
Service Manual Level &2
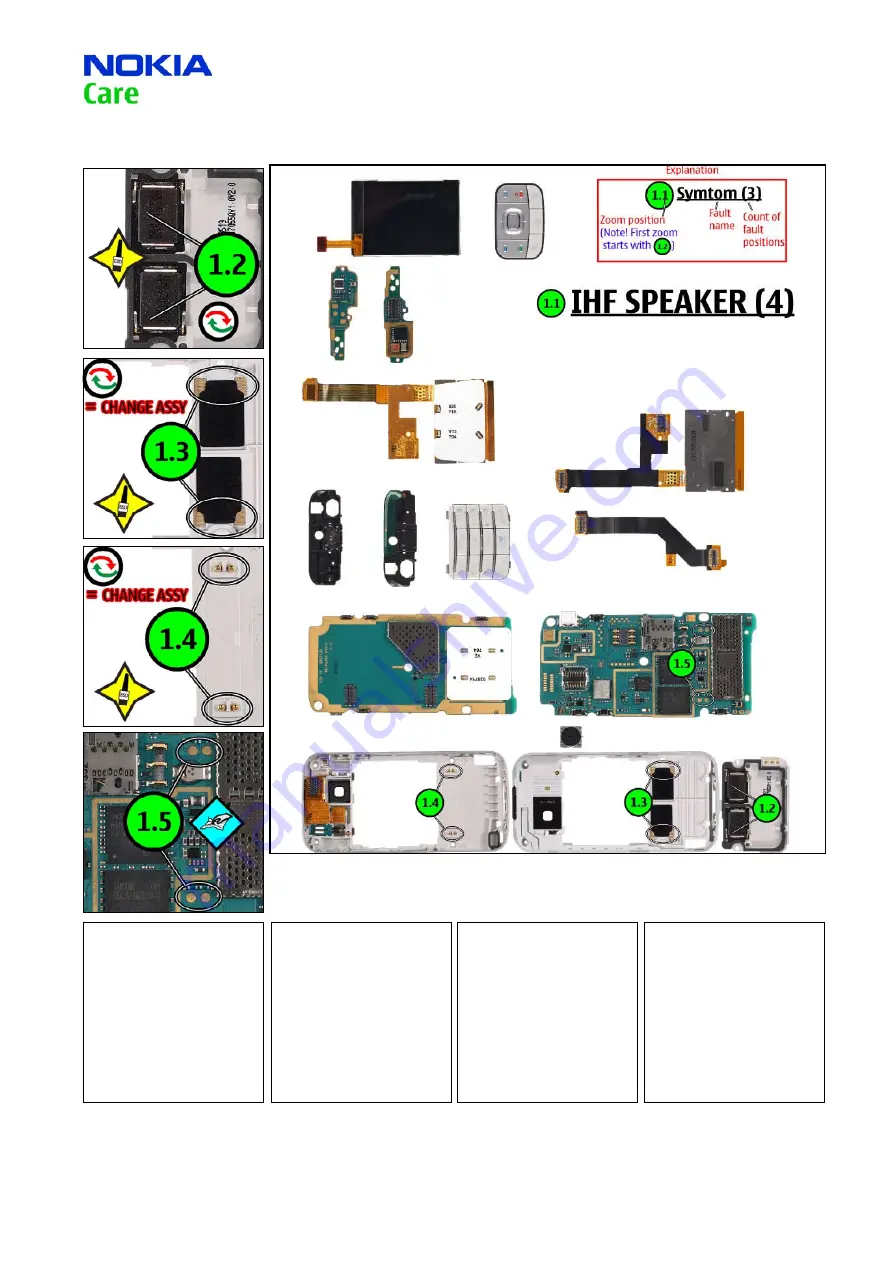
QUICK TROUBLE SHOOTER - IHF SPEAKER
24.
Страница 1: ...Standby Note up to 3 5h up to 11days Depends on network parameters Transceiver characteristics Band EGSM Quad band 850 900 1800 1900MHz WCDMA 2100MHz Display LCD 5 588cm QVGA 2 2 240x320 pixel 16M colors Camera Camera 2 0 Megapixel SMIA95 4x digital zoom CIF Camera Operating System Series 60 3rd Edition Connections Wireless Bluetooth GPS Connector Mini USB Connector AV Connector Memory MicroSD max...
Страница 2: ...d also that this documentation is continuously being updated and modified so watch always out for the newest version Copyright 2007 Nokia All rights reserved Reproduction transfer distribution or storage of part or all of the contents in this document in any form without the prior written permission of Nokia is prohibited Nokia Nokia Connecting People and Nokia X and Y are trademarks or registered...
Страница 3: ...by qualified personnel only 2 Ensure all work is carried out at an anti static workstation and that an anti static wrist strap is worn 3 Use only approved components as specified in the parts list 4 Ensure all components modules screws and insulators are correctly re fitted after servicing and alignment 5 Ensure all cables and wires are repositioned correctly 1 2 3 Nokia requires that service poin...
Страница 4: ...times but it will eventually wear out When the operating time talk time and standby time is noticeably shorter than normal it is time to buy a new battery Use only batteries approved by the phone manufacturer and recharge the battery only with the chargers approved by the manufacturer Unplug the charger when not in use Do not leave the battery connected to a charger for longer than a week since ov...
Страница 5: ...Y 16 LOWER BLOCK DISASSEMBLY 20 LOWER BLOCK ASSEMBLY 25 LEGEND FOR QUICK TROUBLE SHOOTER 30 QUICK TROUBLE SHOOTER POWER ON 31 QUICK TROUBLE SHOOTER CHARGING 32 QUICK TROUBLE SHOOTER NO SERVICE 33 QUICK TROUBLE SHOOTER BLUETOOTH 34 QUICK TROUBLE SHOOTER GPS 35 QUICK TROUBLE SHOOTER EARPIECE 36 QUICK TROUBLE SHOOTER IHF SPEAKER 37 QUICK TROUBLE SHOOTER DISPLAY 38 QUICK TROUBLE SHOOTER ALPHA KEYMAT 3...
Страница 6: ...IDENTIAL Copyright 2007 NOKIA All rights reserved 6110 Navigator RM 122 Page 44 ISSUE 4 Service Manual Level 1 2 See corresponding ITEM CIRCUIT REF in the Spare Parts Service Bulletins on NOL EXPLODED VIEW 7 ...
Страница 7: ... CONFIDENTIAL Copyright 2007 NOKIA All rights reserved 6110 Navigator RM 122 Page 44 ISSUE 4 Service Manual Level 1 2 SPARE PARTS OVERVIEW 8 ...
Страница 8: ... CONFIDENTIAL Copyright 2007 NOKIA All rights reserved 6110 Navigator RM 122 Page 44 ISSUE 4 Service Manual Level 1 2 GENERAL RECYCLING RECOMMENDATION 9 ...
Страница 9: ... CONFIDENTIAL Copyright 2007 NOKIA All rights reserved 6110 Navigator RM 122 Page 44 ISSUE 4 Service Manual Level 1 2 LEVEL 2 SOLDER COMPONENTS 10 ...
Страница 10: ... phone battery DKE 2 Service Cable to connect the PC with the mini USB connector SS 45 Camera removal tool One side is for disassembly the other side for as sembly RJ 102 Soldering Jig Lead free Solder Wire Mandatory for lead free products Level 2 only 0772040 NMP Standard Toolkit V2 For more informations refer to the Service Bulletin SB 011 on NOKIA On line Supplier or manufacturer contacts for t...
Страница 11: ...r RM 122 Page 44 ISSUE 4 Service Manual Level 1 2 SW UPDATE 12 Flash Concept Point of Sales To use FLS 5 Flash Dongle you have to follow the user guide inside the sales package Please check always for the latest version of flash software which is available on NOKIA Online ...
Страница 12: ...ols The SS 93 the dental pick metal tweezers a flat bladed screwdriver a bit holder with a torx size 6 bit and a torque driver 2 Check that no battery is still inserted 3 Open the assembly in order to reach the LOGO LABEL 4 Use the dental pick to release the label at the position shown 5 Do not use it again 6 Gently lift up remove and discard the LOGO LABEL ...
Страница 13: ...dhesive residues before reassembly 8 Unscrew both screws It is not necessary to remove the 2nd screw if only A COVER or FUNCTIONAL KEYMAT needs to be replaced 9 Open the clips of the A COVER 10 Shift it to bottom side direction and lift it up 11 The FUNCTION KEYMAT can be removed easily 12 Unlock the clips of the GPS ANTENNA ASSEMBLY ...
Страница 14: ...Page 44 ISSUE 4 Service Manual Level 1 2 13 It can be removed now 14 The EARPIECE is not glued in and can be replaced easily 15 Open the metal latches of the SHIELD 16 on both sides 17 Lever up the flex connector of the display 18 Unlock the clip of the display through the recess ...
Страница 15: ...ice Manual Level 1 2 19 Now the display can be lifted up 20 The glued in UI FLEX can be removed Note For disconnecting the flex connectors the lower block must be disassembled first The adhesive was assembled for production issues and must not be replaced 21 The disassembly procedure is now completed ...
Страница 16: ...el 1 2 UPPER BLOCK ASSEMBLY 14 1 Assembly 2 Mind the correct positioning when replacing the UI FLEX foils 3 When replacing the LCD FRAME ASSEMBLY mind the correct positioning of the LCD FRAME 4 Position the LCD into its compartment 5 Peel off the protective film 6 Mind the correct positioning of the grounding pad ...
Страница 17: ... 2 7 Close the flex connector 8 Flip over the SHIELD LID 9 Click the snaps into their places Note the correct positioning of the alignment tabs 10 Fit the EARPIECE into the GPS ANTENNA ASSEMBLY 11 Place the GPS ANTENNA ASSEMBLY click the snaps into their places 12 Check that this snap clicked into its place correctly ...
Страница 18: ...M 122 Page 44 ISSUE 4 Service Manual Level 1 2 13 Do not forget placing the CAMERA DUST SHIELD 14 Insert the FUNCTION KEYMAT 15 Insert the assembly into the A COVER beginning from the bottom 16 Click all snaps into their places 17 Insert the screws 18 Set the correct torque ...
Страница 19: ...pyright 2007 NOKIA All rights reserved 6110 Navigator RM 122 Page 44 ISSUE 4 Service Manual Level 1 2 19 Tighten both screws with the correct torque 20 Place a new LOGO LABEL Align it correctly and smooth it down evenly ...
Страница 20: ...orx Plus size 4 bit and a torque driver 2 Start your repair with opening the BATTERY COVER Ensure that no battery is still inserted 3 Note not to damage this pin while proceed 4 This ALPHA KEYMAT can be exchanged without removing any screws Gently lever out and remove it 5 It is possible to remove the USB LID and the MICRO SD DOOR without removing the cover Open the lid first 6 Place the flat blad...
Страница 21: ... In case of trouble shooting at the MAIN ANTENNA ASSY only the screw 3 and 4 must be removed 9 Due to the fact that these screws are using locking compound they must always be replaced after unscrewing 10 Lift up the MAIN ANTENNA COVER ASSEMBLY 11 Both IHF SPEAKER can be removed but fit them with new gaskets before reassemble 12 Shift open again the assembly gently pry open the hidden clips of the...
Страница 22: ...ll connected with the flex foils 14 Disconnect both flex connectors For complete removal of these flex foils the upper block must be disassembled too 15 Now the parts can be separated 16 Lift up the C COVER now 17 The SHIELD LID can be lifted up easily 18 Use appropriate soldering jig or at least the C COVER as support when replacing the CAMERA MODULE ...
Страница 23: ...e 44 ISSUE 4 Service Manual Level 1 2 19 Unlock and remove the CAMERA MODULE with the SS 45 20 The removal of the VIBRA is easy 21 Detach the snap of the LB FLEX MODULE 22 Pry out the FLASH LIGHT 23 Now the LB FLEX MODULE ASSEMBLY can be removed 24 Release the clip of the BT ASSEMBLY ...
Страница 24: ...24 CONFIDENTIAL Copyright 2007 NOKIA All rights reserved 6110 Navigator RM 122 Page 44 ISSUE 4 Service Manual Level 1 2 25 Push out and remove it 26 The disassembly procedure is now complete ...
Страница 25: ...M 122 Page 44 ISSUE 4 Service Manual Level 1 2 1 Assembly 2 Insert the BT ASSEMBLY 3 Fit the connector with LB FLEX MODULE into the B COVER 4 Position the switch as shown 5 Position the FLASH LIGHT 6 Insert the VIBRA Push it into its correct position LOWER BLOCK ASSEMBLY 16 ...
Страница 26: ...UE 4 Service Manual Level 1 2 7 Insert the CAMERA MODULE 8 Note the correct positioning of the alignment tab 9 Slightly push it into its place 10 Insert the SHIELD LID into the C COVER 11 Note the correct positioning of the spring contacts as shown before continue 12 Place the ENGINE MODULE ...
Страница 27: ...mbly into the open position to gain the maximum flex foil lengths 14 Now close the flex connector 15 Carefully close the assembly and hold it into the middle position to gain the maximum flex foil lengths of the second connector 16 Close this connector too 17 Open the slider Position the upper part over the lower part 18 Mind this guides ...
Страница 28: ...he parts before continuing 20 When replacing the IHF Speaker always fit new gaskets and mind the correct positioning of the speakers 21 Click the snaps of the MAIN ANTENNA COVER ASSEMBLY into their place Check the correct position before going on 22 Insert the screws 23 Set the correct torque 24 Note the correct screw order Apply the torque to all screws ...
Страница 29: ...rights reserved 6110 Navigator RM 122 Page 44 ISSUE 4 Service Manual Level 1 2 25 Click the USB LID and MICRO SD DOOR into their places 26 Place the BATTERY COVER 27 While inserting the KEYMAT use the SS 93 only Mind the components underneath ...
Страница 30: ...30 CONFIDENTIAL Copyright 2007 NOKIA All rights reserved 6110 Navigator RM 122 Page 44 ISSUE 4 Service Manual Level 1 2 LEGEND FOR QUICK TROUBLE SHOOTER 17 ...
Страница 31: ...31 CONFIDENTIAL Copyright 2007 NOKIA All rights reserved 6110 Navigator RM 122 Page 44 ISSUE 4 Service Manual Level 1 2 QUICK TROUBLE SHOOTER POWER ON 18 ...
Страница 32: ...32 CONFIDENTIAL Copyright 2007 NOKIA All rights reserved 6110 Navigator RM 122 Page 44 ISSUE 4 Service Manual Level 1 2 QUICK TROUBLE SHOOTER CHARGING 19 ...
Страница 33: ...33 CONFIDENTIAL Copyright 2007 NOKIA All rights reserved 6110 Navigator RM 122 Page 44 ISSUE 4 Service Manual Level 1 2 QUICK TROUBLE SHOOTER NO SERVICE 20 ...
Страница 34: ...34 CONFIDENTIAL Copyright 2007 NOKIA All rights reserved 6110 Navigator RM 122 Page 44 ISSUE 4 Service Manual Level 1 2 QUICK TROUBLE SHOOTER BLUETOOTH 21 ...
Страница 35: ...35 CONFIDENTIAL Copyright 2007 NOKIA All rights reserved 6110 Navigator RM 122 Page 44 ISSUE 4 Service Manual Level 1 2 QUICK TROUBLE SHOOTER GPS 22 ...
Страница 36: ...36 CONFIDENTIAL Copyright 2007 NOKIA All rights reserved 6110 Navigator RM 122 Page 44 ISSUE 4 Service Manual Level 1 2 QUICK TROUBLE SHOOTER EARPIECE 23 ...
Страница 37: ...37 CONFIDENTIAL Copyright 2007 NOKIA All rights reserved 6110 Navigator RM 122 Page 44 ISSUE 4 Service Manual Level 1 2 QUICK TROUBLE SHOOTER IHF SPEAKER 24 ...
Страница 38: ...38 CONFIDENTIAL Copyright 2007 NOKIA All rights reserved 6110 Navigator RM 122 Page 44 ISSUE 4 Service Manual Level 1 2 QUICK TROUBLE SHOOTER DISPLAY 25 ...
Страница 39: ...39 CONFIDENTIAL Copyright 2007 NOKIA All rights reserved 6110 Navigator RM 122 Page 44 ISSUE 4 Service Manual Level 1 2 QUICK TROUBLE SHOOTER ALPHA KEYMAT 26 ...
Страница 40: ...40 CONFIDENTIAL Copyright 2007 NOKIA All rights reserved 6110 Navigator RM 122 Page 44 ISSUE 4 Service Manual Level 1 2 QUICK TROUBLE SHOOTER VOLUME KEYS 27 ...
Страница 41: ...41 CONFIDENTIAL Copyright 2007 NOKIA All rights reserved 6110 Navigator RM 122 Page 44 ISSUE 4 Service Manual Level 1 2 QUICK TROUBLE SHOOTER MY OWN KEY 28 ...
Страница 42: ...42 CONFIDENTIAL Copyright 2007 NOKIA All rights reserved 6110 Navigator RM 122 Page 44 ISSUE 4 Service Manual Level 1 2 QUICK TROUBLE SHOOTER CAMERA KEY 29 ...
Страница 43: ...43 CONFIDENTIAL Copyright 2007 NOKIA All rights reserved 6110 Navigator RM 122 Page 44 ISSUE 4 Service Manual Level 1 2 QUICK TROUBLE SHOOTER CAMERA 30 ...
Страница 44: ...44 CONFIDENTIAL Copyright 2007 NOKIA All rights reserved 6110 Navigator RM 122 Page 44 ISSUE 4 Service Manual Level 1 2 QUICK TROUBLE SHOOTER CIF CAMERA 31 ...