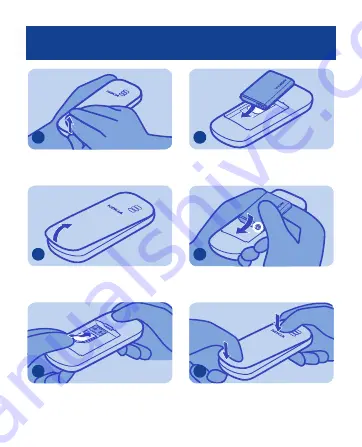
Insert the SIM card and battery
Put your finger in the gap at the
bottom of the phone.
1
Lift the back cover.
2
Slide in the SIM card.
3
Line up the contacts.
4
Push the battery in.
5
Press down to click.
6
Страница 1: ...Nokia 103 User Guide Issue 1 0 EN ...
Страница 2: ...Keys and parts 2 3 4 5 6 7 1 Select Back 1 Earpiece 2 Display 3 End Power key 4 Keypad 5 Navi key navigation key 6 Call key 7 Selection keys 2 ...
Страница 3: ...10 9 8 11 12 8 Flashlight 9 Charger connector 10 Microphone 11 Loudspeaker 12 Headset connector You may need to buy the headset as a separate accessory 3 ...
Страница 4: ...Insert the SIM card and battery Put your finger in the gap at the bottom of the phone 1 Lift the back cover 2 Slide in the SIM card 3 Line up the contacts 4 Push the battery in 5 Press down to click 6 4 ...
Страница 5: ...ger to the phone 2 Phone indicates full charge You can use the phone while it is charging 3 Switch on 2 seconds Press and hold the power key 1 OK Back 00 09 To set the hour press up or down 2 OK Back 15 00 To set the minutes press right and then press up or down Press OK 3 5 ...
Страница 6: ... up or down Press OK 5 Menu Go to 15 00 Phone is ready to use 6 Lock or unlock keypad Menu Go to 15 00 To avoid accidental pressing of keys use the keypad lock Menu Go to Press Menu and then quickly press 1 Keypad locked The keypad locks To unlock the keypad repeat step 1 2 6 ...
Страница 7: ... number that you have 012345 Clear Options Enter the phone number 1 Calling End call 0123456789 Press 2 A friend s phone rings 3 9876543210 Silence calling To answer press 4 You can enjoy chatting with your friend To end the call press 5 7 ...
Страница 8: ...call or when listening to the radio Volume Press left for quieter right for louder 1 Better 2 Use the loudspeaker Others in the room can join in with a call 0123456789 Options Loudsp 00 00 05 During a call press Loudsp 1 Place the phone on a table 2 8 ...
Страница 9: ...free call with a headset 0123456789 calling Silence Connect a headset 1 Calling End call 0123456789 Make a call 2 Save a name and number Add a friend s number to your phone Menu Go to 12 30 Press Menu 1 Select Exit Messages Press right 2 9 ...
Страница 10: ...ntacts 3 Search Select Back Press right 4 Select Back Add contact Select Add contact 5 Contact name OK Clear Mi abc Write the name 6 Contact name OK Clear Mike abc Press OK 7 Phone number OK Clear 0123 17 Enter the phone number 8 10 ...
Страница 11: ...eceive a call the name number and picture are shown 11 Save numbers in five separate phonebooks To use separate phonebooks save contacts in the phone memory Select Back Settings Select Contacts press right and select Settings 1 Select Back 2 Phone Memory in use SIM card To set current memory to phone memory select Memory in use Phone 2 11 ...
Страница 12: ...elect Phonebook style 4 Select Back Normal 2 Multi Phonebk Style Select Multi Phonebk 5 Multi Phonebook activated Multi Phonebook is ready to use 6 Select Back Current phonebook 2 Multi Phonebook Shared cont Press down and select Current phonebook 7 Select Back Shared cont 2 Phonebk 1 Phonebk 2 Filter Select a phonebook 8 12 ...
Страница 13: ...own and select Manage contacts 10 Select Back Dad 87654321 Mum 12345678 Select a contact 11 Unmark Done Shared cont 2 Phonebk 1 Phonebk 2 Mum Mark a phonebook and press Done 12 Yes No Save changes Save the changes To save more contacts repeat steps 10 12 13 Select Back Rename phonebooks 4 Multi Phonebook Select Rename phonebooks 14 13 ...
Страница 14: ...amily 12 Write the name and press OK The phonebook name is changed 16 Details Back Dad 87654321 Mum 12345678 You can see the saved contacts in the current phonebook 17 Change the ringtone Menu Go to 10 50 Press Menu 1 Select Exit Messages Press right 2 Select Exit Settings Select Settings 3 14 ...
Страница 15: ...a tune Ringing tone Tone settings Select Ringing tone 5 OK Back 2 Airy Brook Nokia tune Ringing tone Select a ringtone and stop there for a moment to hear the sound 6 OK Back Brook Coconut 3 Airy Ringing tone Select a ringtone and press OK 7 Done Ringtone selected 8 15 ...
Страница 16: ...tings Phone settings Language the language and OK See iv in General Information Insert a space press 0 Change a word press repeatedly until the word is shown Insert a number press and hold the number key Insert a special character press and hold Change the text input method press repeatedly Use predictive text select Options Dictionary and the language Press a key for each letter When the word is ...
Страница 17: ... message Select Create message 3 Hello Anna Clear abc 905 1 Options Press the keys to write your message 4 Hello Anna how are you today are you still going to Clear abc 868 1 Options Press Options and select Send See i in General Information 5 Phone number Clear 0123456789 11 OK Enter a phone number Press OK 6 17 ...
Страница 18: ...age press Show 8 Options Back Hello Anna how are you today are you still going to To view the rest of the message press down 9 Set an alarm Use your phone as an alarm clock to wake you up Menu Go to 12 30 Press Menu 1 Select Exit Clock Press right and select Clock 2 18 ...
Страница 19: ... 3 OK Back 00 08 To set the hour press up or down 4 OK Back 08 30 To set the minutes press right and then up or down 5 Back OK 08 30 Press OK 6 Alarm on The alarm is ready 7 Stop Snooze 08 30 Alarm An alarm sounds at the set time Press Stop 8 19 ...
Страница 20: ...ds Menu Go to 12 30 Press Menu 1 Select Exit Messages Press right 2 Select Exit Extras Select Extras and press right 3 Select Back Calendar Select Calendar 4 Options Back Week 3 Jan M 20 T W T F S S 18 19 21 22 23 24 25 26 27 28 29 30 31 Go to the date and press Options 5 20 ...
Страница 21: ... Meeting abc Write a name for the reminder 7 OK Back Alarm on Alarm off Set alarm 1 To set an alarm select Alarm on 8 OK Back 00 09 To set the hour press up or down 9 OK Back 20 30 To set the minutes press right and then press up or down 10 Reminder added Press OK The alarm is ready 11 21 ...
Страница 22: ...t cable works as the radio antenna 1 Menu Go to 12 30 Press Menu and press right 2 Select Exit Radio Select Radio The radio is on 3 Select Back Switch off Save channel Auto tuning FM radio 3 To find radio channels press Options and select Auto tuning 4 FM radio OK Back Auto tuning 106 60 MHZ To select the next channel press down 5 22 ...
Страница 23: ...annel To save more channels repeat steps 4 8 8 Select Back FM radio Delete channel Rename Loudspeaker 8 To use the loudspeaker press Options and select Loudspeaker 9 Radio 1 FM radio Save channel Auto tuning Select Back Switch off off Toclose the radio press Options and select Switch off 10 Snooze Stop Alarm 08 30 Tip To wake up to the sound of the radio press Options and select Clock radio Set th...
Страница 24: ...phone to make a calculation Menu Go to 12 30 Press Menu 1 Select Exit Messages Press right 2 Select Exit Extras Select Extras 3 Select Back Calculator Select Calculator 4 Equals Clear 50 x Press keys to enter numbers 5 24 ...
Страница 25: ...down 6 Equals Clear 12 x 50 x Enter the second number 7 Equals Clear 12 x 600 50 x Press Equals 8 Switch off Menu Go to 15 35 To save battery power switch the phone off 2 seconds Switch off Press and hold the power key 1 The phone switches off 2 25 ...
Страница 26: ...r more details see www nokia asia com accessories Practical rules about accessories Keep all accessories out of the reach of small children When you disconnect the power cord of any accessory grasp and pull the plug not the cord Check regularly that accessories installed in a vehicle are mounted and are operating properly Installation of any complex car accessories must be made by qualified person...
Страница 27: ...hich battery is exposed network conditions and many other factors and may be significantly shorter than those specified above Ringing tones hands free call handling use in digital mode and other features will also consume the battery and the amount of time a device is used for calls will affect its stand by time Likewise the amount of time that the device is turned on and in the standby mode will ...
Страница 28: ...ur ear when the loudspeaker is in use Battery removing Switch the device off and disconnect the charger before removing the battery Product and safety information Feature specific instructions Your device may have internal and external antennas Avoid touching the antenna area unnecessarily while the antenna is transmitting or receiving Contact with antennas affects the communication quality and ma...
Страница 29: ...atures When the device warms to its normal temperature moisture can form inside the device and damage electronic circuits Do not attempt to open the device other than as instructed in the user guide Unauthorised modifications may damage the device and violate regulations governing radio devices Do not drop knock or shake the device Rough handling can break internal circuit boards and mechanics Onl...
Страница 30: ...C 59 F and 77 F Extreme temperatures reduce the capacity and lifetime of the battery A device with a hot or cold battery may not work temporarily Accidental short circuiting can happen when a metallic object touches the metal strips on the battery for example if you carry a spare battery in your pocket Short circuiting may damage the batteryortheconnecting object Do not dispose of batteries in a f...
Страница 31: ... may contain small parts Keep them out of the reach of small children Medical devices Operation of radio transmitting equipment including wireless phones may interfere with the function of inadequately protected medical devices Consult a physician or the manufacturer of the medical device to determine whether they are adequately shielded from external RF energy Switch off your device when regulati...
Страница 32: ...nic systems in motor vehicles such as electronic fuel injection electronic antilock braking electronic speed control and air bag systems For more information check with the manufacturer of your vehicle or its equipment Only qualified personnel should install the device in a vehicle Faulty installation or service may be dangerous and may invalidate your warranty Check regularly that all wireless de...
Страница 33: ...ts kilogram W kg averaged over 10 grams of tissue Tests for SAR are conducted using standard operating positions with the device transmitting at its highest certified power level in all tested frequency bands The actual SAR level of an operating device can be below the maximum value because the device is designed to use only the power required to reach the network That amount changes depending on ...
Страница 34: ...tted by applicable law under no circumstances shall Nokia or any of its licensors be responsible for any loss of data or income or any special incidental consequential or indirect damages howsoever caused The contents of this document are provided as is Except as required by applicable law no warranties of any kind either express or implied including but not limited to the implied warranties of me...