background image

CHILD LOCK

Press and hold the              buttons for 3 seconds until       appears to lock the heater 
controls. Repeat the procedure to unlock.

FACTORY RESET

To restore factory settings, press the      button for 3 seconds to enter the menu. Select the 
factory setting icon      using the              buttons.  

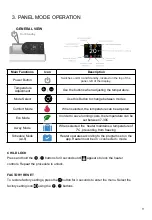
3. PANEL MODE OPERATION 

GENERAL VIEW 

Main Functions

Icon

Description 

Power Button 

Switches unit On and Off, located on the top of the 

panel, left of the display. 

Temperature 

Adjustment 

Use the buttons when adjusting the temperature. 

Mode Select

Use this Button to change between modes 

Comfort Mode 

When selected, the temperature can be adjusted.  

Eco Mode

In order to save running costs, the temperature can be 

set between 7-30C.

Away Mode 

When selected the  heater maintains a temperature of 

7°C, preventing from freezing.

Schedule Mode

(wi-fi)

Heater operates according to the program set on the 

app. Heater must be on « connected » mode

9

On/Off

On / Standby

Switches unit On and Standby, located on the top of the 

panel, left of the display.

9.

Содержание 7358-3TWIFI

Страница 1: ... Operating Installation Instructions In Order To Qualify For Your Lifetime Warranty Please Visit our Website and complete the Online Registration Visit us at www olimpiasplendid com au Distributed by Olimpia Splendid Australia Pty Ltd NOIROT SPOT PLUS WI FI Model with Wi Fi ...

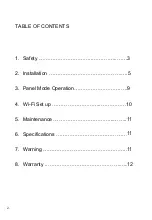
Страница 2: ...TABLE OF CONTENTS 1 Safety 3 2 Installation 5 3 Panel Mode Operation 9 4 Wi Fi Set up 10 5 Maintenance 12 6 Specifications 12 7 Warning 12 8 Warranty 13 2 2 11 11 11 12 ...

Страница 3: ...t not play with the heater unless supervised Children must not perform user cleaning and maintenance Ensure children aged under 3 are kept at a safe distance unless they are under constant supervision Children aged between 3 and 8 may only turn the heater on or off providing it has been placed or installed in the normal position for its operation and providing they are under supervision or they ha...

Страница 4: ... If the power supply cable is damaged it must be replaced by the manufacturer its after sales service or a person with similar qualifications in order to prevent any potential hazards Avoid installing the heater in a draught which may otherwise affect its thermostat control This direct electric heater is designed for ambient heating of residential type rooms or similar in new or existing single an...

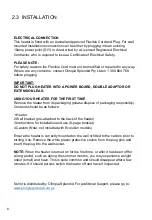
Страница 5: ...suitable fixing method according to the surface you mount the heater on note fixings not included Place the heater on to the bracket and clip into position Note To centre your appliance laterally on the wall use the hole marked 2 The heater must not be located immediately below a socket outlet as per requirement of Clause 7 12 of AS NZS 60335 2 30 5 Model Power W Height mm A mm B mm C mm 7358 3TWI...

Страница 6: ...ty Thermal Cut Out Switch is activated the heater will automatically switch off to limit the temperature to a safe value To reset the thermal cut out simply switch the heater off unplug it from the power point and remove the obstruction s Plug the heater back in and switch it on The thermal cut out switch will reset after a few minutes and the heater will function normally This heater is IPX4 rate...

Страница 7: ...h the bottom of the castors into the base of the heater Note This heater is tested and approved for use with the optional Easy Glide Castors Please follow the fitting instructions supplied with the castors closely ensuring the BLACK CLIPS are correctly installed Note that once the BLACK CLIPS are fixed into position the castors CANNOT be removed without breaking them WARNING DO NOT use the heater ...

Страница 8: ... its packaging please dispose of packaging responsibly Contents should be as follows 1 Heater 2 Wall bracket pre attached to the back of the heater 3 Instructions for installation and use 8 page booklet 4 Castors Note not included with Evolution models Ensure the heater is correctly mounted on the wall or fitted to the castors prior to turning it on Remove the white plastic protective covers from ...

Страница 9: ... the panel left of the display Temperature Adjustment Use the buttons when adjusting the temperature Mode Select Use this Button to change between modes Comfort Mode When selected the temperature can be adjusted Eco Mode In order to save running costs the temperature can be set between 7 30C Away Mode When selected the heater maintains a temperature of 7 C preventing from freezing Schedule Mode wi...

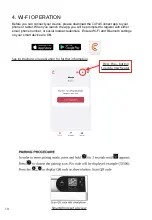
Страница 10: ... Connect app to your phone or tablet When you launch the app you will be prompted to register with either email phone number or social media credentials Ensure Wi Fi and Bluetooth settings on your smart device are ON 10 Smartphone set up view Once scanned serial number and pin code are displayed Set a name for your heater and press save Smartphone commences pairs with heater CAPA See instructions ...

Страница 11: ...dels Power W Current A Height mm Width mm Depth mm 7358 3TWIFI 1000 4 2 440 420 80 7358 5TWIFI 1500 6 3 440 585 80 7358 7TWIFI 2000 8 3 440 745 80 7358 8TWIFI 2400 10 0 440 900 80 7 WARNING Do not use this heater if it has been dropped Do not use if there are visible signs of damage to the heater Use this heater on a horizontal and stable surface on castors or fix it to the wall as applicable Do n...

Страница 12: ...nder warranty the place of purchase of the product will order a replacement heater to which Noirot Australia at our cost will deliver the heater to the place of purchase 4 The consumer will then be required at their cost to pick up the replacement heater from the place of purchase 5 If the heater is faulty but not deemed to be under warranty an explanation will be provided to the consumer and that...

Страница 13: ......

Отзывы: