TPC6000
‐
A101
User
Manual
18
2.3
Hard
drive
installation
This
section
outlines
the
installation
of
the
hard
drive
in
the
TPC6000
‐
A101.
To
install
the
hard
drive,
please
follow
the
steps
below:
Step1:
Flip
over
this
device
and
you
can
see
its
back.
Step
2:
Unfasten
the
4
silver
retention
screws
on
the
left
and
right
side.
(Figure
2
‐
1)
Step
3:
Lift
the
cover
to
remove.
Step
4:
Locate
the
HDD
bracket.
Step
5:
Insert
the
SATA
connector
at
the
end
of
the
HDD
into
the
bracket
to
connect
the
motherboard
SATA
connector
to
the
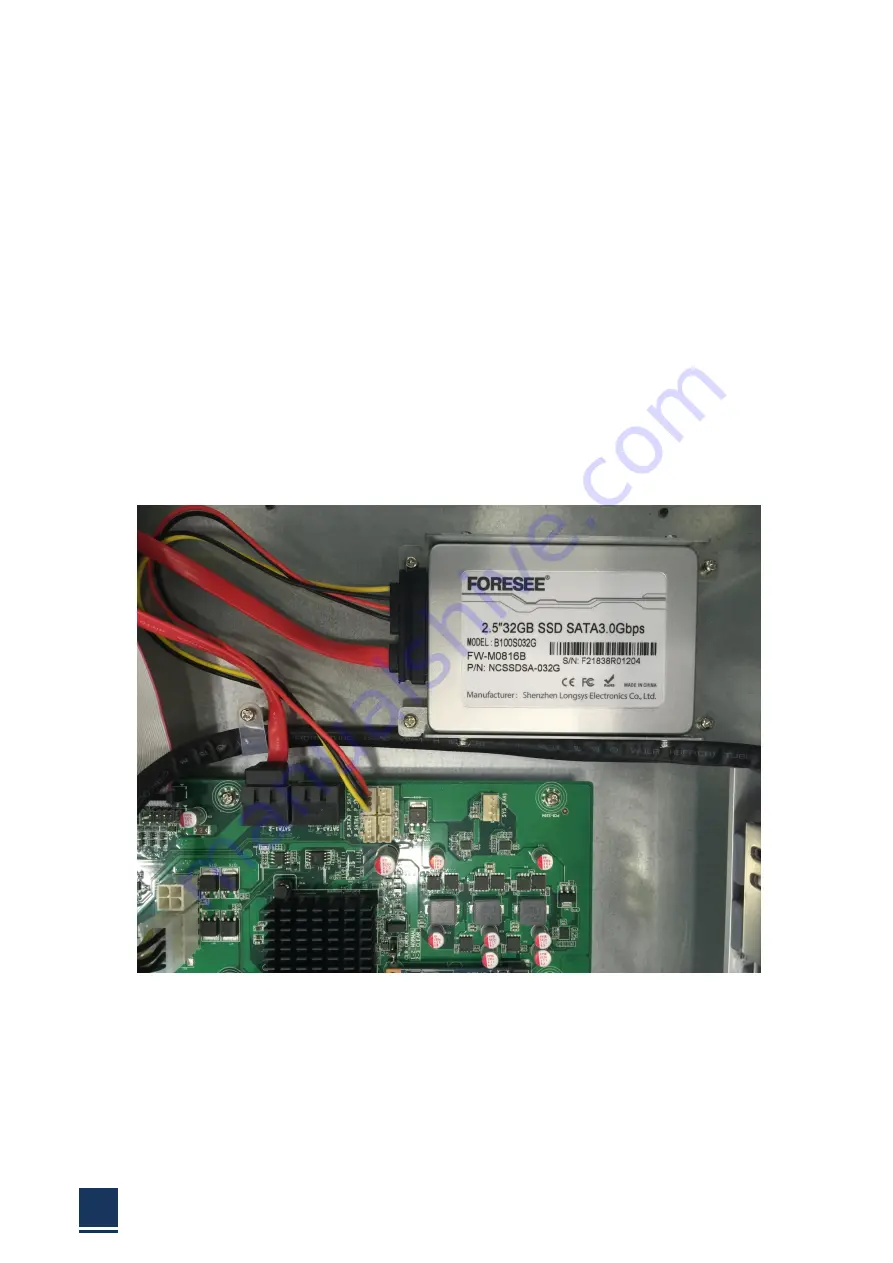
hard
drive
SATA
connector
as
shown
in
the
figure
below.
Step
6:
Plant
the
screw
on
the
HDD
bracket.
Step
7:
Replace
the
covers
and
screws.
2.4
SSD
installation
by
using
mSATA
The
installation
for
a
SSD
is
described
in
this
section.
Step
1:
Remove
the
HDD
bracket
just
like
mentioned
on
the
“Hard
drive
installation
steps”.
Step
2:
Insert
the
mSATA
SSD
into
the
mSATA
slot
as
shown
in
the
Figure
2
‐
4
below:
Содержание TPC6000-A101
Страница 1: ...TPC6000 A101 User Manual 1 User ManualVer1 0 TPC6000 A101 Robust Industrial Panel PC...
Страница 8: ...TPC6000 A101 User Manual 8 Chapter 1 OVERVIEW...
Страница 14: ...TPC6000 A101 User Manual 14 1 6 Dimensions Figure 1 5 TPC6000 A101 dimensions...
Страница 15: ...TPC6000 A101 User Manual 15 Chapter 2 INSTALLATIONS...
Страница 34: ...TPC6000 A101 User Manual 34 Press NEXT to continue...
Страница 39: ...TPC6000 A101 User Manual 39 Press YES to agree the License agreement then go to the next step...
Страница 41: ...TPC6000 A101 User Manual 41 Press YES to continue...
Страница 44: ...TPC6000 A101 User Manual 44 Press NEXT to continue...
Страница 46: ...TPC6000 A101 User Manual 46...
Страница 49: ...TPC6000 A101 User Manual 49 Press NEXT to continue Press INSTALL to continue...
Страница 52: ...TPC6000 A101 User Manual 52 Press Next to continue and don t forget to agree with the license agreement...
Страница 55: ...TPC6000 A101 User Manual 55 Chapter 3 BIOS Setup...
Страница 59: ...TPC6000 A101 User Manual 59 Figure 3 3 Advanced BIOS Features Setup Screen 3 3 1 PCI Subsystem Setting...
Страница 60: ...TPC6000 A101 User Manual 60 Figure 3 3 1PCI Subsystem Configuration Setting...
Страница 61: ...TPC6000 A101 User Manual 61 3 3 2 ACPI Setting Figure 3 3 2ACPI Configuration Setting...
Страница 62: ...TPC6000 A101 User Manual 62 3 3 3 CPU Configuration Setting Figure 3 3 3CPU Configuration Setting...
Страница 64: ...TPC6000 A101 User Manual 64 3 3 5 USB Configuration Figure 3 3 5USB Configuration...
Страница 66: ...TPC6000 A101 User Manual 66 3 3 7 PC Health Status Figure 3 3 7 PC Health status...
Страница 67: ...TPC6000 A101 User Manual 67 3 3 8 PPM Configuration Figure 3 3 8 PPM Configuration...
Страница 68: ...TPC6000 A101 User Manual 68 3 4 Chipset Settings hostbridge Figure 3 4 Chipset Settings...
Страница 69: ...TPC6000 A101 User Manual 69 3 4 1 Intel graphic configuration...
Страница 71: ...TPC6000 A101 User Manual 71 3 5 Chipset settings south bridge Figure 3 5 Chipset Settings...
Страница 73: ...TPC6000 A101 User Manual 73 3 5 2 Power on configuration Figure 3 5 3Power on Settings...
Страница 75: ...TPC6000 A101 User Manual 75 Figure 3 5 3 Boot configuration...
Страница 76: ...TPC6000 A101 User Manual 76 3 6 Security settings Figure 3 6 Security settings...
Страница 79: ...TPC6000 A101 User Manual 79 Chapter 4 System Maintenance...
Страница 81: ...TPC6000 A101 User Manual 81 A Safety Precautions...
Страница 85: ...TPC6000 A101 User Manual 85 B ALC662 Digital Microphone Configuration...
Страница 90: ...TPC6000 A101 User Manual 90 C Watchdog Timer...
Страница 93: ...TPC6000 A101 User Manual 93 D Hazardous Materials Disclosure...
Страница 96: ...TPC6000 A101 User Manual 96 Chapter 5 Appendix A...


