NN STINGER CS150 Скачать руководство пользователя страница 12

www.stingerworld.com 

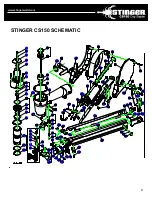
STINGER CS150 PARTS LIST 

10 

Ref. 

Number

NNC Part 

Number

Description

Parts Kit

Ref. 

Number

NNC Part 

Number

Description

Parts Kit

01

0136665

Screw

47

0135912

Feed Piston

02

0135851

Washer

48

0135913

O-Ring

*

03

0136635

Exhaust Deflector

49

0135914

Spring

04

0137973

O-Ring

*

50

0135915

Piston Stop

*

05

0135854

Washer

51

0135916

Feed Piston Cover

06

0137953

Cap Screw(4)

52

0135917

Retaining Ring

07

0135856

Flat Washer(4)

53

0137986

O-Ring

*

08

0137899

Cap

54

0135918

Hold Down Spring

09

0136627

Exhaust Seal

*

55

0135925

Feed Chute

10

0136628

O-Ring

*

56

0137957

Lock Nut

11

0136630

Poppet Spring

57

0135926

Screw(2)

12

0136643

Poppet O-Ring

*

58

0136608

Screw(5)

13

0136642

Poppet

59

0135919

Magazine Right

14

0137976

Piston Stop O-Ring

*

60

0135921

Magazine Cover

15

0137979

Cylinder Seal O-Ring

*

61

0135922

Magazine Left

16

0553031

Guide Spacer

62

0135923

Screw(2)

17

0136675

Cylinder

63

0136672

Nut

18

0137969

Cylinder O-Ring

*

64

0136631

Spring Clip

19

0553029

Cylinder O-Ring

*

65

0136673

Negator Spring

20

0136615

Piston O-Ring

*

66

0136648

Negator Spring Drum

21

0137898

Piston & Driver Assembly

67

0135892

Screw(5)

22

0553001

Bumper

*

68

0135893

Static Front Plate

23

0136657

Return Seal

69

0136654

O-Ring

*

24

0137966

Gasket

*

70

0136624

Step Pin

25

0137897

Body

71

0136637

Latch Assembly

26

0136621

O-Ring(2)

*

72

0136637

Removable Front Plate

27

0136645

Barb Fitting(2)

73

0136652

Pin

28

0135897

Safety Guide

74

0136656

Wear Plate

29

0136658

Spring

75

0136653

Pin

30

0137896

Safety

76

0137892

Feed Chute Basket

31

0137895

Safety Assembly

77

0136660

Screw

32

0135947

Washer

78

0137891

Magazine Cover

33

0135948

Belt Clip

79

0137890

Cover Rod

34

0136623

Trigger Pin

80

0137889

Magazine

35

0136653

Pin

81

0135885

Spring

36

0135911

O-Ring(2)

*

82

0137888

Button

37

0136640

Bleeder Valve

83

0137887

Housing

38

0136676

O-Ring

*

84

0136659

Spring

39

0136622

Spring

85

0136651

Fixed Spacer

40

0136620

Plunger

86

0136644

Plug

41

0136650

Trigger Assembly

87

0136639

Spring

42

0137894

Tubing

88

0137886

Pusher

43

0135907

Pin

89

0136649

Spacer

44

0137893

Cap Feeder

90

0137885

Bracket

45

0137911

Spring

91

0136611

Washer

46

0135910

Feed Cylinder

92

0135924

Screw

93

0136667

Return Seal

 * Parts included in AS-97384 O-ring and Seal Kit 

Содержание STINGER CS150

Страница 1: ...PLEASE READ This manual contains important information about product safety www stingerworld com Operation Maintenance Safety Warranty CS150 CAP STAPLER OWNER S MANUAL Revised 6 2013...

Страница 2: ...er s Manual before operating or maintaining the STINGER CS150 Cap Stapler The CS150 is intended for securing housewrap foamboard and roofing felt only Improper use of the CS150 could result in serious...

Страница 3: ...BLE OF CONTENTS Welcome 1 Important Information 2 Tool Specifications 5 Loading the Tool 6 Operating the Tool 7 STINGER CS150 Schematic 9 STINGER CS150 Parts List 10 Maintenance and Storage 13 Warrant...

Страница 4: ...ol operator and all other personnel in the work area To prevent accidental injuries Handle the tool with care Always assume that the tool contains fasteners Always disconnect the air hose from the STI...

Страница 5: ...operating air pressure of the tool Pressure drops in the air supply can reduce the tool s driving power Use a pressure regulator and gauge to allow visual inspection of the air pressure being delivere...

Страница 6: ...eners Never point the tool toward yourself or any other persons Never cycle the tool unless it is in contact with the work piece Never use the tool as a hammer or wedging device or drop to the floor f...

Страница 7: ...only Each 2000 count StaplePac consists of 20 strips of 7 8 1 1 4 and 1 1 2 18 gauge staples 100 staples per strip and 10 reels of 1 diameter plastic collated caps 200 caps per reel 5 1 Magazine 2 Ma...

Страница 8: ...e cap coil is placed over the cap guide area of the Magazine Insert lead cap into the Feed Chute Slide caps along the Feed Chute with fingers until they engage the Cap Feeder Pull the Cap Feeder back...

Страница 9: ...l using a quick connect fitting and check the air pressure reading on the regulator to ensure it does not exceed 105 PSI Check the tool for any air leaks 8 Place the tool empty of fasteners in operati...

Страница 10: ...ece 12 To adjust the depth of penetration regulate the air pressure at the regulator and or disconnect the air hose adjust the depth control screw connect the air hose and cycle the tool on a scrap wo...

Страница 11: ...www stingerworld com 9 STINGER CS150 SCHEMATIC...

Страница 12: ...20 0136615 Piston O Ring 66 0136648 Negator Spring Drum 21 0137898 Piston Driver Assembly 67 0135892 Screw 5 22 0553001 Bumper 68 0135893 Static Front Plate 23 0136657 Return Seal 69 0136654 O Ring 24...

Страница 13: ...ur check the piston O ring for adequate grease lubrication 4 Never use any parts other than genuine STINGER replacement parts To order call 800 746 5659 5 Periodically clean the Magazine and Nose of t...

Страница 14: ...S 1 The beginning date in which the warranty is in force is the date of purchase 2 The warranty is not transferable 3 The warranty is voided by any of the following a Abuse misuse or damage to the too...

Страница 15: ...Tighten cap screws Remove fasteners from Magazine Open Quick Clear Lever if applicable remove jammed fastener and close Latch Load tool Check to make sure there is adequate air supply Replace Bumper i...

Страница 16: ...n SW Grand Rapids MI 49519 USA Phone 800 968 6245 Fax 616 531 5970 Contact Inside Sales at 800 746 5659 to place an order for replacement parts Visit our website at www nationalnail com to learn more...

Страница 17: ...OR FAVOR LEA Este manual tiene informaci n importante sobre la seguridad del producto www stingerworld com Operaci n Mantenimiento Seguridad Garantia CS150 CAP STAPLER MANUAL DEL USUARIO Revidado 6 20...

Страница 18: ...s de operar o mantener la pistola engrapadora STINGER CS150 Cap Stapler La CS150 est dise ada para sujetar s lo membranas hidr fugas planchas de espuma y tela asf ltica El uso indebido de la CS150 pod...

Страница 19: ...n Importante 2 Epecificaciones de la Herramienta 5 C mo Cargar la Herramienta 6 Operaci n de la Herramienta 7 Esquema de la STINGER CS150 9 Lista de Piezas de la STINGER CS150 10 Mantenimiento y Almac...

Страница 20: ...la herramienta y el resto del personal en el rea de trabajo Para evitar lesiones accidentales Maneje con cuidado la herramienta Asuma siempre que la herramienta contiene sujetadores Desconecte siempr...

Страница 21: ...s de presi n en el suministro de aire pueden reducir la potencia de accionamiento de la herramienta Utilice un regulador de presi n y man metro para obtener una inspecci n visual de la presi n de aire...

Страница 22: ...acia usted mismo ni hacia cualquier otra persona Nunca haga funcionar la herramienta a menos que est en contacto con la pieza de trabajo Nunca use la herramienta como un martillo o dispositivo de cu a...

Страница 23: ...tiene 20 tiras de grapas de calibre 18 de 7 8 Pulg 1 1 4 Pulg y 1 1 2 Pulg 100 grapas por tira y 10 rollos de capuchones intercalados de pl stico de 1Pulg de di metro 200 capuchones por rollo 5 1 Rec...

Страница 24: ...nes de la Rec mara Inserte el capuch n gu a en el Canal de Alimentaci n Deslice los capuchones a lo largo del Canal de Alimentaci n con los dedos hasta que encajen en el Alimentador de Capuchones Hale...

Страница 25: ...rramienta con un acoplamiento de conexi n r pida y compruebe la lectura de la presi n del aire en el regulador para asegurar que no exceda 105 PSI Compruebe que no haya fugas de aire en la herramienta...

Страница 26: ...a profundidad de penetraci n regule la presi n de aire en el regulador y o desconecte la manguera de aire modifique el tornillo de control de profundidad conecte la manguera de aire y use la herramien...

Страница 27: ...www stingerworld com 9 ESQUEMA DE LA STINGER CS150...

Страница 28: ...O del pist n 66 0136648 Tambor del resorte inversor 21 0137898 Conjunto pist n y accionador 67 0135892 Tornillo 5 22 0553001 Parachoques 68 0135893 Placa frontal fija 23 0136657 Junta de regreso 69 01...

Страница 29: ...pist n tenga la lubricaci n adecuada con grasa 4 Nunca use piezas que no sean piezas de reemplazo genuinas STINGER Para ordenar llame al 800 746 5659 5 Limpie peri dicamente la rec mara y nariz de la...

Страница 30: ...fecha a partir de la cual la garant a est en vigor es la fecha de compra 2 La garant a no es transferible 3 La garant a queda anulada por cualquiera de los siguientes puntos a Abuso mal uso o da o a...

Страница 31: ...tornillo Quite los sujetadores de la Rec mara Abra la Palanca Quick Clear si es aplicable quite el sujetador atascado y cierre el Pestillo Cargue la herramienta Compruebe que haya suficiente suminist...

Страница 32: ...ids MI 49519 USA Tel fono 800 968 6245 Fax 616 531 5970 Comun quese con Ventas Internas llamando al 800 746 5659 para ordenar piezas de repuesto Visite nuestro sitio web www nationalnail com para apre...

Страница 33: ...es renseignements importants sur la s curit du produit This manual contains important information about product safety www stingerworld com Utilisation Entretien S curit Garantie CS150 CAP STAPLER GUI...

Страница 34: ...l entretien du STINGER CS150 Cap Stapler Le CS150 est con u uniquement pour l installation de membrane pare air de planche de styro mousse et de papier toiture en rouleau L utilisation inappropri e d...

Страница 35: ...eil 1 Renseignements importants 2 Caract ristiques de l outil 5 Chargement de l outil 6 Utilisation de l outil 7 Illustration sch matique du STINGER CS150 9 Liste des pi ces du STINGER CS150 10 Entret...

Страница 36: ...de l outil ainsi qu toute personne qui se trouve sur le lieu de travail Pour viter les blessures accidentelles Manipulez l outil avec prudence Agissez toujours comme si l outil contenait des agrafes D...

Страница 37: ...me l outil Les chutes de pression de l air d alimentation pourraient r duire la puissance de fonctionnement de l outil Utilisez une source en air comprim dot d un r gulateur de pression et d un manom...

Страница 38: ...ent pas d agrafes Ne dirigez jamais l outil vers d autres personnes ni vers vous Ne faites jamais fonctionner l outil lorsqu il n est pas en contact avec la pi ce fixer N utilisez jamais l outil comme...

Страница 39: ...00 agrafes StaplePac comprend 20 bandes d agrafes de 7 8 1 1 4 ou 1 1 2 po de calibre 18 100 agrafes par bande ou 10 bobines de capuchons de plastique d un pouce de diam tre 200 capuchons par bobine 5...

Страница 40: ...Magasin Ins rez le premier capuchon dans la Goulotte d Alimentation Poussez les capuchons dans la Goulotte d Alimentation jusqu ce qu ils glissent dans le Alimentation en Capuchon Tirez sur le Aliment...

Страница 41: ...raccord branchement rapide puis v rifiez la pression d air sur le manom tre du r gulateur pour vous assurer qu elle n est pas sup rieure 105 lb po2 V rifiez l outil la recherche de fuite d air 8 Place...

Страница 42: ...r la profondeur modifiez la pression de l air au niveau du r gulateur ou d branchez la conduite d air r glez la vis de commande de profondeur rebranchez la conduite d air puis utilisez de nouveau l ou...

Страница 43: ...www stingerworld com 9 ILLUSTRATION SCH MATIQUE DU STINGER CS150...

Страница 44: ...e du piston 66 0136648 Tambour du ressort d inverseur 21 0137898 Ensemble piston et entra nement 67 0135892 Vis 5 22 0553001 Butoir 68 0135893 Plaque avant fixe 23 0136657 Joint du retour 69 0136654 J...

Страница 45: ...utilisez jamais d autres pi ces que les pi ces de rechange originales STINGER Pour en commander faites sans frais le 1 800 746 5659 5 Nettoyez p riodiquement le magasin et le nez de l outil au moyen d...

Страница 46: ...jours CONDITIONS DE LA GARANTIE 1 La date d entr e en vigueur de la garantie est la date d achat 2 La garantie n est pas cessible 3 La garantie est annul e dans les situations suivantes a Usage abusif...

Страница 47: ...les agrafes du Magasin Ouvrez le Levier Quick ClearMC s il y a lieu retirez les agrafes bloqu es puis refermez le Verrou Chargez l outil Assurez vous que l alimentation en air est suffisante Remplacez...

Страница 48: ...ids MI 49519 USA T l phone 1 800 968 6245 T l c 616 531 5970 Communiquez avec les Ventes Internes au 800 746 5659 pour commander des pi ces de rechange Visitez notre site Web www nationalnail com pour...

Отзывы: