Nixeus FreeSync EDG 27 Скачать руководство пользователя страница 9


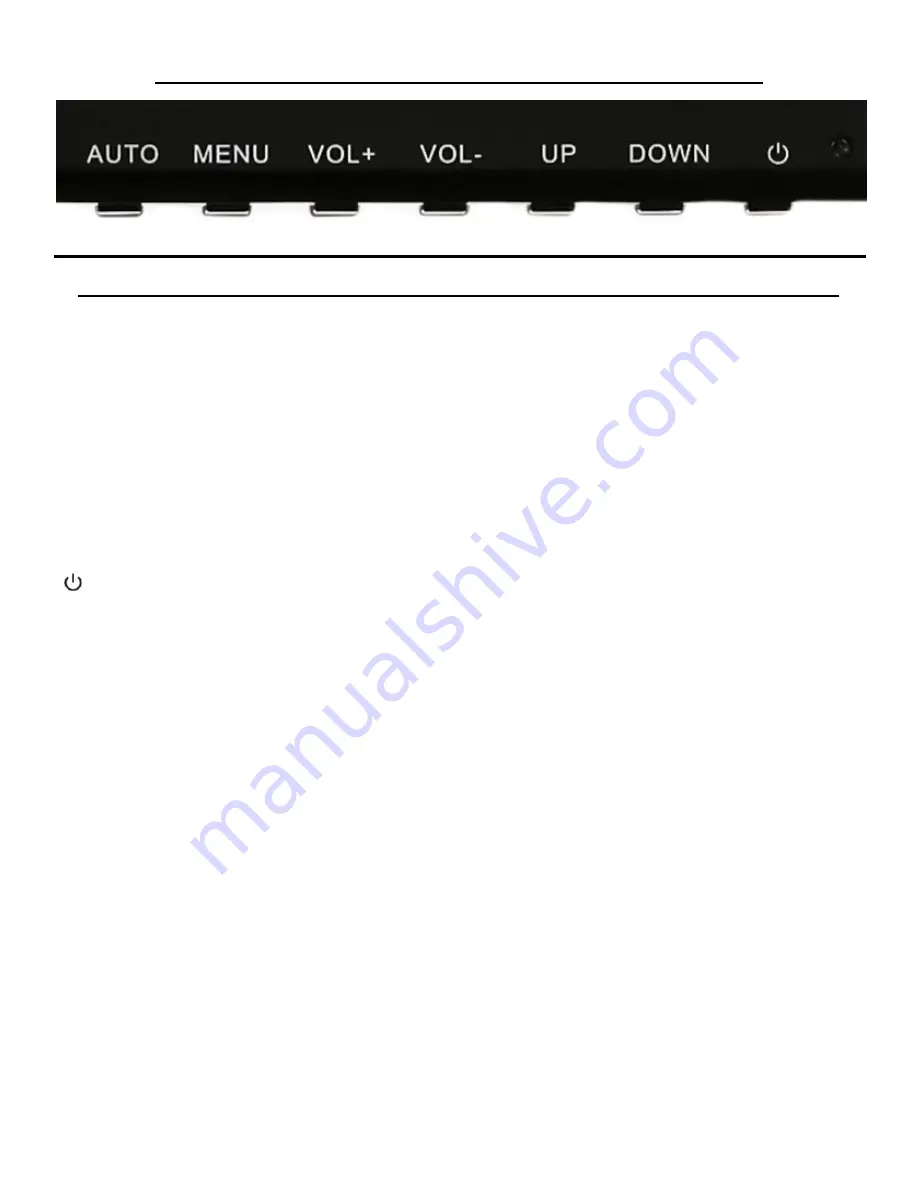
Monitor Button Operations - Legends and Functions 


Button Functions when NOT navigating in the On Screen Display (OSD) Main Menu 

"AUTO"  

Press to AUTO detect video inputs.  Also brings up the video INPUT menu for  DP, HDMI 2.0,  


HDMI 1.4 and DVI for switching to different video source. 

"MENU"  

Brings up and enables the On Screen Display Menu (OSD). 

"VOL+"  

-  

Increase display's speaker volume.  Press to navigate forward  or go to next (to the right). 

"VOL-"

  -  

Decrease display's speaker volume.  Press to navigate back or go to previous (to the left). 

"UP"  - 

Increase display brightness. 

"

DOWN"  - 

Decrease display brightness. 

[ ]  - 

POWER ON/OFF 


Содержание FreeSync EDG 27

Страница 1: ...1 NX EDG27 NX EDG27S Nixeus EDG 27 IPS AHVA 2560 x 1440 AMD FreeSync 144Hz Gaming Monitor USER MANUAL Version 8 31 2017 www nixeus com...

Страница 2: ...c Contrast Ratio Adjustment DCR 19 On Screen Display OSD COLOR Sub Menu 20 Color Effects 20 Saturation 21 Gamma 22 Temperature Presets 23 User Settings Red Green Blue Adjustment for Color Calibration...

Страница 3: ...ded by Nixeus If any power connections are missing please contact Nixeus for a replacement Using un authorized power connectors may damage your monitor and void your warranty 7 During operation please...

Страница 4: ...remove the image persistence Please contact Nixeus if you need assistance in removing image persistence CAUTION Serious brand incidental image or after image will not disappear and cannot be repaired...

Страница 5: ...start guide for installation of Stand Base and Stand Shaft Box Contents for NX EDG27S With Base Tilt Only Stand Nixeus EDG 27 IPS 2560x1440 AMD FreeSync 144Hz Gaming Monitor NX EDG27S Stand Base x 1 w...

Страница 6: ...r connecting your headphones desktop speakers sound bar or any other audio speaker device The included DisplayPort to DisplayPort cable is for connecting the NX EDG27 for DisplayPort output devices ha...

Страница 7: ...by up to 15 Monitor Swivel Left Right NX EDG27 Make sure the NX EDG27 is on a stable level surface Holding the base shaft with your hand carefully twist the monitor shaft left or right to desired ori...

Страница 8: ...tor Pivot to 90 Portrait Mode NX EDG27 Make sure the NX EDG27 is on a stable level surface Using both hands first raise the monitor to the highest point Next pivot the monitor clock wise into portrait...

Страница 9: ...menu for DP HDMI 2 0 HDMI 1 4 and DVI for switching to different video source MENU Brings up and enables the On Screen Display Menu OSD VOL Increase display s speaker volume Press to navigate forward...

Страница 10: ...eo source devices with DisplayPort 1 2 HDMI 2 0 HDMI 1 4 and Dual Link DVI connections a To bring up the INPUT sub menu press AUTO b Press VOL to move right or press VOL to move left to select the inp...

Страница 11: ...11 VOLUME The NX EDG27 includes two built in stereo speakers A To adjust the volume press VOL to move right or press VOL to move left to select the desired volume...

Страница 12: ...12 Brightness A To adjust the BRIGHTNESS press UP to move right or press DOWN to move left to select the desired BRIGHTNESS for the display...

Страница 13: ...us or to exit MENU Press to confirm or for ok VOL Press to increase setting status bar Press to navigate forward or go to next to the right VOL Press to decrease settings status bar Press to navigate...

Страница 14: ...ee picture and press MENU to confirm selection Highlight BRIGHTNESS and press MENU to enter into BRIGHTNESS adjustment c Press VOL to make brightness lower or press VOL to make brightness higher Defau...

Страница 15: ...est color black a In the PICTURE sub menu use the arrow buttons DOWN or UP to highlight CONTRAST and press MENU to confirm selection b Press VOL to make the CONTRAST lower or press VOL to make the CON...

Страница 16: ...TURE sub menu use the arrow buttons DOWN or UP to highlight SHARPNESS and press MENU to confirm selection b Press VOL to make the SHARPNESS lower or press VOL to make the SHARPNESS higher Default SHAR...

Страница 17: ...1 a In the PICTURE sub menu use the arrow buttons DOWN or UP to highlight ASPECT RATIO and press MENU to confirm selection b Press VOL to make the SHARPNESS lower or press VOL to change the ASPECT RA...

Страница 18: ...picture color affect picture video quality or add input lag in PC games we recommend leaving this feature off for PC Gaming a In the PICTURE sub menu use the arrow buttons DOWN or UP to highlight ULTR...

Страница 19: ...picture color affect picture video quality or add input lag in PC games we recommend leaving this feature off for PC Gaming a In the PICTURE sub menu use the arrow buttons DOWN or UP to highlight DCR...

Страница 20: ...nd gaming needs STANDARD GAMING MOVIES PHOTO and VIVID a In the COLOR sub menu use the arrow buttons DOWN or UP to highlight COLOR EFFECTS and press MENU to confirm selection b Press VOL to make the C...

Страница 21: ...ns DOWN or UP to highlight SATURATION and press MENU to confirm selection b Press VOL to make the SATURATION lower or press VOL to make the SATURATION higher Default SATURATION is at 50 c Once you adj...

Страница 22: ...R sub menu use the arrow buttons DOWN or UP to highlight COLOR EFFECTS and press MENU to confirm selection b Press VOL to make the COLOR EFFECTS lower or press VOL to make the COLOR EFFECTS higher Def...

Страница 23: ...r UP to navigate to TEMPERATURE and press MENU to enable TEMPERATURE selection b Use VOL or VOL to cycle through the settings and to highlight USER c Press MENU once to confirm the USER selection and...

Страница 24: ...ngs press MENU to confirm selection and press AUTO exit to COLOR sub menu to adjust the next color settings a To adjust the GREEN setting Use the buttons DOWN or UP to navigate and highlight G and pre...

Страница 25: ...hed adjust and calibrating the all the R G B color settings Press AUTO once to exit to the COLOR sub menu To completely exit out of the On Screen Display press AUTO again NOTE When using a colorimeter...

Страница 26: ...highlight VOLUME and press MENU to confirm selection b Press VOL to make the VOLUME lower or press VOL to make the VOLUME higher Default VOLUME is at 50 c Once you adjust the VOLUME settings to your d...

Страница 27: ...G27 also includes a 3 5mm audio cable for an Line In alternative audio source transmission mainly for the DVI connection since DVI cannot transmit audio a In the ADVANCE sub menu use the buttons DOWN...

Страница 28: ...c and 144Hz refresh rate The alternative setting of DP 1 1 can only support 2560x1440 resolution with 60Hz refresh rate a In the ADVANCE sub menu use the buttons DOWN or UP to highlight DP OPTION and...

Страница 29: ...MENU to confirm selection b Press VOL or press VOL to cycle through the OVER DRIVE settings Default OVER DRIVE settings is OFF c Once you adjust the OVER DRIVE settings to your desired level press ME...

Страница 30: ...light transmission will affect the accuracy of color for professional or gaming use of the display a In the PICTURE sub menu use the arrow buttons DOWN or UP to highlight LOW BLUE RAY and press MENU t...

Страница 31: ...o navigate to LANGUAGE Make sure selection is highlighted see picture and press MENU to confirm selection b Use the arrow buttons VOL or press VOL to navigate to the preferred LANGUAGE Make sure selec...

Страница 32: ...P to navigate to MENU TIME Make sure selection is highlighted see picture and press MENU to confirm selection c The default OSD MENU TIME is 25 seconds Use the arrow buttons VOL or press VOL to adjust...

Страница 33: ...ION selection is highlighted in red see picture and press MENU to confirm selection b Use the arrow buttons VOL or press VOL to adjust between 0 to 100 for the OSD H POSITION placement of the OSD MENU...

Страница 34: ...ction is highlighted in red see picture and press MENU to confirm selection b Use the arrow buttons VOL or press VOL to adjust between 0 to 100 for the OSD V POSITION placement of the OSD MENU towards...

Страница 35: ...o confirm selection b Use the arrow buttons DOWN or UP to navigate to TRANSPARENCY Make sure selection is highlighted see picture and press MENU to confirm selection c Use the arrow buttons VOL or pre...

Страница 36: ...OL to navigate to the OSD SETTINGS sub menu and press MENU to confirm selection b Use the arrow buttons DOWN or UP to navigate to OSD ROTATE Make sure selection is highlighted see picture and press ME...

Страница 37: ...et all On Screen Display OSD configurations or changes you have made back to the monitors default settings a In the OSD SETTINGS sub menu use the DOWN or UP to navigate to RESET Make sure selection is...

Страница 38: ...g AMD FreeSync technology please visit http www amd com en us innovations software technologies technologies gaming freesync The NX EDG27 and NX EDG27S has FreeSync enabled by default FreeSync can be...

Страница 39: ...ll Screen or Exclusive Full Screen Windowed Mode may not be optimal at this time Please refer to the latest AMD Radeon Graphic Driver release notes for more information at http support amd com en us d...

Страница 40: ...he sellers or the liquidators expressly disclaim their warranty obligation whereas the product is being sold As Is without any warranty RMA Return Merchandise Authorization Request The customer shall...

Страница 41: ...IBILITY OF SUCH DAMAGES TO THE MAXIMUM EXTENT PERMITTED BY LAW THE SOLE REMEDY FOR A BREACH OF THE FOREGOING LIMITED WARRANTY IS REPAIR OR REPLACEMENT OF THE DEFECTIVE OR NONCONFORMING PRODUCT THE MAX...

Страница 42: ...ngs typographical errors or omissions to this user manual The contents of this user manual is subject to revisions and changes at anytime AMD Radeon FreeSync and all mentioned brands and logos used wi...

Отзывы: