background image


Checking the laser level 

 
   You should regularly check the following parameters of the laser level 


 setting a horizontal plane  


 cone error 


 setting a vertical plane  

Checking and calibration of the horizontal and vertical planes is simple and in most cases can 
be done by the user. Checking the cone error can be also done by the user, but this error can 
be only removed by an authorized service center.  
 

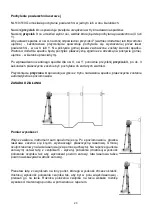
Checking the horizontal plane 


1. Set the instrument about 30m from the wall so that the X-axis is perpendicular to the 

wall and X direction a pointed to a wall.  

2. Turn on the instrument and wait until it level automatically.  
3. Place a sheet of paper on the wall. Mark the position of the laser beam on the sheet. 

Turn off the instrument.  

4. Loosen the tripod fixing screw and rotate the instrument 180°.  


WARNING!

 Be careful not to move the instrument while the head is spinning. 

5.  Turn on the instrument once again and wait until it level automatically. 
6.  Once again mark the position of the laser beam on the sheet. 
7.  Measure the distance between the marks, if the distance is less than  6 mm calibration 

is not necessary, in other case please contact service center 

8.  Perform similar operations for the Y axis . 

 
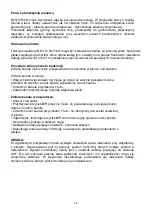
Checking the cone error 

 
Please do this procedure after calibration of horizontal plane. 
 

1. Set  the  laser  centered  between  the  walls  distanced  from  each  other  of  30  m.  Set  the 

instrument in the X or Y direction.  

2. Mark the position of the laser beam on both walls.  
3. Turn off the instrument and move it near to the of one of the walls (1 to 2 meters). Do not 

change the orientation of the axes. Turn on the instrument.  

4. Again, mark the position of the laser beam on the walls 
5. Measure the distance between the marks on the walls.  
6. If the difference in distance is less than 3 mm, it can be assumed that this error does not 

occur.  

 
Warning! If this error is more than 3m, you should contact the service center. 
 

Checking the vertical plane 

 
This procedure should be done after calibration of the horizontal plane.  


1.  Set the laser centered between the walls distanced from each other of 30 m 

2.  Turn on the laser level. 
3.  Place the paper sheets on the walls and mark the position of the laser beam. 
4.  Turn off the instrument. Set the instrument in vertical position near to one of the walls.  
5.  Turn on the instrument. 
6.  Mark the position of the laser beam on the paper sheet. Measure the distance 

between the markers 

Содержание NL510

Страница 1: ... NL510G Thank you for purchasing a Nivel System NL510 NL510G laser level To best use the purchased instrument please read the instructions carefully and put in a convenient spot so that in the future you will be able to use it ...

Страница 2: ...2 WARNING The device contains a rechargeable nickel hydrogen batteries which must be recycled and should be disposed in accordance with the requirements WEEE Reg DE23874031 ...

Страница 3: ...o it it s possible to stop the beam at a given distance NL510 NL510G models can be controlled from the device control panel or remotely with remote control Laser level is waterproof and can be used outdoors even in the rain However these devices can t be submerged in water Laser plumb up masking flap Laser module Optical glass MENU LCD Charge socket Handle Laser plumb down PRECAUTIONS WARNING the ...

Страница 4: ...clean water and consult a doctor Broken or damaged transport box or transport box latches can lead to falling out of the box and damage the laser The collapse of laser level to the ground can lead to damage Shaky unstable site of laser level can lead to collapse and damage the laser Always make sure that all screws and latches in a tripod works properly Exclusions of liability 1 It is expected fro...

Страница 5: ...equipment in manual mode can be tilted beyond self levelling or work in difficult terrain near the heavy construction equipment does not react to the vibrations of the land When the equipment is switched to manual mode the display shows the hand icon 2 Adjusting the rotation speed of the head available head spin speeds 0 60 120 300 600 rpm Each press will switch speed When working on smaller dista...

Страница 6: ...pressing again this button Scan mode Adjust the rotating speed of the head Press button 6 which will cause the device goes into scan mode the laser will begin to draw a line at set distance Each time when you press this button you will cause increase the range of drawn line Depending on your needs switch the direction of rotation of the head clockwise or counter clockwise The inclination of laser ...

Страница 7: ...pecify the inclination eg If you want to get a inclination of 1 at a distance of 10 m laser staff the difference between the height of the zero point on the staff should and designated inclination should be 10 cm Working with the vertical plane NL510 NL510G can set horizontal or vertical beam If you work with a vertical laser beam you must set the laser level as in the picture beside After switchi...

Страница 8: ... non blinking antenna icon indicates a proper connection with the remote NOTE In exceptional cases you may experience instability working of laser level in cooperation with the remote control This is caused by data transmission system between the remote control and leveling tool The communication system is based on a radio transmitter operating on UHF In this range there are multiple transmission ...

Страница 9: ... not necessary in other case please contact service center 8 Perform similar operations for the Y axis Checking the cone error Please do this procedure after calibration of horizontal plane 1 Set the laser centered between the walls distanced from each other of 30 m Set the instrument in the X or Y direction 2 Mark the position of the laser beam on both walls 3 Turn off the instrument and move it ...

Страница 10: ...low please Lower the sensor you will hear a high frequency sound You are in the right position you will hear a continuous sound Too low the laser signal is above you will hear a high frequency sound discharged batteries buzzer on off Sensor panel LCD display laser signal receiver ON OFF button bracket working mode of a sensor buzzer Nivel System RD500 DIGITAL RD500G DIGITAL Specification Detecting...

Страница 11: ...attery Features Easily set up adjust the balance with magnets and vials at both side and top with LCD at both front and back easier for mounting and detecting the signal of laser LED Display Unit switch Arrows indicates that laser location is upper than the leveled line High frequent buzzer Arrows indicates that laser location is lower than the leveled line High frequent buzzer Leveled line Buzzer...

Страница 12: ...or is switched with loudest sound sequence of the switch is loudest no sound normal sound Accuracy switch Detector is switched with highest accuracy sequence of the switch is highest accuracy middle accuracy rough accuracy Magnet s Level vial Level mark Detecting Accuracy indicator Upper LED red lights indicate laser locates upper the leveled line Middle LED Green lights indicate laser locates at ...

Страница 13: ... sensor digital option NL BR laser bracket Tripod adapter 0 90 Rechargeable battery pack CH 1 charger YR laser shelf TR R TR G laer targets GL R GL G laser glasses Laser case Remote controller SJJ1 tripod SJJ32 tripod 3 2m LS 24 laser staff 2 4m LS 35 laser staff 3 5m ...

Страница 14: ...on of surveying equipment shall not be considered a warranty repair The user shall be charged for unjustified complaints in accordance with the effective price lists Warranty repairs shall be carried out only and exclusively based on purchase document Under the warranty the Warrantor shall not be liable for the consequences of defects that is damage caused to people third parties property lost pro...

Страница 15: ...ure 20 C 50 C Power DC 4 8 6 V 4 rechargeable batteries type D NiMH Working time about 30h Battery charging time about 7h Dust and waterproof IP56 Dimensions 206 x 206 x 211 mm Weight 2 8kg Remote control technical specification Working range about 30m outside about 20m Warning AC Adapter could not be used outside Do not use it for charging alkaline batteries Device look such as tech spec could be...

Страница 16: ...16 ...

Страница 17: ...kujemy za zakupienie niwelatora laserowego firmy Nivel System model NL510 NL510G Aby móc jak najlepiej wykorzystać zakupiony instrument prosimy uważnie przeczytać instrukcję i położyć w dogodnym miejscu żeby w przyszłości móc z niej skorzystać ...

Страница 18: ...18 UWAGA Urządzenie zawiera baterie niklowo wodorowe baterie te muszą być poddane recyklingowi lub powinny być utylizowane zgodnie z wymogami WEEE Reg DE23874031 ...

Страница 19: ...a wyznaczają oś płaszczyzny laserowej laser liniowy punkt do góry i punkt do dołu Za pomocą laserów możliwe jest także rysowanie linii laserem funkcja skanowania dzięki czemu możliwe jest zatrzymanie wiązki na danym odcinku Model NL510 510G może być sterowany zarówno z panela kontrolnego urządzenia jak i zdalnie z pilota Niwelator jest wodoszczelny i może pracować na zewnątrz także podczas deszczu...

Страница 20: ...nikające z tego powodu straty Niewłaściwe użycie lasera oraz stosowanie go niezgodnie z opisanymi w tej instrukcji procedurami może spowodować obrażenia lub narażenie się na nadmierną dawkę promieniowania Nie można pozwolić aby ktokolwiek pracował w promieniu lasera Przed rozpoczęciem pracy należy upewnić się że wiązka lasera znajduje się ponad głowami pracowników Oświetlenie wiązką laserową może ...

Страница 21: ...re mogą być ładowane Ładowanie akumulatorków odbywa się za pośrednictwem ładowarki na wyposażeniu standardowym za pomocą złącza znajdującego się na panelu frontowym niwelatora Ładowanie sygnalizowane jest zapaleniem się diody na zasilaczu Kiedy dioda zapali się na zielono ładowanie zostaje zakończone Jeżeli jest potrzeba wymiany akumulatorków komora akumulatorków powinna być rozkręcona Używaj niwe...

Страница 22: ...e kąty wyświetlania wiązki 0 10 45 90 180 Każdorazowe przyciśnięcie spowoduje przestawienie kąta wyświetlanej wiązki 7 MINUS obrót w prawo użyj przycisku aby odjąć wartość spadku minus obrócić głowice w prawo gdy głowica nie wiruje lub niwelator przełączony jest w tryb skanowania 8 PLUS obrót w lewo użyj przycisku aby dodać wartość spadku plus obrócić głowice w lewo PRACA Z NIWELATOREM Włączanie z...

Страница 23: ... Y ponownie przyciśnij przycisk 3 po ok 3 sekundach płaszczyzna zacznie być pochylana do zadanych wartości Przyciśnięcie przycisku 4 spowoduje wyjście z trybu nadawania spadku płaszczyzna zostanie automatycznie spoziomowana ZASADA DZIAŁANIA Pomiar wysokości Włącz zasilanie instrument sam spoziomuje się Po spoziomowaniu głowica laserowa zacznie się kręcić wyznaczając płaszczyznę laserową Umocuj czu...

Страница 24: ...otąd aż zacznie pulsować ikonka podobna do telefonu a obok będzie wyświetlony numer kanału Zmienić nr kanału przyciskami lub Zatwierdzić przytrzymując przycisk włącznika pilota Zmiana kanału w niwelatorze Włączyć niwelator Przytrzymać przycisk X Y przez ok 5 sek do pojawienia się pulsującej ikonki anteny i numeru kanału Zmienić numer kanału przyciskami lub na identyczny jaki został ustawiony w pil...

Страница 25: ... pomiędzy znaczkami z pierwszego i drugiego położenia niwelatora jeśli odległość jest mniejsza niż 6 mm kalibracja nie jest potrzebna w przeciwnym przypadku zalecany jest kontakt z serwisem 8 Wykonaj analogiczną operacje dla kierunku Y Sprawdzenie błędu stożka Sprawdzenie to wykonaj po wykonaniu kalibracji płaszczyzny poziomej 1 Ustaw laser pośrodku między odległymi od siebie o 30 m ścianami Ustaw...

Страница 26: ...czna CZUJNIKI LASEROWE Nivel System RD100 Wyświetlacz Tryb precyzyjny Tryb zgrubny Za wysoko sygnał laserowy znajduje się poniżej obniż czujnik słyszalny będzie dźwięk wysokiej częstotliwości Jesteś na właściwej pozycji słyszalny będzie ciągły dźwięk Za nisko sygnał laserowy znajduje się powyżej słyszalny będzie dźwięk wysokiej częstotliwości brzęczek włączony brzęczek wyłączony rozładowane bateri...

Страница 27: ...odbioru lasera Zakres temperatury pracy 20 C 50 C Wymiary 170 L 76 W 35 H mm Waga z bateriami 373g wyświetlana jednostka strzałki nawigacyjne odchylenie od poziomu wiązki laserowej sygnał dźwiękowy przerywany poziom lasera sygnał dźwiękowy ciągły strzałki nawigacyjne odchylenie od poziomu wiązki laserowej sygnał dźwiękowy przerywany poziom naładowania baterii W przypadku gdy ikona jest pusta bater...

Страница 28: ...tlacza przełącznik głośności sygnalizatora poziomu przełącznik trybu dokładności pracy magnes y libelka znacznik poziomu Wskaźnik poziomu LED Górny wskaźnik LED czerwony wiązka laserowa znajduje się powyżej centralnego poziomu Środkowy wskaźnik LED zielony wiązka laserowa znajduje się w centralnym położeniu Dolny wskaźnik LED żółty wiązka laserowa znajduje się poniżej centralnego poziomu wstęga od...

Страница 29: ...e NL BR uchwyt czujnika Adapter na statyw 0 90 Komplet akumulatorków CH 1 ładowarka YR półka laserowa TR R TR G tarczki laserowe GL R GL G okulary laserowe Waliza transportowa Pilot zdalnego sterowania SJJ1 statyw aluminiowy SJJ32 statyw aluminiowy LS 24 łata laserowa 2 4m korbowy 32m LS 35 łata laserowa 3 5m ...

Страница 30: ...jest użytkownik zgodnie z obowiązującymi cenami Naprawa gwarancyjna dokonana będzie wyłącznie na podstawie dokumentu zakupu W ramach gwarancji Gwarant nie ponosi odpowiedzialności z tytułu skutków usterek tj szkód wyrządzonych ludziom zniszczenia cudzej własności strat w zyskach itp 2 Gwarancja traci ważność w przypadku stwierdzenia przekroczenia norm użytkowania sprzętu uszkodzeń powstałych w wyn...

Страница 31: ...wania głowicy zmienna 0 60 120 300 600 obr min Skanowanie 0 10 45 90 180 Praca w zakresie temperatur 20 C 50 C Zasilanie DC 4 8 6 V 4 akumulatorki typ Ni MH Czas pracy ok 30 godz Czas ładowania akumulatorków ok 7 godz Pyło i wodoszczelność IP56 Wymiary 206 x 206 x 211 mm Waga 2 8kg Specyfikacja pilota sterowania Obszar pracy zasięg ok 30m 20m przy pracy na zewnątrz Uwaga Ładowarka nie może być sto...

Страница 32: ...32 Nivel System serwis i wsparcie TPI Sp z o o ul Bartycka 22 00 760 Warszawa Polska 48 22 651 03 06 48 22 651 03 09 tpi tpi com pl www nivelsystem com ...

Отзывы: