background image

17

EN

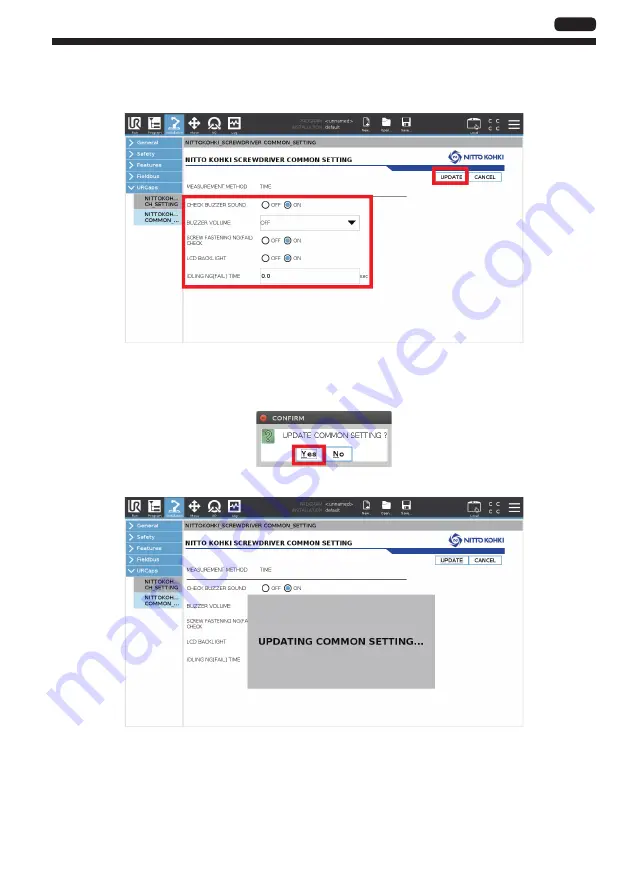
Edit the setting items (

4

), and click [UPDATE] (

5

)

4

5

Click [CANCEL] to return to the settings before editing.
A confirmation message is displayed.

Click [Yes]

A message saying [UPDATING COMMON SETTING...] is displayed.

The update is complete when the display is cleared.

TV08374-0̲URCaps̲en.indb   17

TV08374-0̲URCaps̲en.indb   17

2021/06/01   17:34:32

2021/06/01   17:34:32

Содержание delvo DCC0241X-AZ

Страница 1: ...erly and safely Keep the manual handy so you can use it whenever necessary Due to continuous product development improvement the specifications and configurations in this document are subject to chang...

Страница 2: ...operation and maintenance About pictograms WARNING Failure to follow the instructions for handling could cause danger when using the tool Using this tool improperly could result in serious injury Read...

Страница 3: ...lier version of the controller To use a version earlier than 1 20 please contact NITTO KOHKI For details on other usage conditions and product specifications refer to the instruction manual for the el...

Страница 4: ...ic screwdriver on the universal robot Used by mounting the diamond shape flange coupling or flange coupling Diamond shape flange coupling DLW9017 For use by mounting in automatic screw fastening machi...

Страница 5: ...Vacuum pickup DLP7401 K An attachment used to vacuum screws Attached vacuum sleeve DLS4220 DLS4221 Use DLP7401 J for the J bit type electric screwdriver For details on the installation method refer t...

Страница 6: ...bot after the bit has been removed 1 Attach the pin of 6 DIA provided with the flange attachment DLW9520 to the flange part of the robot 2 Mount the flange attachment DLW9520 on the flange part of the...

Страница 7: ...e coupling refer to the instruction manual for the electric screwdriver The flange attachment mounting holes are different on the DLV45C and DLV04C 10C DLV45C PCD52 DLV04C 10C PCD51 4 Connect the cabl...

Страница 8: ...ewdriver CAUTION Make sure the controller version is 1 20 or later There is no force stop function in versions earlier than 1 20 To use a version earlier than 1 20 please contact NITTO KOHKI Changeove...

Страница 9: ...o operate the electric screwdriver and a function for changing the settings of the controller from a teaching pendant Installing the software 1 Download the software from the following URL on your PC...

Страница 10: ...8 EN 4 Click System 3 3 5 Select URCaps 4 and then click 5 4 5 Using the Software...

Страница 11: ...9 EN 6 Select nittokohkiScrewdriver N N N urcap 6 and then click Open 7 N N N indicates the version 6 7 7 Click Restart 8 8 The robot restarts and the software installation is complete...

Страница 12: ...hannels When you select a channel a message saying RECEIVING CH SETTING is displayed and the channel settings are acquired 3 Set the name of the selected channel and the screw fastening conditions 4 U...

Страница 13: ...99 sec 1 0 1 to 60000 2 0 12 WORKPIECE SIGNAL OFF ON OFF 13 WORKPIECE SETUP TIME 0 0 1 sec to 9 9 sec 0 14 SCREW FASTENING OK PASS SIGNAL OFF ON ON 15 OK PASS OUTPUT TIMING COUNT FINISHED AT WORKPIECE...

Страница 14: ...12 EN 1 Click Installation 1 1 2 Click URCaps 2 and then select NITTOKOHKI_SCREWDRIVER CH_SETTING 3 2 3 Using the Software...

Страница 15: ...IVING CH SETTING is displayed 4 4 Edit the setting items 5 and click UPDATE 6 Select the measurement method of the setting times in 7 5 7 6 Click CANCEL to return to the settings before editing A conf...

Страница 16: ...n the display is cleared If you change the workpiece signal settings If you change the workpiece signal settings be sure to save the installation settings 6 Click Save 1 and then click Save All 2 or S...

Страница 17: ...is displayed 3 Cancels the edited content and returns the settings to the state prior to editing The following settings are available Details Setting value Default MEASUREMENT METHOD TIME ROTATION SIG...

Страница 18: ...16 EN 1 Click Installation 1 1 2 Click URCaps 2 and then select NITTOKOHKI_SCREWDRIVER COMMON_SETTING 3 2 3 UPDATING COMMON SETTING is displayed Using the Software...

Страница 19: ...4 and click UPDATE 5 4 5 Click CANCEL to return to the settings before editing A confirmation message is displayed 4 Click Yes A message saying UPDATING COMMON SETTING is displayed The update is compl...

Страница 20: ...r operating the electric screwdriver For details on the operation program refer to the user s manual for the universal robot 1 Click Installation 1 1 2 Click General 2 and then Screwdriving 3 and then...

Страница 21: ...19 EN 3 Select TCP 5 To link with the workpiece signal select the input signal to be linked 6 6 5 4 Click Program 7 7...

Страница 22: ...a b b 0 Select the advancing direction rotation direction of the screwdriver Tighten Forward rotation Loosen Reverse rotation a Set the processing method when the screwdriver is advancing b Select the...

Страница 23: ...21 EN When only channel switching is performed 1 Click URCaps 1 and then select CH_SWITCHING_OF NITTOKOHKI_SCREWDRIVER 2 2 1 2 Select the channel to switch 3 3...

Страница 24: ...ation Please refer to the following website for information on NITTO KOHKI products accessories dimensional outline drawings and other public announcements Japanese https www nitto kohki co jp English...

Страница 25: ...23 EN...

Страница 26: ...24 EN...

Страница 27: ......

Страница 28: ...siness Centre Singapore 415978 Tel 65 6227 5360 Fax 65 6227 0192 NITTO KOHKI CO LTD Bangkok Representative Office 2 Jasmine Building 22nd Floor Soi Prasarnmitr Sukhumvit23 Sukhumvit Road North Klongto...

Отзывы: