


HD-TVI
DOCXSEE870
SEE870 Multi-Format HD Camera (TVI/AHD/CVI) & Analogue with IRs
Email: [email protected]
Last Revised 23/03/2017
Mounting the Camera
The camera is for indoor or outdoor mounting on a wall, ceiling or under a lintel. First disconnect
base from camera by removing the allen screw holding the securing plate, using the supplied allen
key. Secure the base with suitable screws using the four screw holes in the base. Adjust the eyeball
camera and cover to ensure that the correct view is achieved and refit the securing plate using the
allen screw. The camera is IP65 rated and suitable for outdoor use.
Powering the Camera
The SEE870 requires a 12V DC 500mA regulated power supply minimum when IRs are on, and
power consumption is rated at 4.2 watts. It should be noted that 500mA provides extra headroom
that is required when the camera is first powered up. The camera is provided with a fly lead with a
mini power 2.1mm DC socket. The camera is polarity sensitive so connections must be correctly
made.
Connecting the camera to control equipment
The dome camera comes with a fly lead for power, TVI/AHD/CVI/CVBS selected BNC video
output plus a second analogue (CVBS) video output on a separate BNC lead. Connect the HD
camera to control equipment via a female BNC-BNC lead. When using a co-ax type cable such as
RG59 or similar, the outer braid of the co-ax provides the “0V GROUND” connection and the inner
core provides the “Video” connection. The separate analogue (CVBS) output is primarily available
for setup purposes but can be used for viewing via an analogue monitor. Note that you can use both
analogue outputs together but the menu can only be viewed on one channel.
switch cycle
When you are in correct format, press the joystick button in, momentarily, if you wish to access the
menu.
Automatic Zoom and Focus
This camera has an automatic zoom and focus. If you want to manually set the zoom, select the PTZ
Control option in the DVR menu and press the Zoom plus or minus buttons. If you want to
manually set focus you will need to enter the camera menu by either using the menu buttons on the
camera or pressing Iris +using the PTZ option in the DVR and select ONEPUSHAF then press the
Iris+ button. Otherwise the camera will automatically focus when powered up.
See further details on menu access.
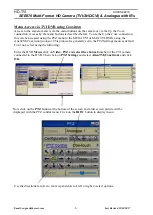
These cameras can be viewed in TVI, AHD, CVI and CVBS.
First power the camera up when it is connected to a monitor or
DVR and monitor, and see if the required format displays a
colour picture. If not or in black and white, press the joystick
button in and not down, for 3 seconds. Repeat until picture
displays in colour. (Note that picture may be in b/w in low light
levels or the cellophane lens cover has not been removed).
Alternatively if you use the menu, you can change the camera
format in the menu:
Example - Change camera format to TVI:
<System> <Output> <MAIN OUTPUT ANALOG OUT0
<System> <Output> <ANALOG OUT0 TVI
TVI
AHD
TVI
CVI
CVBS
2


