background image

289

Service Manual – SW5500, FLOORTEC R 985

52 - Hopper System

Hopper Dumping Hydraulic Cylinder

Removal

1  

Drive the machine on a level floor.

2   Ensure that the hopper is empty 

3   Lift the hopper to head height 

WARNING: Place a safety rod under the lifted hopper.

4   Turn the ignition key to “0”, then engage the parking brake 

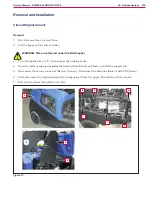
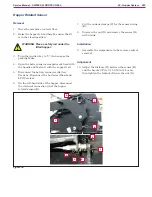
5   Working from the left-hand side of the hopper, unscrew the nut (A) and remove the washer 

6   Supporting the hopper (B), disconnect the rod (C) from the pin, then rotate the hopper downwards 

7  

Unscrew the hydraulic cylinder lines (D) and (E), collecting any hydraulic fluid which may come out 

in a suitable container; immediately plug the disconnected fittings to prevent impurities entering the 

hydraulic system 

WARNING: Hydraulic system oil is highly corrosive.

WARNING: The hydraulic system oil should be disposed of properly according to the Law in force.

8   Unscrew the screw (F) 

9   Remove the cotter (G) and the washer 

10   Remove the hydraulic cylinder (H), disengaging it from the pin (I) 

Figure 20:   

B

A

D

F

H

E

I

G

C

Содержание 9084410010

Страница 1: ...D Form No 1467281000 Service Manual Advance Model Numbers 9084416010 SW5500 B 9084417010 SW5500 LP Nilfisk Model Numbers 9084410010 SW5500 B 9084413010 FLOORTEC R 985 B 9084412010 SW5500 D 9084411010 SW5500 LPG 9084414010 FLOORTEC R 985 LPG English ...

Страница 2: ...PG version 29 05 Control System 30 Functional Description 30 Functional Block Diagram 32 Wiring Diagram 33 Component Locations 34 Troubleshooting 35 Main Machine Controller Alarm Codes 35 Service Screens 41 Main Screen 41 Machine Settings Screen 42 Alarm Log Screen 44 Operating Time Counter Screen 45 Main Machine Controller Outputs Verification Screen 46 Removal and Installation 48 Main Machine Co...

Страница 3: ...cal System 123 Functional Description Battery Version 123 Wiring Diagram Battery ADVANCE Version 125 Wiring Diagram Battery NILFISK Version 126 Functional Description Diesel LPG Version 127 Wiring Diagram Diesel Version 129 Wiring Diagram LPG Version 130 Component Locations Battery Diesel LPG versions 131 Component Locations Battery version 132 Component Locations Diesel version 133 Component Loca...

Страница 4: ...Component Locations 168 Maintenance and Adjustments 170 Engine Air Filter Cleaning Check 170 Engine oil level check 171 Engine Oil Change 172 Engine Spark Plug Check Replacement 173 LPG System Leakage Check 174 Fuel Solenoid Valve Filter Cleaning 176 CO Regulation 178 Troubleshooting 181 Removal and Installation 182 LPG System Emptying 182 LPG System Hose and Fitting 183 Pressure Regulator 185 Fue...

Страница 5: ... Side broom height check and adjustment 232 Troubleshooting 234 Side Broom Motor Current Draw Check 235 Removal and Installation 237 Side Broom 237 Side Broom Motor 238 Side Broom Motor Carbon Brush Check Replacement 239 Side Broom Actuator 240 Specifications 244 50 Dust Control System 245 Functional Description 245 Wiring Diagram 246 Component Locations 247 Maintenance and Adjustments 248 Panel D...

Страница 6: ... 273 Hopper Lowering 274 Component Locations 275 Maintenance and Adjustments 277 Hydraulic System Oil Level Check 277 Troubleshooting 278 Removal and Installation 279 Closed Hopper Sensor 279 Lifted Hopper Sensor 281 Hopper Rotated Sensor 282 Hopper 283 Hydraulic Control Unit 285 Hopper Lifting Hydraulic Cylinder 287 Hopper Dumping Hydraulic Cylinder 289 Hydraulic Fluid Changing 291 Specifications...

Страница 7: ...n The hopper is equipped with a lifting system to discharge the collected debris Service Manual Purpose and Field of Application The Service Manual is a technical resource intended to help service technicians when carrying out maintenance and repairs on the SW5500 to guarantee the best cleaning performance and a long working life for the machine Please read this manual carefully before performing ...

Страница 8: ...th suspension 1466897000 Left side broom kit 1466898000 Working light kit 1466899000 Dust guard kit 1466900000 Side broom guard kit 1466901000 Battery charger kit 1466904000 SW5500 B FLOORTEC R 985 B Hybrid kit 1466903000 SW5500 D SW5500 LPG FLOORTEC R 985 LPG These manuals and spare parts list are available at Local Advance or Nilfisk Retailer Advance website www advance us com Nilfisk website ww...

Страница 9: ...the operator s position when driving Serial Number Label Reference to Figure 1 The machine serial number and model name are marked on the plate see the example to the side Product code and year of production are marked on the same plate Date code A18 means January 2018 This information is useful when requiring machine spare parts Figure 1 Figure 1 ...

Страница 10: ... water jets WARNING Moving parts Danger of crushing X WARNING Do not use the machine on slopes with a gradient exceeding the specifications WARNING Parts under voltage Presence of corrosive fluids It is important for you to read and understand this manual The information it contains relates to protecting your safety and preventing problems The symbols below are used to help you recognize this info...

Страница 11: ... R 985 Battery Keep the batteries away from sparks flames and incandescent material Explosive gases are released when charging the batteries Do not wear jewels when working near electrical components If the machine is equipped with lead WET batteries battery charging produces highly explosive hydrogen gas Keep the hood open when charging the batteries and perform this procedure in well ventilated ...

Страница 12: ...r the hydraulic system always wear protective clothes and safety glasses This machine is not intended for use by persons including children with reduced physical sensory or mental capabilities or lack of experience and knowledge unless they have been given supervision or instruction concerning use of the machine by a person responsible for they safety Children should be supervised to ensure that t...

Страница 13: ...n and bad weather both under operation and inactivity condition Store the machine indoors in a dry place If applicable This machine must be used in dry conditions it must not be used or kept outdoors in wet conditions Do not use the machine as a means of transport or for pushing towing The machine s maximum capacity operator s weight not included is 240 kg the weight of waste In case of fire use a...

Страница 14: ... charger optional ensure that frequency and voltage values indicated on the battery charger plate match the electrical mains voltage Keep the battery charger cable away from heated surfaces Do not use the machine if the battery charger cable or plug is damaged Before performing any maintenance procedure disconnect the battery charger cable from the electrical mains to avoid any risk of fire electr...

Страница 15: ... by using the system Empty the tank every 10 hours or once a week according to the use If the machine is not used for more than one week empty the tank completely and let it dry If the tank cannot be cleaned regularly consider using a biocide that can kill or exert a controlling effect on Legionella bacteria Biocide must be chosen according to the local regulations and must be used according to th...

Страница 16: ...ition adjusting lever Right side broom Steering wheel Working light Front column Main broom height adjusting knob Front driving and steering wheel Water nozzles Left side broom Accelerator pedal Driver s seat with microswitch Battery compartment hood Rear wheels Front skirt lifting pedal Service brake pedal Removable left side panel Left door Parking brake lever ...

Страница 17: ...er Vacuum system rear hood LPG tank fastening band Serial number plate Panel filter Dust filter container Dust guard system water tank Water filler neck plug Vacuum system hood release lever Hopper Anchoring slots for transport Main control panel Hybrid version Engine off button Accelerator pedal Right panel Removable right side door Main broom ...

Страница 18: ...ation Machine Nomenclature Battery version Continues BATTERY PLUG 6V 6V 6V 6V BATTERY PLUG 24V Figure 4 Battery compartment hood open Battery connection diagram Open hood safety rod Battery charger Hydraulic unit complete with tank Battery connector Batteries ...

Страница 19: ...985 03 General Information Machine Nomenclature Diesel version Continues Figure 5 Battery compartment hood open Open hood safety rod Hydraulic unit complete with tank Fuel tank cap Fuel tank Diesel engine Cooling fan Alternator Batteries ...

Страница 20: ...20 Service Manual SW5500 FLOORTEC R 985 03 General Information Machine Nomenclature LPG version Continues Figure 6 Hydraulic unit complete with tank LPG engine Alternator Batteries Cooling fan ...

Страница 21: ...e broom button DustGuard sys tem button One Touch sweep ing vacuuming button USB socket Hopper reset button Hopper dumping button Hopper lowering button Increase maximum running speed button Reverse gear forward gear reset button Working light button Decrease maximum running speed button Emergency button Hopper lifting button Hopper enablement button Horn button Multifunction display Ignition key ...

Страница 22: ...tion Reverse gear activation Side brooms speed setting Auto shut off timer Hopper opening warning Fuel reserve warning Engine overheat warning DustGuard system Work light turned on Machine angle warning Main broom adjustment procedure warning Battery type Side brooms activation Main broom activation Alternator warning Engine oil pressure warning Service call Main broom worn out ...

Страница 23: ...uter charged with the current version of EzParts Adobe Reader and if possible Internet connection Digital Volt Meter DVM Amp clamp with possibility of making DC measurements Hydrometer Battery charge tester to check 12V batteries Antistatic wrist strap Dynamometric wrench set A copy of the Instructions for use and Spare parts list of the machine to be serviced provided with the machine or availabl...

Страница 24: ... kW 3 000 rpm Engine model Yanmar L70N Honda iGX 270 Fuel type Diesel LPG Fuel tank capacity 1 8 US gal 7 liters LPG tank capacity 33 lb 15 Kg Type of Engine oil SAE 15W40 SAE 10W30 Hydraulic system Arnica 46 Main broom Motor power 1 3 hp 1 000 W 1 7 hp 1 250 W Speed 3 800 rpm 4 800 rpm Side broom Motor power 0 16 hp 120 W Speed 40 155 rpm Vacuum Motor power 0 35 hp 260 W Drive Type Electrical on ...

Страница 25: ... 79 dB A 3 dB A Machine sound pressure level ISO 3744 ISO 4871 EN 60335 2 72 LwA 88 dB A 104 dB A 98 dB A IP protection class X3 Dust guard system water tank optional capacity 8 4 US gal 32 liters U turn space right left 91 93 5 in 2 310 2 375 mm Vibration level at the operator s arms ISO 5349 1 98 4 in s2 2 5 m s2 Vibration level at the operator s body ISO 2631 1 31 5 in s2 0 8 m s2 With operator...

Страница 26: ...5500 D weight percentage SW4000 LPG FLOORTEC R 985 LPG Weight percentage Aluminum 100 0 2 0 2 0 1 Electric motors various 29 15 3 15 1 20 4 Ferrous materials 100 64 9 65 6 61 1 Wiring harnesses 80 0 0 0 0 0 0 Liquids 100 0 5 0 6 0 6 Plastic non recyclable material 0 0 0 0 0 0 0 Plastic recyclable material 100 0 9 1 1 0 8 Polyethylene 92 8 7 8 3 8 1 Rubber 20 9 3 9 0 8 7 Cardboard paper wood 100 0 ...

Страница 27: ...27 Service Manual SW5500 FLOORTEC R 985 03 General Information Dimensions 1 564 mm 61 6 in 1 200 mm 47 2 in 1 300 mm 51 2 in 1 874 mm 73 8 in Figure 9 ...

Страница 28: ...and main broom height check Service brake cable adjustment 3 Hopper dust filter check and cleaning A method 4 Hopper hydraulic lifting system oil level check 2 Skirt height and operation check Dust guard system water filter check and cleaning Hopper dust filter check and cleaning B method 4 Filter shaker operation check Brake adjustment Nut and screw tightening check 5 Steering chain cleaning Safe...

Страница 29: ...g check 6 Steering chain cleaning Safety system operation check 2 Engine filter trap cleaning Engine baffle plate cleaning Fuel filter cleaning 7 Brake pad check adjustment replacement 3 Hopper dust filter check and cleaning C method 4 Hopper gasket integrity check Lifted hopper sensor operation check adjustment Fuel filter cleaning diesel Engine paper air filter replacement Spark plug replacement...

Страница 30: ...uttons on the Main Control Board EB4 on the steering column and side control panel ì board EB5 beside the seat All machine functions with the exception of the drive are managed and controlled directly by the Main Machine Controller EB1 The drive function is managed by the Drive Wheel Controller EB2 All controls relating to the drive function operator presence SW1 and accelerator pedal R1 are wired...

Страница 31: ... Service Manual SW5500 FLOORTEC R 985 05 Control System Figure 1 Main Control Board EB4 Main Machine Controller contactor ES1 Side Main Control Board EB5 Main Machine Controller EB1 Display Controller EB3 ...

Страница 32: ...CONTACTOR ES2 DRIVING WHEEL M0 ACCELERATOR PEDAL R1 Right Side Broom Actuators A2 A3 Main Broom Actuator A1 Water Pump Motor P1 Hopper Solenoid Valves EV1 EV2 EV3 Horn Relay ES9 PWM Main Broom Motor M4 Hopper Sensors S1 S2 S3 Main Broom Sensors S4 Right Side Broom Motor M5 Left Side Broom Motor M6 Filter Shaker Motor M2 Vacuum System Motor M1 Hopper Pump Motor M3 MAIN MACHINE CONTROLLER CONTACTOR ...

Страница 33: ...J2 4 Common power supply signal output Common power supply signal output Working light output Horn output B Drive system board enabling BUZZER BZ BEACON LIGHT BE HORN RELAY ES9 HORN RELAY ES9 KEY CIRCUIT FUSE F2 HORN FUSE F8 HORN HN WORKING LIGHT L1 EMERGENCY PUSH BUTTON SW0 BATTERY BATTERY RESISTANCE KEY KEY Main Control B serial connection Main Control B serial connection Main Control B el board...

Страница 34: ...e Controller EB1 Display Controller EB3 Main Control Board EB4 Side Main Control Board EB5 Flat cables from EB3 to EB4 Ignition key KEY Figure 4 Main Control Board EB4 Main Machine Controller EB1 Ignition key KEY Display Controller EB3 Flat cables from EB3 to EB4 Side Main Control Board EB5 ...

Страница 35: ...ions detected in the input signals The alarms are grouped into 3 categories GENERAL ALARMS G relating to generic function of the Main Machine Controller EB1 FUNCTIONS ALARMS F relating to managed functionality of the Main Machine Controller EB1 DRIVE SYSTEM ALARMS TR relating to Drive Wheel Controller EB2 The alarms are shown on the display as in the example Figure 5 The drive system alarm are sho...

Страница 36: ... Battery version B B 32V instantaneous All functions blocked Check the battery connections Could be also caused descending from heavy slopes if the batteries are not enough capable If repeated change the batteries or use bigger battery pack size G5 Battery voltage high Diesel and LPG versions B 33V for at least 300 sec or B 40 0V instantaneous All functions blocked Check the battery connections Ch...

Страница 37: ...c protection I 80A for T 10s Hopper lifting pump operation blocked Check the hopper hydraulic system change the pump motor F10 MAIN SIDE BROOM VACUUM SYSTEM HOPPER RAISING PUMP power section damaged Short circuit of MOSFET or main broom current reading circuit damaged Broom vacuum system water pump operation blocked Check for a short circuit in one of the Main Machine Controller main outputs main ...

Страница 38: ...MN HIGH High voltage on motor phases Possible short circuit on battery or no battery Drive operation blocked Check the continuity from Battery negative to EB2 B TR AL 37 CONTACTOR CLOSED Internal to Drive board EB2 Drive operation blocked Replace the Main Machine Controller TR AL 38 CONTACTOR OPEN Contactor not closing Drive operation blocked Check for the drive system contactor ES2 wires replace ...

Страница 39: ...al to the motor rpm from wire blue Phase A and wire white Phase B TR AL 86 PEDAL WIRE KO No pedal negative Drive operation blocked Check the accelerator pedal wiring or replace the accelerator pedal R1 TR AL 208 EEPROM KO Issue internal to the drive board Drive operation blocked Switch off and on the machine by key switch KEY If persists replace the Main Machine Controller TR AL 209 PARAM RESTORE ...

Страница 40: ...ver s seat switch SW1 wires replace the driver s seat switch TR AL 231 WATCHDOG 2 Issue internal to the drive board Drive operation blocked Switch off and on the machine by key switch KEY If persists replace the Main Machine Controller TR AL 233 POWER MOS SHORT Internal to Drive board EB2 Drive operation blocked Replace the Main Machine Controller TR AL 236 CURRENT GAIN Max current problem interna...

Страница 41: ...re 7 2 Press the hopper lifting button to change the machine settings see Machine Settings Screen 3 Press the hopper lowering button to check any alarms stored by the machine see Alarm Log Screen 4 Press the increase running speed button to check the machine working hours see Operating Time Counter Screen 5 Press the decrease running speed button to exit service mode and return to operator mode 6 ...

Страница 42: ...een press and hold the hopper lowering button MODIFIABLE PARAMETERS Code Description Min value Factory Setting Max value VSL Side broom speed 50 100 100 SCF Filter shaker activation time 5 sec 20 sec 60 sec FVMIN Minimum forward speed 0 25 100 FVMAX Maximum forward speed Battery 10 85 100 Diesel LPG 10 100 100 RVMAX Maximum reverse speed 10 30 50 BAT Installed battery type WET WET GEL AGM TOFF Aut...

Страница 43: ...number of hours before the service icon appears on the multifunction display If 0 function disabled ISC Main broom maximum current Battery 50 70 1 000 Maximum continuous current permitted for the main broom motor Diesel LPG 50 60 100 HRC Maximum number of hours without recharge 0 5 50 Significant only for machines equipped with hybrid system KIT Cumulative number of hours running on battery withou...

Страница 44: ... button repeatedly Each alarm see table in the Main Machine Controller Alarm Codes is stored along with the working hour machine operating time counter at which it occurred and all alarms are recorded in the order in which they occurred from the most recent to the oldest The memory holds up to 20 alarm records after which the oldest are overwritten when new alarms occur Press the hopper lifting bu...

Страница 45: ... accumulated hours of work for each machine subsystem A C B D E Figure 10 A TOTAL hour counter machine on time B SIDE BROOMS hour counter side brooms usage time C MAIN BROOM hour counter main broom usage time D DRIVE hour counter drive system usage time E VACUUM hour counter vacuum system usage time To return to the main screen press the hopper lifting button ...

Страница 46: ... output will be independently activated from any condition present on the inputs and only for the time while the button is pressed Where indicated in the table the display shows in real time the current consumption detected by the card on the active output Figure 12 For some buttons not directly related to any the output activation the display shows the effective button pressing WARNING Pay maximu...

Страница 47: ...n MAIN BROOM ACTUATOR UP Yes RH RIGHT SIDE BROOM ACTUATOR lowering activation RIGHT BROOM ACTUATOR DOWN Yes RH RIGHT SIDE BROOM ACTUATOR lifting activation RIGHT BROOM ACTUATOR UP Yes LH LEFT SIDE BROOM ACTUATOR lowering activation LEFT BROOM ACTUATOR DOWN Yes LH LEFT SIDE BROOM ACTUATOR lifting activation LEFT BROOM ACTUATOR UP Yes FILTER SHAKER output activation FILTER SHEAKER ON Yes Button pres...

Страница 48: ...Diesel and LPG Version 5 Unscrew the four screws A fastening the fairing B 6 Unscrew the nut C on the front 7 Slide the sleeve D until it is flush on the steering wheel 8 Press the stud E sliding it upwards causing the Main Control Board F to lift slightly then remove the fairing B by disengaging it from its seat and the stud E 9 Disconnect the electrical connection G from the Display Controller H...

Страница 49: ...shown in the figure and disengaging it from the shaft with key M 13 Disconnect all the electrical connections from the Main Machine Controller N after marking their various positions 14 Unscrew the four nuts P and remove the Main Machine Controller N Installation 15 Assemble the components in the reverse order of removal and note the following P P N P P M M L L Figure 14 ...

Страница 50: ...G Version 5 Unscrew the four screws A fastening the fairing B 6 Unscrew the nut C on the front 7 Slide the sleeve D until it is flush on the steering wheel 8 Press the stud E sliding it upwards causing the Main Control Board F to lift slightly then remove the fairing B by disengaging it from its seat and the stud E 9 Disconnect the electrical connection G from the Display Controller H 10 Disconnec...

Страница 51: ...ons from the Drive Wheel Controller N after marking their various positions 14 Unscrew the four nuts P and remove the Drive Wheel Controller N Installation 15 Assemble the components in the reverse order of removal and note the following Apply a thin layer of thermal paste such as ELECTROLUBE HTS to the entire rear surface Q of the Drive Wheel Controller If a new Drive Wheel Controller is being in...

Страница 52: ...r screws A fastening the fairing B 6 Unscrew the nut C on the front 7 Slide the sleeve D until it is flush on the steering wheel 8 Press the stud E sliding it upwards causing the Main Control Board F to lift slightly then remove the fairing B by disengaging it from its seat and the stud E 9 Working from underneath the Main Control Board F disconnect the electrical connections G and H of the Displa...

Страница 53: ... the battery connector Battery Version Disconnect the batteries Diesel and LPG Version 5 Unscrew the four screws A fastening the fairing B 6 Unscrew the nut C on the front 7 Slide the sleeve D until it is flush on the steering wheel 8 Press the stud E sliding it upwards causing the Main Control Board F to lift slightly then remove the fairing B by disengaging it from its seat and the stud E 9 Remo...

Страница 54: ...see procedure in the Steering System chapter 13 Remove the sleeve K 14 Disconnect the electrical connection L of the Main Control Board on the Display Controller M 15 Remove the screws N and lower the Display Controller M 16 Use a spatula to detach the Main Control Board P starting in a corner If necessary unscrew the screws Q and remove the board bracket R to facilitate the work Figure 19 Q Q R I...

Страница 55: ...Control Board EB4 continues Installation 17 Clean the seat of the Main Control Board P with solvent and remove any adhesive residue 18 Install the new Main Control Board centering it in its seat 19 Assemble the components in the reverse order of removal Figure 20 P ...

Страница 56: ...nect the battery connector Battery Version Disconnect the batteries Diesel and LPG Version 5 Working on the inner left side of the battery engine compartment unscrew the screws A and remove the guard B 6 Turn the fastener C downwards then disconnect the emergency button electrical connector D 7 Disconnect the side Main Control Board electrical connection E 8 Unscrew the screws F and working from t...

Страница 57: ...its reference J from its seat K 10 Use a spatula to detach the side Main Control Board L starting in a corner Installation 11 Clean the seat of the side Main Control Board L with solvent and remove any adhesive residue 12 Install the new side Main Control Board L centering it in its seat 13 Assemble the components in the reverse order of removal Figure 22 L H I K I J ...

Страница 58: ... Controller power supply in 24V 150A BAT B Main Machine Controller power supply in 0V 150A BAT B B Figure 23 B B Power Connections M5 screw terminals Ref Description Controller in out V ref I max Connected to BR Main broom motor out 24V 120A M4 BR Main broom motor out 0V 120A M4 PM Hopper lifting pump motor out 24V 90A S3 20 M3 PM Hopper lifting pump motor out 0V 90A S3 20 M3 BR BR BR BR PM PM Fig...

Страница 59: ...r out 24V 10A PWM M5 RSB Right side broom motor out 0V 10A PWM M5 LSB Left side broom motor out 24V 10A PWM M6 LSB Left side broom motor out 0V 10A PWM M6 VA Vacuum system motor out 24V 20A M1 VA Vacuum system motor out 0V 20A M1 FS Filter shaker motor out 24V 20A S3 20 M2 FS Filter shaker motor out 0V 20A S3 20 M2 WP Water pump motor out 24V 10A P1 WP Water pump motor out 0V 10A P1 Figure 25 RSB ...

Страница 60: ...1 2 ENGINE VERS CONFIG input in 0V 1A A1 6 3 Not used 4 Main broom actuator supply 1 out 0 24V 8A A1 5 Not used 6 End of stroke microswitch power supply out 0V 1A A1 2 A1 Figure 26 A1 A2 Actuator 2 connection RH side broom MOLEX MINIFIT type 6 way vertical PIN Description Controller in out V ref I max Connected to 1 Right side broom actuator supply 1 out 0 24V 8A A2 2 Not used 3 Not used 4 Right s...

Страница 61: ...nected to 1 Left side broom actuator supply 1 out 0 24V 8A A3 2 Not used 3 Not used 4 Left side broom actuator supply 1 out 0 24V 8A A3 5 Not used 6 Not used A3 Figure 28 A3 A4 Actuator 4 connection MOLEX MINIFIT type 6 way vertical PIN Description Controller in out V ref I max Connected to 1 REVERSE GEAR enabling out 0 24V 8A EB2 B8 2 Not used 3 MAX SPEED REF out 0 5V 1A EB2 C9 4 Not used 5 Not u...

Страница 62: ...nput in 24V 1A EB5 4 5 OPEN HOPPER input in 24V 1A S1 6 LIFTED HOPPER input in 24V 1A S2 7 Not used 8 FUEL RESERVE input in 0V 1A S6 9 Signal power supply out 24V 1A S1 10 Signal power supply out 24V 1A S2 11 Drive system board enabling out 24V 1A EB2 C1 12 MAIN BROOM WEAR input in 24V 1A S4 13 RECTIFIER TEMP input in 0V 1A S8 14 ALTERNATOR input in 24V 1A ALT 15 TURNED HOPPER input in 24V 1A S3 1...

Страница 63: ...ing valve output out 0V 1A EV3 4 Horn output out 0V 1A ES9 5 ENGINE FAN RPM output out 0V 1A ES4 ES6 6 FUEL PUMP VALVE output out 0V 1A EV4 P2 7 WATER PUMP warning light output out 0V 1A EB5 5 8 Working light output out 0V 3A L1 9 Common power supply signal output out 24V 3A EV1 2 3 10 Not used 11 Not used 12 Common power supply signal output out 24V 3A ES9 13 Common power supply signal output out...

Страница 64: ... Main Control board serial connection in out 0 5V 1A EB3 2 2 Main Control board serial connection in out 0 5V 1A EB3 3 3 Not used 4 Main Control board board power supply out 0V 1A EB3 4 J3 Figure 32 J3 J4 Signal inputs outputs connections MOLEX MINIFIT type 2 way vertical PIN Description Controller in out V ref I max Connected to 1 Electromagnetic switch output out 0V 1A ES1 2 Electromagnetic swit...

Страница 65: ...Controller EB1 Connectors Continues J5 Auxiliary power supplies connections MOLEX MINIFIT type 8 way vertical PIN Description Controller in out V ref I max Connected to 1 Not used 2 Not used 3 Not used 4 Not used 5 Not used 6 Not used 7 Not used 8 Not used J5 Figure 34 J5 ...

Страница 66: ...signal out 24V 1A TRK BN 2 Power supply 24V out 24V 1A TRK RD 3 iButton input in 0V 1A TRK YE 4 BROOM ACTIVE FUNC signal out 0V 1A TRK WH 5 Power out 0V 1A TRK BU 6 DRIVE SYSTEM ACTIVE signal out 24V 1A TRK PK J6 Figure 35 J6 J7 TYCO MODU II type 2 ways vertical PIN Description Controller in out V ref I max Connected to 1 CAN BUS H channel in out 5V 1A EB2 C5 2 CAN BUS L channel in out 5V 1A EB2 C...

Страница 67: ...ays vertical Ref Description Controller in out V ref I max Connected to 1 Power in 24V 1A KEY 15 54 2 Main Control board serial connection in out 0 5V 1A EB1 J3 1 3 Main Control board serial connection in out 0 5V 1A EB1 J3 2 4 Power in 0V 1A EB1 J3 4 5 Power supply enabling out 24V 1A EB1 J1 1 6 Not used J1 Figure 37 ...

Страница 68: ...V 1A EB4 J1 4 5 SPEED button P9 in 0V 1A EB4 J1 5 6 REVERSE GEAR button P15 in 0V 1A EB4 J1 6 7 HOPPER OPEN button P12 in 0V 1A EB4 J1 7 8 HOPPER CLOSE button P13 in 0V 1A EB4 J1 8 9 HORN button P14 in 0V 1A EB4 J1 9 10 VACUUM button P6 in 0V 1A EB4 J1 10 11 LEFT SIDE BROOM button P3 in 0V 1A EB4 J1 11 12 MAIN BROOM button P1 in 0V 1A EB4 J1 12 13 SIDE BROOM SPEED button P4 in 0V 1A EB4 J1 13 14 S...

Страница 69: ...connected to the main battery negative unless otherwise specified A battery powered machine was used for circuits that are common Then engine powered machines were used for circuits unique to the engine applications Shop Measurements Main Machine Controller EB1 Battery Connection B B Figure 39 B B PIN Color Description Measured Condition B Red Main Machine Controller power supply 24 3V Sweeping Sy...

Страница 70: ...Connections BR BR BR BR PM PM Figure 40 BR BR BR BR PM PM PIN Color Description Measured Condition BR Red Main broom motor 23 8V Main broom on BR Black Main broom motor 0 4v Main broom on 24 8V main broom off PM Red Hopper lifting pump motor 24 3V pump running PM Hopper lifting pump motor 0 3V pump running 24 8V pump off ...

Страница 71: ...escription Measured Condition RSB Red Right side broom motor 24 3v on RSB Black Right side broom motor 0 3V on 24 9V off LSB Left side broom motor LSB Left side broom motor VA Red Vacuum system motor 24 3V on VA Black Vacuum system motor 0 3V on 24 9V off FS Red Filter shaker motor 24 3V on FS Black Filter shaker motor 0 or 24V cycling on and off WP Water pump motor WP Water pump motor ...

Страница 72: ...f 0 0V 2 Red Black Configuration Battery or Engine 0 004V when loop is present 3 4 Black Main broom actuator supply 1 Up 25 1V Down 0 1V Off 0 0V 1 5 6 Red Black Configuration Battery or Engine 0 004V when loop is present A2 Actuator 2 connection A2 Figure 43 A2 PIN Color Description Measured Condition 1 Red Right side broom actuator supply 1 Up 0 18V Down 25 2V Off 0 0V 2 3 4 Black Right side bro...

Страница 73: ...ff 0 0V 2 3 4 Black Left side broom actuator supply 1 Up 25 1V Down 0 04V Off 0 0V 5 6 A4 Actuator 4 connection A4 Figure 45 A4 PIN Color Description El board in out V ref I max Measured Condition 1 REVERSE GEAR enabling out 0 24V 8A EB2 B8 2 Position 0 microswitch return in 1A Not used 3 MAX SPEED REF out 0 5V 1A EB2 C9 4 REMOTE VAC enablement out 24V 8A Not used 5 Position 1 microswitch return i...

Страница 74: ... 4 99V fuel OK 0 006 Low pressure 9 Green White Signal power supply 23 4V 10 Blue White Signal power supply 23 4V 11 Orange Black Drive Wheel Controller enabling Key On 23 9V Key off 0 02V 12 Brown BROOM WEAR input Normal Broom 0 009V Worn out Broom 22 8V Illuuminated 13 Pink Black RECTIFIER TEMP input Engine Only Normal Temp 0 0V Excessive Temp 4 9V 14 Red Black ALTERNATOR input Engine Only Engin...

Страница 75: ...FAN Speed request and Charging output relay Engine Only 25 09V Off 0 15V On 6 Pink Black LPG Starter relay and LPG safety shut down solenoid FUEL PUMP VALVE output Engine Only LPG Key on Initial 0 0V LPG Key on after 10 seconds without Alternator output 23 9V EV4 P2 7 Black WATER PUMP warning light output Off 24 3V On 0 008V 8 Yellow Black Working light output L1 9 Red Common power supply signal o...

Страница 76: ...sured Condition 1 Blue Main Control board serial connection 4 09V 2 Yellow Main Control board serial connection 2 4 2 7V 3 4 Main Control board power supply 0 004V J4 Signal inputs outputs connections J4 Figure 49 J4 PIN Color Description Measured Condition 1 Black Electromagnetic switch output Key on 23 5V initially Drops to 0 056V when it turns on 2 Red Electromagnetic switch output 22 7V ...

Страница 77: ...anual SW5500 FLOORTEC R 985 05 Control System Shop Measurements Main Machine Controller EB1 continues J5 Auxiliary power supplies connections J5 Figure 50 J5 PIN Color Description Measured Condition 1 2 3 4 5 6 7 8 ...

Страница 78: ...51 J6 PIN Color Description Measured Condition 1 MACHINE ON signal TRK BN 2 Power supply 24V TRK RD 3 iButton input TRK YE 4 BROOM ACTIVE FUNC signal TRK WH 5 Power TRK BU 6 DRIVE SYSTEM ACTIVE signal TRK PK J7 TYCO MODU II type J7 Figure 52 J7 PIN Color Description Measured Condition 1 Red CAN BUS H channel 2 45V 2 Black CAN BUS L channel 2 39V ...

Страница 79: ...oller EB3 J1 MOLEX MINIFIT type J1 Figure 53 PIN Color Description Measured Condition 1 Orange Power Key Off 0 4V Key On 24 7V 2 Blue Main Control board serial connection 4 09V 3 Yellow Main Control board serial connection 2 4 2 7V 4 Green Power 0 06V 5 Orange Power supply enabling 23 9V 6 ...

Страница 80: ...15 Not Pressed 3 1V Presssed 0 009V 7 Ribbon HOPPER OPEN button P12 Not Pressed 3 1V Presssed 0 009V 8 Ribbon HOPPER CLOSE button P13 Not Pressed 3 1V Presssed 0 009V 9 Ribbon HORN button P14 Not Pressed 3 1V Presssed 0 009V 10 Ribbon VACUUM button P6 Not Pressed 3 1V Presssed 0 009V 11 Ribbon LEFT SIDE BROOM button P3 Not Pressed 3 1V Presssed 0 009V 12 Ribbon MAIN BROOM button P1 Not Pressed 3 1...

Страница 81: ...nd side brooms A Central section supporting batteries engine with alternator B Lower compartment for central broom C Rear side supporting the hopper and rear wheels on hubs D Side and central holder for separating wall between engine compartment vacuum system compartment and for supporting the hopper lifting linkages E Figure 1 B A C D E ...

Страница 82: ...hout any drive or stop system These are hold in place by means of a pin on eccentric flange fastened to the chassis by means of screws On the Battery version the standard wheels are super elastic non marking optionally black On Diesel and LPG versions the standard wheels are foam optionally super elastic non marking or black ...

Страница 83: ...14 Wheel System Non Traction Component Locations Rear wheels Hub Hexagon castle nut Drum brake Service brake pedal Parking brake lever Figure 1 Service brake pedal Service brake pedal Rear wheels Hexagon castle nut Hub Rear wheels Drum brake ...

Страница 84: ...site to the one to be checked 4 Lift the hopper to the end of stroke WARNING Place a safety rod under the lifted hopper 5 Turn the fasteners and remove the left door 6 Remove the right door after removing the relevant mounting screws 7 Apply a suitable jack B underneath the chassis zone C and raise the machine a few cm so that the wheel to be checked D can turn freely 8 For safety place a suitable...

Страница 85: ... mass starts rubbing against the wheel D 11 Perform the check described in the previous step and if necessary adjust the brake tie rod H as follows Slacken off the nuts I and adjust them until the situation described in the previous step is met with the regulation complete tighten down the nuts I 12 Perform in the reverse order steps 3 7 8 9 Then repeat steps 3 7 8 9 For the other rear wheel 13 Pe...

Страница 86: ...leshooting Trouble Possible causes Remedy Braking is unbalanced the machine does not brake Drum brake cables incorrectly regulated Regulate The braking shoes are worn Replace Wheel tread worn Replace the wheels Brakes squeal Brake pedal in park position Release parking brake ...

Страница 87: ...t the same time in order to achieve correct braking effectiveness of the parking brake Removal 1 Drive the machine on a level floor 2 Check that the parking brake is not engaged 3 Ensure that the machine cannot move by placing opposing chocks A on the wheel opposite to the one to be checked 4 Lift the hopper to the end of stroke WARNING Place a safety rod under the lifted hopper Figure 4 A A ...

Страница 88: ...screws 7 Apply a suitable jack B underneath the chassis zone C and raise the machine a few cm so that the wheel to be checked D can turn freely 8 For safety place a suitable spacer E underneath the chassis zone F to prevent the machine from dropping accidentally 9 Slacken off the cable H by unscrewing the nuts I then disconnect the terminal J of the cable from the brake lever G Figure 5 H I I H D ...

Страница 89: ...rew the screw K on the rear wheel D 11 Remove the rear wheel D 12 Disconnect the springs L from the braking shoes M 13 Remove the braking shoes M Installation 14 Assemble the components in the reverse order of removal and note the following Perform regulation of the drum brake cable see procedure in the relevant paragraph Figure 6 M M L L D K ...

Страница 90: ...5500 B FLOORTEC R 985 B SW5500 D SW5500 LPG FLOORTEC R 985 LPG Rear wheels diameter 16 in 406 mm Drum brake diameter 6 3 in 160 mm Rear axle curb weight 1 320 lb 599 Kg 1 067 lb 484 Kg 1 115 lb 506 Kg Rear wheel specific pressure on the floor 116 psi 0 8 N mm2 58 psi 0 4 N mm2 72 psi 0 5 N mm2 ...

Страница 91: ...e when the hopper open sensor S1 detects that the hopper is lifted the maximum machine speed is decreased to a safety value When the machine is started with the key switch KEY the system is always placed in forward mode Pressing the reverse button changes to reverse mode until the button is pressed again When reverse is selected this is signalled by the icon on the display and the buzzer The posit...

Страница 92: ... the analogue maximum speed signal supplied by the Main Machine Controller to the drive system board is reduced in proportion to the measured acceleration the voltage value of the speed signal depends also to the speed setting buttons and varies tipically from 1 to 5 V Only on LPG DIESEL version The relay ES8 is activated by the output of the auxiliary bridge rectifier D1 only when the engine is r...

Страница 93: ...ve system board enabling CAN BUS H channel CAN BUS L channel B A4 4 WIRE ENGINE VERSION WIRE BATTERY VERSION Traction inhibition ACCELERATOR PEDAL R1 TEMP SENSOR S5 DRIVER S SEAT MICROSWITCH SW1 BATTERIES BAT ENCODER ENC DRIVING WHEEL M0 J1 14 ALTERNATOR input DRIVE SYSTEM ENABLING RELAY ES8 B Main machine controller power supply B Main machine controller power supply MAIN MACHINE CONTROLLER EB1 D...

Страница 94: ...imum running speed button Reverse gear forward gear reset button Accelerator pedal R1 Driver s seat safety microswitch SW1 Service brake pedal Parking brake lever Figure 3 Driver s seat microswitch SW1 Increase maximum running speed button Decrease maximum running speed button Reverse gear forward gear reset button Accelerator pedal R1 ...

Страница 95: ...eel System Traction Component Locations Continues Driving wheel M0 Drive Wheel Controller EB2 Main fuse 160A F3 Drive Wheel Controller contactor ES2 Figure 4 Driving wheel M0 Drive Wheel Controller EB2 Main fuse 160A F3 Drive system contactor ES2 ...

Страница 96: ... EB2 faulty Replace The wiring harness is damaged Check the electrical connections repair the wiring harness The ignition key switch KEY is not working Replace Driver seat safety microswitch SW1 not working Replace Driving wheel M0 faulty Replace Drive Wheel Controller contactor ES2 faulty Replace Drive system board fuse F3 blown Replace The machine is moving at reduced speed Encoder ENC faulty Re...

Страница 97: ...bigger capacity battery TR AL 30 VMN LOW Low voltage on motor phases Check the battery voltage Replace the Main Machine Controller TR AL 31 VMN HIGH High voltage on motor phases Possible short circuit on battery or no battery Check for damage or short circuits into the power wires between the drive board and the drive system motor M0 and check the B and B power connections to the drive board Repla...

Страница 98: ...oder track Replace the encoder ENC TR AL 86 PEDAL WIRE KO No pedal negative Check the accelerator pedal R1 wires and connections Substitute the pedal TR AL 208 EEPROM KO Issue internal to the drive board Switch off and on the machine by key switch KEY Replace the Main Machine Controller TR AL 209 PARAM RESTORE Issue internal to the drive board Switch off and on the machine by key switch KEY Replac...

Страница 99: ...achine Controller TR AL 236 CURRENT GAIN Issue internal to the drive board Switch off and on the machine by key switch KEY Replace the Main Machine Controller TR AL 247 DATA ACQUISITION Issue internal to the drive board Switch off and on the machine by key switch KEY Replace the Main Machine Controller TR AL 248 NO CAN MSG CANBUS communication problem Check the twisted pair between the drive board...

Страница 100: ...g B 4 Unscrew the nut C on the front 5 Slide the sleeve D until it is flush on the steering wheel 6 Press the stud E sliding it upwards causing the Main Control Board F to lift slightly then remove the fairing B by disengaging it from its seat and the stud E 7 Position a suitable lifting device G at the centre of the front section of the machine on the chassis bracket H then raise the front of the...

Страница 101: ... at the maximum speed and check that the driving wheel amperage is within 15 and 25A at 24Vac Stop the drive system Turn the ignition key to 0 Remove the ammeter clamp K If the amperage is higher perform the following procedures to detect and correct it Check that there is no dust or debris ropes cables etc on the driving wheel that can prevent it from turning If necessary disassemble the drive sy...

Страница 102: ...ly in 0Vdc 250A BAT U Drive motor phase U out 0 24Vac 250A M0 U V Drive motor phase V out 0 24Vac 250A M0 V W Drive motor phase W out 0 24Vac 250A M0 W Shop Measurements Drive Wheel Controller EB2 JB Connector JB Figure 7 PIN Color Description Measured Condition 1 2 Red Power Supply from ES2 contactor Key off 0v Key on 25 3V 3 4 Yellow Drive Pedal Micro switch input Pedal not pressed 0V Pedal pres...

Страница 103: ... Main Machine Controller Key Off 0V Key On 23 9 2 Violet Smart Key Communication Optional 3 Brown POT Low output 0 005V 4 White POT Wiper Pedal at rest 0 014V Full forward 4 9V 5 Red CAN High 2 45V 6 Violet Black Seat Switch Input Open 0 005V Closed On seat 23 9V 7 8 Green POT High 13 4V 9 Blue Maximum Speed input from Main Machine Controller Speed Select 1 1 21V 2 1 93V 3 2 66V 4 3 39V 5 4 13V 10...

Страница 104: ... supply 13 4V 3 Yellow Motor Temp Sensor input 1 38V 26 Deg C 12 1V when circuit is open 4 White Encoder Phase B 13 5V or 0 135V depending on location You can move the wheel slightly by hand to confirm that it switches Rotating 6 7V Average 5 Black Encoder negative supply 0 005V 6 Yellow Black Motor Temp Sensor negative reference 0 005V High Current Cables Measurment points Stationary Low Speed No...

Страница 105: ...at the centre of the front section of the machine on the chassis bracket H then raise the front of the machine by a few centimeters until the driving wheel can be removed 4 For safety purposes to prevent accidental lowering of the machine apply two suitable spacers under the right C and left D side brackets 5 Unscrew the six screws E 6 Remove the wheel F Installation 7 Assemble the components in t...

Страница 106: ... FLOORTEC R 985 20 Wheel System Traction Driving Wheel Assembly Spare parts 1 Motorwheel A 2 Chain stretcher B 3 Non marking wheel C 4 Motor D 5 Steering plate E 6 Gear box for motorwheel F 7 Speed kit G C E F G B D Figure 11 A ...

Страница 107: ...l and LPG Version 5 Unscrew the four screws A fastening the fairing B 6 Unscrew the nut C on the front 7 Slide the sleeve D until it is flush on the steering wheel 8 Press the stud E sliding it upwards causing the Main Control Board F to lift slightly then remove the fairing B by disengaging it from its seat and the stud E 9 Disconnect the electrical connection G from the Display Controller H 10 D...

Страница 108: ...teering wheel with steering shafts assembly L gripping it as shown in the figure and disengaging it from the shaft with key M 13 Remove the screws N and remove the accelerator P and brake Q pedals 14 Unscrew the handwheels R on the left hand side of the machine and remove the left door S Figure 13 M L Q P N N R S R ...

Страница 109: ...nd side of the machine and remove the right door U 16 Unscrew the two screws V and remove the cover W at the base of the steering column 17 Working below the footboard X unscrew the screws in the fastening positions Y of the footboard itself 18 Remove the footboard X freeing it from the steering column Z X Figure 14 X V W T U T Y Y Y Z X ...

Страница 110: ...e Steering System chapter 20 Free the three caps AA and disconnect the three electrical connections AB of the driving wheel AC after unscrewing the corresponding nuts 21 Disconnect the driving wheel temperature electrical connection AD 22 Disconnect the encoder electrical connection AE 23 Cut the fastening clamps AF Figure 15 AC AC AF AA AB AD AE ...

Страница 111: ...he front section of the machine on the chassis bracket AL then carefully raise the front of the machine by a few centimeters until the driving wheel AM can be removed take care as the driving wheel weighs 95 lb 43 Kg Installation 26 Assemble the components in the reverse order of removal and note the following When positioning the driving wheel AM take care that it is correctly oriented in the cor...

Страница 112: ...nd LPG Version 5 Unscrew the four screws A fastening the fairing B 6 Unscrew the nut C on the front 7 Slide the sleeve D until it is flush on the steering wheel 8 Press the stud E sliding it upwards causing the Main Control Board F to lift slightly then remove the fairing B by disengaging it from its seat and the stud E 9 Disconnect the electrical connection G from the Display Controller H 10 Disc...

Страница 113: ...assembly L gripping it as shown in the figure and disengaging it from the shaft with key M 13 Remove the side brooms see procedure in the Side Broom System 14 Remove the screws N and remove the accelerator P and brake Q pedals 15 Unscrew the handwheels R on the left hand side of the machine and remove the left door S Figure 18 M L Q P N N R S R ...

Страница 114: ... side of the machine and remove the right door U 17 Unscrew the two screws V and remove the cover W at the base of the steering column 18 Working below the footboard X unscrew the screws in the fastening positions Y of the footboard itself 19 Remove the footboard X freeing it from the steering column Z X Figure 19 X V W T U T Y Y Y Z X ...

Страница 115: ...rew the screws AB and remove the accelerator pedal AC 22 If necessary go to the workbench to unscrew the screw AD and remove the lever AE from the accelerator pedal AC freeing it from the shaft AF with seat Assembly 23 Assemble the components in the reverse order of removal and note the following When re installation is complete check that the accelerator pedal is working correctly Figure 20 AA AD...

Страница 116: ...sion Disconnect the batteries Diesel and LPG Version 5 Working from the inside of the battery engine compartment disconnect the electrical connection A of the seat microswitch 6 If necessary also remove the seat rails by unscrewing the nuts B 7 Disengage the support rod C and close the battery engine hood 8 Operate the lever D and remove the seat E from the rails 9 Free the seat cable F from the h...

Страница 117: ...emoval and note the following Before tightening the screws G check that the seat rails H are aligned After the seat have been reinstalled check that it slides properly on the rails and also check that it engages properly in each position Also check correct operation of the seat microswitch by trying the start the machine without sitting in the seat Figure 22 H G G H ...

Страница 118: ...ng acceleration 500 Nm Ingress protection IP20 Forward speed 5 6 mi h 9 km h 6 2 mi h 10 km h Reverse speed 2 5 mi h 4 km h 2 8 mi h 4 5 km h Driving wheel diameter 12 in 300 mm Maximum gradient when working 20 Front axle weight in running conditions 1 106 lb 502 Kg 780 lb 354 Kg 804 lb 365 Kg Front wheel specific pressure on the floor 232 psi 1 6 N mm2 101 psi 0 7 N mm2 101 psi 0 7 N mm2 U turn s...

Страница 119: ...ctional Description The steering wheel is fastened to the steering column and connected to a shaft with a universal joint The movement is transmitted with pinion and chain to the ring gear which determines the steering The ring gear is fastened to the driving wheel ...

Страница 120: ...eering System Component Locations Steering wheel Steering column Universal joint Steering shaft Steering assembly Steering chain Figure 1 Steering shaft Universal joint Steering shaft Steering wheel Steering column Steering assembly Steering chain ...

Страница 121: ...sher C 5 With a suitable puller remove the steering wheel D using the surface E of the steering shaft and the threaded holes F of the steering wheel Installation 6 Assemble the components in the reverse order of removal and note the following Insert the steering wheel in its seat D ensuring the following conditions are met Driving wheel straight not steered Steering wheel with circular impression ...

Страница 122: ...nut D If there is no footboard on the machine the operations on the locknut C and the nut D can be performed from the upper section of the chassis through the slot E 5 Remove the link F and remove the chain B Installation 6 Assemble the components in the reverse order of removal and note the following Do not lubricate the chain B otherwise dust and debris will stick to the lubricant The chain must...

Страница 123: ...oard battery charger CH is directly connected on the battery pins for the power side to connector C2 for the inhibition signal When the battery charger is not connected to the electrical mains the relay inside the battery charger closes the contact between the 2 wires connected to C2 this contact opens when the battery charger is connected to the electrical mains When the battery charger is not in...

Страница 124: ...nual SW5500 FLOORTEC R 985 24 Electrical System Functional Description Battery Version continues Figure 2 On board battery charger CH Jumper bridge w o on board battery charger Connector C2 Emergency push button SW0 ...

Страница 125: ...wer 30 1 15 50 C1 C1 15 54 30 J1 5 Power supply enabling P0 P1 P2 Drive system board enabling KEY CIRCUIT FUSE F2 HORN FUSE F8 EMERGENCY PUSH BUTTON SW0 BATTERIES BAT KEY KEY B Main machine controller power supply B Main machine controller power supply MAIN MACHINE CONTROLLER EB1 DISPLAY CONTROLLER EB3 MAIN MACHINE CONTROLLER FUSE F1 Figure 3 ...

Страница 126: ...B 15 54 30 J1 5 Power supply enabling P0 P1 P2 Drive system board enabling WITHOUT ON BOARD BATTERY CHARGER BATTERY CHARGER CH KEY CIRCUIT FUSE F2 HORN FUSE F8 EMERGENCY PUSH BUTTON SW0 BATTERIES BAT KEY KEY B Main machine controller power supply B Main machine controller power supply MAIN MACHINE CONTROLLER EB1 DISPLAY CONTROLLER EB3 MAIN MACHINE CONTROLLER FUSE F1 Figure 4 ...

Страница 127: ...speed or not even if the corresponding input is open The engine fuel supply system is fitted with a safety solenoid valve EV4 which allows LPG to flow to the engine only when powered The solenoid valve EV4 is powered when the key switch KEY is in position II and for the first 10 seconds of operation when it is in position I After these 10 seconds have passed if the engine has not been started powe...

Страница 128: ...tion Diesel LPG Version continues Figure 5 Fuel pump P2 Resistor R4 Recharging contactor ES10 Battery charging fuse F4 Engine speed realy ES4 Main Machine Controller EB1 Starter motor Diesel MST Starter motor GPL MST Diode jumper D1 GPL solenoid valve EV4 Diesel solenoid valve EV4 ...

Страница 129: ...TTERIES BAT KEY KEY J1 13 RECTIFIER TEMP input TEMP SENSOR DIODE JUMPER S8 ALTERNATOR ALT FAN RELAY ES6 RECHARGE SYSTEM ELECTROMAGNETIC SWITCH ES10 ALTERNATOR FUSE F4 FAN FUSE F7 ENGINE COMPARTMENT FAN M7 0V J2 5 ENGINE RPM FAN output J1 14 ALTERNATOR input FAN RELAY ES6 RECHARGE SYSTEM ELECTROMAGNETIC SWITCH ES10 B Main machine controller power supply B Main machine controller power supply MAIN M...

Страница 130: ...NCY PUSH BUTTON SW0 BATTERIES BAT KEY KEY J1 13 RECTIFIER TEMP input TEMP SENSOR DIODE JUMPER S8 ALTERNATOR ALT FAN RELAY ES6 RECHARGE SYSTEM ELECTROMAGNETIC SWITCH ES10 ALTERNATOR FUSE F4 FAN FUSE F7 ENGINE COMPARTMENT FAN M7 J1 14 ALTERNATOR input FAN RELAY ES6 J2 5 ENGINE RPM FAN output B Main machine controller power supply B Main machine controller power supply MAIN MACHINE CONTROLLER EB1 DIS...

Страница 131: ...achine Controller fuse 150A F1 Key circuit fuse 10A F2 Drive system fuse 160A F3 Horn fuse 10A F8 Horn relay ES9 Drive board electromagnetic switch ES2 Figure 8 Emergency push button SW0 Beacon light BE Main Machine Controller fuse 150A F1 Horn relay ES9 Key circuit fuse 10A F2 Horn fuse 10A F8 Drive system fuse 160A F3 Drive board electromagnetic switch ES2 ...

Страница 132: ... version Battery charger CH Batteries BAT Wiring harnesses Battery connector C1 Bridge jumper without on board battery charger Figure 9 BATTERY PLUG 6V 6V 6V 6V BATTERY PLUG 24V Wiring harnesses Battery connector C1 Batteries BAT Battery charger CH Bridge jumper w o on board charger battery ...

Страница 133: ... batteries 150A F0 Battery charging fuse 125A F4 Starter motor fuse 100A F6 Engine compartment fan fuse 20A F7 Drive system enablement relay ES8 Drive system enablement relay ES8 Starter motor fuse 100A F6 Engine compartment fan fuse 20A F7 Fuse for batteries 125A F0 Batteries BAT Alternator ALT Figure 10 Battery charging fuse 150A F4 ...

Страница 134: ... ES10 Diode jumper D1 Engine on off relay ES3 Engine speed relay ES4 Engine start realy ES5 Drive system relay ES8 Diode jumper temp sensor S8 Figure 11 Fuse for batteries 125A F0 Drive system relay ES8 Engine start realy ES5 Engine speed realy ES4 Engine on off relay ES3 Battery charging fuse 160A F4 Starting command fuse 15A F6 Recharging contactor ES10 Engine compartment fan fuse 20A F7 Fan rel...

Страница 135: ... ENGINE COMPARTMENT FAN 20A ENGINE COMPARTMENT FAN F8 UNIVAL 10A HORN 10A HORN 10A HORN The components managed directly by the Main Machine Controller EB1 are protected by current reading systems which switch off the component when specific maximum current draw values are exceeded for a time greater than the set value For details see Main Machine Controller Alarm Code Relays Contactors Description...

Страница 136: ...th the ignition key A 2 In the first two seconds after ignition the multifunction display B will indicate The hours the machine has worked C The type of batteries set D The current machine maximum speed setting E 3 After two seconds have passed it is possible to view the charge level of the batteries on the same icon D for the battery type set Figure 12 B A C D E ...

Страница 137: ...e of the batteries Diesel LPG Version The voltage of the batteries with components operational should be between 26V and 30V The voltage of the batteries with components switched off wait 10 seconds with the machine stopped and components switched off should be between 24V and 26V ...

Страница 138: ...atteries are larger than the container use the square guides supplied with the machine to ensure the stability inside the battery compartment WARNING Non sealed WET batteries always need an appropriate container to prevent the acid form leaking Do not install the WET batteries without an appropriate container 1 Drive the machine on a level floor 2 Turn the ignition key to 0 then engage the parking...

Страница 139: ...ry change the setting using the hare G and tortoise H buttons Battery Removal 13 Drive the machine on a level floor 14 Turn the ignition key to 0 then engage the parking brake 15 Open the battery compartment hood with the handle and fasten it with the support rod 16 Disconnect the battery connector B 17 Disconnect the battery wiring harnesses C 18 Remove any square guide or bracket fastening the b...

Страница 140: ...he batteries or clean repair the connections The batteries BAT are broken Check the battery no load voltage replace them Battery Version Battery charger CH faulty Replace Diesel and LPG Versions Alternator ALT faulty Repair replace The fuses are open Replace The wiring harness is cut or pressed or short circuited Repair The ignition key switch KEY is not working Replace Main Machine Controller EB1...

Страница 141: ...the ignition key to 0 then engage the parking brake 3 Open the battery compartment hood with the handle and fasten it with the support rod 4 Disconnect the battery connector A 5 Lift and remove the right side panel B disengaging it from the upper C and lower D fasteners 6 Disconnect the wiring E from the terminals F and G of the batteries unit H Figure 15 B A F E H G C C C D D D ...

Страница 142: ...ction cable to the Main Control Board 8 Remove the four fastening screws K of the battery charger I 9 Remove the battery charger I with the electrical cables L connecting it to the batteries and M for connection to the mains Installation 10 Assemble the components in the reverse order of removal 11 Set the type of battery installed WET or GEL AGM with the switch on the battery charger Figure 16 I ...

Страница 143: ...rew E 5 Unscrew the four screws F 6 Screw in an M12 screw L approximately 1 6 in 40 mm in length into the hole G bringing it into contact with the crankshaft H and use it as an extractor screwing it in far enough to remove the alternator I from the engine 7 If necessary unscrew the four screws J and remove the coupling flange I Installation 8 Assemble the components in the reverse order of removal...

Страница 144: ...w E 5 Unscrew the four screws F 6 Screw in an M12 screw L approximately 1 6 in 40 mm in length into the hole G bringing it into contact with the crankshaft H and use it as an extractor screwing it in far enough to remove the alternator I from the engine 7 If necessary unscrew the four screws J and remove the coupling flange I Installation 8 Assemble the components in the reverse order of removal a...

Страница 145: ... A3 4 Right side broom actuator supply 1 Right side broom actuator supply 1 Left side broom actuator supply 1 Left side broom actuator supply 1 WP1 WP2 Water pump motor Water pump motor J2 12 J2 15 J2 8 J2 4 Common power supply signal output Common power supply signal output Working light output Horn output B Main machine controller power supply PM BR BR Hopper lifting pump motor Hopper lifting pu...

Страница 146: ...ut B Main machine controller power supply PM BR BR Hopper lifting pump motor Hopper lifting pump motor Main broom motor Main broom motor A4 1 REVERSE GEAR enabling J7 1 CAN_H J7 2 CAN_L Drive system board enabling CAN BUS H channel CAN BUS L channel B WITHOUT ON BOARD BATTERY CHARGER TU RD TU RD SMART KEY SK TRACKUNIT TU BUZZER BZ BATTERY CHARGER CH BEACON LIGHT BE HORN RELAY ES9 HORN RELAY ES9 HO...

Страница 147: ...J6 1 J6 3 J6 4 J6 5 J6 6 MACHINE ON signal iButton input BROOMS FUNCTIONACTIV signal Power supply TRACTION ON signal TU RD J1 5 J1 6 J1 15 J1 12 OPEN HOPPER input LIFTED HOPPER input TURNED HOPPER input MAIN BROOM WEAR input J1 8 FUEL RESERVE input A1 A2 A3 ALTERNATOR ALT DIODE BRIDGE D1 FAN RELAY ES6 FAN RELAY ES6 RESISTOR R3 ENGINE SUPPLY RELAY ES7 ENGINE SUPPLY RELAY ES7 DRIVE SYSTEM ENABLING R...

Страница 148: ...nnel CAN BUS L channel J1 8 FUEL RESERVE input J1 2 J1 1Power J2 16 J1 3 J1 4 J1 5 Power Power supply enabling 30 1 15 50 15 54 30 P0 P1 P2 A4 4 Traction inhibition DRIVE SYSTEM ENABLING RELAY ES8 VACUUM SYSTEM MOTOR FILTER SHAKER MOTOR HOPPER PUMP MOTOR MAIN BROOM MOTOR RIGHT SIDE BROOM MOTOR LEFT SIDE BROOM MOTOR HORN RELAY ES9 WORKING LIGHT L1 WATER PUMP MOTOR RECHARGE SYSTEM CONTACTOR ES10 FAN...

Страница 149: ...ype Engine starting is performed by a starter motor At a later stage the running engine supplies the power to generate the current and to power the electrical systems of the machine The surplus current is used to charge the batteries The engine speed is fixed to 3 000 rpm to grant a constant current to the electrical system The fuel tank is located inside the engine compartment on the rear bulkhea...

Страница 150: ...INE SUPPLY RELAY ES7 ENGINE SUPPLY RELAY ES7 FUEL SOLENOID VALVE EV4 BATTERY FUSE F0 ENGINE FUSE F5 STARTER FUEL PUMP MOTOR OIL SENSOR S7 DIESEL ENGINE BATTERIES BAT KEY CIRCUIT FUSE F2 EMERGENCY PUSH BUTTON SW0 P2 KEY KEY J1 9 Signal power supply FUEL RESERVE SENSOR S6 J1 8 FUEL RESERVE input B Main machine controller power supply B Main machine controller power supply MAIN MACHINE CONTROLLER EB1...

Страница 151: ...Diesel engine Filler neck Fuel tank Fuel opening closing valve Fuel reserve sensor S6 Engine oil pressure sensor Engine overheat sensor S7 Figure 2 Fuel opening closing valve Filler neck Fuel tank Diesel engine Fuel reserve sensor S6 Engine overheat sensor S7 Engine oil pressure sensor ...

Страница 152: ...ator B is present on the crankshaft otherwise unscrew the screws C and remove the grid D then apply it Reposition the grid D and screw down the screws 5 Start the engine with the ignition key and wait for its speed to stabilise 6 With an appropriate opticale revolution indicator check the engine speed which should be 3 200 rpm 150 7 If necessary reset the engine speed taking the engine to a YANMAR...

Страница 153: ...om the upper and lower fasteners 5 Remove the wing nut A and remove the cover B 6 Remove the wing nut C and disassemble the filter element 7 Separate the paper filter D from the foam filter E 8 Check both filters and replace them if necessary Replace the paper filter D when required see Scheduled Maintenance Table 9 To reuse the filters clean them both by blowing compressed air at no more than 207...

Страница 154: ...rake 3 Open the engine compartment hood with the handle and fasten it with the support rod 4 Lift and remove the machine left side panel disengaging it from the upper and lower fasteners 5 Remove the cap A 6 Check the oil level If it is below the upper limit B top up with the recommended oil until you reach the upper limit 7 Reinstall the filler cap A safely 8 Perform steps 3 and 4 in the reverse ...

Страница 155: ...ine compartment hood with the handle and fasten it with the support rod 4 Lift and remove the machine left side panel disengaging it from the upper and lower fasteners 5 Remove the cap A 6 Disengage the extension tube B with cap C on the engine oil drain hole from its fastener in order to facilitate draining off the oil 7 Pour the new oil through the filler D until it reaches the upper limit E Not...

Страница 156: ...s 5 Remove the bolt A 6 Remove the cap B and remove the oil filter C 7 Clean the oil filter or replace it if damaged 8 Install the oil filter C 9 Ensure that the oil filter plug B is completely inserted 10 Install and tighten the retaining bolt A 11 Add engine oil as recommended see Technical Data and the Yanmar Engine Manual CAUTION See Engine Oil Level Check for the oil top up procedure 12 Warm ...

Страница 157: ...battery charger Emergency push button SW0 pressed Check and release the emergency push button Accelerator lever on engine not locked in position Lock it Figure 8 Valves opening lever on engine blocked Release it Figure 9 Insufficient time waited at ignition for the electronic system to reboot Engine power relay ES7 fuel solenoid valve EV4 and fuel pump motor P2 faulty Replace components as require...

Страница 158: ...r or stops during operation The filter element or elements are clogged Clean or replace the filter elements The fuel filter is clogged the start system is broken the valves are locked etc Replace or repair the faulty components as necessary take the engine to an authorized Honda service centre The machine shuts down Battery fuse F0 blown Replace The machine generates an alarm when powered see Main...

Страница 159: ... complete B Side exide muffler C Diesel Filter D Diesel cartridge filter E Dielsel oil pump F Starter Motor G Oil pressure sensor H Filter air I Inlet ait grid J Oil drain gasket K Fuel inject nozzle L Drain oil cap M Gauge oil cap N Hoses O Injector pump P Cover valves gasket Figure 10 A B C D E F G H I J K M L N N N N O P ...

Страница 160: ...0 Service Manual SW5500 FLOORTEC R 985 28 Engine System Diesel Alternator Spare Parts A Alternator complete B Heat sink C Bridge rectifier D Resistor E Grid side F Temperature sensor Figure 11 A B C D E F ...

Страница 161: ...e machine left and right side panels disengaging them from their upper and lower fasteners 6 Unscrew the screws A and remove the front panel B in the direction indicated by the arrow 7 Disconnect the electrical connections C of the diesel engine wiring D 8 Disconnect the electrical connection E on the diesel valve and the electrical connection F on the oil pressure sensor 9 Working from the other ...

Страница 162: ...sealing plugs the disconnected fittings immediately to prevent foreign materials from entering into the system 11 Loosen the retaining clamp L and disconnect the terminal M on the air vacuum hose 12 Disconnect the engine oil drain line N from the fastener 13 Unscrew the nut P and disconnect the two earth connections Q 14 Remove the two mounting nuts R on the left side of the engine alternator unit...

Страница 163: ...gine alternator unit 16 Unscrew the nuts U and remove the cross member V 17 Screw down the lifting eyebolt W onto the Diesel engine X then use appropriate lifting equipment to lift and remove the engine alternator unit weight of assembly approx 121 lb 55 Kg Installation 18 Assemble the components in the reverse order of disassembly Figure 14 S W X V U C T ...

Страница 164: ... L70N Dimensions 14 9 x 16 6 x 17 8 in 378 x 422 x 453 mm Dry weight 90 lb 41 0 Kg Displacement 320 cm3 Power 4 1 kW 5 5 hp 3 000 rpm Oil type SAE 15W 40 SYNTHETIC API SJ Fuel tank capacity 1 8 US gal 7 liters Engine oil quantity 1 1 US qt 1 05 liters Cooling system Forced air Starting system Electrical starting ...

Страница 165: ...essure which then reaches the carburettor The LPG system is protected against any overpressure by a relief valve which activates at 27 atm 400 PSI The fuel reserve icon is shown on the display when the sensor in the power supply system detects a pressure lower than 1 1 bar 16 psi For safety reasons if the engine is not started ignition key to II within 10 seconds after turning on the Main Control ...

Страница 166: ...ting valve and the air valve by means of a step motor to the throttle control step located inside the carburetor The actuator together with a unit wax based thermally connected actuator assembly controls the air valve of starting up a hot or cold engine It is not necessary to use any battery for operating the STR controller The recoil starter starts the STR controller Figure 1 ECM AIR TEMPERATURE ...

Страница 167: ...ART RELAY ES3 ENGINE START RELAY ES3 ENGINE IGNITION COIL EB7 ENGINE ECM EB6 ENGINE RPM RELAY ES4 ENGINE RPM RELAY ES4 CHARGING COIL SPARK PLUG BATTERY FUSE F0 OIL ALERT SENSOR S7 LPG ENGINE BATTERIES BAT ENGINE START RELAY ES5 ENGINE START RELAY ES5 STARTER ENGINE FUSE KEY CIRCUIT FUSE F2 EMERGENCY PUSH BUTTON SW0 KEY KEY FUEL SOLENOID VALVE EV4 ENGINE START FUSE F6 B Main machine controller powe...

Страница 168: ... LPG Component Locations LPG tank fastening band LPG cylinder LPG tank opening closing valve LPG tank fitting Hose Safety valve Pipe Hose Figure 3 LPG cylinder LPG tank fastening band LPG tank opening closing valve LPG tank fitting Hose Safety valve Hose Pipe ...

Страница 169: ...ne System LPG Component Layout Continues LPG wiring harness Motor Hose LPG pressure regulator Fuel solenoid valve EV4 Fuel reserve sensor S6 Figure 4 LPG pressure regulator LPG wiring harness Motor Hose Fuel reserve sensor S6 Fuel solenoid valve EV4 ...

Страница 170: ...nut A and remove the cover B 6 Remove the wing nut C and disassemble the filter element 7 Separate the paper filter D from the foam filter E 8 Check both filters and replace them if necessary Replace the paper filter D when required see Scheduled Maintenance Table 9 To reuse the filters clean them both by blowing compressed air at no more than 207 kPa 2 1 kgf cm inside the filter Do not use a brus...

Страница 171: ... start up 1 Drive the machine on a level floor 2 Turn the ignition key to 0 then engage the parking brake 3 Open the engine compartment hood with the handle and fasten it with the support rod 4 Lift and remove the machine right side panel disengaging it from the upper and lower fasteners 5 Remove the cap A 6 Check the oil level If it is below the upper limit E top up with the recommended oil until...

Страница 172: ...he machine right side panel disengaging it from the upper and lower fasteners 5 Remove the cap A 6 Unhook the drain hose B and bring it towards the outside of the machine 7 Remove the drain plug C from the hose and drain the oil into a suitable container then refit the oil drain plug and return the hose to its initial location 8 Remove the filler cap D and pour in the new oil through the filler un...

Страница 173: ... sealing washer D is damaged or if the electrode is worn 8 Measure the distance between the spark plug electrodes with a feeler gauge Correct the distance by bending carefully the side electrode E The distance between the electrodes must be of 0 70 0 80 mm 9 Install the spark plug manually with great care to avoid tightening it improperly 10 Once the spark plug is in place tighten it with a proper...

Страница 174: ...ance or replacement procedure involving operations on the fittings or movement of LPG system components check for any LPG gas leaks as shown below 2 Turn the ignition key to 0 and engage the parking brake 3 Open the engine compartment hood with the handle and fasten it with the support rod 4 Remove the machine right body side by lifting it to disengage it from the fasteners 5 If the engine is hot ...

Страница 175: ...oduct 8 Open the LPG tank valve E then check for LPG gas leaks shown by gas bubble development on all LPG system fittings starting from LPG tank fitting A to the fuel solenoid valve H 9 Turn the ignition key to the first position I then check for LPG gas leaks shown by gas bubble development on all LPG system fittings starting from the fuel solenoid valve H to the hose fitting F 10 In case LPG lea...

Страница 176: ...shoes helmets with visor etc Disassembly 1 Remove the pressure regulator see procedure in the relevant paragraph CAUTION For removal installation of the various hoses and fittings of the LPG system see procedure in the relevant paragraph 2 Unscrew the fitting A from the fuel solenoid valve on the workbench 3 Remove the filter holder B Inside the filter holder there is a cylinder with magnet C whic...

Страница 177: ...he filter holder I and the fitting J with compressed air maximum pressure 6 Bar Clean the filter E replace if necessary Take care in order not to damage the remaining part of the fuel solenoid valve do not sink the coil in solvent or water Assembly 6 Assemble the components in the reverse order of disassembly and note the following On the fuel solenoid valve tighten the fitting J to a tightening t...

Страница 178: ...s air from the exhaust holes tube or temperature sensor can be a source of problems The measurement is a very delicate and extremely sensitive to external disturbances Before proceeding to the connection of the analysis probe to verify that the device measures a quantity of oxygen comprised between 20 and 21 that from the guarantee of correct operation of the oxygen sensor CO Emissions Check 1 Rem...

Страница 179: ...haust gasses calibration by operating on the flow regulator s setting screw so to reach a CO value of 3 5 0 1 without exceeding the temperature of 1211 1220 F 655 660 C of the exhaust gas WARNING for Advance version only The excessive overtaking of 212 248 F 100 120 C of the temperatures indicated in point 5 for a prolonged period of time of 10 15 sec it can cause of the irreversible damage to the...

Страница 180: ...onnect the syringe the instrument and restore the connections with the carburetor 5 6 Start engine and repeat the operation in point 5th 5 7 If at a value of CO 3 5 corresponds still a higher temperature as indicated increase the gas delivery pressure screwing on the socket set screw on the LPG pressure regulator so as to decrease the exhaust gas temperature to the indicated level 5 8 Go back to p...

Страница 181: ...Replace Engine start relay ES5 faulty Replace Starter motor fuse F6 blown Replace Key circuit fuse F2 open circuit Replace The ignition key switch KEY is not working Replace The engine is overheating shutting down and activating the rectifier temperature sensor Fan relay ES6 faulty Replace Fan fuse F7 blown Replace Fan M7 faulty Replace The engine loses power or stops during operation The filter e...

Страница 182: ...s with visor etc 1 Before operating on the LPG system for maintenance replacement of parts bleed the LPG system as shown below 2 Close the LPG tank valve 3 Start the engine and let it run until it stops because it has run out of LPG WARNING This procedure must be performed where there is a proper ventilation and under the SAFETY conditions indicated in this Manual 4 Turn the ignition key to 0 and ...

Страница 183: ...ically according to the law in force The hose B must be of a specific length in order to comply with the safety technical data it must not be shortened for any reason Removal 1 Empty the LPG system see procedure in the relevant parapgaph 2 Turn the ignition key to 0 then engage the parking brake 3 Open the engine compartment hood with the handle and fasten it with the support rod 4 If fitted remov...

Страница 184: ...are equipped with fastening bands Assembly 8 Before re tightening the fittings D clean them thoroughly and replace the inner gaskets 9 Before screwing down the fittings E carefully remove any remaining of sealant then apply the new sealant use PTFE by WURTH saBesto P N 0893 511 050 S I or equivalent Proceed according to the instructions on the package of the product 10 Before connecting the fittin...

Страница 185: ...moval 1 Drive the machine on a level floor 2 Empty the LPG system see procedure in the relevant paragraph 3 Turn the ignition key to 0 then engage the parking brake 4 Open the engine compartment hood with the handle and fasten it with the support rod 5 If fitted remove the machine right side panel by lifting it to disengage it from the fasteners 6 If the engine is hot wait that it cools down 7 Loo...

Страница 186: ...186 Service Manual SW5500 FLOORTEC R 985 29 Engine System LPG Pressure Regulator Continues 8 Unscrew the fitting D on the line 9 Disconnect the electrical connections E and F Figure 19 F E D ...

Страница 187: ...om the fitting J at the workbench 13 Unscrew the fitting K from the pressure regulator C 14 Retrieve the pressure regulator C 15 If necessary unscrew the fittings L and M from the pressure regulator C Installation 16 Assemble the components in the reverse order of removal 17 Check the LPG system for leaks see procedure in the relevant paragraph 18 If a new pressure regulator has been installed reg...

Страница 188: ...e on a level floor 3 Turn the ignition key to 0 then engage the parking brake 4 Open the engine compartment hood with the handle and fasten it with the support rod 5 If fitted remove the machine right side panel by lifting it to disengage it from the fasteners 6 If the engine is hot wait that it cools down 7 Disconnect the fuel reserve sensor B electrical connections A 8 Unscrew the fuel reserve s...

Страница 189: ... to cover the whole body antistatic and antispark shoes helmets with visor etc Removal 1 Remove the pressure regulator see procedure in the relevant paragraph 2 Unscrew the fuel solenoid valve A from the fitting B at the workbench WARNING For removal installation of the various hoses and fittings of the LPG system see procedure in the relevant paragraph 3 Remove the fuel solenoid valve A Installat...

Страница 190: ...to 0 then engage the parking brake 4 Open the engine compartment hood with the handle and fasten it with the support rod 5 If fitted remove the machine right side panel by lifting it to disengage it from the fasteners 6 If the engine is hot wait that it cools down 7 Unscrew the screws A and remove the case B WARNING For removal installation of the various hoses and fittings of the LPG system see p...

Страница 191: ... C Engine coil ignition D Carburetor E Filter box cover F Air filter G Muffler gasket H Pipe exhaust gasket I Starter Motor J for Advance model Catalytic Muffler L for Nilfisk model Muffler M Gauge oil cap N Unit control O Air filter knob P Connectors Q Manifold exhaust Figure 24 A B C D E F G H I J K L N M O P Q ...

Страница 192: ...92 Service Manual SW5500 FLOORTEC R 985 29 Engine System LPG Alternator Spare Parts A Alternator complete B Heat sink C Bridge rectifier D Resistor E Grid side F Temperature sensor Figure 25 A B C D E F ...

Страница 193: ... the handle and fasten it with the support rod 4 Disconnect both the negative and positive terminals from the batteries 5 Remove the machine right and left side panels by lifting them to disengage them from the fasteners 6 Disconnect the engine harness B electrical connections A 7 Disconnect the electrical connections C and D from the starter motor E 8 Disconnect the engine electrical connections ...

Страница 194: ...e relevant paragraph 11 Unscrew the retaining screws J on the casing K protecting the exhaust pipe 12 Unscrew the screw L fastening the casing K and the engine as well 13 Remove the engine fastening screw M 14 Unscrew the engine fastening screws N and move the electrical cable P 15 Attach an appropriate lifting system to the two attachments Q on the engine then carefully raise and remove the engin...

Страница 195: ...ower 6 3 kW 8 4 hp 3 600 rpm Max torque 19 1 Nm 1 98 kgfm 2 500 rpm Oil type SAE 10W 30 SYNTHETIC API SJ LPG tank capacity 33 lb 15 Kg Engine oil quantity 0 3 US gal 1 1 liters Cooling system Forced air Starting system CDI magneto PTO shaft rotation Counter clockwise Valve clearance cold INTAKE 0 15 0 02 mm EXHAUST 0 20 0 02 mm Distance between the spark plug electrodes 0 028 0 031 in 0 70 0 80 mm...

Страница 196: ...attery charger high logic input with battery charger connected to the network 4 Addition of the engine shut off switch SW2 which allows the engine to be turned off while continuing the work on battery mode only without being forced to completely stop machine by means of the main key switch The shut off switch SW2 with normally closed contact for switching off the engine on the GPL version it opens...

Страница 197: ... TEMP SENSOR S9 TRACTION ENABLE RELAY ES12 COMM 4 COMM 3 ENGINE SHUT OFF SWITCH SW2 0V HYBRID SYSTEM BATTERY CHARGER CH P2 FUEL PUMP MOTOR DIESEL ENGINE BATTERIES BAT EMERGENCY PUSH BUTTON SW0 TRACTION ENABLE RELAY ES12 KEY KEY JC 1 COMM 5 COMM 14 J1 1 Return from KEY circuit J1 11 Drive system board enabling MAIN MACHINE CONTROLLER EB1 DRIVE WHEEL CONTROLLER EB2 DISPLAY CONTROLLER EB3 Figure 1 ...

Страница 198: ...S11 ENGINE SHUT OFF SWITCH SW2 HYBRID SYSTEM BATTERY CHARGER CH LPG ENGINE BATTERIES BAT EMERGENCY PUSH BUTTON SW0 KEY KEY HYBRIS SYSTEM RELAY ES11 TRACTION ENABLE RELAY ES12 0V BATTERYTEMP SENSOR S9 COMM 5 COMM 14 TRACTION ENABLE RELAY ES12 JC 1 J1 1 Return from KEY circuit J1 11 Drive system board enabling MAIN MACHINE CONTROLLER EB1 DRIVE WHEEL CONTROLLER EB2 DISPLAY CONTROLLER EB3 Figure 2 ...

Страница 199: ...Battery Diesel LPG versions Engine shut off switch SW2 Hybrid system battery charger CH Bridge wire on the ES8 relay connection Hybrid system relay ES11 Figure 3 Hybrid system battery charger CH Engine shut off switch SW2 Bridge wire on the ES8 relay connection Hybrid system relay ES11 ...

Страница 200: ...g brake 2 Turn the ignition key to 0 3 Connect the battery charger plug D to a mains electrical socket WARNING Check that the voltage and frequency shown on the battery charger plate D match the mains supply values Note When the battery charger is connected to the electrical mains all machine functions are automatically cut off The multifunction display shows the screen C as in the figure 4 When t...

Страница 201: ...hut off switch SW2 broken Check that the engine shut off switch closes the circuit when in the rest position normally closed contact The battery life is short Time during which the engine is kept running not enough for recharging the batteries between a period of use in battery mode and the next one Make a full recharge cycle with on board battery charger The battery life even after a full recharg...

Страница 202: ...machine must be moving otherwise the main broom motor does not run Information on the machine movement is detected by the drive motor M0 encoder ENC connected to the Drive Wheel Controller EB2 The Drive Wheel Controller EB2 transmits this information to the Main Machine Controller EB1 via the CANOPEN protocol on the CAN BUS line between connector J7 of the Main Machine Controller EB1 and connector...

Страница 203: ...WEAR SENSOR S4 J3 1 J3 2 J3 4 J1 1 Dashboard serial connection Dashboard serial connection Dashboard el board power supply Return from KEY circuit J1 2 J1 1Power J2 16 J1 3 J1 4 J1 5 Dashboard serial connection Dashboard serial connection Power Power supply enabling M4 J1 1 Drive system board enabling A1 MAIN BROOM ACTUATOR B Main machine controller power supply B Main machine controller power sup...

Страница 204: ...oom Main broom height adjusting knob Front skirt lifting pedal Main broom Device to adjust the parallelism between the main broom and the floor Figure 3 Main broom height adjusting knob One Touch sweeping vacuum button raising lowering of main broom Device to adjust the parallelism between the main broom and the Front skirt lifting pedal Main broom ...

Страница 205: ...es Rear skirt Front skirt Left side skirt Right side skirt Main broom actuator A1 Main broom wear sensor S4 Main broom motor M4 Main broom driver Figure 4 Main broom actuator A1 Main broom wear sensor S4 Main broom motor M4 Rear skirt Main broom driver Front skirt Right side skirt Left side skirt ...

Страница 206: ...m activation lift it by pressing the One Touch button Check that the main broom print B along its length is 2 to 4 cm wide If the print B is not within specifications adjust the main broom height according to the following procedure 2 Turn the knob C bearing in mind that to increase the print width turn the knob counter clockwise Note The knob can be used both to adjust the print and to adjust the...

Страница 207: ...Loosen the nuts E Loosen the locknut F Turn the screw G bearing in mind the following Turning it clockwise will make the main broom lower to the left Turning it anti clockwise will make the main broom raise to the left When you have finished the adjustment tighten the locknut F and the nuts E Fit the left side door H and engage the fasteners Figure 6 S G F F E H ...

Страница 208: ...Skirt Check 4 Remove the left door by turning the fasteners 5 Remove the right door by unscrewing the screws 6 Check the condition of the side skirts A and B Replace the skirts when they have cuts C larger than 0 8 in 20 mm or cracks tears D larger than 0 4 in 10 mm To replace the skirts see procedure in the relevant paragraph 7 Check that the distance from the ground E of the side skirts A and B ...

Страница 209: ... skirts H and I Replace the skirts when they have cuts C larger than 0 8 in 20 mm or cracks tears D larger than 0 4 in 10 mm 10 Check that the front skirt G and rear skirt I slightly rub the floor without coming off the ground J The front G and rear I skirts are not adjustable To replace the skirts see procedure in the relevant paragraph Installation 11 Assemble the components in the reverse order...

Страница 210: ...ct with broom Adjust it Hopper open Close it The main broom has not been properly adjusted in height parallelism Adjust Excessive broom pressure on ground Reduce pressure on ground with adjustment knob Check for any contact between the main broom and the skirts cowling and other mechanical parts The main broom does not clean properly The main broom is too worn out Replace check operation of the ma...

Страница 211: ...from rotating 3 Unscrew the four screws A fastening the fairing B 4 Unscrew the nut C on the front 5 Slide the sleeve D until it is flush on the steering wheel 6 Press the stud E sliding it upwards causing the Main Control Board F to lift slightly then remove the fairing B by disengaging it from its seat and the stud E 7 Position a suitable lifting device G at the centre of the front section of th...

Страница 212: ... amperage of the motor is 15 25A at 24V Stop the main broom rotation Turn the ignition key to 0 Remove the ammeter clamp K If the amperage is higher perform the following procedures to detect and correct it Check if there is dust or dirt cords cables etc on the broom drive hub Check the carbon brushes of the electric motor see procedure in the relevant paragraph If necessary disassemble the motor ...

Страница 213: ...the main broom is in the lifted position 3 Turn the ignition key to 0 then engage the parking brake 4 Turn the fasteners B and remove the left door A 5 Pull the knob C as indicated by the arrow to disengage the closing support D 6 Open the closing support D together with the left side skirt E disengaging it from the various fasteners H 7 Remove the main broom F 8 Check that the drive hub G is free...

Страница 214: ...nd ensure that the hexagonal mesh J fits into the relevant drive hub G 11 Turn and close the closing support D together with the left side skirt E until the knob C clicks attach the left side skirt E to the various fasteners H 12 Refit the left door A and turn the fasteners B back into the closed position 13 Check and adjust the main broom height see procedure in the relevant paragraph Figure 12 C...

Страница 215: ...able for checking the skirt height 3 Turn the ignition key to 0 then engage the parking brake 4 Turn the fasteners and remove the machine left door 5 Unscrew the nuts A and remove the strap B 6 Pull and release the knob C 7 Open the skirt D freeing it from the pins E 8 Remove the skirt D freeing it from the hub F 9 Install the skirt D and the other removed components in the reverse order of remova...

Страница 216: ...t check 11 Drive the machine on a level ground that is suitable for checking the skirt height 12 Turn the ignition key to 0 then engage the parking brake 13 Unscrew the screws and remove the machine right door 14 Unscrew the nuts G and remove the strap H 15 Remove the skirt I 16 Install the skirt I and the other removed components in the reverse order of removal and note the following Check the sk...

Страница 217: ...0 then engage the parking brake 20 Remove the side brooms see procedure in the side broom system 21 Remove the main broom see procedure in the relevant paragraph 22 Release the clips A and B and disconnect the corresponding tie rods from the front skirt C 23 Working from the two sides of the machine unscrew the nuts D 24 Working inside the main broom compartment remove the strap E the front skirt ...

Страница 218: ... the end of stroke WARNING Place a safety rod under the lifted hopper 31 Working inside the main broom compartment unscrew the nuts A fastening the rear skirt B 32 Working from the hopper compartment remove the rear skirt B and the strap C 33 If necessary unscrew the nuts D on the recycling skirt E From the main broom compartment remove the strap F and the recycling skirt E 34 Install the rear ski...

Страница 219: ...n the battery engine compartment hood with the handle and fasten it with the support rod 5 Disconnect the battery connector Battery Version Disconnect the batteries Diesel and LPG Version 6 Remove the main broom see procedure in the relevant paragraph 7 Unscrew the screws A and remove the right door B 8 Lift and remove the right side panel C disengaging it from the upper D and lower E fasteners 9 ...

Страница 220: ...ws K and remove the main broom gear motor H 13 If necessary remove the reduction unit from the motor on the workbench according to the following procedure Mark the relative position L between the motor M and reduction unit N Unscrew the four screws P and remove the reduction unit N detaching its shaft from the motor M with a spanner unscrew the screws P gradually extracting the reduction unit Inst...

Страница 221: ...he fastening screws F of the electrical connections of the four carbon brushes G 6 Remove the four carbon brushes G from their housings by disengaging them from the retaining springs H 7 Check the two carbon brushes G for wear Replace the carbon brushes when the contact with the motor armature is insufficient the carbon brushes are worn the carbon brush contact surface is not integral the thrust s...

Страница 222: ...loor 2 Lift the hopper to the end of stroke WARNING Place a safety rod under the lifted hopper 3 Turn the ignition key to 0 then engage the parking brake 4 Remove the main broom see procedure in the relevant paragraph 5 Unscrew the screws A and remove the right door B 6 Unscrew the nut C on the main broom motor D Figure 20 A D A B C ...

Страница 223: ... it from the side broom compartment complete with the drive hub F 8 If necessary unscrew the hub lock nut G on the workbench and extract the driver H detaching it from the shaft with two spanners Installation 9 Assemble the components in the reverse order of removal and note the following If necessary replace the lock nut G to ensure correct fastening Figure 21 F E G H ...

Страница 224: ...tery engine compartment hood with the handle and fasten it with the support rod 6 Disconnect the battery connector Battery Version Disconnect the batteries Diesel and LPG Version 7 Lift and remove the right side panel A disengaging it from the upper B and lower C fasteners 8 Cut the retaining clamp D then disconnect the electrical connection E on the main broom actuator F 9 Unscrew the locknut G 1...

Страница 225: ...on 12 Assemble the components in the reverse order of removal and note the following If necessary replace the lock nuts G and H of the screw to ensure correct fastening also screw them down just enough to bring them together ensuring free movement of the actuator F on the slots J and pin K Figure 23 F H J G K ...

Страница 226: ...battery engine compartment hood with the handle and fasten it with the support rod 6 Disconnect the battery connector Battery Version Disconnect the batteries Diesel and LPG Version 7 Unscrew the screws A and remove the right door B 8 Lift and remove the right side panel C disengaging it from the upper D and lower E fasteners 9 Disconnect the electrical connection F of the broom wear sensor G 10 O...

Страница 227: ...on insert the sensor G the nut J and the locknut I then adjust the sensor G to the distance P of 4 5 mm finally tighten the locknut I onto the nut J 14 Using the knob K raise the main broom returning it to roughly its initial position Installation 15 Assemble the components in the reverse order of removal and note the following After assembling the main broom perform the height adjustment see proc...

Страница 228: ...RTEC R 985 LPG Main broom size length x diameter 33 5 x 14 2 in 850 x 360 mm Theoretical working capacity Main broom 6 338 yd2 h 5 300 m2 h 6 697 yd2 h 5 600 m2 h Main broom Motor power 1 3 hp 1 000 W 1 7 hp 1 250 W Speed 3 800 rpm 4 800 rpm IP rating 44 Actuator Maximum force 350 N Stroke 45 mm Voltage 24V Limit stop sensor 2 IP rating 54 ...

Страница 229: ... end stroke position each actuator has internal limit switches with bypass diodes In case of side impact the system can return by means of a spring which absorbs the shock The broom is fastened to the reduction unit shaft with a safety pin The side broom motors turn only when the main broom is activated The side broom motors M5 RHS M6 LHS are powered by the Main Machine Controller EB1 at a voltage...

Страница 230: ...MAIN BROOM MOTOR RIGHT SIDE BROOM MOTOR LEFT SIDE BROOM MOTOR M4 M5 M6 BATTERY BATTERY J3 1 J3 2 J3 4 J1 1 Dashboard serial connection Dashboard serial connection Dashboard el board power supply Return from KEY circuit J1 2 J1 1Power J2 16 J1 3 J1 4 J1 5 Dashboard serial connection Dashboard serial connection Power Power supply enabling J1 11Drive system board enabling A2 A3 RIGHT SIDE BROOM ACTUA...

Страница 231: ...Broom height adjustment Side broom motor M5 M6 Side broom Side broom actuator Adjusting side broom tilt Figure 3 Right side broom lifting lowering button Side broom rotation speed adjustment buttons Left side broom lifting lowering button Right side broom Side broom actuator A2 right A3 left Broom height adjustment Side broom motor M5 right M6 left Adjusting side broom tilt Left side broom Broom h...

Страница 232: ...om the ground according to the following procedure Drive the machine on a level floor Keeping the machine stationary using the service brake lower the side brooms and turn them on for a few seconds Stop and lift the side brooms then move the machine Check that the side broom prints are as shown in the figure A and B If the print is not within specifications adjust the side broom height according t...

Страница 233: ... ring nut E and by adjusting the adjuster F until the correct print B is achieved Finally lock the adjuster F into position with the ring nut E 4 Perform step 1 again to check the proper adjustment of the side broom height 5 When the broom is too worn to be adjusted replace it see procedure in the relevant paragraph 6 If necessary adjust the side broom height according to the following procedure T...

Страница 234: ...oom has not been properly adjusted in height parallelism Adjust The broom is excessively worn Replace The side brooms do not work Side broom motor M5 M6 faulty Check the motor amperage replace Carbon brushes worn Replace There are ropes or debris restraining the broom rotation Remove and clean The side broom does not lower raise Actuator A2 A3 not working Repair replace ...

Страница 235: ...gn materials ropes rags etc accidentally rolled up which can prevent it from rotating 4 Unscrew the four screws A fastening the fairing B 5 Unscrew the nut C on the front 6 Slide the sleeve D until it is flush on the steering wheel 7 Press the stud E sliding it upwards causing the Main Control Board F to lift slightly then remove the fairing B by disengaging it from its seat and the stud E 8 Posit...

Страница 236: ...ccelerator pedal 13 Check that the amperage of the relevant motor is 1 0 1 5A at 24V Stop the side broom rotation Turn the ignition key to 0 Remove the ammeter clamp L 14 If the amperage is higher perform the following procedures to detect and correct it Check if there is dust or dirt cords cables etc on the side broom hub Check the carbon brushes of the electric motor see procedure in the relevan...

Страница 237: ... be sharp debris between the bristles Removal 1 Drive the machine on a level floor 2 Turn the ignition key to 0 then engage the parking brake 3 Detach and remove the pin A from the hub B of the side broom C 4 Remove the side broom C from the hub B and remove the protection flange D Installation 5 Install the protection flange D on the hub B along with the side broom B 6 Insert the pin A and engage...

Страница 238: ...y engine compartment hood with the handle and fasten it with the support rod 6 Disconnect the battery connector Battery Version Disconnect the batteries Diesel and LPG Version 7 Disconnect the electrical connection C of the side broom motor B located above the motor itself if necessary cut any clamps in the way 8 Remove the four fastening screws D of the motor B 9 Remove the motor B from its seat ...

Страница 239: ...ng the carbon brushes inside the motor armature 5 Inside the cap disconnect the connections E and remove the carbon brushes with wiring harness F 6 Check the two carbon brushes F for wear Replace the carbon brushes when the contact with the motor armature is insufficient the carbon brushes are worn the carbon brush contact surface is not integral the thrust spring is broken etc If the length of th...

Страница 240: ...Version Disconnect the batteries Diesel and LPG Version 5 Remove the side brooms see procedure in the relevant paragraph 6 Unscrew the four screws A fastening the fairing B 7 Unscrew the nut C on the front 8 Slide the sleeve D until it is flush on the steering wheel 9 Press the stud E sliding it upwards causing the Main Control Board F to lift slightly then remove the fairing B by disengaging it f...

Страница 241: ... Unscrew the handwheels L on the left hand side of the machine and remove the left door M 13 Unscrew the screws N on the right hand side of the machine and remove the right door M 14 Working below the footboard Q unscrew the screws in the fastening positions R of the footboard itself 15 Partially raise the footboard Q and support it with a rope R Figure 12 Q Q J K L M L N P N R R R R Q ...

Страница 242: ... connection T of the actuator 17 Cut the cable clamp U 18 Disconnect the spring V from the side W by using a lever X in the slot Y 19 Remove the cotter Z and extract the pin AA then remove the actuator and broom motor assembly AB 20 At the workbench remove the screws with nut AC and AD retain the spacers AE 21 Remove the actuator AF Figure 13 AA V W AC AC AE AB T U S X AB Z Y AF AD ...

Страница 243: ...ues Installation 22 Assemble the components in the reverse order of removal and note the following If necessary replace the lock nut on the screw AD to ensure correct fastening also screw it down just enough to bring it flush ensuring free movement of the screw AD on the slots AG Figure 14 AG AD ...

Страница 244: ...D SW5500 LPG FLOORTEC R 985 LPG Cleaning width With one side broom 46 3 in 1 175 mm With two side brooms 59 in 1 500 mm Side broom diameter 20 in 500 mm Theoretical working capacity With one side broom 8 694 yd2 h 7 270 m2 h With two side brooms 11 050 yd2 h 9 240 m2 h Side broom Motor power 0 16 hp 120 W Speed 40 155 rpm ...

Страница 245: ...corresponding One Touch button it can however be turned on or off independently with the vacuum button it turns off when the machine is stopped when the hopper is lifted and during activation the electric filter shaker The electric filter shaker system is composed of two motors M2 connected in parallel which are powered by the Main Machine Controller EB1 When the filter shaker button is pressed th...

Страница 246: ... Vacuum system motor FS FS Filter shaker motor Filter shaker motor BR BR Main broom motor Main broom motor VACUUM SYSTEM MOTOR FILTER SHAKER MOTOR MAIN BROOM MOTOR M1 M2 M4 M2 BATTERY BATTERY B Main machine controller power supply B Main machine controller power supply MAIN MACHINE CONTROLLER EB1 Figure 2 ...

Страница 247: ...mponent Locations Vacuum button Filter shaker button Vacuum fan motor M1 Filter shaker motor M2 M2 Panel filter Filter gasket Figure 3 Vacuum fan motor M1 Filter shaker motor M2 M2 Filter gasket Filter shaker motor M2 M2 Panel filter Filter shaker button Vacuum button ...

Страница 248: ...s when cleaning the filter Do not puncture the filter Clean the filter in a well ventilated area Wear appropriate dust mask to avoid breathing in dust 1 Drive the machine on a level floor 2 Turn the ignition key to 0 then engage the parking brake 3 Open the battery engine compartment hood with the handle and fasten it with the support rod 4 Release the fasteners A and open the vacuum system cover ...

Страница 249: ...under a gentle stream of water maximum pressure 2 5 Bar Let the filter dry completely before installing it back into the machine For a better cleaning it is allowed to wash the filter with water and non lathering detergents This provides better quality cleaning but reduces the life of the filter which will have to be replaced more frequently The use of inadequate detergents can damage the filter F...

Страница 250: ...lter is clogged Clean the dust filter by using the filter shaker or by disassembling it The vacuum system compartment gasket is damaged Repair replace Check the operation of the skirts Dust coming out of the fan compartment Dust filter not seated correctly Reposition the filter Filter broken Replace Filter gasket damaged Repair replace The filter shaker is not working Filter shaker motor M2 broken...

Страница 251: ...flush on the steering wheel 6 Press the stud E sliding it upwards causing the Main Control Board F to lift slightly then remove the fairing B by disengaging it from its seat and the stud E 7 Position a suitable lifting device G at the centre of the front section of the machine on chassis bracket H then raise the front of the machine by a few centimeters until the driving wheel can turn without bru...

Страница 252: ...heck that the current draw of the fan motor is 8 10A at 24V Stop the vacuum system Turn the ignition key to 0 Remove the clamp ammeter M If the current draw is higher remove the vacuum fan motor see procedure in the relevant paragraph and check the condition of all its components If the above mentioned procedures do not produce the correct readings for the electric fan motor amperage the motor mus...

Страница 253: ...ersion Disconnect the batteries Diesel and LPG Version 5 Release the fasteners A then lift the vacuum system cover hood B all the way 6 Working on the filter shaker assembly requiring removal disconnect the electrical connection C of the filter shaker motor 7 Unscrew the four screws D and remove the filter shaker E 8 Unscrew the four screws F and remove the filter shaker motor G 9 If necessary rem...

Страница 254: ...semble the components in the reverse order of removal and note the following When reinstalling the eccentric cylinder I respect the required position of the grub screw fastening surface On reassembly position the filter shaker motor G with the cable entry J on the upper side as shown in the figure Figure 9 I G J ...

Страница 255: ...battery engine compartment hood with the handle and fasten it with the support rod 5 Disconnect the battery connector Battery Version Disconnect the batteries Diesel and LPG Version 6 Lift and remove the right side panel A disengaging it from the upper B and lower C fasteners 7 Disconnect the electrical connections D of the vacuum system electric fan and filter shaker 8 Release the fasteners E of ...

Страница 256: ...Remove the hood F disengaging the slot H of the lever I for releasing the hood from the pin L on the machine chassis 11 Cut the various cable clamps M on the workbench then disconnect the electrical connections N of the two filter shaker motors and the electrical connection P of the electric fan Figure 11 F G G F I H L N M P ...

Страница 257: ...the electrical cables S from the connector T then extract the electrical cables from the cable grommet U 14 Unscrew the screws V then remove the vacuum fan motor assembly W 15 If necessary unscrew the nuts X and remove the flange Y from the electric fan W Installation 16 Assemble the components in the reverse order of removal Figure 12 V T U Q R Q Q Q X V Y V W U S ...

Страница 258: ...ns Model SW5500 B FLOORTEC R 985 B SW5500 D SW5500 LPG FLOORTEC R 985 LPG Filter Area 75 3 ft2 7 m2 Filter efficiency 77 08 µm Vacuum Motor power 0 35 hp 260 W Speed rpm 3 000 Fan diameter 9 8 in 250 mm Ingress protection IP68 Filter shaker x2 Motor power 12 Speed rpm 3 900 200 ...

Страница 259: ...ined in a tank located inside the rear filter housing The system is composed of a pump motor P1 which is powered by the Main Machine Controller EB1 The system is activated by pressing the DustGuard system button on the side Main Control Board and the corresponding icon on the display indicates its operating status The pump is powered only when the function is active and at least one of the side br...

Страница 260: ...P16 P17 P18 LD1 J1 3 J1 4 J1 5 B Main machine controller power supply B Main machine controller power supply MAIN MACHINE CONTROLLER EB1 BATTERY BATTERY J1 2 HOPPER ENABLING push button input WP1 WP2 Water pump motor Water pump motor WATER PUMP MOTOR SIDE CONTROL PANEL BOARD EB5 P1 Figure 2 ...

Страница 261: ...R 985 51 Dust Guard System Component Locations Dust guard system button Water tank Tank filler Water pump P1 Water filter Spraying nozzle Figure 3 Water pump P1 Water filter Dust guard system button Spraying nozzle Water tank Tank filler ...

Страница 262: ...move the left side panel disengaging it from the upper and lower fasteners 4 Unscrew the transparent cover A with its sealing gasket 5 Remove the filter strainer B from the support C 6 Clean the filter strainer B and transparent cover A with sealing gasket check that the gasket is in good condition 7 Reposition the filter strainer B and screw down the transparent cover A with sealing gasket CAUTIO...

Страница 263: ...0 then engage the parking brake 1 On the front side of the side brooms remove the ring nuts A bayonet connection 1 Remove and clean the nozzles B the gaskets C and the filters D with compressed air Remove any calcium deposit If necessary replace the filters D 2 Reinstall the filters gaskets and the nozzles then fasten them with the ring nuts Figure 5 A C A B D ...

Страница 264: ...zles The nozzle filter and or nozzle is clogged Clean replace The water filter is clogged Clean replace The pump is not working properly Repair replace No water to the nozzles The water filter is clogged Clean replace Possible blockage in water line from tank outlet Drain the tank and clean with running water Water pump motor P1 broken Repair replace ...

Страница 265: ... it with the support rod 4 Disconnect the battery connector Battery Version Disconnect the batteries Diesel and LPG Version 5 Lift and remove the left side panel disengaging it from the upper and lower fasteners 6 Disconnect the pump B electrical connection A 7 Cut the cable clamp C 8 Loosen the clamps D and disconnect the lines E from the pump 9 Unscrew the screws F and remove the pump B Installa...

Страница 266: ...ust Guard System Specifications Model SW5500 B FLOORTEC R 985 B SW5500 D SW5500 LPG FLOORTEC R 985 LPG Dust guard system water tank capacity 8 4 US gal 32 liters Pump Current 3A Voltage 24V Capacity 1 5 US gal min 5 7 l min Pressure 49 psi 3 4 Bar ...

Страница 267: ...duction of machine maximum speed sounding of the buzzer BZ on the Main Machine Controller displaying the hopper lifting icon on the display switching off the vacuum system motor M1 and the broom motors M4 M5 M6 When the hopper reaches a height sufficient to activate the hopper lifted sensor S2 light sensor on rotation of the hopper can be activated with the dumping button to empty the hopper and t...

Страница 268: ...W5500 FLOORTEC R 985 52 Hopper System Functional Description continues Figure 1 Hopper pump M3 Lowering valve EV2 Raising valve EV1 Dumping valve EV3 Hopper dumping sensor S3 Hopper lifted sensor S2 Hopper closed sensor S1 ...

Страница 269: ...opper lifting pump motor Hopper lifting pump motor HOPPER PUMP MOTOR M3 J1 3 J1 2 J1 4 J2 7 HEADLIGHT push button input HOPPER ENABLING push button input WATER PUMP push button input WATER PUMP warning light output RESISTANCE J1 1 J1 2 P16 P17 P18 LD1 J1 3 J1 4 J1 5 DUMPING VALVE EV3 RAISING VALVE EV1 LOWERING VALVE EV2 CLOSED HOPPER SENSOR S1 HOPPER LIFTED SENSOR S2 HOPPER DUMPING SENSOR S3 MAIN ...

Страница 270: ...pper System Hydraulic Diagrams Hopper Down Hopper raising Cylinder Raises Lowers Hopper Hopper dumping Cylinder Discharges Recalls Hopper P T 140bar 800W Hopper pump Reservoir 1cc P1 T1 A2 B2 A1 B1 5 l 1 C2 C1 V1 V2 C2 C1 V1 V2 V2 EV1 EV2 0 1 2 EV3 3 4 Figure 3 ...

Страница 271: ...LOORTEC R 985 52 Hopper System Raise Hopper P T 140bar 800W Hopper pump Reservoir 1cc P1 T1 A2 B2 A1 B1 5 l 1 C2 C1 V1 V2 C2 C1 V1 V2 V2 Hopper raising Cylinder Raises Hopper Hopper dumping Cylinder EV1 EV2 0 1 2 EV3 3 4 Figure 4 ...

Страница 272: ...TEC R 985 52 Hopper System Discharge Hopper P T 140bar 800W Hopper pump Reservoir 1cc P1 T1 A2 B2 A1 B1 5 l 1 C2 C1 V1 V2 C2 C1 V1 V2 V2 Hopper raising Cylinder Hopper dumping Cylinder Discharges Hopper EV1 EV2 0 1 2 EV3 3 4 Figure 5 ...

Страница 273: ...OORTEC R 985 52 Hopper System Recall Hopper P T 140bar 800W Hopper pump Reservoir 1cc P1 T1 A2 B2 A1 B1 5 l 1 C2 C1 V1 V2 C2 C1 V1 V2 V2 Hopper raising Cylinder Hopper dumping Cylinder Recalls Hopper EV1 EV2 0 1 2 EV3 3 4 Figure 6 ...

Страница 274: ...ORTEC R 985 52 Hopper System Hopper Lowering P T 140bar 800W Hopper pump Reservoir 1cc P1 T1 A2 B2 A1 B1 5 l 1 C2 C1 V1 V2 C2 C1 V1 V2 V2 Hopper raising Cylinder Lowers Hopper Hopper dumping Cylinder EV1 EV2 0 1 2 EV3 3 4 Figure 7 ...

Страница 275: ...pper dumping button Hopper reset button Closed hopper sensor S1 Hopper lifted sensor S2 Hopper dumping sensor S3 Hopper linkages Hopper Figure 8 Hopper reset button Hopper dumping button Hopper lowering button Hopper lifting button Hopper lifted sensor S2 Closed hopper sensor S1 Hopper Hopper linkages Hopper dumping sensor S3 Hopper movement enabling button ...

Страница 276: ...valve Hydraulic hoses Hydraulic lifting cylinder Hydraulic dumping cylinder Hopper pump M3 Hydraulic oil tank Figure 9 Lowering valve EV2 Raising valve EV1 Hydraulic hoses Hydraulic dumping cylinder Hydraulic hoses Hydraulic lifting cylinder Hydraulic hoses Check valve Hydraulic lifting cylinder Hopper pump M3 Hydraulic oil tank Dumping valve EV3 ...

Страница 277: ...partment hood with the handle and fasten it with the support rod 4 Check that the oil level in the hydraulic unit tank A is between the minimum MIN B and maximum MAX C marks shown 5 If necessary top up the oil after removing the plug D use the oil specified in Technical Data section WARNING Hydraulic system oil is highly corrosive WARNING The hydraulic system oil should be disposed of properly acc...

Страница 278: ...ed or broken Adjust replace The hopper does not give a signal of being turned Hopper dumping sensor S3 miscalibrated or broken Adjust replace The hopper will not raise Hydraulic system oil level incorrect Check the hydraulic system oil level in the tank Operation on sloping surface Move the machine to level ground Hopper pump M3 fault Replace Raising valve EV1 faulty Replace The hopper does not lo...

Страница 279: ...lifted hopper 3 Turn the ignition key to 0 then engage the parking brake 4 Open the battery engine compartment hood with the handle and fasten it with the support rod 5 Disconnect the battery connector Battery Version Disconnect the batteries Diesel and LPG Version 6 Lift and remove the right side panel A disengaging it from the upper B and lower C fasteners 7 Remove the screws D and the cover E F...

Страница 280: ...onnection F of the hopper closed sensor G 9 Unscrew the nut H and remove the sensor G with wiring Installation 10 Assemble the components in the reverse order of removal Adjustment 11 Adjust the distance I between the sensor G and the flange J to 0 15 0 20 in 4 5 mm then tighten the locknut K onto the nut H Figure 12 G K J H F I G ...

Страница 281: ... up and disconnect the electrical connection F of the hopper lifted sensor G 3 Unscrew the nut H and remove the sensor G with wiring Installation 4 Assemble the components in the reverse order of removal Adjustment 5 Adjust the distance I between the sensor G and the flange J to 0 15 0 20 in 4 5 mm then tighten the locknut K onto the nut H Figure 13 G K J G H F I ...

Страница 282: ...en it with the support rod 5 Disconnect the battery connector Battery Version Disconnect the batteries Diesel and LPG Version 6 On the left hand side of the hopper disconnect the electrical connection A of the hopper rotated sensor B 7 Cut the various clamps C for the sensor wiring B 8 Unscrew the nut D and remove the sensor B with wiring Installation 9 Assemble the components in the reverse order...

Страница 283: ...port rod 4 Disconnect the battery connector Battery Version Disconnect the batteries Diesel and LPG Version 5 Remove the hopper dumping cylinder B see procedure in relevant paragraph it is not however necessary to disconnect its hoses nor is it necessary to bring the hopper to head height 6 Cut the retaining clamp and disconnect the sensor electrical connection C 7 Unscrew the two threaded pins D ...

Страница 284: ...er Continues Installation 9 Assemble the components in the reverse order of removal and note the following If the hopper is changed check the three hopper sensors in the following positions Closed Lifted Rotated refer to the sensor installation removal procedures ...

Страница 285: ...y engine compartment hood with the handle and fasten it with the support rod 5 Disconnect the battery connector Battery Version Disconnect the batteries Diesel and LPG Version 6 Lift and remove the right side panel A disengaging it from the upper B and lower C fasteners 7 Working above the hydraulic unit D free the caps E and the disconnect the electrical terminals F after unscrewing the correspon...

Страница 286: ...s highly corrosive WARNING The hydraulic system oil should be disposed of properly according to the Law in force 10 Unscrew the screws I and remove the hydraulic unit J Installation 11 Assemble the components in the reverse order of removal and note the following After the installation of the hydraulic unit either the same unit or a new one fill the tank with hydraulic fluid up to the Max level th...

Страница 287: ...with the handle and fasten it with the support rod 6 Lift and remove the right side panel C disengaging it from the upper D and lower E fasteners 7 Unscrew the lines F and G from the hydraulic cylinder check valve collecting any hydraulic fluid which may come out in a suitable container immediately plug the disconnected fittings to prevent impurities entering the hydraulic system WARNING Hydraulic...

Страница 288: ...e lower pin M of the hydraulic cylinder J 10 Remove the hydraulic cylinder M Installation 11 Assemble the components in the reverse order of removal and note the following After the installation of the hydraulic cylinder either the same or a new one fill the tank with hydraulic fluid up to the Max level then perform some movements with the hopper the hydraulic system is self bleeding then check th...

Страница 289: ...6 Supporting the hopper B disconnect the rod C from the pin then rotate the hopper downwards 7 Unscrew the hydraulic cylinder lines D and E collecting any hydraulic fluid which may come out in a suitable container immediately plug the disconnected fittings to prevent impurities entering the hydraulic system WARNING Hydraulic system oil is highly corrosive WARNING The hydraulic system oil should be...

Страница 290: ... in the reverse order of removal and note the following After the installation of the hydraulic cylinder either the same or a new one fill the tank with hydraulic fluid up to the Max level then perform some movements with the hopper the hydraulic system is self bleeding then check the hydraulic fluid level see procedure in relevant paragraph ...

Страница 291: ...syringe to remove all the hydraulic fluid in the tank 5 Add the new hydraulic fluid to the tank filling up to the MAX mark B Use the hydraulic fluid specified in the Technical Data section WARNING Hydraulic system oil is highly corrosive WARNING The hydraulic system oil should be disposed of properly according to the Law in force 6 Screw down the cap A 7 Close the battery engine compartment hood u...

Страница 292: ... D SW5500 LPG FLOORTEC R 985 LPG Hopper Capacity 5 3 ft 150 liters Maximum liftable weight 240 Kg Maximum lifting height 65 in 1 650 mm Hydraulic control unit Voltage 24V Power 0 8 kW Oil tank capacity 1 litre Hydraulic system oil type Arnica 46 Displacement 1 cc Pressure relief valve calibration 140 2 bar 3l 1 ...

Страница 293: ...293 Service Manual SW5500 FLOORTEC R 985 90 Options Description Illustration DUSTGUARD SYSTEM KIT See Dust Guard System chapter HYBRID KIT See Hybrid System chapter SAFETY BELT KIT ...

Страница 294: ...294 Service Manual SW5500 FLOORTEC R 985 90 Options Description Illustration ROOF COVER KIT PROTECTION ROOF KIT WORKING LIGHT KIT ...

Страница 295: ...295 Service Manual SW5500 FLOORTEC R 985 90 Options Description Illustration LEFT SIDE BROOM KIT SIDE BROOM GUARD KIT ...

Отзывы: