background image

39

Additional Information

For safe handling of the camera

WARNING

• Do not attempt to disassemble, repair, or modify the

camera yourself, as it houses high-voltage circuitry
that can cause electric shock. Also, such actions will
cause the camera to malfunction.

• If the camera is dropped and damaged, do not touch

any exposed interior metal parts, as it houses high-
voltage circuitry that can cause electric shock. Remove
the battery and take the camera to your nearest Nikon
dealer for repair.

• If you detect smoke coming from the camera, stop

operation immediately and turn the camera off. Let the
camera cool off before removing the battery. Then take
the camera to your nearest Nikon dealer for repair.

• Do not submerge the camera in water, allow water to

splash on it, or expose it to rain, as this may cause
electric shock or fire.

• Do not operate the camera in a place where there is

any possibility of catching fire or causing an
explosion.
If the camera is used in an environment where
combustible gas or dust may be generated, such as
where there is propane and gasoline, this may cause
fire or explosion.

• Do not let the strap wind around your neck.

In particular, never put the strap around a child’s neck,
as this may cause suffocation.

• Do not look at the sun or other strong light source

directly through the viewfinder, as this may damage
your retina, resulting in permanent eye damage.

• Batteries and accessories that are small enough to

enter the mouth of a child must be kept out of the
reach of children.
They may be swallowed by children.  If this happens,
call a physician immediately.

Содержание Lite Touch Zoom 70 W QD

Страница 1: ...Instruction Manual Pages 2 41 Bedienungsanleitung Seiten 42 81 Manuel d ulilisation Pages 82 121 Manual de instrucciones Páginas 122 161 E G F S ...

Страница 2: ...s from 28 to 70 mm focal length range p 14 Close up photography in Macro mode for subjects as near as at 0 6 to 1 0 m 2 0 to 3 3 ft p 29 Symbols used in this manual Indicates items to be checked such as requirements and restrictions Indicates notes and cautions you are requested to follow Indicates supplementary descriptions Indicates pages for reference Accessories The following item is supplied ...

Страница 3: ... focus subjects ________________________________ 19 Flash photography ______________________________________ 20 Procedure for Flash Photography __________________________ 21 To automatically fire the flash _____________________________ 22 To cancel flash operation _________________________________ 23 To fire the flash intentionally ______________________________ 24 To photograph a person in a nigh...

Страница 4: ...om lever p 14 button Flash mode pp 20 25 Infinity Focus mode p 28 button Red eye Reduction pp 26 27 Self Timer p 28 Battery chamber lid p 8 Macro button p 29 Flash pp 20 27 Auto Exposure metering window Shutter Release button p 13 Mid roll Rewind button p 17 Red eye Reduciton lamp p 26 27 Self Timer lamp p 28 Autofocus window ...

Страница 5: ...e Touch Zoom 70W QD only Viewfinder eyepiece Tripod socket Camera back lock release lever p 10 Date panel pp 30 31 ADJUST button for correcting data p 31 SEL button for selecting the position of data to be corrected p 31 MODE button for selecting data to be imprinted or corrected pp 30 31 ...

Страница 6: ...ction indicator pp 26 27 Infinity Focus Mode indicator p 28 Low battery power indicator p 9 Flash Mode indicator pp 20 25 Frame counter p 11 Self Timer indicator p 28 LCD panel The illustrations are fully labeled for your reference ...

Страница 7: ...leased but the flash does not fire Lights up Focus is achieved and the flash is ready to fire When you press the Shutter Release button the flash fires Blinks The flash is being charged The Shutter Release button is disabled Quick blinks The flash dose not fire If the popped up flash unit is inadvertently pressed down the LED quickly blinks as a warning Does not light The camera to subject distanc...

Страница 8: ...hamber lid Open the battery chamber lid to the direction indicated by the arrow in the illustration 2 Install a new battery Observe the correct polarities and insert the battery in the direction shown in the illustration above 3 Close the battery chamber lid Firmly press the battery chamber lid until it clicks shut ...

Страница 9: ...event battery drain close the slide cover the camera is turned off and press down the flash unit when the camera is not in use Checking the battery power Check for the Low Battery Power indicator on the LCD panel If battery power is sufficient is not indicated If is blinking or all the indicators on the LCD panel do not appear the battery is exhausted Replace it with a new one Always check the bat...

Страница 10: ...lm be sure not to open the camera back cover into direct sunlight Film recommended It is recommended to use ISO400 film which provides good results in flash photography and reasonable protection against camera shake 1 Open the camera back Slide the camera back lock release lever in the direction of the arrow 1 to open the camera back 2 2 Insert a film cartridge Loading the film Tips on 35mm film D...

Страница 11: ...y positioned with no slack 4 Close the camera back and check that the film has been correctly loaded When the film has been properly set is displayed on the frame counter when the camera is turned on If the letter blinks on the frame counter the film is not properly loaded Open the camera back again and reload film ...

Страница 12: ...sh with your fingers hair or the camera strap Be careful not to press down on the flash unit when it is in the popped up position Take some trial shots Before taking important pictures it is strongly recommended to take a few trial shots first to familiarize yourself with the camera and all of its features Nikon cannot be held responsible for malfunctions caused by using the Lite Touch Zoom 70W Li...

Страница 13: ... the focus and exposure are achieved and the red LED lights up The focus is locked Focus lock p 18 while the Shutter Release button is depressed lightly 2 Fully depress the Shutter Release button to take the picture Pressing the Shutter Release button abruptly in one stroke may result in camera shake Be sure to slowly press the Shutter Release button ...

Страница 14: ...mm photography or to the direction of for wide angle 28mm photography Remove your finger from the lever when the desired image size is obtained If the camera is not operated for more than 3 minutes the lens automatically retracts to the wide angle position Example of a telephoto photograph Example of a wide angle photograph ...

Страница 15: ... 18 2 Lightly press the Shutter Release button The relationships between the red LED indications and the camera functions are shown in the table below Focusing Complete Complete Impossible Momentarily lights Steadily lights Slowly blinks Quickly blinks Does not light Flash Does not fire Fires Being charged Does not fire Shutter Shooting Enabled Enabled Locked 1 p 16 Enabled 2 p 16 Locked 3 p 16 co...

Страница 16: ...n and the shutter cannot be released Move away from the subject until the red LED lights up Note that the Shutter Release button may still work even if the camera to subject distance is extremely short i e out of the control range of the camera 3 Slowly press the Shutter Release button all the way If the subject is dark in Auto Flash mode the flash fires automatically Pressing the Shutter Release ...

Страница 17: ...s midway through the roll because of a dead battery it resumes automatically as soon as the battery is replaced Do not open the camera back until the letter starts blinking To rewind the film at mid roll Press the mid roll rewind button using the stud on the end of the strap lug or the point of a ball point pen Once rewinding starts there is no need to keep the button pressed Removing the film 1 M...

Страница 18: ...ables you to change the picture composition while locking the focus Also use focus lock for difficult to focus subjects described on the next page p 19 1 Compose the picture If the shutter is released in a condition like that in the above example where the main subject is out of focus 2 Center the autofocus frame mark on the main subject then lightly press the Shutter Release button Do not change ...

Страница 19: ...istant from the camera then compose the picture to shoot Subjects too small to fully cover the autofocus frame mark Subjects behind glass Dark subjects with no reflection Glossy lihgt reflecting surfaces such as shiny cars or water Subjects without solid content i e candle flame fireworks etc Secondary subjects are closer to the camera than the main subject ...

Страница 20: ...ration in lighting conditions where normally the flash would automatically fire Anytime Flash p 24 To fire the flash intentionally regardless of the available light Slow Sync Flash p 25 To brighten both the subject and the background at dusk or in night scenes While the red LED is blinking with the Shutter Release button pressed lightly the flash is being charged and the shutter cannot be released...

Страница 21: ...nge The reference distance values are shown below With ISO100 film speed wide angle setting approx 0 9 to 3 3 m 3 0 to 10 9 ft telephoto setting approx 1 2 to 1 9 m 4 0 to 6 2 ft With ISO400 film speed wide angle setting approx 0 9 to 6 6 m 3 0 to 21 8 ft telephoto setting approx 1 2 to 3 8 m 4 0 to 12 5 ft Do NOT press against the flash unit If extra force is applied to the flash unit the red LED...

Страница 22: ...he red LED lights up then shoot If the subject is sufficiently illuminated the flash does not fire In this case the red LED momentarily lights to notify you of this when you lightly press the Shutter Release button When the red LED is blinking with the Shutter Release button pressed lightly the flash is being charged and the shutter cannot be released Lightly press the Shutter Release button again...

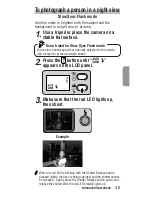
Страница 23: ...aphy is prohibited 1 Use a tripod or place the camera on a stable flat surface Use a tripod for Flash Cancel mode Since slow shutter speeds are usually selected in this mode use a tripod to prevent camera shake 2 Press the button until appears on the LCD panel 3 Make sure that the red LED momentarily lights then shoot Example ...

Страница 24: ... 1 Press the button until appears on the LCD panel 2 Make sure that the red LED lights up then shoot When the red LED is blinking with the Shutter Release button pressed lightly the flash is being charged and the shutter cannot be released Lightly press the Shutter Release button again and release the shutter after the red LED steadily lights up Example ...

Страница 25: ...lash mode Since slow shutter speeds are usually selected in this mode use a tripod to prevent camera shake 2 Press the button until appears on the LCD panel 3 Make sure that the red LED lights up then shoot When the red LED is blinking with the Shutter Release button pressed lightly the flash is being charged and the shutter cannot be released Lightly press the Shutter Release button again and rel...

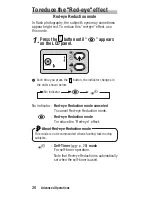
Страница 26: ...n the LCD panel Each time you press the button the indicator changes in the order shown below No indicator Red eye Reduction mode canceled To cancel Red eye Reduction mode Red eye Reduction mode To reduce the Red eye effect About Red eye Reduction mode This mode is not recommended when shooting fast moving subjects Self Timer p 28 mode For self timer operation Note that Red eye Reduction is automa...

Страница 27: ...camera or let the subject move until the flash fires While the red LED is blinking with the Shutter Release button pressed lightly the flash is being charged and the shutter cannot be released Lightly press the Shutter Release button again and release the shutter after the red LED stops blinking and stays lit Red eye Reduction mode is not automatically canceled by turning the power off To cancel t...

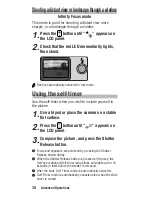
Страница 28: ...ish to include yourself in the picture 1 Use a tripod or place the camera on a stable flat surface 2 Press the button until appears on the LCD panel 3 Compose the picture and press the Shutter Release button Focus and exposure are achieved by pressing the Shutter Release button lightly When the Shutter Release button is pressed all the way the Red eye reduction Self timer lamp blinks and lights up...

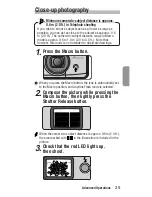
Страница 29: ...o 1 0 m 2 0 to 3 3 ft Note that however this mode is not intended to duplicate drawings 1 Press the Macro button When you press the Macro button the lens is automatically set to the Macro position and Anytime Flash mode is selected 2 Compose the picture while pressing the Macro button then lightly press the Shutter Release button When the camera to subject distance is approx 0 6m 2 0 ft the area m...

Страница 30: ... imprinted on pictures Each time you press the MODE button the indicator changes in the order shown below Imprint position Day Month Year Month Day Year Year Month Day Day Hour Minute NO printing If is displayed on the LCD panel the date time of the shot will be imprinted on the picture Set to No printing if you prefer the date time not to be imprinted Imprint position of date time The imprint pos...

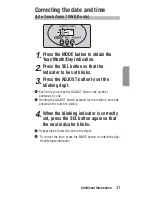
Страница 31: ...DJUST button to set the blinking digit Each time you press the ADJUST button the number advances by one Holding the ADJUST button pressed for more than 2 seconds advances the number quickly 4 When the blinking indicator is correctly set press the SEL button again so that the next indicator blinks Repeat steps 3 and 4 to set all the digits To correct the time press the MODE button to obtain the Day...

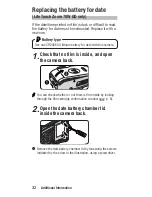
Страница 32: ...is camera 1 Check that no film is inside and open the camera back You can check whether or not there is film inside by looking through the film cartridge confirmation window p 5 2 Open the date battery chamber lid inside the camera back Remove the date battery chamber lid by loosening the screws indicated by the arrow in the illustration using a screwdriver Replacing the battery for date Lite Touc...

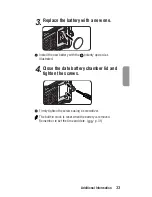
Страница 33: ...Install the new battery with the polarity upward as illustrated 4 Close the date battery chamber lid and tighten the screws Firmly tighten the screws using a screwdriver The built in clock is reset when the battery is removed Remember to set the time and date p 31 ...

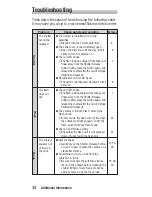
Страница 34: ...Once take your finger away from the Shutter Release button lightly press the button again and release the shutter after the red LED stops blinking and stays lit a The camera is in Auto Flash Slow Sync Flash mode In this mode the flash will not fire when the subject is bright enough To fire the flash select Anytime Flash mode a The red LED blinks quickly Check that the flash unit is not pressed dow...

Страница 35: ... points and solution a appears on the LCD panel when the camera is turned on by opening the slide cover Remove the film and load it again a The battery for date is exhausted Replace it with a new one aThe date panel displays Set the panel so that it displays the indication to be imprinted The numeral does not appear even when film is loaded The date time are not imprinted on pictures Problem Date ...

Страница 36: ...hen storing the camera Do not leave the camera in an excessively hot and humid place such as inside a closed car or car trunk or in front of a heater or a place exposed to chemicals such as camphor or naphthalene Using a desiccant during storage is recommended Maintenance Use a dry soft cloth or commercially available blower brush or lens cleaner to remove dirt and smudges Lightly wipe away the di...

Страница 37: ...y lightly pressing the Shutter Release button Distance range from approx 0 9 m 3 0 ft to infinity at 28mm approx 1 2 m 4 0 ft to infinity at 70mm Focus lock Focus is locked as long as the shutter Release button lightly pressed Exposure control Electronically controlled program AE auto exposure range ISO100 EV5 to 15 at 28mm EV6 to 15 at 70mm Flash fires automatically if the available light is low ...

Страница 38: ...of 24 exposure film when flash is used for half the exposures LCD panel Power is on Frame counter Flash mode Red eye Reduction Self timer Infinity Focus mode Low battery power Power source One 3V lithium battery CR2 Date imprint function Lite Touch Zoom 70W QD only 24 hour cycle with no AM PM Five indication formats selectable by a push button Year Month Day Day Hour Minute no printing Month Day Y...

Страница 39: ... repair Do not submerge the camera in water allow water to splash on it or expose it to rain as this may cause electric shock or fire Do not operate the camera in a place where there is any possibility of catching fire or causing an explosion If the camera is used in an environment where combustible gas or dust may be generated such as where there is propane and gasoline this may cause fire or exp...

Страница 40: ... camera while mounted on a tripod as you might bump into something and injure yourself or others Do not throw used batteries into a fire Also do not short circuit disassemble or heat the battery as this may cause it to catch fire or explode Always follow the warning instructions printed on batteries to prevent them from catching fire or exploding Never use batteries not specified in this instructi...

Страница 41: ...41 Additional Information ...

Страница 42: ...nd einem Brennweitenbereich zwischen 28 und 70 mm S 54 Nahaufnahmen im Makromodus von Motiven die nicht mehr als 0 6 bis 1 0 m vom Objektiv entfernt sein müssen S 69 Symbole in dieser Anleitung Wichtige Hinweise die Sie beachten sollten z B bestimmte Voraussetzungen oder Einschränkungen Hinweise und Warnhinweise die unbedingt befolgt werden müssen Zusätzliche Erläuterungen Seiten mit Querverweisen...

Страница 43: ...________ 59 Aufnahmen mit Blitz ____________________________________ 60 Vorgehen bei Aufnahmen mit Blitz _________________________ 61 So wird der Blitz automatisch ausgelöst _____________________ 62 So schalten Sie den Blitz aus ______________________________ 63 So wird der Blitz bei jeder Aufnahme ausgelöst _______________ 64 So fotografieren Sie ein Motiv bei Nacht _____________________ 65 So ve...

Страница 44: ...r den Blitzmodus S 60 65 für die Unendlicheinstellung S 68 Taste zur Verringerung des Rote Augen Effekts S 66 67 für den Selbstauslöser S 68 Batteriefachdeckel S 48 Makrotaste S 69 Blitz S 60 67 Belichtungs meßfenster Auslöser S 53 Taste zum Zurückspulen teilbelichteter Filme S 57 Lampe zur Verringerung des Rote Augen Effekts S 66 67 Selbstauslöseranzeige S 68 Autofokusfenster ...

Страница 45: ... Touch Zoom 70W QD Sucherokular Stativbuchse Rückwandentriegelung S 50 Datums Display S 70 71 Taste ADJUST zum Korrigieren von Daten S 71 Taste SEL zum Auswählen der Position der zu korrigierenden Daten S 71 Taste MODE zum Auswählen von Daten die einbelichtet oder korrigiert werden sollen S 70 71 ...

Страница 46: ... Rote Augen Effekts S 66 67 Anzeige für Unendlicheinstellung S 68 Batterieanzeige S 49 Anzeige für Blitzmodus S 60 65 Bildzähler S 51 Selbstauslöseranzeige S 68 LC Display Auf den in Klammern angegebenen Seiten finden Sie weitere Erläuterungen ...

Страница 47: ... aber der Blitz wird nicht ausgelöst Leuchtet auf Der Fokus ist scharf eingestellt bzw der Blitz kann ausgelöst werden Wenn Sie den Auslöser drücken wird der Blitz ausgelöst Blinkt Der Blitz wird gerade aufgeladen Der Auslöser ist blockiert Blinkt schnell Der Blitz wird nicht ausgelöst Wenn Sie den aufgeklappten Blitzträger versehentlich hinunterdrücken blinkt die LED als Warnung schnell Leuchtet ...

Страница 48: ...e den Batteriefachdeckel in die Richtung die mit dem Pfeil in der Abbildung angegeben ist 2 Legen Sie eine neue Batterie ein Achten Sie auf die richtige Polarität und legen Sie die Batterie in der in der Abbildung oben dargestellten Richtung ein 3 Schließen Sie den Batteriefachdeckel Drücken Sie fest auf den Batteriefachdeckel bis er mit einem Klicken einrastet ...

Страница 49: ...atterie nicht unnötig belastet wird schließen Sie die Schiebeabdeckung wenn Sie die Kamera nicht verwenden und drücken Sie den Blitz herunter Die Kamera schaltet sich aus Überprüfen der Batterleladung Überprüfen Sie die Batterieanzeige im LCD Display Solange nicht angezeigt wird ist die Batterieladung ausreichend Wenn blinkt oder keine Anzeigen im LC Display erscheint ist die Batterie erschöpft Er...

Страница 50: ... beim Einlegen oder Herausnehmen eines Films darauf die Rückwand der Kamera nicht in direktem Sonnenlicht zu öffnen Empfohlener Filmtyp Es empfiehlt sich ISO 400 Filme zu verwenden die auch bei Blitzaufnahmen gute Resultate ergeben Überdies beugen sie Verwacklungsunschärfen vor 1 Öffnen Sie die Kamerarückwand Schieben Sie den Entriegelungshebel für die Kamerarückwand in Pfeilrichtung 1 um sie 2 zu...

Страница 51: ... Film darf sich nicht nach oben wölben 4 Schließen Sie die Kamerarückwand und überprüfen Sie ob der Film richtig eingelegt wurde Wenn der Film korrekt eingelegt ist erscheint beim Einschalten der Kamera im Bildzähler Wenn im Bildzähler stattdessen blinkt ist der Film nicht richtig eingelegt Öffnen Sie die Kamerarückwand nochmals und legen Sie den Film erneut ein ...

Страница 52: ...jektiv das Autofokusfenster oder den Blitz nicht mit Fingern Haaren oder der Trageschlaufe Achten Sie darauf nicht auf den Blitz zu drücken wenn er aufgeklappt ist Probeaufnahmen Vor wichtigen Ereignissen empfiehlt es sich dringend zunächst einige Probeaufnahmen zu machen um mit der kamera und all ihren Funktionen vertraut zu werden Nikon übernimmt keine Haftung für Fehlfunktionen die darauf zurüc...

Страница 53: ... und Belichtung eingestellt und die rote LED leuchtet auf Die Fokuseinstellung ist fixiert Fokusspeicherfunktion S 58 solange Sie den Auslöser leicht gedrückt halten 2 Drücken Sie den Auslöser ganz nach unten um das Bild aufzunehmen Wenn Sie den Auslöser abrupt ganz nach unten drücken kann die Kamera leicht wackeln Achten Sie also darauf den Auslöser langsam zu drücken ...

Страница 54: ...nahmen 70 mm oder in die Richtung für Weitwinkelaufnahmen 28 mm Lassen Sie den Hebel los wenn das Bild in der gewünschten Größe angezeigt wird Wenn die Kamera mehr als 3 Minuten lang nicht bedient wird wechselt das Objektiv automatisch wieder in die Weitwinkelposition Beispiel für eine Teleaufnahme Beispiel für eine Weitwinkelaufnahme ...

Страница 55: ...äzise Scharfeinstellung erzielen S 58 2 Drücken Sie den Auslöser leicht Die Bedeutung der roten LED bei den einzelnen Kamerafunktionen sehen Sie in der folgenden Tabelle Leuchtet kurz auf Leuchtet stetig Blinkt langsam Blinkt schnell Leuchtet nicht Fokussierung Abgeschlossen Abgeschlossen Nicht möglich Blitz Wird nicht ausgelöst Wird ausgelöst Wird geladen Wird nicht ausgelöst Auslöser Ausgelöst A...

Страница 56: ...e zu schonen Aufnehmen Fortsetzung 1 Wenn die rote LED blinkt nachdem Sie den Auslöser leicht gedrückt haben wird der Blitz aufgeladen und der Auslöser ist blockiert Drücken Sie erneut leicht auf den Auslöser und drücken Sie den Auslöser ganz wenn die rote LED aufhört zu blinken und stetig leuchtet 2 Wenn Sie den aufgeklappten Blitz versehentlich herunterdrücken blinkt die LED als Warnung schnell ...

Страница 57: ...wird spult die Kamera den restlichen Film zurück sobald eine neue Batterie eingelegt wird Öffnen Sie die Kamerarückwand erst wenn der Buchstabe zu blinken anfängt So spulen Sie einen nur teilweise belichteten Film zurück Drücken Sie mit der Spitze der Schlaufenöse oder eines Kugelschreibers die Taste Zurückspulen teilbelichteter Filme Sobald das Zurückspulen beginnt brauchen Sie die Taste nicht me...

Страница 58: ...stellen des Fokus den Bildausschnitt verändern Die Fokusspeicherfunktion eignet sich auch für Motive die sich nur schwer scharfeinstellen lassen S 59 1 Richten Sie die Kamera auf den gewünschten Bildausschnitt Wenn Sie in einer Situation wie im Beispiel oben Hauptmotiv nicht scharf eingestellt den Auslöser drücken 2 Richten Sie die Markierung für den Autofokusrahmen in der Mitte auf das Hauptmotiv...

Страница 59: ...on der Kamera befindet und wählen Sie dann den gewünschten Bildausschnitt Motive die zu klein sind um den Autofokusrahmen ganz zu füllen Motive hinter Glas Dunkle Motive die kaum Licht reflektieren Glänzende stark reflektierende Flächen zum Beispiel ein frisch poliertes Auto oder Wasser Körperlose Motive zum Beispiel Kerzenflammen oder ein Feuerwerk Motive die weiter von der Kamera entfernt sind a...

Страница 60: ...Lichtverhältnissen nicht aktiviert bei denen er normalerweise ausgelöst würde Blitz bei jeder Aufnahme S 64 Der Blitz wird unabhängig von den Lichtverhältnissen bei jeder Aufnahme ausgelöst Langzeitsynchronisation S 65 Das Motiv und der Hintergrund werden in der Dämmerung oder bei Nacht aufgehellt Wenn die rote LED blinkt nachdem Sie den Auslöser leicht gedrückt haben wird der Blitz aufgeladen und...

Страница 61: ...öser 3 Achten Sie darauf daß die rote LED aufleuchtet und drücken Sie dann den Auslöser Reichweite des Blitzlichts Die jeweiligen Werte für die Reichweite sind im folgenden angegeben Bei ISO 100 Filmen Weitwinkel ca 0 9 bis 3 3 m Telebereich ca 1 2 bis 1 9 m Bei ISO 400 Filmen Weitwinkel ca 0 9 bis 6 6 m Telebereich ca 1 2 bis 3 8 m Drücken Sie NICHT auf den Blitz Wenn Sie auf den Blitz drücken bl...

Страница 62: ...Sie darauf daß die rote LED aufleuchtet und drücken Sie dann den Auslöser Wenn das Motiv hell genug ist wird der Blitz nicht ausgelöst In diesem Fall leuchtet die rote LED kurz auf um Sie darauf hinzuweisen wenn Sie den Auslöser leicht drücken Wenn die rote LED blinkt nachdem Sie den Auslöser leicht gedrückt haben wird der Blitz aufgeladen und der Auslöser ist blockiert Drücken Sie erneut leicht a...

Страница 63: ...stellen Sie die Kamera auf einer stabilen waagerecht Oberfläche auf Verwenden Sie bei Blitzabschaltung ein Stativ Da in diesem Modus in der Regel eine längere Verschlußzeit gilt empfiehlt sich die Verwendung eines Stativs um Verwacklungsunschärfen zu vermeiden 2 Drücken Sie die Taste bis im LC Display erscheint 3 Achten Sie darauf daß die rote LED kurz aufleuchtet und drücken Sie dann den Auslöser...

Страница 64: ...löst 1 Drücken Sie die Taste bis im LC Display erscheint 2 Achten Sie darauf daß die rote LED aufleuchtet und drücken Sie dann den Auslöser Wenn die rote LED blinkt nachdem Sie den Auslöser leicht gedrückt haben wird der Blitz aufgeladen und der Auslöser ist blockiert Drücken Sie erneut leicht auf den Auslöser und drücken Sie den Auslöser ganz wenn die rote LED stetig leuchtet Beispiel ...

Страница 65: ...ion ein Stativ Da in diesem Modus in der Regel eine längere Verschlußzeit gilt empfiehlt sich die Verwendung eines Stativs um Verwacklungsunschärfen zu vermeiden 2 Drücken Sie die Taste bis im LC Display erscheint 3 Achten Sie darauf daß die rote LED aufleuchtet und drücken Sie dann den Auslöser Wenn die rote LED blinkt nachdem Sie den Auslöser leicht gedrückt haben wird der Blitz aufgeladen und d...

Страница 66: ...ne Anzeige Keine Verringerung des Rote Augen Effekts Der Modus zur Verringerung des Rote Augen Effekts wird eingeschaltet Modus zur Verringerung des Rote Augen Effekts Der Modus zur Verringerung des Rote Augen Effekts wird eingeschaltet Hinweis zur Verringerung des Rote Augen Effekts Dieser Modus ist für die Aufnahme von Motiven die sich schnell bewegen nicht zu empfehlen Selbstauslösermodus S 68 ...

Страница 67: ...die Kamera nicht zu bewegen und achten Sie darauf daß sich auch das Motiv nicht bewegt bis der Blitz ausgelöst wird Wenn die rote LED blinkt nachdem Sie den Auslöser leicht gedrückt haben wird der Blitz aufgeladen und der Auslöser ist blockiert Drücken Sie erneut leicht auf den Auslöser und drücken Sie den Auslöser ganz wenn die rote LED aufhört zu blinken und stetig leuchtet Der Modus zur Verring...

Страница 68: ...er aufzunehmen 1 Verwenden Sie ein Stativ oder stellen Sie die Kamera auf einer stabilen waagerecht Oberfläche auf 2 Drücken Sie die Taste bis im LC Display erscheint 3 Richten Sie die Kamera auf den gewünschten Bildausschnitt und drücken Sie den Auslöser Fokus und Belichtung werden eingestellt wenn Sie den Auslöser leicht drücken Wenn der Auslöser ganz gedrückt wird blinkt die Lampe zur Verringer...

Страница 69: ...Fotografieren von Zeichnungen nicht eignet 1 Drücken Sie die Makrotaste Wenn Sie die Makrotaste drücken fährt das Objektiv automatisch in die Makroposition und die Kamera schaltet in den Modus Blitz bei jeder Aufnahme 2 Richten Sie die Kamera auf den gewünschten Bildausschnitt während Sie die Makrotaste gedrückt halten und drücken Sie dann leicht den Auslöser Bei einem Abstand von etwa 0 6 m zwisc...

Страница 70: ... Tastendruck auf die Taste MODE wechselt die Anzeige wie unten dargestellt Tag Monat Jahr Monat Tag Jahr Jahr Monat Tag Tag Stunde Minute KEINE Einbelichtung Wenn im LC Display angezeigt wird werden Datum Uhrzeit der Aufnahme in das Bild einbelichtet Wählen Sie Keine Einbelichtung wenn Datum Uhrzeit nicht einbelichtet werden sollen Position von Datum Uhrzeit Die Abbildung zeigt die Einbelichtungsp...

Страница 71: ...DJUST ein Mit jedem Tastendruck auf ADJUST wird die Zahl um eins weitergeschaltet Wenn Sie die Taste ADJUST mehr als 2 Sekunden lang gedrückt halten laufen die Zahlen schnell durch 4 Wenn die blinkende Angabe korrekt eingestellt ist drücken Sie die Taste SEL erneut so daß die nächste Angabe zu blinken beginnt Stellen Sie die übrigen Zahlen wie in Schritt 3 und 4 erläutert ein Wenn Sie die Uhrzeit ...

Страница 72: ...atterietyp Verwenden Sie bei dieser Kamera eine Lithiumbatterie CR2025 mit 3 V als Datumsspeicherbatterie 1 Achten Sie darauf daß kein Film eingelegt ist und öffnen Sie die Kamerarückwand Wenn Sie prüfen wollen ob ein Film eingelegt ist schauen Sie durch das Filmsichtfenster S 45 2 Öffnen Sie den Batteriefachdeckel in der Kamerarückwand Nehmen Sie den Batteriefachdeckel ab indem Sie mit einem Schr...

Страница 73: ...ldung gezeigt mit dem Pol nach oben ein 4 Schließen Sie den Batteriefachdeckel wieder und bringen Sie die Schrauben wieder an Ziehen Sie die Schrauben mit einem Schraubenzieher fest Die eingebaute Uhr wird zurückgesetzt wenn die Batterie herausgenommen wird Denken Sie daran Uhrzeit und Datum erneut einzustellen S 71 ...

Страница 74: ...nzeige im LC Display Die Batterie ist erschöpft Ersetzen Sie sie durch eine neue a Die rote LED blinkt Der Blitz wird gerade aufgeladen Lassen Sie den Auslöser kurz los drücken Sie ihn erneut leicht und anschließend ganz wenn die rote LED zu blinken aufhört und stetig leuchtet a Die Kamera ist in den Modus Blitzautomatik oder Langzeitsynchronisation geschaltet In diesem Modus wird der Blitz nicht ...

Страница 75: ...ßnahmen a erscheint im LC Display wenn Sie die Kamera einschalten indem Sie die Schiebeabdeckung öffnen Nehmen Sie den Film aus der Kamera und legen Sie ihn erneut ein a Die Datumsspeicherbatterie ist erschöpft Ersetzen Sie sie durch eine neue a Im Datums Display erscheint Stellen Sie das Display so ein daß darin die Anzeige erscheint die einbelichtet werden soll Die Zahl erscheint nicht wenn ein ...

Страница 76: ...warmer oder feuchter Umgebung zum Beispiel in einem geschlossenen Auto oder Kofferraum oder vor einer Heizung Schützen Sie sie vor Chemikalien wie Kampfer oder Naphthalin Es empfielt sich die Kamera zusammen mit einem feuchtigkeitsabsorbierenden Mittel Trockenmittel zu lagern Wartung Entfernen Sie Staub und Verschmutzungen mit einem weichen trockenen Tuch oder einem handelsüblichen Staubbläser ode...

Страница 77: ...ösers Arbeitsbereich bei 28 mm von ca 0 9 m bis unendlich bei 70 mm von ca 1 2 m bis unendlich Fokusspeicherung Die Fokuseinstellung bleibt gespeichert solange der Auslöser leicht gedrückt wird Belichtungssteuerung Elektronisch gesteuerte programmierte Belichtungsautomatik Arbeitsbereich der Belichtungsautomatik ISO 100 Lichtwert 5 15 bei 28 mm Lichtwert 6 15 bei 70 mm automatische Blitzzuschaltun...

Страница 78: ...terie ca 10 Filmrollen mit je 24 Aufnahmen 50 der Aufnahmen mit Blitz Anzeigen im LC Display bei eingeschalteter Kamera Bildzähler Blitzmodus Verringerung des Rote Augen Effekts Selbstauslöser Unendlicheinstellung Batterieladung Stromquelle Eine Lithiumbatterie CR2 mit 3 V Funktion zur Datumseinbelichtung nur LiteTouch Zoom 70W QD 24 Stunden Anzeige fünf Anzeigeformate mit Drucktaste wählbar Jahr ...

Страница 79: ... Sie die Kamera nicht ins Wasser und schützen Sie sie vor Spritzwasser und Regen Andernfalls besteht die Gefahr eines Brandes oder eines elektrischen Schlags Verwenden Sie die Kamera nicht in einer Umgebung in der sie Feuer fangen oder explodieren könnte Wenn Sie die Kamera in einer Umgebung mit brennbarem Gas oder Staub verwenden zum Beispiel in der Nähe von Propangas oder Benzin besteht die Gefa...

Страница 80: ...ht wenn sie auf einem Stativ montiert ist Sie könnten irgendwo anstoßen und sich oder andere verletzen Werfen Sie gebrauchte Batterien nicht ins Feuer Schließen Sie die Batterie nicht kurz und zerlegen bzw erhitzen Sie sie nicht Andernfalls besteht die Gefahr eines Brandes oder einer Explosion Befolgen Sie die Warnhinweise die auf einer Batterie aufgedruckt sind damit sich die Batterie nicht entzü...

Страница 81: ...81 Weitere Informationen ...

Страница 82: ... compact à zoom 2 5x intégré d une focale de 28 à 70 mm p 94 Photographie en mode Macro de gros plans de sujets distants de 0 6 à 1 0 m p 109 Symboles utilisés dans le présent mode d emploi Signale des éléments à vérifier par exemple des conditions et des restrictions Signale des remarques et des mises en garde auxquelles vous êtes tenu de vous conformer Signale des descriptions supplémentaires In...

Страница 83: ...98 Sujets difficiles à mettre au point __________________________ 99 Photographie au flash __________________________________ 100 Procédure de photographie au flash _______________________ 101 Déclenchement automatique du flash ______________________ 102 Pour désactiver le flash _________________________________ 103 Déclenchement intentionnel du flash _______________________ 104 Pour photographier...

Страница 84: ...es pp 106 107 Retardateur p 108 Couvercle du logement de la pile p 88 Bouton Macro p 109 Flash pp 100 107 Fenêtre d exposition automatique Déclencheur p 93 Bouton rembobinage forcé d un film partiellement exposé p 97 Illuminateur d atténuation des yeux rouges pp 106 107 Témoin du retardateur p 108 Fenêtre de mise au point automatique Couvercle coulissant commutateur marche arrêt p 89 Fenêtre de mi...

Страница 85: ...viseur Filetage pour fixation sur pied Levier de déverrouillage du dos de l appareil p 90 Panneau dateur pp 110 111 Bouton ADJUST pour corriger des données p 111 Bouton SEL pour sélectionner la position des données à corriger p 111 Bouton MODE pour sélectionner les données à impressionner ou à corriger pp 110 111 Témoin rouge p 87 ...

Страница 86: ...dicateur de mode de mise au point sur l infini p 108 Indicateur de tension de pile insuffisante p 89 Indicateur de mode de flash pp 100 105 Compteur de vues p 91 Indicateur du retardateur p 108 Ecran de contrôle CL Les illustrations sont complètes à titre de référence ...

Страница 87: ...r le flash se déclenche S allume brièvement La mise au point est réglée Lorsque vous appuyez sur le déclencheur la prise de vues est exécutée mais le flash ne se déclenche pas Clignote Le flash est en train de se recycler Le déclencheur est désactivé Clignotements rapides Le flash ne se déclenche pas Si le flash est renfoncé par inadvertance le témoin clignote rapidement en guise d avertissement N...

Страница 88: ...u logement de la pile dans le sens de la flèche indiquée dans l illustration 2 Introduisez une pile neuve Respectez la polarité de la pile et installez celle ci dans le sens de la flèche indiquée dans l illustration ci dessus 3 Refermez le couvercle du logement de la pile Appuyez fermement sur le couvercle du logement de la pile jusqu à ce qu il s encliquette en position ...

Страница 89: ...sure de la pile refermez le couvercle coulissant l appareil se met hors tension et renfoncez le flash lorsque vous n employez pas l appareil Contrôle de la tension de la pile Vérifiez l indicateur de tension de pile insuffisante sur l écran de contrôle CL Lorsque la tension de la pile est suffisante l indicateur n est pas affiché Si l indication clignote ou si aucun indicateur de l écran de contrô...

Страница 90: ...z à ne pas ouvrir le dos de l appareil sous le rayonnement direct du soleil Film conseillé Nous préconisons l emploi de films 400 ISO qui offrent de bons résultats en photographie au flash et une protection raisonnable contre les risques de bougé 1 Ouvrez le dos de l appareil Faites glisser le levier de déverrouillage du dos dans le sens de la flèche 1 pour ouvrir le dos de l appareil 2 2 Introdui...

Страница 91: ...et bien tendu 4 Refermez le dos de l appareil et vérifiez si le film est correctement chargé Si le film a correctement été chargé l indication s affiche dans le compteur de vues lorsque vous mettez l appareil sous tension Si le symbole clignote dans le compteur de vues c est que le film n a pas été correctement chargé Ouvrez le dos de l appareil et rechargez le film ...

Страница 92: ... le flash avec vos doigts vos cheveux ou la dragonne Veillez à ne pas appuyer sur le flash lorsqu il se trouve en position déployée Effectuez quelques essais de prise de vues Avant de prendre des photos importantes il est vivement conseillé d effectuer quelques essais de prise de vues pour vous familiariser avec votre nouvel appareil et toutes ses fonctions La responsabilité de Nikon ne peut être ...

Страница 93: ...ppareil règle la mise au point et l exposition puis le témoin rouge s allume La mise au point reste mémorisée fonction de mémorisation de la mise au point p 98 tant que vous pressez le déclencheur à mi course 2 Enfoncez complètement le déclencheur pour prendre la photo Une brusque pression à fond sur le déclencheur peut entraîner un risque de bougé Appuyez lentement sur le déclencheur ...

Страница 94: ...bjectif 70 mm ou dans la direction de pour des photos en position de grand angle 28 mm Relâchez le bouton lorsque vous avez obtenu le cadrage voulu de la scène Si vous n actionnez pas l appareil pendant au moins 3 minutes l objectif se rétracte automatiquement sur la position grand angle Exemple de photographie au téléobjectif Exemple de photographie au grand angle ...

Страница 95: ...ation de la mise au point p 98 2 Appuyez pls delete sur légèrement sur le déclencheur La relation entre l indication du témoin rouge et les fonctions de l appareil est présentée dans le tableau ci dessous suite page suivante Mise au point Terminée Terminée Impossible S allume momentanément S allume en continu Clignote lentement Clignote rapidement Ne s allume pas Flash Ne se déclenche pas Se décle...

Страница 96: ...ues suite 1 Pendant que le témoin rouge clignote alors que le déclencheur est enfoncé à mi course le flash se recycle et l obturateur ne peut être déclenché Appuyez de nouveau légèrement sur le déclencheur et déclenchez le dès que le témoin rouge a cessé de clignoter et reste allumé 2 Si le flash est est renfoncé par inadvertance le témoin rouge clignote rapidement en guise d avertissement Dans ce...

Страница 97: ...ue la pile est déchargée il reprendra automatiquement dès que vous aurez remplacé la pile N ouvrez pas le dos de l appareil avant que la lettre se mette à clignoter Pour rembobiner un film partiellement exposé Pressez le bouton rembobinage de film partiellement exposé à l aide de l ergot de l œillet de la dragonne ou de la pointe d un stylo à bille Lorsque le rembobinage a démarré il est inutile d...

Страница 98: ...lant le réglage de la mise au point Utilisez également le verrouillage de la mise au point pour les sujets difficiles à mettre au point tels que ceux décrits à la page suivante p 99 1 Composez l image Si l obturateur est déclenché dans une condition telle que dans l exemple ci dessus où le sujet principal n est pas net 2 Centrez le sujet principal à l intérieur des repères de la zone de mise au po...

Страница 99: ...distant de l appareil puis composez l image pour prendre la photo Sujets trop petits pour couvrir complètement la zone de mise au point automatique Sujet derrière une vitre Sujet sombres sans réflexions Surfaces brillantes réfléchissant la lumière comme des voitures brillantes ou de l eau Sujets sans consistance matérielle comme la flamme d une bougie un feu d artifice Sujets secondaires plus proc...

Страница 100: ... Pour désactiver le fonctionnement du flash dans des conditions de prise de vues où le flash se déclencherait normalement Flash imposé p 104 Pour déclencher le flash volontairement indépendamment de la lumière disponible Flash en synchronisation lente p 105 Pour éclairer le sujet et l arrière plan au crépuscule ou la nuit Pendant que le témoin rouge clignote alors que le déclencheur est enfoncé à ...

Страница 101: ...témoin rouge est allumé et prenez la photo Plage de portée du flash Les distances de référence sont indiquées ci dessous Avec un film 100 ISO Réglage grand angle approx 0 9 à 3 3 m Réglage téléobjectif approx 1 2 à 1 9 m Avec un film 400 ISO Réglage grand angle approx 0 9 à 6 6 m Réglage téléobjectif approx 1 2 à 3 8 m Ne touchez PAS le flash Si une pression extérieure est exercée sur le flash le ...

Страница 102: ...ntrôle CL 2 Vérifiez si le témoin rouge est allumé et prenez la photo Si le sujet est suffisamment lumineux le flash ne se déclenche pas Dans ce cas le témoin rouge s allume brièvement pour vous le signaler lorsque vous sollicitez légèrement le déclencheur Pendant que le témoin rouge clignote alors que le déclencheur est légèrement enfoncé le flash se recycle et l obturateur ne peut être déclenché...

Страница 103: ...z le sur une surface stable Utilisez un trépied pour la photographie en mode de flash annulé Comme l appareil sélectionne souvent des vitesses d obturation lentes dans ce mode nous conseillons d utiliser un trépied pour éviter les risques de bougé 2 Appuyez sur le bouton jusqu à ce que l indication apparaisse dans l écran de contrôle 3 Vérifiez si le témoin rouge s allume momentanément et prenez l...

Страница 104: ...yez sur le bouton jusqu à ce que l indication apparaisse dans l écran de contrôle 2 Vérifiez si le témoin rouge s allume et prenez la photo Pendant que le témoin rouge clignote alors que le déclencheur est légèrement enfoncé le flash se recycle et l obturateur ne peut être déclenché Appuyez de nouveau légèrement sur le déclencheur et déclenchez le dès que le témoin rouge reste allumé Exemple ...

Страница 105: ... appareil sélectionne souvent des vitesses d obturation lentes dans ce mode nous conseillons d utiliser un trépied pour éviter les risques de bougé 2 Appuyez sur le bouton jusqu à ce que l indication apparaisse dans l écran de contrôle 3 Vérifiez si le témoin rouge s allume et prenez la photo Pendant que le témoin rouge clignote alors que le déclencheur est légèrement enfoncé le flash se recycle e...

Страница 106: ...fois que vous appuyez sur le bouton l indicateur change dans l ordre suivant Pas d indicateur Mode d atténuation des yeux rouges désactivé Pour désactiver le mode d atténuation des yeux rouges Mode d atténuation des yeux rouges Pour réduire l effet des yeux rouges A propos du mode d atténuation des yeux rouges Ce mode est déconseillé lors des prises de vues de sujets en déplacement rapide Mode de ...

Страница 107: ...ace pas avant le déclenchement du flash Pendant que le témoin rouge clignote alors que le déclencheur est enfoncé à mi course le flash se recycle et l obturateur ne peut être déclenché Appuyez de nouveau légèrement sur le déclencheur et déclenchez le dès que le témoin rouge a cessé de clignoter et reste allumé Le mode d atténuation des yeux rouges n est pas automatiquement désactivé lorsque vous m...

Страница 108: ... vous souhaitez vous aussi figurer sur la photo 1 Montez l appareil sur un trépied ou installez le sur une surface stable 2 Appuyez sur le bouton jusqu à ce que l indication apparaisse dans l écran de contrôle 3 Composez l image et appuyez sur le déclencheur Réglez la mise au point et l exposition en appuyant légèrement sur le déclencheur Lorsque vous appuyez sur à fond sur le déclencheur l illumi...

Страница 109: ...ron 0 6 à 1 0 m Attention cependant que ce mode n est pas conçu pour la duplication de dessins 1 Appuyez sur le bouton Macro Lorsque vous appuyez sur le bouton Macro l objectif se règle automatiquement en position Macro et le mode de Flash imposé est sélectionné 2 Composez l image tout en appuyant sur le bouton Macro et appuyez ensuite légèrement sur le déclencheur Lorsque la distance entre l appa...

Страница 110: ...s photos Chaque fois que vous appuyez sur le bouton MODE l indicateur change dans l ordre suivant Jour Mois Année Mois Jour Année Année Mois Jour Jour Heure Minutes PAS d impression Lorsque l indication est affichée dans l écran de contrôle la date heure de la prise de vue sera impressionnée sur la photo Sélectionnez pas d impression si vous ne voulez pas impressionner la date heure sur les vues P...

Страница 111: ...gler le chiffre qui clignote Chaque fois que vous appuyez sur le bouton ADJUST le nombre avance d une unité Maintenez le bouton ADJUST enfoncé pendant au moins 2 secondes pour faire avancer le nombre plus rapidement 4 Lorsque l indicateur qui clignote est correctement réglé appuyez de nouveau sur le bouton SEL pour faire clignoter l indicateur suivant Répétez les étapes 3 et 4 pour régler tous les...

Страница 112: ...film à l intérieur de l appareil et ouvrez le dos Vous pouvez vérifiez s il y a un film à l intérieur de l appareil en regardant dans la fenêtre témoin de présence d un film p 85 2 Ouvrez le couvercle du logement de la pile du dateur à l intérieur du boîtier de l appareil Enlevez le couvercle du logement de la pile du dateur en desserrant les vis indiquées par la flèche dans l illustration à l aid...

Страница 113: ... polarité orientée vers le haut comme illustré 4 Refermez le couvercle du logement de la pile du dateur et resserrez les vis Serrez correctement les vis à l aide d un tournevis L horloge intégrée est réinitialisée lorsque vous retirez la pile N oubliez pas de régler de nouveau l heure et la date p 111 ...

Страница 114: ...z de nouveau légèrement sur le bouton et déclenchez l obturateur dès que le témoin rouge a cessé de clignoter et reste allumé a L appareil se trouve en mode de flash automatique ou de synchronisation lente Dans ce mode le flash ne se déclenche pas lorsque le sujet est suffisamment lumineux Pour déclencher le flash sélectionnez le mode de Flash imposé a Le témoin rouge clignote rapidement Vérifiez ...

Страница 115: ...lutions a L indication apparaît dans l écran de contrôle CL lorsque l appareil est mis sous tension en ouvrant le couvercle coulissant Retirez le film et rechargez le a La pile du dateur est déchargée Remplacez la aLe panneau dateur affiche Réglez le panneau de façon à ce qu il affiche l indication à impressionner Le chiffre ne s affiche pas même si un film a été chargé dans l appareil La date heu...

Страница 116: ... pas l appareil à un endroit excessivement chaud et humide comme à l intérieur d une voiture fermée dans le coffre d une voiture ou face à un chauffage et ne l exposez pas à des substances chimiques telles que du camphre ou de la naphtaline Nous conseillons l utilisation d un dessiccateur durant la période de rangement Entretien Utilisez un chiffon doux et sec ou un pinceau soufflant disponible da...

Страница 117: ...lant d approx 0 9 m à l infini à 28 mm approx 1 2 m à l infini à 70 mm Mémorisation de mise au point La mise au point est mémorisée tant que vous maintenez le déclencheur légèrement enfoncé Contrôle de l exposition Exposition automatique programmée AE plage d exposition automatique 100 ISO 5 à 15 IL à 28mm 6 à 15 IL à 70mm le flash se déclenche automatiquement si la luminosité ambiante est faible ...

Страница 118: ... 24 vues le flash étant utilisé pour la moitié des vues Ecran de contrôle CL appareil sous tension Compteur de vues mode de flash atténuation des yeux rouges retardateur mode de mise au point sur l infini tension de pile insuffisante Alimentation Une pile au lithium de 3 V CR2 Fonction d impression de la date Lite Touch Zoom 70W QD uniquement Cycle de 24 heures cinq formats d affichage commutables...

Страница 119: ...gez pas l appareil dans l eau et évitez les projections d eau sur l appareil parce que cela risque de provoquer des décharges électriques ou un incendie Ne faites pas fonctionner l appareil à un endroit où il risque de prendre feu ou de provoquer une explosion Si l appareil est utilisé dans un environnement où des gaz ou de la poussière combustible sont susceptibles d être générés comme là où il y...

Страница 120: ...reil lorsqu il est monté sur un trépied car vous risquez de heurter quelque chose et de vous blesser ou de blesser d autres personnes Ne jetez pas les piles usagées au feu De même ne court circuitez pas ne démontez pas et ne chauffez pas les piles car vous risquez sinon de provoquer un incendie ou une explosion Conformez vous en toutes circonstances aux avertissements imprimés sur les piles pour é...

Страница 121: ...121 Informations complémentaires ...

Страница 122: ...CORPORATION bleiben ausdrücklich vorbehalten Toute reproduction en tout ou partie de ce manuel est sauf pour de brèves citations dans des bancs d essai ou des articles de presse interdite sans l autorisation écrite de NIKON CORPORATION Queda prohibida la reproducción total o parcial de este folleto salvo en lo que se refiere a citas breves en artículos o revistas especializadas sin la autorización...

Отзывы: