background image

259

U

Fine-tune focus for up to 12 lens types. AF tuning is not recommended in most 
situations and may interfere with normal focus; use only when required. 

AF Fine-tune

G

 button

B

setup menu

Option

Description

AF fine-tune 

(On/Off)

On

: Turn AF tuning on.

Off

: Turn AF tuning off.

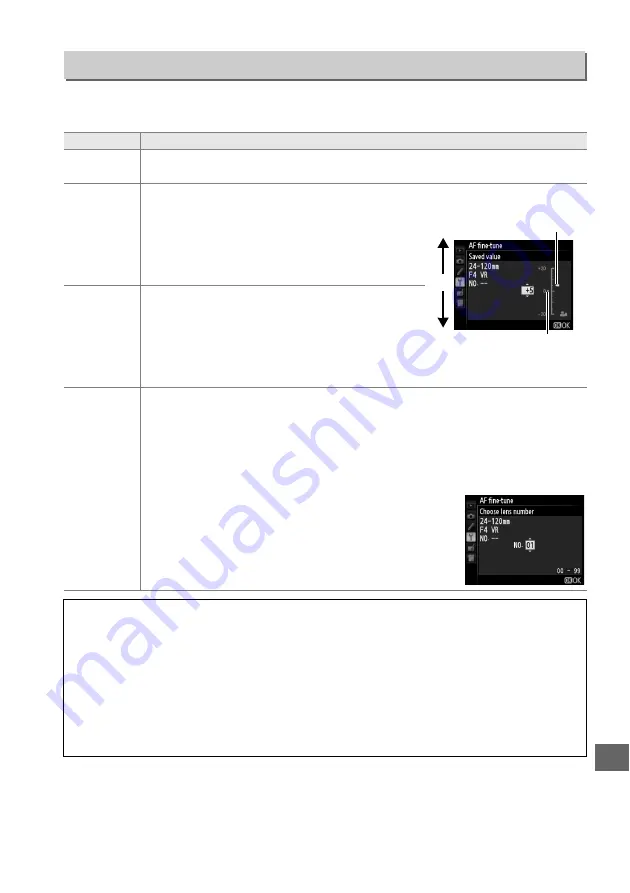
Saved value

Tune AF for the current lens (CPU lenses only). 
Press 

1

 or 

3

 to choose a value b20 and 

–20. Values for up to 12 lens types can be stored. 
Only one value can be stored for each type of lens.

Default

Choose the AF tuning value used when no 
previously saved value exists for the current lens 
(CPU lenses only).

List saved 

values

List previously saved AF tuning values. To delete a lens from the list, highlight 
the desired lens and press 

O

 (

Q

). To change a lens identifier (for example, to 

choose an identifier that is the same as the last two digits of the lens serial 
number to distinguish it from other lenses of the same type in light of the fact 
that 

Saved value

 can be used with only one lens of each type), highlight the 

desired lens and press 

2

.

The menu shown at right will be displayed; press 

1

 or 

3


to choose an identifier and press 

J

 to save changes and 

exit.

D

AF Tuning

The camera may be unable to focus at minimum range or at infinity when AF tuning is 
applied.

D

Live View

Tuning is not applied to autofocus during in live view (

0

53).

A

Saved Value

Only one value can be stored for each type of lens. If a teleconverter is used, separate values 
can be stored for each combination of lens and teleconverter.

Move focal 
point away 
from camera.

Current 
value

Move focal 
point toward 
camera.

Previous 
value

Содержание D610

Страница 1: ...m of this manual in whole or in part except for brief quotation in critical articles or reviews may be made without written authorization from NIKON CORPORATION Printed in Thailand 6MB19511 01 DIGITAL CAMERA User s Manual En En ...

Страница 2: ... the camera monitor are shown in bold Camera Settings The explanations in this manual assume that default settings are used Help Use the camera s on board help feature for help on menu items and other topics See page 18 for details A For Your Safety Before using the camera for the first time read the safety instructions in For Your Safety 0 xviii xix D This icon marks cautions information that sho...

Страница 3: ...Playback 0 35 xLive View Photography 0 49 yMovie Live View 0 57 P S A and M Modes 0 73 User Settings U1 and U2 Modes 0 81 kRelease Mode 0 83 dImage Recording Options 0 89 NFocus 0 97 SISO Sensitivity 0 105 ZExposure 0 109 rWhite Balance 0 115 JImage Enhancement 0 129 lFlash Photography 0 143 tOther Shooting Options 0 151 IMore on Playback 0 177 QConnections 0 193 UMenu Guide 0 207 nTechnical Notes...

Страница 4: ...ictures with the self timer or a remote control 85 Can I reduce shutter noise in quiet surroundings quiet shutter release 6 83 Focus Can I choose how the camera focuses 97 100 Can I choose the focus point 101 Exposure Can I make photos brighter or darker 112 How do I preserve details in shadows and highlights 137 Using the Flash Can I set the flash to fire automatically when needed 35 143 147 How ...

Страница 5: ...ming grid in the viewfinder or the monitor 55 62 229 How do I tell if the camera is level 258 How do I set the camera clock 27 253 How do I format memory cards 31 250 How do I restore default settings 151 214 221 How do I get help for a menu or message 18 322 Connections 0 How do I copy photos to a computer 193 195 How do I print photos 196 203 Can I print the date of recording on my photos 198 20...

Страница 6: ...t folder by number Select folder from list File naming File naming Role played by card in Slot 2 Overflow default Backup RAW Slot 1 JPEG Slot 2 Image quality NEF RAW JPEG fine NEF RAW JPEG normal NEF RAW JPEG basic NEF RAW JPEG fine JPEG normal default JPEG basic Image size Large default Medium Small Image area Auto DX crop Choose image area JPEG compression Size priority default Optimal quality N...

Страница 7: ...r up Multiple exposure Multiple exposure mode Number of shots Auto gain 0 105 Interval timer shooting Choose start time Now Start time Interval Select no of times no of shots Start Time lapse photography Start Interval Shooting time Movie settings Frame size frame rate Movie quality Microphone Destination 1 Not available if no custom Picture Controls are present 2 Defaults to Off modes P S A M 1 2...

Страница 8: ...Information display Image review Live view c5 Remote on duration 1 min default 5 min 10 min 15 min d Shooting display d1 Beep Volume Pitch d2 Viewfinder grid display On Off default d3 ISO display and adjustment Show ISO sensitivity Show ISO Easy ISO Show frame count default d4 Screen tips On default Off d5 CL mode shooting speed 5 fps 4 fps 3 fps default 2 fps 1 fps d6 Max continuous release 1 100...

Страница 9: ...ched f Controls f1 OK button shooting mode Select center focus point default Highlight active focus point Not used f2 Assign Fn button Preview FV lock AE AF lock AE lock only AE lock Hold AF lock only AF ON Flash off Bracketing burst Active D Lighting NEF RAW Matrix metering Center weighted metering Spot metering Framing grid Choose image area default Viewfinder virtual horizon MY MENU Access top ...

Страница 10: ...lt g2 Assign preview button Index marking default View photo shooting info AE AF lock AE lock only AE lock Hold AF lock only AF ON None f Controls g3 Assign AE L AF L button Index marking View photo shooting info AE AF lock default AE lock only AE lock Hold AF lock only AF ON None g4 Assign shutter button Take photos default Record movies Format memory card Slot 1 Slot 2 Save user settings Save to...

Страница 11: ...lack and white Sepia Cyanotype Filter effects Skylight Warm filter Red intensifier Green intensifier Blue intensifier Cross screen Soft Color balance Image overlay 1 NEF RAW processing Resize Select image Choose destination Choose size Quick retouch Straighten Distortion control Auto Manual Fisheye Color outline Color sketch Perspective control Miniature effect Selective color Edit movie Choose st...

Страница 12: ...nd Dials 12 The BM 14 Monitor Cover 17 Camera Menus 18 Using Camera Menus 19 First Steps 21 Charge the Battery 21 Insert the Battery 23 Attach a Lens 25 Basic Setup 27 Insert a Memory Card 29 Format the Memory Card 31 Adjust Viewfinder Focus 33 Basic Photography and Playback 35 Point and Shoot Photography i and j Modes 35 Step 1 Turn the Camera On 35 Step 2 Select i or j Mode 36 Step 3 Frame the P...

Страница 13: ...4 1 Silhouette 45 2 High Key 45 3 Low Key 45 Basic Playback 46 Deleting Unwanted Photographs 47 Live View Photography 49 Focusing in Live View 51 The Live View Display Live View Photography 53 The Information Display Live View Photography 55 Manual Focus 55 Movie Live View 57 Indices 60 The Live View Display Movie Live View 61 The Information Display Movie Live View 62 Image Area 63 Movie Settings...

Страница 14: ...ings 82 Resetting User Settings 82 Release Mode 83 Choosing a Release Mode 83 Self Timer and Remote Control Modes 85 Mirror up Mode 88 Image Recording Options 89 Image Area 89 Image Quality and Size 93 Image Quality 93 Image Size 95 Using Two Memory Cards 96 Focus 97 Autofocus 97 Autofocus Mode 97 AF Area Mode 99 Focus Point Selection 101 Focus Lock 102 Manual Focus 103 ISO Sensitivity 105 Auto IS...

Страница 15: ...reating Custom Picture Controls 134 Sharing Custom Picture Controls 136 Preserving Detail in Highlights and Shadows 137 Active D Lighting 137 High Dynamic Range HDR 139 Flash Photography 143 Using the Built in Flash 143 Flash Mode 144 Flash Compensation 148 FV Lock 149 Other Shooting Options 151 Two Button Reset Restoring Default Settings 151 Bracketing 153 Multiple Exposure 160 Interval Timer Pho...

Страница 16: ...ographs 196 Connecting the Printer 196 Printing Pictures One at a Time 197 Printing Multiple Pictures 199 Creating a DPOF Print Order Print Set 202 Viewing Photographs on TV 204 Menu Guide 207 D The Playback Menu ManagingImages 207 Playback Folder 207 Hide Image 208 Playback Display Options 209 Copy Image s 209 Image Review 212 After Delete 212 Rotate Tall 212 Slide Show 213 C The Shooting Menu Sh...

Страница 17: ...ers AE Lock 226 c1 Shutter Release Button AE L 226 c2 Standby timer 227 c3 Self Timer 227 c4 Monitor off Delay 228 c5 Remote on Duration 228 d Shooting Display 228 d1 Beep 228 d2 Viewfinder Grid Display 229 d3 ISO Display and Adjustment 229 d4 Screen Tips 229 d5 CL Mode Shooting Speed 229 d6 Max Continuous Release 230 d7 File Number Sequence 230 d8 Information Display 231 d9 LCD Illumination 231 d...

Страница 18: ...tup 249 Format Memory Card 250 Monitor Brightness 250 Image Dust Off Ref Photo 251 Flicker Reduction 252 Time Zone and Date 253 Language 253 Image Comment 253 Auto Image Rotation 254 Battery Info 255 Copyright Information 256 Save Load Settings 257 Virtual Horizon 258 AF Fine tune 259 Eye Fi Upload 260 Firmware Version 260 N The Retouch Menu CreatingRetouched Copies 261 Creating Retouched Copies 2...

Страница 19: ...ng a Power Connector and AC Adapter 299 Caring for the Camera 300 Storage 300 Cleaning 300 The Low Pass Filter 301 Clean Now 301 Clean at Startup Shutdown 302 Manual Cleaning 303 Caring for the Camera and Battery Cautions 306 Available Settings 309 Defaults 312 Exposure Program Mode P 315 Troubleshooting 316 Battery Display 316 Shooting All Modes 317 Shooting P S A M 319 Playback 320 Miscellaneous...

Страница 20: ... could result in explosion or fire ADo not place the strap around the neck of an infant or child Placing the camera strap around the neck of an infant or child could result in strangulation AKeep out of reach of children Failure to observe this precaution could result in injury In addition note that small parts constitute a chocking hazard Should a child swallow any part of this equipment consult ...

Страница 21: ...lfunction due to fire or electric shock Dust on or near the metal parts of the plug should be removed with a dry cloth Continued use could result in fire Do not handle the power cable or go near the chargerduring thunderstorms Failureto observe this precaution could result in electric shock Do not damage modify or forcibly tug or bend the power cable Do not place it under heavy objects or expose i...

Страница 22: ...rical and electronic equipment is to be collected separately Thefollowingapplyonlytousersin European countries This product is designated for separate collection at an appropriate collection point Do not dispose of as household waste Separate collection and recycling helps conserve natural resources and prevent negative consequences for human health and the environment that might result from incor...

Страница 23: ...h can be determined by turning the equipment off and on the user is encouraged to try to correct the interference by one or more of the following measures Reorient or relocate the receiving antenna Increase the separation between the equipment and receiver Connect the equipment into an outlet on a circuit different from that to which the receiver is connected Consult the dealer or an experienced r...

Страница 24: ...eative works such as books music paintings woodcuts prints maps drawings movies and photographs is governed by national and international copyright laws Do not use this product for the purpose of making illegal copies or to infringe copyright laws Disposing of Data Storage Devices Please note that deleting images or formatting memory cards or other data storage devices does not completely erase th...

Страница 25: ...ommends that the camera be inspected by the original retailer or a Nikon authorized service representative once every one to two years and that it be serviced once every three to five years note that fees apply to these services Frequent inspection and servicing are particularly recommended if the camera is used professionally Any accessories regularly used with the camera such as lenses or option...

Страница 26: ...Li ion battery with terminal cover AN DC10 strap UC E15 USB cable ViewNX 2 CD User s Manual this guide Warranty Memory cards are sold separately MH 25 battery charger AC wall adapter supplied only in countries or regions where required Shape of power cable depends on country of sale DK 5 eyepiece cap A The Camera Strap Attach the strap securely to the two eyelets on the camera body as shown below ...

Страница 27: ...elease 5 4 Eyelet for camera strap 5 Release mode dial lock release 6 83 6 Accessory shoe for optional flash unit 292 7 Accessory shoe cover 292 8 Power switch 1 9 Shutter release button 38 39 10 E button Exposure compensation 112 Two button reset 151 11 Movie record button 58 12 Z Q button Metering 109 Formatting memory cards 31 13 Focal plane mark E 103 14 Control panel 7 A The Power Switch Rota...

Страница 28: ...ode selector 97 103 15 Headphone connector 61 16 Connector for external microphone 61 17 USB connector Connecting to a computer 194 Connecting to a printer 196 18 HDMI mini pin connector 204 19 Accessory terminal 175 298 A LCD Illuminators Rotating the power switch toward D activates the standby timer and control panel backlight LCD illuminator allowing the display to be read in the dark After the...

Страница 29: ...ery chamber cover 23 6 Battery chamber cover latch 23 7 Contact cover for optional MB D14 battery pack 297 8 Power connector cover 299 9 CPU contacts 10 Lens mount 26 103 11 AF coupling 12 Tripod socket 13 Body cap 25 298 D The Microphone and Speaker Do not place the microphone or speaker in close proximity to magnetic devices Failure to observe this precaution could affect the data recorded on th...

Страница 30: ... quality size 93 95 10 W S button Playback zoom out thumbnails 185 186 ISO sensitivity 105 Auto ISO sensitivity control 107 Two button reset 151 11 Diopter adjustment control 33 12 A button Using the AE AF lock button 102 110 244 13 Main command dial 12 245 14 Multi selector 19 15 J OK button 19 241 16 Focus selector lock 101 17 Memory card slot cover 29 18 Ambient brightness sensor for automatic ...

Страница 31: ...8 Auto Modes Select these modes for simple point and shoot photography i Auto 0 35 j Auto flash off 0 35 Scene Modes 0 40 The camera automatically optimizes settings to suit the selected scene Match your selection to the scene being photographed U1 and U2 Modes 0 81 Store and recall customized shooting settings A Non CPU Lenses Non CPU 0 285 lenses can be used only in modes A and M Selecting anoth...

Страница 32: ...s pressed CH Continuous high speed The camera takes photographs at a fast rate while the shutter release button is pressed J Quiet shutter release As for single frame except that camera noise is reduced M Qc quiet continuous shutter release The camera takes photographs while the shutter release button is pressed camera noise is reduced E Self timer Take pictures with the self timer 4 Remote contro...

Страница 33: ...nses 174 PC mode indicator 195 13 Memory card indicator Slot 1 30 96 14 Memory card indicator Slot 2 30 96 15 ISO sensitivity indicator 105 Auto ISO sensitivity indicator 108 16 Interval timer indicator 166 Time lapse indicator 170 17 Metering 109 18 Flash sync indicator 234 19 Flexible program indicator 75 20 Auto area AF indicator 99 AF area mode indicator 100 3D tracking indicator 99 21 HDR ind...

Страница 34: ... warning 35 19 Exposure and flash bracketing indicator 153 WB bracketing indicator 156 ADL bracketing indicator 158 20 Auto ISO sensitivity indicator 108 21 Number of exposures remaining 36 Number of shots remaining before memory buffer fills 38 84 335 Preset white balance recording indicator 122 Exposure compensation value 112 Flash compensation value 148 22 K appears when memory remains for over...

Страница 35: ...ximum aperture non CPU lenses 174 8 Release mode 6 83 Continuous shooting speed 229 9 Exposure indicator 78 Exposure compensation display 112 Bracketing progress indicator Exposure and flash bracketing 153 WB bracketing 156 10 HDR indicator 140 HDR exposure differential 140 11 Camera battery indicator 35 12 MB D14 battery type display 232 MB D14 battery indicator 232 13 K appears when memory remai...

Страница 36: ... 244 41 Vignette control indicator 218 42 Active D Lighting indicator 138 43 High ISO noise reduction indicator 218 44 Movie settings 65 45 Autofocus mode 97 46 Eye Fi connection indicator 260 47 ISO sensitivity indicator 105 ISO sensitivity 105 Auto ISO sensitivity indicator 108 48 Picture Control indicator 130 A Turning the Monitor Off To clear shooting information from the monitor press the R b...

Страница 37: ...ngs 65 2 High ISO noise reduction 218 3 Active D Lighting 137 4 Vignette control 218 5 Depth of field preview button assignment 244 6 Fn button assignment 242 7 AE L AF L button assignment 244 8 Remote control mode 85 9 Long exposure noise reduction 218 10 Role played by card in Slot 2 96 A Tool Tips A tool tip giving the name of the selected item appears in the information display Tool tips can b...

Страница 38: ...ty of settings Flash mode Flash compensation Bracketing M Y button D button Mode dial Sub command dial Main command dial Exposure compensation E button Metering Z Q button Autofocus mode AF area mode AF mode button White balance L U button ISO sensitivity Auto ISO sensitivity control W S button Image quality size X T button ...

Страница 39: ...Monitor Set image quality 0 93 X T button Main command dial Control panel Choose an image size 0 95 X T button Sub command dial Control panel Choose an autofocus mode 0 98 AF mode button Main command dial Control panel Choose an AF area mode 0 100 AF mode button Sub command dial Control panel ...

Страница 40: ...rol panel Choose a combination of aperture and shutter speed mode P 0 75 Mode P Main command dial Control panel Choose a shutter speed mode S or M 0 76 78 Mode S or M Main command dial Control panel Choose an aperture mode A or M 0 77 78 Mode A or M Sub command dial Control panel Choose a metering option mode P S A or M 0 109 Z Q button Main command dial Control panel ...

Страница 41: ... or M 0 153 D button Main command dial Control panel Select bracketing increment mode P S A or M 0 154 D button Sub command dial Control panel Choose a white balance option mode P S A or M 0 115 L U button Main command dial Control panel Fine tune white balance 0 117 set color temperature 0 120 or choose a white balance preset 0 121 in mode P S A or M L U button Sub command dial Control panel ...

Страница 42: ...16 X FlashSettings Choose a flash mode 0 144 M Y button Main command dial Control panel Set flash compensation mode P S A or M 0 148 M Y button Sub command dial Control panel ...

Страница 43: ...en the camera is not in use To attach the cover insert the projection on the top of the cover into the matching indentation above the camera monitor q and press the bottom of the cover until it clicks into place w To remove the cover hold the camera firmly and pull the bottom of the cover gently outwards as shown at right ...

Страница 44: ...uch 0 261 O m My Menu or Recent settings defaults to My Menu 0 280 d If a d icon is displayed at the bottom left corner of the monitor help can be displayed by pressing the L U button A description of the currently selected option or menuwillbedisplayedwhilethebuttonispressed Press 1 or 3 to scroll through the display G button Slider shows position in current menu Current settings are shown by ico...

Страница 45: ...nus 2 Highlight the icon for the current menu Press 4 to highlight the icon for the current menu 3 Select a menu Press 1 or 3 to select the desired menu 4 Position the cursor in the selected menu Press 2 to position the cursor in the selected menu Selecthighlighteditemor display sub menu Move cursor up Move cursor down J button select highlighted item Cancel and return to previous menu G button ...

Страница 46: ...hlighted item Press J to select the highlighted item To exit without making a selection press the G button Note the following Menu items that are displayed in gray are not currently available While pressing 2 generally has the same effect as pressing J there are some cases in which selection can only be made by pressing J To exit the menus and return to shooting mode press the shutter release butt...

Страница 47: ...te 2 Remove the terminal cover Remove the terminal cover from the battery 3 Insert the battery Place the battery in the battery bay as shown in the illustration on the charger 4 Plug the charger in The CHARGE lamp will flash slowly while the battery charges 5 Remove the battery when charging is complete Charging is complete when the CHARGE lamp stops flashing Unplug the charger and remove the batt...

Страница 48: ...adapter may also be supplied with the charger To use the adapter insert it into the charger AC inlet q Slide the AC wall adapter latch in the direction shown w and rotate the adapter 90 to fix it in the position shown e Reverse these steps to remove the adapter AC wall adapter latch 90 ...

Страница 49: ... orange battery latch pressed to one side The latch locks the battery in place when the battery is fully inserted w 3 Close the battery chamber cover D Inserting and Removing Batteries Always turn the camera off before inserting or removing batteries A Removing the Battery Turn the camera off and open the battery chamber cover Press the battery latch in the direction shown by the arrow to release ...

Страница 50: ...instances result in the charger showing that charging is complete when the battery is only partially charged Remove and reinsert the battery to begin charging again Battery capacity may temporarily drop if the battery is charged at low temperatures or used at a temperature below the temperature at which it was charged If the battery is charged at a temperature below 5 C 41 F the battery life indic...

Страница 51: ...tive purposes is an AF S NIKKOR 24 120mm f 4G ED VR 1 Turn the camera off 2 Remove the rear lens cap and the camera body cap Lens cap Lens hood Focal length scale Mounting index Focal length scale index CPU contacts 0 287 Focus mode switch 0 26 103 Vibration reduction ON OFF switch Vibration reduction mode switch Focus ring 0 55 103 Rear lens cap Zoom ring ...

Страница 52: ...ect autofocus mode A M A or A M A Detaching the Lens Be sure the camera is off when removing or exchanging lenses To remove the lens press and hold the lens release button q while turning the lens clockwise w After removing the lens replace the lens caps and camera body cap D CPU Lenses with Aperture Rings In the case of CPU lenses equipped with an aperture ring 0 287 lock aperture at the minimum ...

Страница 53: ...time zone the UTC field shows the difference between the selected time zone and Coordinated Universal Time or UTC in hours and press J 4 Choose a date format Press 1 or 3 to choose the order in which the year month and day will be displayed Press J to proceed to the next step 5 Turn daylight saving time on or off Daylight saving time options will be displayed Daylight saving time is off by default...

Страница 54: ...y is installed or the camera is powered by an optional EP 5B power connector and EH 5b AC adapter 0 297 Two days of charging will power the clock for about three months If the camera displays a warning at startup stating that the clock is not set and a Y icon flashes in the information display the clock battery is exhausted and the clock has been reset Set the clock to the correct time and date A ...

Страница 55: ...s is the first time the memory card will be used in the camera or the card has been formatted in another device format the card as described on page 31 A Inserting and Removing Memory Cards Always turn the camera off before inserting or removing memory cards D Inserting Memory Cards Inserting memory cards upside down or backwards could damage the camera or the card Check to be sure the card is in ...

Страница 56: ... has occurred the icon for the affected card will flash 0 324 Control panel Information display D Memory Cards Memory cards may be hot after use Observe due caution when removing memory cards from the camera Turn the power off before inserting or removing memory cards Do not remove memory cards from the camera turn the camera off or remove or disconnect the power source during formatting or while ...

Страница 57: ...the memory card wait until C stops flashing about six seconds or press any button other than the O Q and Z Q buttons 3 Press the O Q and Z Q buttons again Press the O Q and Z Q buttons together a second time while C is flashing to format the memory card Do not remove the memory card or remove or disconnect the power source during formatting When formatting is complete the control panel and viewfin...

Страница 58: ...memory card can not be formatted and photos can not be deleted or recorded a warning will be displayed in the monitor if you attempt to release the shutter To unlock the memory card slide the switch to the write position A See Also See page 250 for information on formatting memory cards using the Format memory card option in the setup menu Write protect switch 1 6 G B ...

Страница 59: ...l with your eye to the viewfinder be careful not to put your fingers or fingernails in your eye A Adjusting Viewfinder Focus If you are unable to focus the viewfinder as described above select single servo autofocus AF S 0 97 single point AF 0 99 and the center focus point 0 101 and then frame a high contrast subject in the center focus point and press the shutter release button halfway to focus t...

Страница 60: ...34 X ...

Страница 61: ...p and turn the camera on The control panel will turn on and the display in the viewfinder will light 2 Check the battery level Check the battery level in the control panel or viewfinder Point and Shoot Photography i and j Modes Controlpanel Viewfinder Description L Battery fully charged K Battery partially discharged J I H d Low battery Charge battery or ready spare battery H flashes d flashes Shu...

Страница 62: ...ll flash in the shutter speed displays and the icon for the affected card will flash Insert another memory card 0 29 or delete some photos 0 47 189 Step 2 Select i or j Mode To shoot where use of a flash is prohibited photograph infants or capture natural lighting under low light conditions rotate the mode dial to j Otherwise rotate the mode dial to i j mode i mode A Camera Off Display If the came...

Страница 63: ...old the camera as shown in the bottom of the three illustrations at right In j mode shutter speeds slow when lighting is poor use of a tripod is recommended 2 Frame the photograph Frame a photograph in the viewfinder with the main subject in the AF area brackets A Using a Zoom Lens Use the zoom ring to zoom in on the subject so that it fills a larger area of the frame or zoom out to increase the a...

Страница 64: ... t 0 84 will be displayed in the viewfinder Step 5 Shoot Smoothly press the shutter release button the rest of the way down to release the shutter and record the photograph The memory card access lamp next to the memory card slot cover will light while the photograph is being recorded to the memory card Do not eject the memory card or remove or disconnect the power source until the lamp has gone o...

Страница 65: ...ivate the display The length of time before the standby timer expires automatically can be selected using Custom Setting c2 Standby timer 0 227 Exposure meters on Exposure meters off Exposure meters on A The Built in Flash If additional lighting is required for correct exposure in i mode the built in flash will pop up automatically when the shutter release button is pressed halfway If the flash is...

Страница 66: ...ooting as described on pages 35 39 hMode To view the currently selected scene rotate the mode dial to h and press the R button To choose another scene rotate the main command dial Mode dial Main command dial Monitor Portrait Landscape Child Sports Close up Night portrait Night landscape k l p m n o r Party indoor Beach snow Sunset Dusk dawn Pet portrait Candlelight Blossom s t u v w x y Autumn col...

Страница 67: ...he built in flash and AF assist illuminator turn off use of a tripod is recommended to prevent blur when lighting is poor pChild Use for snapshots of children Clothing and background details are vividly rendered while skin tones remain soft and natural mSports Fast shutter speeds freeze motion for dynamic sports shots in which the main subject stands out clearly The built in flash and AF assist il...

Страница 68: ...the background in portraits taken under low light Use of a tripod is recommended to prevent blur when lighting is poor rNightLandscape Reduce noise and unnatural colors when photographing night landscapes including street lighting and neon signs The built in flash and AF assist illuminator turn off use of a tripod is recommended to prevent blur sParty Indoor Capture the effects of indoor backgroun...

Страница 69: ... in flash and AF assist illuminator turn off use of a tripod is recommended to prevent blur when lighting is poor vDusk Dawn Preserves the colors seen in the weak natural light beforedawn or after sunset The built in flash and AF assist illuminator turn off use of a tripod is recommended to prevent blur when lighting is poor wPetPortrait Use for portraits of active pets The AF assist illuminator t...

Страница 70: ...capes featuring expanses of blossoms The built in flash turns off use of a tripod is recommended to prevent blur when lighting is poor zAutumnColors Captures the brilliant reds and yellows in autumn leaves The built in flash turns off use of a tripod is recommended to prevent blur when lighting is poor 0Food Use for vivid photographs of food Use of a tripod is recommended to prevent blur the flash...

Страница 71: ...lur when lighting is poor 2HighKey Use when shooting bright scenes to create bright images that seem filled with light The built in flash turns off 3LowKey Use when shooting dark scenes to create dark somber images that bring out highlights The built in flash turns off use of a tripod is recommended to prevent blur when lighting is poor ...

Страница 72: ...n the current photograph press 1 and 3 0 179 To end playback and return to shooting mode press the shutter release button halfway A Image Review When On is selected for Image review in the playback menu 0 212 photographs are automatically displayed in the monitor for a few seconds after shooting A See Also See page 178 for information on choosing a memory card slot K button 0 0 1 125 F5 6 85mm 100...

Страница 73: ...n of the current image is shown by an icon at the bottom left corner of the display 2 Delete the photograph Press the O Q button A confirmation dialog will be displayed press the O Q button again to delete the image and return to playback To exit without deleting the picture press K A Delete To delete selected images 0 190 all images taken on a selected date 0 191 or all images in a chosen locatio...

Страница 74: ...48 s ...

Страница 75: ...cuses If the camera is able to focus the focus point will be displayed in green if the camera is unable to focus the focus point will flash red note that pictures can be taken even when the focus point flashes red check focus in the monitor before shooting Exposure can be locked by pressing the A AE L AF L button 0 110 focus locks while the shutter release button is pressed halfway In mode M expos...

Страница 76: ... camera may also become noticeably warm but this does not indicate a malfunction The ambient temperature is high The camera has been used for extended periods in live view or to record movies The camera has been used in continuous release mode for extended periods If live view does not start when you press the a button wait for the internal circuits to cool and then try again A Choosing a Picture ...

Страница 77: ...cus in Live View Use an AF S lens The desired results may not be achieved with other lenses or teleconverters Note that in live view autofocus is slower and the monitor may brighten or darken while the camera focuses The focus point may sometimes be displayed in green when the camera is unable to focus The camera may be unable to focus in the following situations The subject contains lines paralle...

Страница 78: ...se for hand held shots of landscapes and other non portrait subjects Use the multi selector to move the focus point anywhere in the frame or press J to position the focus point in the center of the frame Normal area AF Use for pin point focus on a selected spot in the frame Use the multi selector to move the focus point anywhere in the frame or press J to position the focus point in the center of ...

Страница 79: ...rent focus point The display varies with the option selected for AF area mode 49 y Monitor brightness indicator Keeping the L U button pressed press 1 or 3 to adjust monitor brightness note that monitor brightness has no effect on photographs taken with the camera If A auto is selected the camera will automatically adjust brightness in response to ambient lighting conditions as measured by the amb...

Страница 80: ...apor or sodium lamps can be reduced using Flicker reduction 0 252 although they may still be visible in the final photograph at some shutter speeds When shooting in live view mode avoid pointing the camera at the sun or other strong light sources Failure to observe this precaution could result in damage to the camera s internal circuitry A Exposure Depending on the scene exposure may differ from t...

Страница 81: ...the monitor up to about 19 for precise focus press the X T button While the view through the lens is zoomed in a navigation window will appear in a gray frame at the bottom right corner of the display Use the multi selector to scroll to areas of the frame not visible in the monitor available only if wide or normal area AF is selected for AF area mode or press W S to zoom out Information on Informa...

Страница 82: ...No limit is selected for Custom Setting c4 Monitor off delay Live view 0 228 5 s before the monitor is due to turn off automatically Depending on shooting conditions the timer may appear immediately when live view is selected Note that although the count down does not appear during playback live view will still end automatically when the timer expires A HDMI If the camera is attached to an HDMI vi...

Страница 83: ... The subject will no longer be visible in the viewfinder 3 Choose a focus mode 0 51 4 Choose an AF area mode 0 52 A The 0 Icon A 0 icon 0 61 indicates that movies can not be recorded A Before Recording Before recording choose an aperture modes A and M only 0 77 78 you can also choose a Picture Control modes P S A and M only 0 129 or color space 0 217 In modes P S A and M white balance 0 115 can be...

Страница 84: ...sing the shutter release button halfway A Exposure The following settings can be adjusted in movie live view Aperture Shutter speed ISO sensitivity Exposure compensation P S A M Other shooting modes In mode M ISO sensitivity can be set to values between 100 and Hi 2 and shutter speed to values between 1 25 s and 1 4 000 s the slowest available shutter speed varies with the frame rate 0 65 In other...

Страница 85: ...camera will return to live view The photograph will be recorded at the current image area setting using a crop with an aspect ratio of 16 9 Photos will be taken with the flash off Note that the exposure for photographs can not be previewed during movie live view mode P S or A is recommended but accurate results can be achieved in mode M by using the Fn depth of field preview or AE L AF L button 0 ...

Страница 86: ... in the Movie settings menu 0 65 Focus can be adjusted manually as described on page 55 The roles played by the J Fn depth of field preview and A AE L AF L buttons can be chosen using Custom Settings f1 OK button shooting mode 0 241 g1 Assign Fn button 0 247 g2 Assign preview button 0 248 and g3 Assign AE L AF L button 0 248 respectively the last three options also allow you to lock exposure witho...

Страница 87: ...or other stereo microphone is used 62 t Time remaining movie live view The recording time available for movies 58 y Movie frame size The frame size for movie recording 65 u Monitor brightness indicator A monitor brightness indicator 62 i Guide A guide to the options available during movie live view 62 A Using an External Microphone The optional ME 1 stereo microphone can be used to record sound in...

Страница 88: ... 0 61 movies recorded with the camera are unaffected 1 Highlight a setting Press and hold L U and press 4 or 2 to highlight the indicator for the desired setting 2 Adjust the highlighted setting Keeping the L U button pressed press 1 or 3 to adjust the highlighted setting The Information Display Movie Live View To hide or display indicators in the monitor during movie live view press the R button ...

Страница 89: ...ted A Movie Live View Photographs The following table shows the size of photographs taken in movie live view Image area Option Size pixels Print size cm in FX based format 35 5 20 0 mm Large 6 016 3 376 50 9 28 6 20 1 11 3 Medium 4 512 2 528 38 2 21 4 15 0 8 4 Small 3 008 1 688 25 5 14 3 10 0 5 6 DX based format 23 5 13 2 mm Large 3 936 2 224 33 3 18 8 13 1 7 4 Medium 2 944 1 664 24 9 14 1 9 8 5 5...

Страница 90: ...ome areas of the frame with flashing signs and other intermittent light sources or if the subject is briefly illuminated by a strobe or other bright momentary light source When recording movies avoid pointing the camera at the sun or other strong light sources Failure to observe this precaution could result in damage to the camera s internal circuitry Note that noise randomly spaced bright pixels ...

Страница 91: ...lect Manual sensitivity and choose a sensitivity Destination Choose the slot to which movies are recorded The menu shows the time available on each card recording ends automatically when no time remains Frame size frame rate Movie quality Maximum length high quality Normal Frame size pixels Frame rate Maximum bit rate Mbps high quality Normal o 1 1920 1080 30p 24 12 20 min 29 min 59 s p 2 1920 108...

Страница 92: ...settings in the shooting menu and press 2 2 Choose movie options Highlight the desired item and press 2 then highlight an option and press J D Frame Size and Rate Frame size and rate affects the distribution and amount of noise randomly spaced bright pixels fog or bright spots G button ...

Страница 93: ...of movie first frame is indicated by h in top right corner of monitor last frame by i If playback is paused movie rewinds or advances one frame at a time keep pressed for continuous rewind or advance Skip 10 s Rotate the main command dial to skip ahead or back 10 s Skip ahead back Use sub command dial to skip to next or previous index or to skip to the last or first frame if the movie contains no ...

Страница 94: ...68 y A The p Icon Movies with indices 0 60 are indicated by a p icon in full frame playback A The 2 Icon 2 is displayed in full frame and movie playback if the movie was recorded without sound ...

Страница 95: ... Play the movie back as described on page 67 pressing J to start and resume playback and 3 to pause and pressing 4 or 2 or rotating the main or sub command dials to locate the desired frame 0 67 Your approximate position in the movie can be ascertained from the movie progress bar 3 Display movie edit options Press the c b button to display movie edit options Option Description 9 Choose start end p...

Страница 96: ...f the movie contains no indices rotate the sub command dial To switch the current selection from start point w to end point x or vice versa press L U Once you have selected the start point and or end point press 1 All frames before the selected start point and after the selected end point will be removed from the copy 6 Save the copy Highlight one of the following and press J Save as new file Save...

Страница 97: ...e current position will be displayed in red in Step 5 and no copy will be created The copy will not be saved if there is insufficient space available on the memory card Copies have the same time and date of creation as the original A The Retouch Menu Movies can also be edited using the Edit movie option in the retouch menu 0 261 ...

Страница 98: ...e edit options Press the c b button to display movie edit options 3 Choose Save selected frame Highlight Save selected frame and press J 4 Create a still copy Press 1 to create a still copy of the current frame 5 Save the copy Highlight Yes and press J to create a fine quality 0 93 JPEG copy of the selected frame Movie stills are indicated by a 9 icon in full frame playback A Save Selected Frame J...

Страница 99: ...ture can only be adjusted using the lens aperture ring Selecting any other mode disables the shutter release A Non CPU Lenses 0 285 Use the lens aperture ring to adjust aperture If the maximum aperture of the lens has been specified using the Non CPU lens data item in setup menu 0 172 when a non CPU lens is attached the current f number will be displayed in the viewfinder and control panel rounded...

Страница 100: ...achieve different effects while keeping exposure constant Fast shutter speeds and large apertures freeze moving objects and soften background details while slow shutter speeds and small apertures blur moving objects and bring out background details Fast shutter speed 1 1 600 s Slow shutter speed 1 6 s Large aperture f 5 6 Small aperture f 22 Remember the higher the f number the smaller the apertur...

Страница 101: ...the right for large apertures low f numbers that blur background details or fast shutter speeds that freeze motion Rotate the dial to the left for small apertures high f numbers that increase depth of field or slow shutter speeds that blur motion All combinations produce the same exposure While flexible program is in effect a U indicator appears in the control panel To restore default shutter spee...

Страница 102: ... by blurring moving subjects fast shutter speeds to freeze motion To choose a shutter speed rotate the main command dial while the exposure meters are on Shutter speed can be set to v or to values between 30 s and 1 4 000 s Fast shutter speed 1 1 600 s Slow shutter speed 1 6 s A See Also See page 323 for information on what to do if flashing A or indicator appears in the shutter speed displays Mai...

Страница 103: ...se an aperture between the minimum and maximum values for the lens rotate the sub command dial while the exposure meters are on Large aperture f 5 6 Small aperture f 22 A Depth of Field Preview To preview the effects of aperture press and hold the depth of field preview button The lens will be stopped down to the aperture value selected by the camera modes P and S or the value chosen by the user m...

Страница 104: ...t when the lens aperture ring is used to set aperture A The Exposure Indicator If a shutter speed other than bulb or time is selected the exposure indicator in the viewfinder shows whether the photograph would be under or over exposed at current settings Depending on the option chosen for Custom Setting b2 EV steps for exposure cntrl 0 224 the amount of under or over exposure is shown in increment...

Страница 105: ...n is pressed a second time 1 Ready the camera Mount the camera on a tripod or place it on a stable level surface To prevent light entering via the viewfinder interfering with exposure remove the rubber eyecup and cover the viewfinder with the supplied DK 5 eyepiece cap 0 86 To prevent loss of power before the exposure is complete use a fully charged EN EL15 battery or an optional EH 5b AC adapter ...

Страница 106: ... Bulb After focusing press the shutter release button on the camera or optional remote cord all the way down Keep the shutter release button pressed until the exposure is complete Time Press the ML L3 shutter release button all the way down 5 Close the shutter Bulb Take your finger off the shutter release button Time Press the ML L3 shutter release button all the way down Shooting ends automatical...

Страница 107: ...sation flash mode focus point metering autofocus and AF area modes bracketing and settings in the shooting 0 214 and Custom Settings 0 219 menus note that the camera will not store the options selected for Storage folder File naming Image area Manage Picture Control Multiple exposure or Interval timer shooting 3 Select Save user settings Press the G button to display the menus Highlight Save user ...

Страница 108: ...ettings assigned to Save to U1 or to U2 to recall the settings assigned to Save to U2 Resetting User Settings To reset settings for U1 or U2 to default values 1 Select Reset user settings Press the G button to display the menus Highlight Reset user settings in the setup menu and press 2 2 Select Reset U1 or Reset U2 Highlight Reset U1 or Reset U2 and press 2 3 Reset user settings Highlight Reset a...

Страница 109: ...ds 1 5 frames per second 1 Frame rate can be chosen using Custom Setting d5 CL mode shooting speed 0 229 Note that only one picture will be taken if the flash fires CH Continuous high speed While shutter release button is held down camera records up to 6 frames per second 2 Note that only one picture will be taken if the flash fires J Quietshutter release As for single frame except that mirror doe...

Страница 110: ...and memory card performance recording may take from a few seconds to a few minutes Do not remove the memory card or remove or disconnect the power source until the access lamp has gone out If the camera is switched off while data remain in the buffer the power will not turn off until all images in the buffer have been recorded If the battery is exhausted while images remain in the buffer the shutt...

Страница 111: ...cted using the Remote control mode option in the shooting menu After pressing the G button to display the menus highlight Remote control mode in the shooting menu and press 2 to display the following options Press the selector up or down to highlight an option and press J Option Description Delayed remote Shutter is released 2 s after ML L3 shutter release button is pressed Quick response remote S...

Страница 112: ...econds before the shutter is released In quick response remote mode the self timer lamp will flash after the shutter has been released In remote mirror up mode pressing the ML L3 shutter release button once raises the mirror the shutter will be released and the self timer lamp will flash after 30 s or when the button is pressed a second time Note that the remote control can not be used to record m...

Страница 113: ...re the shutter is released A Focusing in Remote Control Mode The camera will not adjust focus in remote mirror up mode or when continuous servo autofocus is selected note however that if any autofocus mode is selected you can focus by pressing the camera shutter release button halfway before shooting pressing the button all the way down will not release the shutter If auto or single servo autofocu...

Страница 114: ...tter release button all the way down again to take a picture To prevent blurring caused by camera movement press the shutter release button smoothly or use an optional remote cord 0 298 The mirror lowers when shooting ends D Mirror Up While the mirror is raised photos can not be framed in the viewfinder and autofocus and metering will not be performed A Mirror up Mode A picture will be taken autom...

Страница 115: ...en a DX lens is attached Image Area Option Description On Camera automatically selects DX crop when DX lens is attached If another lens is attached the crop selected for Choose image area will be used Off Crop selected for Choose image area is used A DX Lenses DX lenses are designed for use with DX format cameras and have a smaller angle of view than lenses for 35mm format cameras If Auto DX crop ...

Страница 116: ...t the center of the image sensor 23 5 15 7 mm is used to record pictures in DX format To calculate the approximate focal length of the lens in 35mm format multiply by 1 5 A Image Area The selected option is shown in the information display A The Viewfinder Display The DX format crop is shown at right the area outside the crop can be viewed in gray when Off is selected for Custom Setting a4 AF poin...

Страница 117: ...TheImageAreaMenu 1 Select Image area in the shooting menu Press G to display the menus Highlight Image area in the shooting menu 0 214 and press 2 2 Choose an option Highlight Auto DX crop or Choose image area and press 2 3 Adjust settings Choose an option and press J The selected crop is displayed in the viewfinder 0 90 G button ...

Страница 118: ...a can be selected by pressing the selected button and rotating the main or sub command dial until the desired crop is displayed in the viewfinder 0 90 The option currently selected for image area can be viewed by pressing the button to display the image area in the control panel viewfinder or information display FX format is displayed as 36 24 and DX format as 24 16 D Auto DX Crop The selected con...

Страница 119: ...Settings such as white balance and contrast can be adjusted after shooting JPEG fine JPEG Record JPEG images at a compression ratio of roughly 1 4 fine quality JPEG normal Record JPEG images at a compression ratio of roughly 1 8 normal quality JPEG basic Record JPEG images at a compression ratio of roughly 1 16 basic quality NEF RAW JPEG fine NEF JPEG Two images are recorded one NEF RAW image and ...

Страница 120: ...h of 12 bits r 14 bit NEF RAW images are recorded at a bit depth of 14 bits producing files larger than those with a bit depth of 12 bits but increasing the color data recorded A NEF RAW Images NEF RAW images can be viewed on the camera or using software such as Capture NX 2 available separately 0 298 or ViewNX 2 available on the supplied ViewNX 2 CD Note that the option selected for image size do...

Страница 121: ...format Large 6 016 4 016 50 9 34 0 20 1 13 4 Medium 4 512 3 008 38 2 25 5 15 0 10 0 Small 3 008 2 008 25 5 17 0 10 0 6 7 DX 24 16 1 5 DX format Large 3 936 2 624 33 3 22 2 13 1 8 7 Medium 2 944 1 968 24 9 16 7 9 8 6 6 Small 1 968 1 312 16 7 11 1 6 6 4 4 Approximate size when printed at 300 dpi Print size in inches equals image size in pixels divided by printer resolution in dots per inch dpi 1 inc...

Страница 122: ... and RAW Slot 1 JPEG Slot 2 as for Backup except that the NEF RAW copies of photos recorded at settings of NEF RAW JPEG are recorded only to the card in Slot 1 and the JPEG copies only to the card in Slot 2 A Backup and RAW Slot 1 JPEG Slot 2 The camera shows the number of exposures remaining on the card with the least amount of memory Shutter release will be disabled when either card is full A Re...

Страница 123: ...tton is pressed halfway At default settings shutter can only be released when in focus indicator is displayed focus priority 0 221 AF C Continuous servo AF For moving subjects Camera focuses continuously while shutter release button is pressed halfway if subject moves camera will engage predictive focus tracking 0 100 to predict final distance to subject and adjust focus as necessary At default se...

Страница 124: ...bject is the same color as the background The focus point contains areas of sharply contrasting brightness Example Subject is half in the shade The focus point contains objects at different distances from the camera Example Subject is inside a cage Background objects appear larger than the subject Example A building is in the frame behind the subject The subject is dominated by regular geometric p...

Страница 125: ...ose when photographing subjects that are moving quickly and can not be easily framed in the viewfinder e g birds 3D tracking Select the focus point as described on page 101 In AF A and AF C focus modes the camera will track subjects that leave the selected focus point and select new focus points as required Use to quickly compose pictures with subjects that are moving erratically from side to side...

Страница 126: ...inder AF area mode Control panel Viewfinder AF area mode Control panel Viewfinder Single point AF 39 point dynamic area AF 9 point dynamic area AF 3D tracking 21 point dynamic area AF Auto area AF Only active focus point is displayed in the viewfinder Remaining focus points provide information to assist focus operation A Manual Focus Single point AF is automatically selected when manual focus is u...

Страница 127: ... to prevent the selected focus point from changing when the multi selector is pressed A Auto area AF The focus point for auto area AF is selected automatically manual focus point selection is not available A See Also For information on choosing when the focus point is illuminated see Custom Setting a4 AF point illumination 0 222 For information on setting focus point selection to wrap around see C...

Страница 128: ...ocus will remain locked while the A AE L AF L button is pressed even if you later remove your finger from the shutter release button AF S focus mode Focus locks automatically when the in focus indicator appears and remain locked until you remove your finger from the shutter release button Focus can also be locked by pressing the A AE L AF L button see above 3 Recompose the photograph and shoot Foc...

Страница 129: ...bject in the selected focus point is in focus the focus point can be selected from any of the 39 focus points After positioning the subject in the selected focus point press the shutter release button halfway and rotate the lens focus ring until the in focus indicator I is displayed Note that with the subjects listed on page 98 the in focus indicator may sometimes be displayed when the subject is ...

Страница 130: ...104 N ...

Страница 131: ... Auto and scene modes also offer an AUTO option which allows the camera to set ISO sensitivity automatically in response to lighting conditions The higher the ISO sensitivity the less light needed to make an exposure allowing higher shutter speeds or smaller apertures ISO sensitivity can be adjusted by pressing the W S button and rotating the main command dial until the desired setting is displaye...

Страница 132: ...ISO 80 50 equivalent Use for larger apertures when lighting is bright Contrast is slightly higher than normal in most cases ISO sensitivities of ISO 100 or above are recommended A The Shooting Menu ISO sensitivity can also be adjusted using the ISO sensitivity settings option in the shooting menu 0 214 A See Also For information on choosing the ISO sensitivity step size see Custom Setting b1 ISO s...

Страница 133: ...e value selected for Maximum sensitivity is lower than the value currently selected for ISO sensitivity the value selected for Maximum sensitivity will be used In modes P and A sensitivity will only be adjusted if underexposure would result at the shutter speed selected for Minimum shutter speed 1 2000 1 s or Auto in modes S and M ISO sensitivity will be adjusted for optimal exposure at the shutte...

Страница 134: ...er speed is ignored in favor of the option selected for Custom Setting e1 Flash sync speed 0 234 Note that ISO sensitivity may be raised automatically when auto ISO sensitivity control is used in combination with slow sync flash modes available with the built in flash and the optional flash units listed on page 293 possibly preventing the camera from selecting slow shutter speeds A Turning Auto IS...

Страница 135: ...tering Z Center weighted Camera meters entire frame but assigns greatest weight to center area if CPU lens is attached size of area can be selected using Custom Setting b4 Center weighted area 0 226 if non CPU lens is attached area is 12 mm in diameter Classic meter for portraits recommended when using filters with an exposure factor filter factor over 1 b Spot Camera meters circle 4 mm 0 16 in in...

Страница 136: ...ter release button halfway With the shutter release button pressed halfway and the subject positioned in the focus point press the A AE L AF L button to lock focus and exposure if you are using autofocus confirm that the I in focus indicator appears in the viewfinder While exposure lock is in effect an AE L indicator will appear in the viewfinder 2 Recompose the photograph Keeping the A AE L AF L ...

Страница 137: ... can be adjusted without altering the metered value for exposure Mode Setting P Shutter speed and aperture flexible program 0 75 S Shutter speed A Aperture The new values can be confirmed in the viewfinder and control panel Note that metering can not be changed while exposure lock is in effect A See Also If On is selected for Custom Setting c1 Shutter release button AE L 0 226 exposure will lock w...

Страница 138: ...and rotate the main command dial until the desired value is displayed in the control panel or viewfinder At values other than 0 0 the 0 at the center of the exposure indicators will flash modes P S and A only and a E icon will be displayed in the control panel and viewfinder after you release the E button The current value for exposure compensation can be confirmed in the exposure indicator by pre...

Страница 139: ...omp for flash 0 240 can be used to restrict the effects of exposure compensation to the background only A See Also For information on choosing the size of the increments available for exposure compensation see Custom Setting b2 EV steps for exposure cntrl 0 224 For information on making adjustments to exposure compensation without pressing the E button see Custom Setting b3 Easy exposure compensat...

Страница 140: ...114 Z ...

Страница 141: ...por lamps 2 700 K Sodium vapor lighting found in sports venues Warm white fluorescent 3 000 K Warm white fluorescent lights White fluorescent 3 700 K White fluorescent lights Cool white fluorescent 4 200 K Cool white fluorescent lights Day white fluorescent 5 000 K Daylight white fluorescent lights Daylight fluorescent 6 500 K Daylight fluorescent lights High temp mercury vapor 7 200 K High color ...

Страница 142: ...e defined with reference to the temperature to which an object would have to be heated to radiate light in the same wavelengths While light sources with a color temperature in the neighborhood of 5 000 5 500 K appear white light sources with a lower color temperature such as incandescent light bulbs appear slightly yellow or red Light sources with a higher color temperature appear tinged with blue...

Страница 143: ... Auto Fluorescent Choose color temp or Preset manual is selected proceed to Step 2 If Auto Fluorescent or Choose color temp is selected highlight the desired setting and press 2 For information on fine tuning preset white balance see page 125 2 Fine tune white balance Use the multi selector to fine tune white balance White balance can be fine tuned on the amber A blue B axis and the green G magent...

Страница 144: ... balance when K or L is selected use the shooting menu as described on page 117 Six settings in both directions are available each increment is equivalent to about 5 mired 0 119 Press the L U button and rotate the sub command dial until the desired value is displayed in the control panel Rotating the sub command dial to the left increases the amount of amber A Rotating the sub command dial to the ...

Страница 145: ... fine tuning white balance A Mired Any given change in color temperature produces a greater difference in color at low color temperatures than it would at higher color temperatures For example a change of 1000 K produces a much greater change in color at 3000 K than at 6000 K Mired calculated by multiplying the inverse of the color temperature by 106 is a measure of color temperature that takes su...

Страница 146: ...the desired results will not be obtained with flash or fluorescent lighting Choose N Flash or I Fluorescent for these sources With other light sources take a test shot to determine if the selected value is appropriate A The White Balance Menu Color temperature can also be selected in the white balance menu Note that the color temperature with the L U button and the sub command dial replaces the va...

Страница 147: ...reased by 1 EV when measuring white balance in mode M adjust exposure so that the exposure indicator shows 0 0 78 2 Set white balance to L Preset manual Press the L U button and rotate the main command dial until L is displayed in the control panel Method Description Direct measurement Neutral gray or white object is placed under lighting that will be used in final photo and white balance measured...

Страница 148: ...nds 5 Measure white balance Before the indicators stop flashing frame the reference object so that it fills the viewfinder and press the shutter release button all the way down The camera will measure a value for white balance and store it in the preset selected in Step 3 No photograph will be recorded white balance can be measured accurately even when the camera is not in focus L U button Sub com...

Страница 149: ...se button halfway to return to Step 5 and measure white balance again D Direct Measurement Mode If no operations are performed while the displays are flashing direct measurement mode will end in the time selected for Custom Setting c2 Standby timer 0 227 A Selecting a Preset Selecting Preset manual for the White balance option in the shooting menu displays the dialog shown at right highlight a pre...

Страница 150: ...menu Highlight Preset manual and press 2 2 Select a destination Highlight the destination preset d 1 to d 4 and press W S 3 Choose Select image Highlight Select image and press 2 4 Highlight a source image Highlight the source image 5 Press J Press J to copy the white balance value for the highlighted photograph to the selected preset If the highlighted photograph has a comment 0 253 the comment w...

Страница 151: ...dialog shown at right will be displayed select the desired card and folder 0 178 A Choosing a White Balance Preset Press 1 to highlight the current white balance preset d 1 d 4 and press 2 to select another preset A Fine Tuning Preset White Balance The selected preset can be fine tuned by selecting Fine tune and adjusting white balance as described on page 117 X T button D button ...

Страница 152: ...or a selected white balance preset 1 Select L Preset manual Highlight Preset manual in the white balance menu and press 2 2 Select a preset Highlight the desired preset and press W S 3 Select Edit comment Highlight Edit comment and press 2 4 Edit the comment Edit the comment as described on page 135 W S button ...

Страница 153: ... and Edit comment options can not be used 1 Select L Preset manual Highlight Preset manual in the white balance menu and press 2 2 Select a preset Highlight the desired preset and press W S 3 Select Protect Highlight Protect and press 2 4 Select On Highlight On and press J to protect the selected white balance preset To remove protection select Off W S button ...

Страница 154: ...128 r ...

Страница 155: ... of Picture Controls will be displayed 2 Choose a Picture Control Highlight the desired Picture Control and press J Picture Controls Option Description Q Standard Standard processing for balanced results Recommended for most situations R Neutral Minimal processing for natural results Choose for photographs that will later be extensively processed or retouched S Vivid Pictures are enhanced for a vi...

Страница 156: ...ture Controls can be saved to a memory card for sharing among other cameras of the same model and compatible software 0 136 A The Picture Control Indicator The current Picture Control is shown in the information display when the R button is pressed Picture Control indicator A The Shooting Menu Picture Controls can also be selected using the Set Picture Control option in the shooting menu 0 214 ...

Страница 157: ...sired Picture Control in the Picture Control list 0 129 and press 2 2 Adjust settings Press 1 or 3 to highlight the desired setting 0 132 and press 4 or 2 to choose a value Repeat this step until all settings have been adjusted or select Quick adjust to choose a preset combination of settings Default settings can be restored by pressing the O Q button 3 Press J A Modifications to Original Picture ...

Страница 158: ...or enhanced brightness Does not affect exposure Manual adjustments non monochrome only Saturation Control the vividness of colors Select A to adjust saturation automatically according to the type of scene or choose from values between 3 and 3 lower values reduce saturation and higher values increase it Hue Choose negative values to a minimum of 3 to make reds more purple blues more green and green...

Страница 159: ...evious value for the setting Use this as a reference when adjusting settings A Filter Effects Monochrome Only The options in this menu simulate the effect of color filters on monochrome photographs The following filter effects are available Option Description Y Yellow Enhances contrast Can be used to tone down the brightness of the sky in landscape photographs Orange produces more contrast than ye...

Страница 160: ...Highlight Save edit and press 2 3 Select a Picture Control Highlight an existing Picture Control and press 2 or press J to proceed to Step 5 to save a copy of the highlighted Picture Control without further modification 4 Edit the selected Picture Control See page 132 for more information To abandon any changes and start over from default settings press the O Q button Press J when settings are com...

Страница 161: ...ol names can be up to nineteen characters long Any characters after the nineteenth will be deleted 7 Press X T Press the X T button to save changes and exit The new Picture Control will appear in the Picture Control list A Manage Picture Control Rename Custom Picture Controls can be renamed at any time using the Rename option in the Manage Picture Control menu A Manage Picture Control Delete The D...

Страница 162: ...ls C 1 through C 9 on the camera and name them as desired Delete from card Delete selected custom Picture Controls from the memory card The confirmation dialog shown at right will be displayed before a Picture Control is deleted to delete the selected Picture Control highlight Yes and press J Copy to card Copy a custom Picture Control C 1 through C 9 from the camera to a selected destination 1 thr...

Страница 163: ...cenery through a door or window or taking pictures of shaded subjects on a sunny day It is most effective when used with matrix metering 0 109 Active D Lighting off Active D Lighting YAuto D Active D Lighting Versus D Lighting The Active D Lighting option in the shooting menu adjusts exposure before shooting to optimize the dynamic range while the D Lighting option in the retouch menu optimizes dy...

Страница 164: ...ent to Q Normal D Active D Lighting Active D Lighting can not be used with movies Noise randomly spaced bright pixels fog or lines may appear in photographs taken with Active D Lighting Uneven shading may be visible with some subjects Active D Lighting can not be used at ISO sensitivities of Hi 0 3 or above A See Also When ADL bracketing is selected for Custom Setting e6 Auto bracketing set 0 241 ...

Страница 165: ...e differential of Auto is equivalent to about 2 EV It can not be used to record NEF RAW images Movie recording 0 57 flash lighting bracketing 0 153 multiple exposure 0 160 and time lapse photography 0 168 can not be used while HDR is in effect and a shutter speed of A is not available 1 Select HDR high dynamic range Press the G button to display the menus Highlight HDR high dynamic range in the sh...

Страница 166: ...creating additional HDR photographs select Off If On series or On single photo is selected a k icon will be displayed in the control panel 3 Choose the exposure differential To choose the difference in exposure between the two shots highlight Exposure differential and press 2 The options shown at right will be displayed Highlightanoptionandpress J Choose higher values for high contrast subjects bu...

Страница 167: ...hutter release button is pressed If On series is selected HDR will only turn off when Off is selected for HDR mode if On single photo is selected HDR turns off automatically after the photograph is taken The k icon clears from the display when HDR shooting ends D Framing HDR Photographs The edges of the image will be cropped out The desired results may not be achieved if the camera or subject move...

Страница 168: ...142 J ...

Страница 169: ... shutter release button is pressed halfway and fire when a photograph is taken If the flash does not pop up automatically DO NOT attempt to raise it by hand Failure to observe this precaution could damage the flash UsingtheBuilt inFlash P S A M and0Modes 1 Raise the flash Press the M Y button to raise the flash 2 Choose a flash mode P S A and M modes only 0 144 3 Take pictures The flash will fire ...

Страница 170: ...c red eye reduction Fill flash Auto red eye reduction Auto slow sync j Off j Off P A S M Fill flash Fill flash Red eye reduction Red eye reduction Slow sync red eye reduction Rear curtain sync Slow sync Rear curtain slow sync S is displayed when setting is complete M Y button Main command dial Control panel A Lowering the Built in Flash To save power when the flash is not in use press it gently do...

Страница 171: ...ires just before shutter closes creating a stream of light behind moving light sources below at right If this icon is not displayed flash will fire as the shutter opens front curtain sync the effect this produces with moving light sources is shown below at left Front curtain sync Rear curtain sync D The Built in Flash Use with lenses with focal lengths in FX format of 24 300 mm 16 300 mm in DX for...

Страница 172: ...nalyzed in combination with range information from matrix metering system to adjust flash output for natural balance between main subject and ambient background lighting If type G E or D lens is used distance information is included when calculating flash output Precision of calculation can be increased for non CPU lenses by providing lens data focal length and maximum aperture see 0 172 Not avail...

Страница 173: ...sitivity as shown below Maximum aperture at ISO equivalent of 100 200 400 800 1600 3200 6400 2 8 3 5 4 5 5 6 7 1 8 If the maximum aperture of the lens is smaller than given above the maximum value for aperture will be the maximum aperture of the lens A See Also See page 149 for information on locking flash value FV for a metered subject before recomposing a photograph For information on auto FP hi...

Страница 174: ...n Normal flash output can be restored by setting flash compensation to 0 0 Flash compensation is not reset when the camera is turned off A Optional Flash Units Flash compensation is also available with optional flash units that support the Nikon Creative Lighting System CLS The SB 910 SB 900 SB 800 SB 700 and SB 600 also allow flash compensation to be set using the controls on the flash unit the v...

Страница 175: ...ting f2 Assign Fn button 0 242 2 Raise the flash In P S A M and 0 modes the flash can be raised by pressing the M Y button In i k p n o s and w modes the flash will pop up automatically when required 3 Focus Position the subject in the center of the frame and press the shutter release button halfway to focus 4 Lock flash level After confirming that the flash ready indicator M is displayed in the v...

Страница 176: ...onitor pre flash AA and monitor pre flash A flash control modes Note that when commander mode is selected for Custom Setting e3 Flash cntrl for built in flash 0 236 you will need to set the flash control mode for the master or at least one remote group to TTL or AA A Metering The metering areas for FV lock when using optional flash unit are as follows Flash unit Flash mode Metered area Stand alone...

Страница 177: ...ult Settings Option Default 0 Image quality JPEG normal 93 Image size Large 95 White balance Auto Normal 115 Fine tuning A B 0 G M 0 117 HDR high dynamic range Off1 139 ISO sensitivity settings ISO sensitivity Auto and scene modes AUTO 105 P S A M 100 Auto ISO sensitivity control Off 107 Interval timer shooting Off2 164 Autofocus viewfinder Autofocus mode AF A 97 AF area mode n x 0 1 2 3 Single po...

Страница 178: ...ction o Auto slow sync 0 P S A M Fill flash FV lock Off 149 Multiple exposure Off5 160 Flexible program Off 75 NEF RAW Off 242 1 Exposure differential and smoothing are not reset 2 If interval timer shooting is currently in progress shooting will end Starting time shooting interval and number of intervals and shots are not reset 3 Focus point not displayed if auto area AF is selected for AF area m...

Страница 179: ...6 Auto bracketing set in the Custom Settings menu To display the menus press the G button Select Custom Setting e6 Auto bracketing set in the Custom Settings menu highlight an option and press J Choose AE flash to vary both exposure and flash level AE only to vary only exposure or Flash only to vary only flash level 2 Choose the number of shots Pressing the D button rotate the main command dial to...

Страница 180: ...pear from the indicator after each shot the y segment when the unmodified shot is taken the z segment when the shot with the negative increment is taken and the x segment when the shot with the positive increment is taken To cancel bracketing press the D button and rotate the main command dial until the bracketing progress indicator and M icon are no longer displayed Bracketing increment D button ...

Страница 181: ...rd fills before all shots in the sequence have been taken shooting can be resumed from the next shot in the sequence after the memory card has been replaced or shots have been deleted to make room on the memory card If the camera is turned off before all shots in the sequence have been taken bracketing will resume from the next shot in the sequence when the camera is turned on A Exposure Bracketin...

Страница 182: ...D will be displayed in the viewfinder see right the control panel will show W 3 Select a white balance increment Pressing the D button rotate the sub command dial to choose from increments of 1 5 mired 0 119 2 10 mired or 3 15 mired The B value indicates the amount of blue the A value the amount of amber 0 117 The bracketing programs with an increment of 1 are listed below Number of shots Bracketi...

Страница 183: ...d rotate the main command dial until the bracketing progress indicator and W icon are no longer displayed A White Balance Bracketing White balance bracketing is not available at an image quality of NEF RAW Selecting NEF RAW NEF RAW JPEG fine NEF RAW JPEG normal or NEF RAW JPEG basic cancels white balance bracketing White balance bracketing affects only color temperature the amber blue axis in the ...

Страница 184: ...in the bracketing sequence Choose two shots to take one photograph with Active D Lighting off and another at the value currently selected for Active D Lighting in the shooting menu if Active D Lighting is off the second shot will be taken with Active D Lighting set to Auto Choose three shots to take a series of photographs with Active D Lighting set to Off Normal and High D will be displayed in th...

Страница 185: ...ots specified in the bracketing program have been taken Shooting will resume the next time the shutter release button is pressed In self timer mode the camera will take the number of shots selected in Step 2 on page 158 each time the shutter release button is pressed regardless of the option selected for Custom Setting c3 Self timer Number of shots 0 227 the interval between shots is however contr...

Страница 186: ...ly if no operations are performed for 30 s 1 Select Multiple exposure in the shooting menu Press the G button to display the menus Highlight Multiple exposure in the shooting menu and press 2 A Extended Recording Times For an interval between exposures of more than 30 s extend the meter off delay using Custom Setting c2 Standby timer 0 227 The maximum interval between exposures is 30 s longer than...

Страница 187: ...e multiple exposure select On single photo Normal shooting will resume automatically after you have created a single multiple exposure To exit without creating additional multiple exposures select Off If On series or On single photo is selected a n icon will be displayed in the control panel 3 Choose the number of shots Highlight Number of shots and press 2 Press 1 or 3 to choose the number of exp...

Страница 188: ...ll end after the first photograph In self timer mode the camera will automatically record the number of exposures selected in Step 3 on page 161 regardless of the option selected for Custom Setting c3 Self timer Number of shots 0 227 the interval between shots is however controlled by Custom Setting c3 Self timer Interval between shots In other release modes one photograph will be taken each time ...

Страница 189: ...randomly spaced bright pixels fog or lines may appear in photographs taken with Off selected for auto gain 0 162 The information listed in the playback photo information display including metering exposure shooting mode focal length date of recording and camera orientation is for the first shot in the multiple exposure A Interval Timer Photography If interval timer photography is activated before ...

Страница 190: ...hoose an interval longer than the time needed to take the number of shots selected in Step 4 If the interval is too short the number of photos taken may be less than the total listed in Step 4 the number of intervals multiplied by the number of shots per interval Press 2 to continue D Before Shooting Do not select self timer E remote 4 or MUP release mode when using the interval timer Before begin...

Страница 191: ...mages may vary from one interval to the next the time between the end of one interval and the beginning of the next may vary If shooting can not proceed at current settings for example if a shutter speed of A is currently selected in manual exposure mode or the start time is in less than a minute a warning will be displayed in the monitor D Out of Memory If the memory card is full the interval tim...

Страница 192: ...keting is active while interval timer photography is in effect the camera will take one shot at each interval and process it to create the number of copies specified in the bracketing program A During Shooting During interval timer photography the Q icon in the control panel will flash Immediately before the next shooting interval begins the shutter speed display will show the number of intervals ...

Страница 193: ...Interval timer shooting will end automatically if the battery is exhausted Interval timer photography can also be ended by Selecting Start Off in the interval timer menu Performing a two button reset 0 151 Selecting Reset shooting menu in the shooting menu 0 214 Changing bracketing settings 0 153 Terminating HDR 0 139 or multiple exposure shooting 0 163 Normal shooting will resume when interval ti...

Страница 194: ... change Choose an interval longer than the slowest anticipated shutter speed Press 2 to continue A Before Shooting Before beginning time lapse photography take a test shot at current settings framing the photo in the viewfinder for an accurate exposure preview and view the results in the monitor To record changes in brightness choose manual exposure 0 78 for consistent coloration choose a white ba...

Страница 195: ...cted in Step 4 The memory card access lamp lights while each shot is recorded note that because shutter speed and the time needed to record the image to the memory card may vary from shot to shot the interval between a shot being recorded and the start of the next shot may vary Shooting will not begin if a time lapse movie can not be recorded at current settings for example if the memory card is f...

Страница 196: ... is 20 minutes A Cover the Viewfinder To prevent light entering via the viewfinder interfering with exposure remove the rubber eyecup and cover the viewfinder with the supplied DK 5 eyepiece cap 0 86 A During Shooting During time lapse photography a Q icon will flash and the time lapse recording indicator will be displayed in the control panel The time remaining in hours and minutes appears in the...

Страница 197: ...ere time lapse photography ended Note that time lapse photography will end and no movie will be recorded if the power source is removed or disconnected or the destination memory card is ejected NoPhotograph The camera will skip the current frame if it is unable to focus using single servo autofocus AF S or single servo autofocus selected for AF A note that the camera focuses again before each shot...

Страница 198: ...nown The aperture value is displayed in the control panel and viewfinder Flash level is adjusted for changes in aperture if the flash unit supports AA auto aperture mode Aperture is listed with an asterisk in the playback photo info display Specifying both the focal length and maximum aperture of the lens Enables color matrix metering note that it may be necessary to use center weighted or spot me...

Страница 199: ... from values between f 1 2 and f 22 4 Select Done Highlight Done and press J The specified focal length and aperture will be stored under the chosen lens number A Focal Length Not Listed If the correct focal length is not listed choose the closest value greater than the actual focal length of the lens A Teleconverters and Zoom Lenses The maximum aperture for teleconverters is the combined maximum ...

Страница 200: ... Custom Setting f2 Assign Fn button 0 242 or Custom Setting f3 Assign preview button 0 244 2 Use the selected control to choose the lens number Press the selected button and rotate the main command dial until the desired lens number is displayed in the control panel Focal length Maximum aperture Lens number Fn button Main command dial Control panel ...

Страница 201: ...GPS device Option Description Enable Exposure meters turn off automatically if no operations are performed for the time selected for Custom Setting c2 Standby timer 0 227 to allow the camera time to acquire GPS data the delay is extended by up to one minute after the exposure meters are activated or the camera is turned on This reduces the drain on the battery Disable Exposure meters do not turn o...

Страница 202: ...176 t ...

Страница 203: ... On is selected for Image review in the playback menu 0 212 photographs are automatically displayed in the monitor for about 4 s after shooting because the camera is already in the correct orientation images are not rotated automatically during image review In continuous release mode display begins when shooting ends with the first photograph in the current series displayed K button K button W S b...

Страница 204: ...d copy of current photograph 0 261 If current picture is marked with 1 icon to show that it is a movie pressing J starts movie playback 0 67 A Choosing a Memory Card Slot If two memory cards are inserted you can select a card for playback by holding the D button and pressing 1 during full frame or thumbnail playback The dialog shown at right will be displayed highlight the desired slot and press 2...

Страница 205: ...s in non FX format including DX based movie format 0 63 89 File information None image only Overview GPS data Highlights RGB histogram Shooting data 1 12 100ND610 DSC_0001 JPG 15 10 2013 10 02 28 N NOR ORMAL AL 6016x4016 0 0 1 125 F5 6 85mm 100 100ND610 DSC_0001 JPG 15 10 2013 10 02 28 N NOR ORMAL AL 6016x4016 NIKON D610 1 12 L L A T A O L I T N T M I G I E T I T U T U U D U D T E D E C E N E 1 3 ...

Страница 206: ...ber frame number2 215 100 1 RGB Select R G B Highlights 3 White balance 115 Color temperature 120 White balance fine tuning 117 Preset manual 121 4 Current channel 1 5 Histogram RGB channel In all histograms horizontal axis gives pixel brightness vertical axis number of pixels 6 Histogram red channel 7 Histogram green channel 8 Histogram blue channel 1 Flashing areas indicate highlights areas that...

Страница 207: ...g applications Some sample histograms are shown below If the image contains objects with a wide range of brightnesses the distribution of tones will be relatively even If the image is dark tone distribution will be shifted to the left If the image is bright tone distribution will be shifted to the right Increasing exposure compensation shifts the distribution of tones to the right while decreasing...

Страница 208: ...PRING HAS COME NIKON D610 100 1 A C R O T P I Y S R T IGHT N N I I K K O O N N TARO NIKON D610 100 1 3 Exposure compensation 112 Optimal exposure tuning2 226 4 Focal length 172 288 291 5 Lens data 172 6 Focus mode 97 103 Lens VR vibration reduction 3 7 Flash type 143 292 Commander mode 237 8 Flash mode 144 9 Flash control 236 294 295 Flash compensation 148 10 Camera name 11 Image area4 89 12 Folde...

Страница 209: ...Landscape Picture Controls only 6 Neutral Monochrome and custom Picture Controls 7 Not displayed with monochrome Picture Controls 8 Monochrome Picture Controls only 9 The fourth page of the shooting data is only displayed if copyright information was recorded with the photograph as described on page 256 GPSData Data for movies are for start of recording L L A T A O L I T N T M I G I E T I T U T U ...

Страница 210: ... the distribution of tones in the image 0 181 6 Image quality 93 7 Image size 95 8 Image area 1 89 9 File name 216 10 Time of recording 27 253 11 Folder name 215 12 Date of recording 27 253 13 Current card slot 46 178 14 Metering 109 15 Shooting mode 35 40 73 16 Shutter speed 74 17 Aperture 74 18 ISO sensitivity 2 105 19 Focal length 172 288 291 20 GPS data indicator 175 21 Image comment indicator...

Страница 211: ...press to view highlighted image full frame Highlight images Use multi selector to highlight images for full frame playback playback zoom 0 187 deletion 0 189 or protection 0 188 View highlighted image J Press J to display the highlighted image full frame Delete highlighted image O Q See page 189 for more information Change protect status of highlighted image L U See page 188 for more information R...

Страница 212: ...frame playback Thumbnaillist Press and hold X T button to zoom in on highlighted picture Highlight dates Highlight images Date list Highlight date Thumbnail list Highlight picture Toggle full frame playback J Date list View pictures taken on selected date Thumbnail list View highlighted picture Delete highlighted photo s O Q Date list Delete all pictures taken on selected date Thumbnail list Delet...

Страница 213: ...ulti selector pressed to scroll rapidly to other areas of frame Navigation window is displayed when zoom ratio is altered area currently visible in monitor is indicated by yellow border View other areas of image Select faces Faces up to 35 detected during zoom are indicated by white borders in navigation window Rotate sub command dial to view other faces View other images Rotate main command dial ...

Страница 214: ...ll frame playback or playback zoom or highlight it in the thumbnail list in thumbnail or calendar playback 2 Press the L U button The photograph will be marked with a P icon To remove protection from the photographso thatitcan be deleted display the photograph or highlight it in the thumbnail list and then press the L U button Full frame playback Thumbnail playback Calendar playback A Removing Pro...

Страница 215: ...Select an image Display the image or highlight it in the thumbnail list in thumbnail or calendar playback 2 Press the O Q button A confirmation dialog will be displayed 3 Press the O Q button again To delete the photograph press the O Q button To exit without deleting the photograph press the K button O Q button Full frame playback Thumbnail playback Calendar playback thumbnail list A Calendar Pla...

Страница 216: ...s and hold the X T button to view images in other locations hold the D button press 1 and select the desired card and folder as described on page 178 3 Select the highlighted picture Press the W S button to select the highlighted picture Selected pictures are marked by a O icon Repeat steps 2 and 3 to select additional pictures to deselect a picture highlight it and press W S Option Description Q ...

Страница 217: ...he highlighted date press W S Use the multi selector to scroll through the pictures or press and hold X T to view the current picture full screen Press W S to return to the date list 3 Select the highlighted date Press 2 to select all pictures taken on the highlighted date Selected dates are marked with a M icon Repeat steps 2 and 3 to select additional dates to deselect a date highlight it and pr...

Страница 218: ...192 I ...

Страница 219: ...SupportedOperatingSystems The supplied software can be used with computers running the following operating systems Windows Pre installed versions of Windows 8 Windows 7 Windows Vista and Windows XP not compatible with 64 bit editions of Windows XP Macintosh OS X 10 8 or 10 7 Mac OS X 10 6 See the websites listed on page xxiii for the latest information on supported operating systems Connecting to ...

Страница 220: ...er 2 If a message is displayed prompting you to choose a program select Nikon Transfer 2 D USB Hubs Connect the camera directly to the computer do not connect the cable via a USB hub or keyboard A Windows 7 If the following dialog is displayed select Nikon Transfer 2 as described below 1 Under Import pictures and videos click Change program A program selection dialog will be displayed select Impor...

Страница 221: ...nu 7 Turn the camera off and disconnect the USB cable when transfer ends Nikon Transfer 2 will close automatically when transfer is complete A Camera Control Pro 2 Camera Control Pro 2 software available separately 0 298 can be used to control the camera from a computer When Camera Control Pro 2 is used to capture photographs and movies directly to the computer the PC connection indicator c will a...

Страница 222: ...ied USB cable 1 Turn the camera off 2 Connect the USB cable Turn the printer on and connect the USB cable as shown Do not use force or attempt to insert the connectors at an angle 3 Turn the camera on A welcome screen will be displayed in the monitor followed by a PictBridge playback display D USB Hubs Connect the camera directly to the printer do not connect the cable via a USB hub ...

Страница 223: ...ed card and folder as described on page 178 2 Display printing options Press J to display PictBridge printing options A Printing Via Direct USB Connection Be sure the EN EL15 battery is fully charged or use an optional EH 5b AC adapter and EP 5B power connector When taking photographs to be printed via direct USB connection set Color space to sRGB 0 217 D Selecting Photographs for Printing NEF RAW...

Страница 224: ...f supported by the printer Highlight Printer default use current printer settings Print with border print photo with white border or No border and press J to select and exit to the previous menu Time stamp Highlight Printer default use current printer settings Print time stamp print times and dates of recording on photos orNo time stamp and press J to select and exit to the previous menu Cropping ...

Страница 225: ...nting Selectdate Print one copy of all the pictures taken on a selected date Print DPOF Print an existing print order created with the DPOF print order option in the playback menu 0 202 The current print order will be displayed in Step 3 Indexprint To create an index print of all JPEG pictures 0 93 on the memory card proceed to Step 4 Note that if the memory card contains more than 256 pictures on...

Страница 226: ...e set to 1 Keeping the W S button pressed press 1 or 3 to specify the number of prints up to 99 to deselect the picture press 3 when the number of prints is 1 Continue until all the desired pictures have been selected If you chose Select date in Step 2 press 1 or 3 to highlight a date and press 2 to toggle the highlighted date on or off To view the pictures taken on the selected date press W S Use...

Страница 227: ...nting options Choose page size border and time stamp options as described on page 198 a warning will be displayed if the selected page size is too small for an index print 6 Start printing Select Start printing and press J to start printing To cancel before all copies have been printed press J ...

Страница 228: ...roll through the pictures on the memory card to view images in other locations hold the D button and press 1 To display the current picture in full screen press and hold the X T button To select the current picture for printing hold the W S button and press 1 The picture will be marked with a Z icon and the number of prints will be set to 1 Keeping the W S button pressed press 1 or 3 to specify th...

Страница 229: ...nt DPOF in the PictBridge menu and follow the steps in Printing Multiple Pictures to modify and print the current order 0 199 DPOF print date and shooting data options are not supported when printing via direct USB connection to print the date of recording on photographs in the current print order use the PictBridge Time stamp option The DPOF print order option can not be used if there is not enou...

Страница 230: ... the connectors can interfere with data transfer A Television Playback Use of an EH 5b AC adapter and EP 5B power connector available separately is recommended for extended playback The TV will display images full screen if photo information is hidden during full frame playback 0 179 Note that the edges may not be visible when photographs are viewed on a television screen A Audio Stereo sound reco...

Страница 231: ...splay shown at right will appear on the television and the television remote can be used in place of the camera multi selector and J button during full frame playback and slide shows If Off is selected the television remote can not be used to control the camera A HDMI and Live View HDMI displays connected via an HDMI cable can be used for live view photography and movie live view 0 49 57 During mo...

Страница 232: ...206 Q ...

Страница 233: ...208 Playback display options 209 Copy image s 209 Image review 212 After delete 212 Rotate tall 212 Slide show 213 DPOF print order 202 Option 0 A See Also Menu defaults are listed on page 312 Playback Folder G button D playback menu Option Description ND610 Pictures in all folders created with the D610 will be visible during playback All Pictures in all folders will be visible during playback Cur...

Страница 234: ...current picture Selected pictures are marked by a R icon to deselect a picture highlight it and press W S again Continue until all the desired pictures have been selected 3 Press J Press J to complete the operation Hide Image G button D playback menu Option Description Select set Hide or reveal selected pictures Select date Selecting this option displays a list of dates To hide all pictures taken ...

Страница 235: ...on is only available when two memory cards are inserted in the camera 1 Choose Select source Highlight Select source and press 2 2 Select the source card Highlight the slot for the card containing the images to be copied and press J Playback Display Options G button D playback menu Copy Image s G button D playback menu Option Description Select source Choose card from which pictures will be copied...

Страница 236: ...r copying by choosing Select all images or Select protected images To mark only individually selected images for copying choose Deselect all before proceeding 6 Select additional images Highlight pictures and press W S to select or deselect to view the highlighted picture full screen press and hold the X T button Selected images are marked with a L Press J to proceed to Step 7 when your selection ...

Страница 237: ...e D Copying Images Images will not be copied if there is insufficient space on the destination card Be sure the battery is fully charged before copying movies If the destination folder contains an image with the same name as one of the images to be copied a confirmation dialog will be displayed Select Replace existingimage to replace the image with the image to be copied or select Replace all to r...

Страница 238: ...cture If deleted picture was last frame previous picture will be displayed T Show previous Display previous picture If deleted picture was first frame following picture will be displayed U Continue as before If user was scrolling through pictures in order recorded following picture will be displayed as described for Show next If user was scrolling through pictures in reverse order previous picture...

Страница 239: ...age displayed from Still images and movies Still images only and Movies only Frame interval Choose how long each picture will be displayed To Press Description Skip back skip ahead Press 4 to return to previous frame 2 to skip to next frame View additional photo info Change or hide photo info displayed still images only 0 179 Pause resume J Pause or resume slide show Raise lower volume X T W S Pre...

Страница 240: ...tion 0 Reset shooting menu 214 Storage folder 215 File naming 216 Role played by card in Slot 2 96 Image quality 93 Image size 95 Image area 89 JPEG compression 94 NEF RAW recording 94 White balance 115 Set Picture Control 129 Manage Picture Control 134 Auto distortion control 217 Color space 217 Active D Lighting 137 HDR high dynamic range 139 Vignette control 218 Long exposure NR 218 High ISO NR...

Страница 241: ...lders depends on the option currently selected for Role played by card in slot 2 0 96 3 Save changes and exit Press J to complete the operation and return to the shooting menu to exit without choosing the storage folder press the G button If a folder with the specified number does not already exist a new folder will be created Subsequent photographs will be stored in the selected folder unless it ...

Страница 242: ...of images that use the Adobe RGB color space _DSC followed by a four digit number and a three letter extension e g DSC_0001 JPG The File naming option is used to select three letters to replace the DSC portion of the file name For information on editing file names see page 135 File Naming G button C shooting menu A Extensions The following extensions are used NEF for NEF RAW images JPG for JPEG im...

Страница 243: ...th severe peripheral distortion The color space determines the gamut of colors available for color reproduction Choose sRGB for general purpose printing and display Adobe RGB with its broader gamut of colors is more suited to shots destined for professional publication and commercial printing Auto Distortion Control G button C shooting menu A Retouch Distortion Control For information on creating ...

Страница 244: ...ing movie recording Photographs taken at high ISO sensitivities can be processed to reduce noise Vignette Control G button C shooting menu A Vignette Control Depending on the scene shooting conditions and type of lens JPEG images may exhibit noise fog or variations in peripheral brightness while custom Picture Controls and preset Picture Controls that have been modified from default settings may n...

Страница 245: ...tings To display the Custom Settings menu press G and select the A Custom Settings menu tab G button Custom Setting groups Main menu Reset custom settings 0 221 Custom Settings are used to customize camera settings to suit individual preferences ...

Страница 246: ...n AE L 226 c2 Standby timer 227 c3 Self timer 227 c4 Monitor off delay 228 c5 Remote on duration 228 d Shooting display d1 Beep 228 d2 Viewfinder grid display 229 d3 ISO display and adjustment 229 d4 Screen tips 229 d5 CL mode shooting speed 229 d6 Max continuous release 230 d7 File number sequence 230 d8 Information display 231 d Shooting display d9 LCD illumination 231 d10 Exposure delay mode 23...

Страница 247: ...henever the shutter release button is pressed release priority Regardless of the option selected if the in focus indicator I is displayed when AF S is selected for autofocus mode focus will lock while the shutter release button is pressed halfway Focus lock continues until the shutter is released Reset Custom Settings G button A Custom Settings menu a Autofocus a1 AF C Priority Selection G button ...

Страница 248: ...ries of subjects at varying distances in quick succession a4 AF Point Illumination G button A Custom Settings menu Option Description Auto The selected focus point is automatically highlighted as needed to establish contrast with the background On The selected focus point is always highlighted regardless of the brightness of the background Depending on the brightness of the background the selected...

Страница 249: ...ist illumination is only available when both of the following conditions are met 1 AF S is selected for autofocus mode 0 97 or single servo autofocus is selected when the camera is in AF A mode 2 Auto area AF is chosen for AF area mode 0 99 or an option other than auto area AF is chosen and the center focus point is selected Off The AF assist illuminator does not light to assist the focus operatio...

Страница 250: ...nt setting is not available at the new step value ISO sensitivity will be rounded to the nearest available setting Select the increments used when making adjustments to shutter speed aperture exposure and flash compensation and bracketing b Metering Exposure b1 ISO Sensitivity Step Value G button A Custom Settings menu b2 EV Steps for Exposure Cntrl G button A Custom Settings menu ...

Страница 251: ...ue selected using the command dial is not reset when the camera turns off or the standby timer expires Off Exposure compensation is set by pressing the E button and rotating the main command dial A Change Main Sub The dial used to set exposure compensation when On Auto reset or On is selected for Custom Setting b3 Easy exposure compensation depends on the option selected for Custom Setting f5 Cust...

Страница 252: ... exposure value selected by the camera Exposure can be fine tuned separately for each metering method by from 1 to 1 EV in steps of 1 6 EV If On is selected exposure will lock when the shutter release button is pressed halfway b4 Center Weighted Area G button A Custom Settings menu b5 Fine tune Optimal Exposure G button A Custom Settings menu D Fine Tuning Exposure Exposure fine tuning is not affe...

Страница 253: ...he length of the shutter release delay the number of shots taken and the interval between shots in self timer mode Self timer delay Choose the length of the shutter release delay 0 85 Number of shots Press 1 and 3 to choose the number of shots taken each time the shutter release button is pressed Intervalbetweenshots Choose the interval between shots when the Number of shots is more than 1 c2 Stan...

Страница 254: ...lfway Choose the pitch and volume of the beep that sounds when the camera focuses using single servo AF AF S or when single servo AF is selected for AF A 0 97 when focus locks during live view photography while the release timer is counting down in self timer and delayed remote release modes 0 85 when a photograph is taken in quick response remote or remote mirror up mode 0 85 when time lapse phot...

Страница 255: ...he main command dial Select Show frame count to display the number of exposures remaining in the control panel Choose On to display tool tips for items selected in the information display 0 11 Choose the maximum frame advance rate in CL continuous low speed mode 0 83 during interval timer photography this setting also determines the frame advance rate for single frame d2 Viewfinder Grid Display G ...

Страница 256: ...om the last number used or from the largest file number in the current folder whichever is higher If a photograph is taken when the current folder contains a photograph numbered 9999 a new folder will be created automatically and file numbering will begin again from 0001 Off File numbering is reset to 0001 when a new folder is created the memory card is formatted or a new memory card is inserted i...

Страница 257: ...e power switch is rotated toward D If On is selected the control panel will be illuminated whenever the standby timer is active 0 39 Select Off for increased battery life In situations where the slightest camera movement can blur pictures select 1 s 2 s or 3 s to delay shutter release until one two or three seconds after the mirror is raised If On is selected the flash ready indicator c will flash...

Страница 258: ...ing FR6 lithium AA batteries A Using AA Batteries The capacity of AA batteries drops sharply at temperatures below 20 C 68 F and varies with make and storage conditions in some cases batteries may cease to function before their expiry date Some AA batteries can not be used due to their performance characteristics and limited capacity alkaline batteries have less capacity than some other types and ...

Страница 259: ...s displayed in the camera control panel when the batteries in the MB D14 are in use d13 Battery Order G button A Custom Settings menu A The MB D14 Battery Pack The MB D14 takes one EN EL15 rechargeable Li ion battery or six AA alkaline Ni MH or lithium batteries an EN EL15 is supplied with the camera AA batteries are available separately The information display shows the type of battery inserted i...

Страница 260: ...et to 1 200 s When the camera shows a shutter speed of 1 200 s in mode P or A auto FP high speed sync will be activated if the actual shutter speed is faster than 1 200 s 1 200 s 1 60 s Flash sync speed set to selected value A Fixing Shutter Speed at the Flash Sync Speed Limit To fix shutter speed at the sync speed limit in mode S or M select the next shutter speed after the slowest possible shutt...

Страница 261: ... can be as slow as 30 s in S and M modes or at flash settings of slow sync slow rear curtain sync or red eye reduction with slow sync Options range from 1 60 s 1 60 s to 30 s 30 s Flash sync speed 1 250 s Auto FP 1 200 s Auto FP 1 200 s Shutter speed Built in flash Optional flash unit Built in flash Optional flash unit Built in flash Optional flash unit From 1 4 000 to but not including 1 250 s Au...

Страница 262: ... pre flashes 3 Repeating flash The flash fires repeatedly while the shutter is open producing a strobe light effect 0 236 4 Commander mode Use the built in flash as a master flash controlling remote optional flash units in one or more groups 0 237 Option Description Output Choose flash output expressed as a fraction of full power Times Choose the number of times the flash fires at the selected out...

Страница 263: ...tion Built in flash Choose a flash mode for the built in flash commander flash TTL i TTL mode Choose flash compensation from values between 3 0 and 3 0 EV in increments of 1 3 EV M Choose the flash level from values between 1 1 and 1 128 1 128 of full power The built in flash does not fire although remote flash units do The built in flash must be raised so that it can emit monitor pre flashes Grou...

Страница 264: ... and output level for the built in flash Note that output level can not be adjusted in mode 2 Adjust settings for group A Choose the flash control mode and output level for the flash units in group A 3 Adjust settings for group B Choose the flash control mode and output level for the flash units in group B 4 Select the channel 5 Press J ...

Страница 265: ...e the built in flash Press the M Y button to raise the built in flash Note that even if is selected for Built in flash Mode the built in flash must be raised so that monitor preflashes will be emitted 9 Frame the photograph focus and shoot After confirming that the camera flash ready light and the flash ready lights for all other flash units are lit frame the photograph focus and shoot FV lock 0 1...

Страница 266: ... from the remote flash units do not enter the camera lens in TTL mode or the photocells on the remote flash units AA mode as this may interfere with exposure To prevent timing flashes emitted by the built in flash from appearing in photographs taken at short range choose low ISO sensitivities or small apertures high f numbers or use an optional SG 3IR infrared panel for the built in flash An SG 3I...

Страница 267: ...g 0 158 Note that white balance bracketing is not available at image quality settings of NEF RAW or NEF RAW JPEG At the default setting of MTR under over H exposure flash and white balance bracketing are performed in the order described on pages 153 and 156 If Under MTR over I is selected shooting will proceed in order from the lowest to the highest value This setting has no effect on ADL bracketi...

Страница 268: ...h or ADL bracketing is active in single frame or quiet shutter release mode all shots in the current bracketing program will be taken each time the shutter release button is pressed If white balance bracketing is active or continuous release mode mode CH CL or M is selected the camera will repeat the bracketing burst while the shutter release button is held down y Active D Lighting Press the Fn bu...

Страница 269: ...ting b2 EV steps for exposure cntrl 0 224 w Choose non CPU lens number Press the Fn button and rotate a command dial to choose a lens number specified using the Non CPU lens data option 0 172 K Playback Fn button performs same function as K button Select when using a telephoto lens or in other circumstances in which it is difficult to operate the K button with your left hand None Pressing the butt...

Страница 270: ...tton is pressed C AE lock only Exposure locks while the A AE L AF L button is pressed E AE lock Hold Exposure locks when the A AE L AF L button is pressed and remains locked until the button is pressed a second time or the standby timer expires F AF lock only Focus locks while the A AE L AF L button is pressed A AF ON The A AE L AF L button initiates autofocus The shutter release button can not be...

Страница 271: ...an only be adjusted with the lens aperture ring and the camera aperture display will show aperture in increments of 1 EV aperture for type G E lenses is still set using the sub command dial Note that regardless of the setting chosen the aperture ring must be used to adjust aperture when a non CPU lens is attached Menusandplayback If Off is selected the multi selector is used to choose the picture ...

Страница 272: ...setting will also end when the standby timer expires Selecting Enable release allows the shutter to be released when no memory card is inserted although no pictures will be recorded they will however be displayed in the monitor in demo mode If Release locked is selected the shutter release button is only enabled when a memory card is inserted in the camera If W is selected the exposure indicators ...

Страница 273: ...tional flash units only 0 149 294 Press again to cancel FV lock G Same as Fn button The MB D14 A AE L AF L button performs the function selected for Custom Setting f2 0 242 g Movie g1 Assign Fn Button G button A Custom Settings menu Option Description r Index marking Press the button during movie recording to add an index at the current position 0 60 Indices can be used when viewing and editing mo...

Страница 274: ...ation on image size see page 63 1 Record movies Press the shutter release button halfway to start movie live view You can then press the shutter release button halfway to focus autofocus mode only and press it all the way down to start or end recording To end movie live view press the a button The shutter release button on an optional remote cord 0 298 can be used to start movie live view and to s...

Страница 275: ... Save user settings 81 Reset user settings 82 Monitor brightness 250 Clean image sensor 301 Lock mirror up for cleaning 1 303 Image Dust Off ref photo 251 HDMI 205 Flicker reduction 252 Time zone and date 253 Language 253 Image comment 253 Auto image rotation 254 Battery info 255 Copyright information 256 Save load settings 257 GPS 175 Virtual horizon 258 Non CPU lens data 172 AF fine tune 259 Eye...

Страница 276: ...e memory cards during formatting A Two Button Format Memory cards can also be formatted by pressing the O Q and Z Q buttons for more than two seconds 0 31 Monitor Brightness G button B setup menu Option Description Auto When the monitor is on monitor brightness is automatically adjusted according to ambient lighting conditions Care should be taken not to cover the ambient brightness sensor 0 4 Man...

Страница 277: ...l be displayed and rEF will appear in the viewfinder and control panel displays Clean sensor and then start Select this option to clean the image sensor before starting The message shown at right will be displayed and rEF will appear in the viewfinder and control panel displays when cleaning is complete 2 Frame a featureless white object in the viewfinder With the lens about ten centimeters four i...

Страница 278: ...wer supply D Image Sensor Cleaning Dust off reference data recorded before image sensor cleaning is performed can not be used with photographs taken after image sensor cleaning is performed Select Clean sensor and then start only if the dust off reference data will not be used with existing photographs D Image Dust Off Reference Data The same reference data can be used for photographs taken with d...

Страница 279: ...aracters long Attach comment Select this option to attach the comment to all subsequent photographs Attach comment can be turned on and off by highlighting it and pressing 2 Time Zone and Date G button B setup menu Option Description Time zone Choose a time zone The camera clock is automatically set to the time in the new time zone Date and time Set the camera clock If the clock is not set a flash...

Страница 280: ...s are recorded Camera orientation is not recorded when Off is selected Choose this option when panning or taking photographs with the lens pointing up or down Auto Image Rotation G button B setup menu Landscape wide orientation Camera rotated 90 clockwise Camera rotated 90 counter clockwise A Rotate Tall To automatically rotate tall portrait orientation photographs for display during playback sele...

Страница 281: ...ce Battery age A five level display showing battery age 0 k indicates that battery performance is unimpaired 4 l that the battery has reached the end of its charging life and should be replaced Note that batteries charged at temperatures under about 5 C 41 F may show a temporary drop in charging life the battery age display will however return to normal once the battery has been recharged at a tem...

Страница 282: ...n page 135 Copyright holder names can be up to 54 characters long Attach copyright information Select this option to attach copyright information to all subsequent photographs Attach copyright information can be turned on and off by highlighting it and pressing 2 Copyright Information G button B setup menu D Copyright Information To prevent unauthorized use of the artist or copyright holder names ...

Страница 283: ...ole played by card in Slot 2 Image quality Image size Image area JPEG compression NEF RAW recording White balance with fine tuning and presets d 1 d 4 Set Picture Control Auto distortion control Color space Active D Lighting Vignette control Long exposure NR High ISO NR ISO sensitivity settings Remote control mode Movie settings Custom settings All Custom Settings except Reset custom settings Setu...

Страница 284: ...n is equivalent to 5 Virtual Horizon G button B setup menu Camera level Camera tilted left or right Camera tilted forward or back D Tilting the Camera The virtual horizon display is not accurate when the camera is tilted at a sharp angle forward or back If the camera is unable to measure tilt the amount of tilt will not be displayed A See Also For information on viewing a roll indicator in the vie...

Страница 285: ...he desired lens and press O Q To change a lens identifier for example to choose an identifier that is the same as the last two digits of the lens serial number to distinguish it from other lenses of the same type in light of the fact that Saved value can be used with only one lens of each type highlight the desired lens and press 2 The menu shown at right will be displayed press 1 or 3 to choose a...

Страница 286: ...indicator is not flashing pictures can be taken normally but you may be unable to change Eye Fi settings View the current camera firmware version Eye Fi Upload G button B setup menu D Eye Fi Cards Eye Fi cards may emit wireless signals when Disable is selected If a warning is displayed in the monitor 0 324 turn the camera off and remove the card See the manual provided with the Eye Fi card and dir...

Страница 287: ...267 n Color balance 268 o Image overlay1 269 7 NEF RAW processing 271 8 Resize 272 Quick retouch 273 e Straighten 274 Distortion control 274 Fisheye 274 f Color outline 275 g Color sketch 275 h Perspective control 275 i Miniature effect 276 u Selective color 277 9 Edit movie 69 p Side by side comparison2 279 Option 0 D Retouching Copies Most options can be applied to copies created using other ret...

Страница 288: ...nformation see the section for the selected item To exit without creating a retouched copy press G 4 Create a retouched copy Press J to create a retouched copy Retouched copies are indicated by a o icon A Retouch The camera may not be able to display or retouch images created with other devices A Monitor off Delay The monitor will turn off and the operation will be cancelled if no actions are perf...

Страница 289: ...263 U A Creating Retouched Copies During Playback Retouched copies can also be created during playback 2 2 Displaypicturefullframeand press J or c b Highlight an option and press J Create retouched copy ...

Страница 290: ...portions of the image that are not affected by red eye check the preview thoroughly before proceeding D Lighting G button N retouch menu Before After Red Eye Correction G button N retouch menu To Use Description Zoom in X T Press X T to zoom in W S to zoom out While photo is zoomed in use multi selector to view areas of image not visible in monitor Keep multi selector pressed to scroll rapidly to ...

Страница 291: ...itch between aspect ratios of 3 2 4 3 5 4 1 1 and 16 9 Position crop Use multi selector to position the crop Press and hold to move the crop rapidly to the desired position Create copy J Save the current crop as a separate file A Trim Image Quality and Size Copies created from NEF RAW or NEF RAW JPEG photos have an image quality 0 93 of JPEG fine cropped copies created from JPEG photos have the sa...

Страница 292: ...pe blue and white monochrome Selecting Sepia or Cyanotype displays a preview of the selected image press 1 to increase color saturation 3 to decrease Press J to create a monochrome copy Monochrome G button N retouch menu Increase saturation Decrease saturation ...

Страница 293: ...the monitor Red intensifier Intensify reds Red intensifier greens Green intensifier or blues Blue intensifier Press 1 to increase the effect 3 to decrease Green intensifier Blue intensifier Cross screen Add starburst effects to light sources Number of points Choose from four six or eight Filter amount Choose the brightness of the light sources affected Filter angle Choose the angle of the points L...

Страница 294: ...f green Increase amount of blue Create retouched copy Increase amount of amber Increase amount of magenta A Zoom To zoom in on the image displayed in the monitor pressX T The histogram will be updated to show data only for the portion of the image displayed in the monitor While the image is zoomed in press L U to toggle back and forth between color balance and zoom When zoom is selected you can zo...

Страница 295: ...ighlight Image overlay in the retouch menu and press 2 The dialog shown at right will be displayed with Image 1 highlighted press J to display a list of the NEF pictures created with this camera 2 Select the first image Use the multi selector to highlight the first photograph in the overlay To view the highlighted photograph full frame press and hold the X T button to view images in other location...

Страница 296: ... while the preview is displayed to save the overlay After an overlay is created the resulting image will be displayed full frame in the monitor D Image Overlay Only NEF RAW photographs with the same image area and bit depth can be combined The overlay has the same photo info including date of recording metering shutter speed aperture shooting mode exposure compensation focal length and image orien...

Страница 297: ... select the highlighted photograph and proceed to the next step 3 Choose settings for the JPEG copy Adjust the settings listed below Note that white balance and vignette control are not available with multiple exposures or pictures created with image overlay and that exposure compensation can only be set to values between 2 and 2 EV The Picture Control grid is not displayed when Picture Controls a...

Страница 298: ...us and select Resize in the retouch menu 2 Choose a destination If two memory cards are inserted you can choose a destination for the resized copies by highlightingChoosedestinationandpressing2 if only one card is inserted proceed to Step 3 The menu shown at right will be displayed highlight a card slot and press J 3 Choose a size Highlight Choose size and press 2 The options shown at right will b...

Страница 299: ...nfirmation dialog will be displayed Highlight Yes and press J to save the resized copies Create copies with enhanced saturation and contrast D Lighting is applied as required to brighten dark or backlit subjects Press 1 or 3 to choose the amount of enhancement The effect can be previewed in the edit display Press J to copy the photograph A Viewing Resized Copies Playback zoom may not be available ...

Страница 300: ...can be previewed in the edit display note that greater amounts of distortion control result in more of the edges being cropped out Press J to copy the photograph or press K to exit to playback without creating a copy Note that distortion control may heavily crop or distort the edges of copies created from photographs taken with DX lenses at an image area setting of FX 36 24 1 0 Create copies that ...

Страница 301: ...ines makes colors more saturated The results can be previewed in the edit display Press J to copy the photograph or press K to exit to playback without creating a copy Create copies that reduce the effects of perspective taken from the base of a tall object Use the multi selector to adjust perspective note that greater amounts of perspective control result in more of the edges being cropped out Th...

Страница 302: ...us Choose position If area of effect is in wide orientation press 1 or 3 to position frame showing area of copy that will be in focus If area of effect is in tall orientation press 4 or 2 to position frame showing area of copy that will be in focus Choose size If area of effect is in wide orientation press 4 or 2 to choose height If area of effect is in tall orientation press 1 or 3 to choose widt...

Страница 303: ...e highlighted photograph and proceed to the next step 3 Select a color Use the multi selector to position the cursor over an object and press the A AE L AF L button to select the color of the object as one that will remain in the final copy the camera may have difficulty detecting unsaturated colors choose a saturated color To zoom in on the picture for precise color selection press X T Press W S ...

Страница 304: ...er colors The effect can be previewed in the edit display 6 Select additional colors To select additional colors rotate the main command dial to highlight another of the three color boxes at the top of the display and repeat Steps 3 5 to select another color Repeat for a third color if desired To deselect the highlighted color press O Q or press and hold O Q to remove all colors 7 Save the edited ...

Страница 305: ...f the display Press 4 or 2 to switch between the source image and the retouched copy To view the highlighted picture full frame press and hold the X T button If the copy was created from two source images using Image overlay or if the source has been copied multiple times press 1 or 3 to view the other source images or copies To exit to playback mode press the K button or press J to exit to playba...

Страница 306: ...recent settings can be displayed in place of My Menu 0 283 Options can be added deleted and reordered as described below AddingOptionstoMyMenu 1 Select Add items In My Menu O highlight Add items and press 2 2 Select a menu Highlight the name of the menu containing the option you wish to add and press 2 3 Select an item Highlight the desired menu item and press J 4 Position the new item Press 1 or ...

Страница 307: ...ms and press 2 2 Select items Highlight items and press 2 to select or deselect Selected items are indicated by a check mark 3 Select Done Highlight Done and press J A confirmation dialog will be displayed 4 Delete the selected items Press J to delete the selected items A Deleting Items in My Menu To delete the item currently highlighted in My Menu press the O Q button A confirmation dialog will b...

Страница 308: ...items and press 2 2 Select an item Highlight the item you wish to move and press J 3 Position the item Press 1 or 3 to move the item up or down in My Menu and press J Repeat Steps 2 3 to reposition additional items 4 Exit to My Menu Press the G button to return to My Menu G button ...

Страница 309: ...nd press J The name of the menu will change from MY MENU to RECENT SETTINGS Menu items will be added to the top of the recent settings menu as they are used To view My Menu again select O My Menu for m Recent settings Choose tab A Removing Items from the Recent Settings Menu To remove an item from the recent settings menu highlight it and press the O Q button A confirmation dialog will be displaye...

Страница 310: ...284 U ...

Страница 311: ...tance with AF 80 200mm f 2 8 AF 35 70mm f 2 8 AF 28 85mm f 3 5 4 5 New or AF 28 85mm f 3 5 4 5 lens at maximum zoom in focus indicator may be displayed when image on matte screen in viewfinder is not in focus Adjust focus manually until image in viewfinder is in focus 9 With maximum aperture of f 5 6 or faster 10 Some lenses can not be used see page 288 Compatible Lenses Camera setting Focus mode ...
Страница 312: ...step or more 16 Exposure determined by presetting lens aperture In mode A preset aperture using lens aperture ring before performing AE lock and shifting lens In mode M preset aperture using lens aperture ring and determine exposure before shifting lens 17 Exposure compensation required when used with AI 28 85mm f 3 5 4 5 AI 35 105mm f 3 5 4 5 AI 35 135mm f 3 5 4 5 or AF S 80 200mm f 2 8D See tele...

Страница 313: ...e to focus on dark or low contrast subjects if the combined aperture is slower than f 5 6 Autofocus is not available when teleconverters are used with the AF S VR Micro Nikkor 105mm f 2 8G IF ED 1 Focus data for focus points other than the center focus point are obtained from line sensors 2 Single point AF is used when 3D tracking or auto area AF is selected forAF area mode 0 99 3 Autofocus not av...

Страница 314: ...174180 360 1200mm f 11 ED serial numbers 174031 174127 200 600mm f 9 5 serial numbers 280001 300490 AF lenses for the F3AF AF 80mm f 2 8 AF 200mm f 3 5 ED AF Teleconverter TC 16 PC 28mm f 4 serial number 180900 or earlier PC 35mm f 2 8 serial numbers 851001 906200 PC 35mm f 3 5 old type Reflex 1000mm f 6 3 old type Reflex 1000mm f 11 serial numbers 142361 143000 Reflex 2000mm f 11 serial numbers 2...

Страница 315: ...F S VR Zoom Nikkor 24 120mm f 3 5 5 6G IF ED 24 mm 1 0 m 3 ft 3 in 35 120 mm No vignetting AF S NIKKOR 24 120mm f 4G ED VR 24 mm 2 0 m 6 ft 7 in 28 mm 1 0 m 3 ft 3 in 50 120 mm No vignetting AF S Zoom Nikkor 28 70mm f 2 8D IF ED 28 mm 1 0 m 3 ft 3 in 50 70 mm No vignetting AF S NIKKOR 28 300mm f 3 5 5 6G ED VR 28 mm 1 5 m 4 ft 11 in 35 mm 1 0 m 3 ft 3 in 50 300 mm No vignetting PC E NIKKOR 24mm f ...

Страница 316: ...4 120mm f 4G ED VR AF S NIKKOR 28 300mm f 3 5 5 6G ED VR AF S NIKKOR 35mm f 1 4G AF Zoom Micro Nikkor ED 70 180mm f 4 5 5 6D AF S VR Micro Nikkor 105mm f 2 8G IF ED At ranges under 1 0 m 3 ft 3 in the following lenses may block the AF assist illuminator and interfere with autofocus when lighting is poor AF S DX NIKKOR 18 200mm f 3 5 5 6G ED VR II AF S NIKKOR 24 70mm f 2 8G ED AF SVRZoom Nikkor24 1...

Страница 317: ... 5 by turning Auto DX crop off and selecting DX 24 16 The DX 24 16 angle of view is about 1 5 times smaller than the 35mm format angle of view To calculate the focal length of lenses in 35mm format when DX 24 16 is selected multiply the focal length of the lens by about 1 5 for example the effective focal length of a 50mm lens in 35mm format would be 75 mm when DX 24 16 is selected FX 36 24 pictur...

Страница 318: ...flash unit for details The built in flash will not fire when an optional flash unit is attached A The AS 15 Sync Terminal Adapter When the AS 15 sync terminal adapter available separately is mounted on the camera accessory shoe flash accessories can be connected via a sync terminal D Use Only Nikon Flash Accessories Use only Nikon flash units Negative voltages or voltages over 250 V applied to the...

Страница 319: ...8 59 10 33 ISO 200 48 157 48 157 53 174 39 128 42 138 30 98 25 82 14 46 1 If a color filter is attached to the SB 910 SB 900 or SB 700 when v or N flash is selected for white balance the camera will automatically detect the filter and adjust white balance appropriately 2 Wireless flash control is not available 3 Controlled remotely with built in flash in commander mode or using optional SB 910 SB ...

Страница 320: ... 9 Power zoom 1 Only available when SU 800 is used to control other flash units The SU 800 itself is not equipped with a flash 2 Standard i TTL flash for digital SLR is used with spot metering or when selected with flash unit 3 Standard i TTL flash for digital SLR is used with spot metering 4 Selected with flash unit 5 Auto aperture AA is used regardless of mode selected with flash unit 6 Can be s...

Страница 321: ...ly 2 Flash mode is automatically set to TTL and shutter release is disabled Set flash unit to A non TTL auto flash 3 Autofocus is available with AF S VR Micro Nikkor 105mm f 2 8G IF ED and AF S Micro NIKKOR 60mm f 2 8G ED lenses only 4 Available when camera is used to select flash mode A Flash Control Mode The information display shows the flash control mode for optional flash units attached to th...

Страница 322: ...ontrol Take a test shot and view the results in the monitor In i TTL use the flash panel or bounce adapter provided with the flash unit Do not use other panels such as diffusion panels as this may produce incorrect exposure The SB 910 SB 900 SB 800 SB 700 SB 600 and SB 400 provide red eye reduction while the SB 910 SB 900 SB 800 SB 700 SB 600 and SU 800 provide AF assist illumination with the foll...

Страница 323: ...ed when the subject is framed against a bright light or when a bright light source is in the frame Center weighted metering is recommended with filters with exposure factors filter factors over 1 Y44 Y48 Y52 O56 R60 X0 X1 C PL ND2S ND4 ND4S ND8 ND8S ND400 A2 A12 B2 B8 B12 See the filter manual for details Viewfinder eyepiece accessories DK 20C Eyepiece Correction Lenses Lenses are available with d...

Страница 324: ...5 battery Pressing the battery chamber latch to the right q insert a fingernail into the gap and open the battery chamber w Ensure that the battery is inserted in the correct orientation r Wireless Remote Controller WR R10 WR T10 When a WR R10 wireless remote controller is attached the camera can be controlled wirelessly using a WR T10 wireless remote controller WirelessRemoteControllerWR 1 WR 1 u...

Страница 325: ...keep the orange battery latch pressed to one side The latch locks the connector in place when the connector is fully inserted 3 Close the battery chamber cover Position the power connector cable so that it passes through the power connector slot and close the battery chamber cover 4 Connect the AC adapter Connect the AC adapter power cable to the AC socket on AC adapter e and the EP 5B power cable...

Страница 326: ...se damage not covered under warranty Lens mirror and viewfinder These glass elements are easily damaged Remove dust and lint with a blower If using an aerosol blower keep the can vertical to prevent the discharge of liquid To remove fingerprints and other stains apply a small amount of lens cleaner to a soft cloth and clean with care Monitor Remove dust and lint with a blower When removing fingerp...

Страница 327: ... is turned on or off CleanNow 1 Select Clean image sensor in the setup menu Press the G button to display the menus Highlight Clean image sensor in the setup menu and press 2 2 Select Clean now The camera will check the image sensor and then begin cleaning This process takes about 10 seconds during this time P flashes in the control panel and other operations can not be performed Do not remove ord...

Страница 328: ...n The image sensor is cleaned automatically at startup and at shutdown Cleaning off Automatic image sensor cleaning off D Image Sensor Cleaning Using camera controls during startup interrupts image sensor cleaning Image sensor cleaning may not be performed at startup if the flash is charging Cleaning is performed by vibrating the low pass filter If dust can not be fully removed using the options i...

Страница 329: ...urn the camera off and insert a fully charged EN EL15 battery or connect an optional EP 5B power connector and EH 5b AC adapter The Lock mirror up for cleaning option is only available in the setup menu at battery levels over J 2 Remove the lens Turn the camera off and remove the lens 3 Select Lock mirror up for cleaning Turn the camera on and press the G button to display the menus Highlight Lock...

Страница 330: ...the low pass filter examine the filter for dust or lint If no foreign objects are present proceed to Step 8 7 Clean the filter Remove any dust and lint from the filter with a blower Do not use a blower brush as the bristles could damage the filter Dirt that can not be removed with a blower can only be removed by Nikon authorized service personnel Under no circumstances should you touch or wipe the...

Страница 331: ...ring production and shipping The D610 however is designed to be used with interchangeable lenses and foreign matter may enter the camera when lenses are removed or exchanged Once inside the camera this foreign matter may adhere to the low pass filter where it may appear in photographs taken under certain conditions To protect the camera when no lens is in place be sure to replace the body cap prov...

Страница 332: ...e product or remove the battery while the product is on or while images are being recorded or deleted Forcibly cutting power in these circumstances could result in loss of data or in damage to product memory or internal circuitry To prevent an accidental interruption of power avoid carrying the product from one location to another while the AC adapter is connected Cleaning When cleaning the camera...

Страница 333: ...y with a soft cloth or chamois leather Should the monitor break care should be taken to avoid injury from broken glass and to prevent liquid crystal from the monitor touching the skin or entering the eyes and mouth Replace the monitor cover when transporting the camera or leaving it unattended Batteries Batteries may leak or explode if improperly handled Observe the following precautions when hand...

Страница 334: ...ant occasions ready a spare EN EL15 battery and keep it fully charged Depending on your location it may be difficult to purchase replacement batteries on short notice Note that on cold days the capacity of batteries tends to decrease Be sure the battery is fully charged before taking photographs outside in cold weather Keep a spare battery in a warm place and exchange the two as necessary Once war...

Страница 335: ...1 Color space1 Active D Lighting1 3 3 2 2 3 3 3 3 HDR high dynamic range 1 2 Vignette control 1 Long exposure NR1 High ISO NR1 ISO sensitivity settings1 2 4 4 4 4 4 4 4 Remote control mode1 Multiple exposure1 2 Interval timer shooting1 Time lapse photography1 Movie settings1 Other settings 2 Autofocus mode viewfinder 5 5 5 5 5 5 5 AF area mode viewfinder 5 5 5 5 5 5 5 AF mode Live view movie 5 5 5...

Страница 336: ...mpensation b4 Center weighted area b5 Fine tune optimal exposure c1 Shutter release button AE L c2 Standby timer c3 Self timer c4 Monitor off delay c5 Remote on duration d1 Beep d2 Viewfinder grid display d3 ISO display and adjustment d4 Screen tips d5 CL mode shooting speed d6 Max continuous release d7 File number sequence d8 Information display d9 LCD illumination d10 Exposure delay mode2 d11 Fl...

Страница 337: ... cntrl for built in flash Optional flash e4 Exposure comp for flash e5 Modeling flash e6 Auto bracketing set e7 Bracketing order f1 OK button shooting mode f2 Assign Fn button f3 Assign preview button f4 Assign AE L AF L button f5 Customize command dials f6 Release button to use dial f7 Slot empty release lock f8 Reverse indicators f9 Assign MB D14 4 button g1 Assign Fn button g2 Assign preview bu...

Страница 338: ... Large 95 Image area Auto DX crop On 89 Choose image area FX 36 24 90 JPEG compression Size priority 94 NEF RAW recording Type Lossless compressed 94 NEF RAW bit depth 14 bit White balance Auto Normal 115 Fine tuning A B 0 G M 0 117 Choose color temp 5000 K 120 Preset manual d 1 121 Set Picture Control Standard 129 Auto distortion control Off 217 Color space sRGB 217 Active D Lighting P S A M 1 2 ...

Страница 339: ...en tips On 229 d5 CL mode shooting speed 3 fps 229 d6 Max continuous release 100 230 d7 File number sequence On 230 d8 Information display Auto 231 d9 LCD illumination Off 231 d10 Exposuredelay mode Off 231 d11 Flash warning On 231 d12 MB D14battery type LR6 AA alkaline 232 d13 Battery order Use MB D14 batteries first 233 e1 Flash sync speed 1 200 s 234 e2 Flash shutter speed 1 60 s 235 e3 Flash c...

Страница 340: ...50 Manual 0 Clean image sensor Clean at startup shutdown Clean at startup shutdown 301 HDMI Output resolution Auto 205 Device control On Flicker reduction Auto 252 Time zone and date Daylight saving time Off 253 Auto imagerotation On 254 GPS Standby timer Enable 175 Use GPS to set camera clock Yes Eye Fi upload Enable 260 Option Default 0 ...

Страница 341: ...en matrix metering is used values over 161 3 EV are reduced to 161 3 EV f 1 4 f 1 f 2 f 2 8 f 4 f 5 6 f 8 f 11 f 16 f 22 f 32 4 5 3 1 2 1 3 2 1 0 1 2 3 4 5 6 7 8 9 1 0 1 1 30 15 8 4 2 1 2 4 8 15 30 60 125 250 500 1000 2000 4000 8000 2 2 2 1 2 0 1 9 1 8 1 7 1 6 1 5 1 4 EV 2 3 1 6 1 3 f 1 4 f 16 ISO 100 lens with maximum aperture of f 1 4 and minimum aperture of f 16 e g AF S NIKKOR 50mm f 1 4G Shut...

Страница 342: ...a that have already been recorded will not be affected by removing or disconnecting the power source Viewfinder is out of focus Adjust viewfinder focus or use optional eyepiece correction lenses 0 33 297 Viewfinder is dark Insert a fully charged battery 0 21 35 Displays turn off without warning Choose longer delays for Custom Setting c2 Standby timer or c4 Monitor off delay 0 227 228 Control panel...

Страница 343: ...ime selected for Custom Setting c5 Remote on duration 0 228 has elapsed press camera shutter release button halfway Bright light is interfering with remote Photos are out of focus Rotate focus mode selector to AF 0 97 Camera unable to focus using autofocus use manual focus or focus lock 0 102 103 Focus does not lock when shutter release button is pressed halfway Use A AE L AF L button to lock focu...

Страница 344: ...tor may become hot with continued use wait for lamp to cool down Smudges appear in photographs Clean front and rear lens elements If problem persists perform image sensor cleaning 0 301 Sound is not recorded with movies Microphone off is selected for Movie settings Microphone The brightness of the image in the monitor differs from the exposure of photographs taken in live view Center weighted or s...

Страница 345: ...an not measure white balance Subject is too dark or too bright 0 123 Imagecannotbe selected assourceforpresetwhite balance Image was not created with D610 0 124 White balance bracketing unavailable NEF RAW or NEF JPEG image quality option selected for image quality 0 93 Multiple exposure mode is in effect 0 163 Effects of Picture Control differ from image to image A auto is selected for sharpening...

Страница 346: ...ure is not displayed on TV Choose correct video mode 0 65 or output resolution 0 205 HDMI 0 204 cable is not correctly connected Camera does not respond to remote control forHDMI CEC television Select On for HDMI Device control in the setup menu 0 205 Adjust HDMI CEC settings for the television as described in documentation provided with the device Can not transfer photos to computer OS not compat...

Страница 347: ... 27 253 Menu item can not be selected Some options are not available at certain combinations of settings or when no memory card is inserted Note that Battery info option is not available when camera is powered by an optional EP 5B power connector and EH 5b AC adapter 0 255 ...

Страница 348: ...tative An extremely exhausted rechargeable Li ion battery or a third party battery is inserted either in the camera or in the optional MB D14 battery pack Replace the battery or recharge the battery if the rechargeable Li ion battery is exhausted F No lens attached or non CPU lens attached without specifying maximum aperture Aperture shown in stops from maximum aperture Aperture value will be disp...

Страница 349: ...de M 76 78 flashes selected in mode S Change shutter speed or select mode M 76 78 P flashes k flashes Images are being processed Wait until processing is complete c flashes If indicator flashes for 3s after flash fires photo may be underexposed Check photo in monitor if underexposed adjust settings and try again 177 n flashes j flashes Memory insufficient to record further photos at current settin...

Страница 350: ...ce and format card or insert new card 29 31 193 Memory card is locked Slide lock to write position W X flashes Memory card is locked write protected Slide card write protect switch to write position 32 Not available if Eye Fi card is locked W O flashes Eye Fi card is locked write protected This card is not formatted Format the card C flashes Memory card has not beenformattedforusein camera Formatm...

Страница 351: ...retouched Images created with other devices can not be retouched 262 Thismoviecannotbe edited The selected movie can not be edited Movies created with other devices can not be edited Movies must be at least two seconds long 71 Check printer Printer error Check printer To resume select Continue if available 196 Check paper Paper in printer is not of selected size Insert paper of correct size and se...

Страница 352: ... 4 normal approx 1 8 or basic approx 1 16 compression Size priority Optimal quality compression available NEF RAW JPEG Single photograph recorded in both NEF RAW and JPEG formats Picture Control System Standard Neutral Vivid Monochrome Portrait Landscape selected Picture Control can be modified storage for custom Picture Controls Media SD Secure Digital and UHS I compliant SDHC and SDXC memory car...

Страница 353: ...1 2 EV bulb time requires optional ML L3 remote control X200 Flash sync speed X 1 200 s synchronizes with shutter at 1 250 s or slower flash range drops at speeds between 1 200 and 1 250 s Release Release mode S single frame CL continuous low speed CH continuous high speed J quiet shutter release M quiet continuous shutter release E self timer 4 remote control MUP mirror up Frame advance rate 1 5 ...

Страница 354: ...valent below ISO 100 or to approx 0 3 0 5 0 7 1 or 2 EV ISO 25600 equivalent above ISO 6400 auto ISO sensitivity control available Active D Lighting Auto Extra high High Normal Low Off Focus Autofocus Nikon Multi CAM 4800 autofocus sensor module with TTL phase detection fine tuning 39 focus points including 9 cross type sensors the center 33 points are available at apertures slower than f 5 6 and ...

Страница 355: ...nits except SB 400 and SB 300 Flash Color Information Communication and FV lock supported with all CLS compatible flash units Sync terminal AS 15 sync terminal adapter available separately White balance White balance Auto 2 types incandescent fluorescent 7 types direct sunlight flash cloudy shade preset manual up to 4 values can be stored choose color temperature 2500 K 10000 K all with fine tunin...

Страница 356: ...HDMI connector Accessory terminal Remote cord MC DC2 available separately GPS unit GP 1 GP 1A available separately Audio input Stereo mini pin jack 3 5mm diameter plug in power supported Audio output Stereo mini pin jack 3 5 mm diameter Supported languages Supported languages Arabic Chinese Simplified and Traditional Czech Danish Dutch English Finnish French German Greek Hindi Hungarian Indonesian...

Страница 357: ...argeable Li ion batteries Charging time Approx 2 hours and 35 minutes at an ambient temperature of 25 C 77 F when no charge remains Operating temperature 0 C 40 C 32 F 104 F Dimensions W H D Approx 91 5 33 5 71 mm 3 6 1 3 2 8 in excluding projections Length of power cable Approx 1 8 m 6 ft U S A and Canada or 1 5 m 4 9 ft other countries Weight Approx 110 g 3 9 oz excluding power cable and AC wall...

Страница 358: ... better OS Pre installed versions of Windows 8 Windows 7 Windows Vista and Windows XP note that 64 bit versions of Windows XP are not supported OS X 10 8 or 10 7 Mac OS X 10 6 Memory RAM 32 bit Windows 8 Windows 7 or Windows Vista 1 GB or more 2 GB or more recommended 64 bit Windows 8 Windows 7 or Windows Vista 2 GB or more 4 GB or more recommended Windows XP 512 MB or more 2 GB or more recommende...

Страница 359: ...printer without first transferring them to a computer HDMI High Definition Multimedia Interface is a standard for multimedia interfaces used in consumer electronics and AV devices capable of transmitting audiovisual data and control signals to HDMI compliant devices via a single cable connection Trademark Information Mac OS and OS X are registered trademarks of Apple Inc in the United States and o...

Страница 360: ...ard readers or other devices with which the card will be used are SDHC compliant The camera supports UHS 1 3 Check that any card readers or other devices with which the card will be used are SDXC compliant The camera supports UHS 1 Other cards have not been tested For more details on the above cards please contact the manufacturer SD cards SDHC cards 2 SDXC cards3 SanDisk 2 GB1 4 GB 8 GB 16 GB 32 ...

Страница 361: ...ected for Auto DX crop Image quality Image size File size1 No of images1 Buffer capacity2 NEF RAW Lossless compressed 12 bit 23 4 MB 190 21 NEF RAW Lossless compressed 14 bit 29 2 MB 147 14 NEF RAW Compressed 12 bit 20 7 MB 258 26 NEF RAW Compressed 14 bit 25 4 MB 215 14 JPEG fine3 Large 12 4 MB 506 51 Medium 7 4 MB 853 100 Small 3 8 MB 1600 100 JPEG normal3 Large 6 2 MB 1000 90 Medium 3 7 MB 1600...

Страница 362: ... file size of JPEG images number of images and buffer capacity drop accordingly Image quality Image size File size1 No of images1 Buffer capacity2 NEF RAW Lossless compressed 12 bit 10 9 MB 426 55 NEF RAW Lossless compressed 14 bit 13 4 MB 332 34 NEF RAW Compressed 12 bit 9 7 MB 571 73 NEF RAW Compressed 14 bit 11 7 MB 480 54 JPEG fine 3 Large 5 9 MB 1000 100 Medium 3 7 MB 1700 100 Small 2 2 MB 29...

Страница 363: ...Live view not used 2 Measured at 20 C 68 F with an AF S NIKKOR 24 85mm f 3 5 4 5G ED VR lens under the following test conditions image quality set to JPEG basic image size set to M medium shutter speed 1 250 s shutter release button pressed halfway for three seconds and focus cycled from infinity to minimum range three times six shots are then taken in succession and monitor turned on for five sec...

Страница 364: ...ting set 153 241 AE lock 110 AE only Auto bracketing set 153 241 AE L AF L button 102 110 244 248 AF 51 52 97 102 AF area brackets 8 33 AF fine tune 259 AF point illumination 222 AF A 97 AF area mode 52 99 AF assist 223 290 296 AF C 97 221 AF F 51 AF mode button 51 52 98 100 AF S 51 97 221 After delete 212 A M mode switch 26 Ambient brightness sensor 4 53 250 Angle of view 291 Aperture 74 77 78 Ap...

Страница 365: ...sure program 315 External microphone 61 65 Eye Fi upload 260 F Face priority AF 52 File naming 216 File number sequence 230 Filter effects 132 133 267 Fine tune optimal exposure 226 Fine tuning white balance 117 Firmware version 260 Fisheye 274 Flash 39 143 144 148 149 292 Flash White balance 115 Flash bracketing 153 241 Flash cntrl for built in flash 236 Flash compensation 148 Flash mode 144 145 ...

Страница 366: ...ng 271 NEF RAW recording 94 Neutral Set Picture Control 129 Nikon Transfer 2 193 194 Non CPU lens 172 285 288 Non CPU lens data 172 Normal area AF 52 Number of focus points 223 Number of shots 337 O OK button shooting mode 241 Optimal quality JPEG compression 94 Optional flash 237 292 Output resolution HDMI 205 Overflow Role played by card in Slot 2 96 Overview data 184 P Page size PictBridge 198 ...

Страница 367: ...45 Smoothing 141 Soft Filter effects 267 Speaker 3 4 Speedlight 292 Spot 109 sRGB 217 Standard Set Picture Control 129 Standard i TTL flash for digital SLR 146 Standby timer 39 175 227 Start printing PictBridge 198 201 Storage folder 215 Straighten 274 Sub command dial 12 Subject tracking AF 52 T Television 204 Thumbnail playback 185 Time 253 Time stamp PictBridge 198 Time zone 27 253 Time zone an...

Страница 368: ...m of this manual in whole or in part except for brief quotation in critical articles or reviews may be made without written authorization from NIKON CORPORATION Printed in Thailand 6MB19511 01 DIGITAL CAMERA User s Manual En En ...

Отзывы: