background image

150

u

Creating Retouched Copies

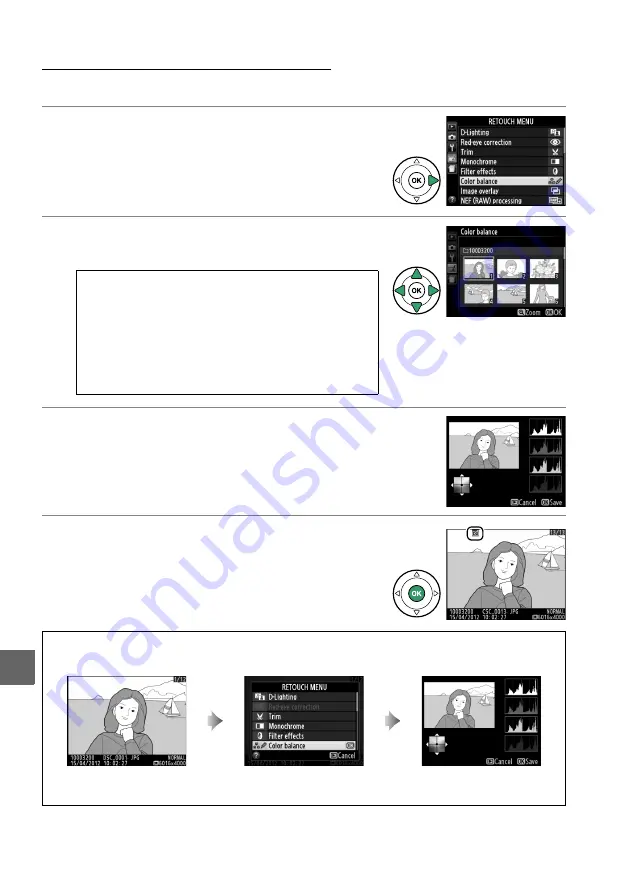
To create a retouched copy:

1

Display retouch options.

Highlight the desired item in the retouch menu 
and press 

2

.

2

Select a picture.

Highlight a picture and press 

J

.

3

Select retouch options.

For more information, see the section for the 
selected item. To exit without creating a 
retouched copy, press 

G

.

4

Create a retouched copy.

Press 

J

 to create a retouched copy. Except in the 

photo information “image only” page (

0

98), 

retouched copies are indicated by a 

N

 icon.

A

Retouch

The camera may not be able to display or retouch 
images created with other devices. If the image was 
recorded at an image quality setting of 

NEF (RAW) + 

JPEG fine

 (

0

44), retouch options apply only to the 

JPEG copy (

Image overlay

 and 

NEF (RAW) 

processing

 excepted).

A

Creating Retouched Copies During Playback

Retouched copies can also be created during playback.

Display picture full frame and 

press 

J

.

Highlight an option and 

press

J

.

Create retouched copy.

Содержание D3200

Страница 1: ......

Страница 2: ......

Страница 3: ......

Страница 4: ......

Страница 5: ......

Страница 6: ......

Страница 7: ......

Страница 8: ......

Страница 9: ......

Страница 10: ......

Страница 11: ......

Страница 12: ......

Страница 13: ......

Страница 14: ......

Страница 15: ......

Страница 16: ......

Страница 17: ......

Страница 18: ......

Страница 19: ......

Страница 20: ......

Страница 21: ......

Страница 22: ......

Страница 23: ......

Страница 24: ......

Страница 25: ......

Страница 26: ......

Страница 27: ......

Страница 28: ......

Страница 29: ......

Страница 30: ......

Страница 31: ......

Страница 32: ......

Страница 33: ......

Страница 34: ......

Страница 35: ......

Страница 36: ......

Страница 37: ......

Страница 38: ......

Страница 39: ......

Страница 40: ......

Страница 41: ......

Страница 42: ......

Страница 43: ......

Страница 44: ......

Страница 45: ......

Страница 46: ......

Страница 47: ......

Страница 48: ......

Страница 49: ......

Страница 50: ......

Страница 51: ......

Страница 52: ......

Страница 53: ......

Страница 54: ......

Страница 55: ......

Страница 56: ......

Страница 57: ......

Страница 58: ......

Страница 59: ......

Страница 60: ......

Страница 61: ......

Страница 62: ......

Страница 63: ......

Страница 64: ......

Страница 65: ......

Страница 66: ......

Страница 67: ......

Страница 68: ......

Страница 69: ......

Страница 70: ......

Страница 71: ......

Страница 72: ......

Страница 73: ......

Страница 74: ......

Страница 75: ......

Страница 76: ......

Страница 77: ......

Страница 78: ......

Страница 79: ......

Страница 80: ......

Страница 81: ......

Страница 82: ......

Страница 83: ......

Страница 84: ......

Страница 85: ......

Страница 86: ......

Страница 87: ......

Страница 88: ...DIGITAL CAMERA Reference Manual En ...

Страница 89: ...this manual assume that default settings are used Help Use the camera s on board help feature for help on menu items and other topics See page 9 for details Digitutor Digitutor a series of watch and learn manuals in movie form is available from the following website http www nikondigitutor com index_eng html A For Your Safety Before using the camera for the first time read the safety instructions ...

Страница 90: ...roduction 0 1 sBasic Photography 0 21 Guide Mode 0 27 zMore on Photography All Modes 0 31 tP S A and M Modes 0 53 xLive View 0 80 yRecording and Viewing Movies 0 88 IPlayback and Deletion 0 97 QConnections 0 111 oThe Playback Menu 0 125 iThe Shooting Menu 0 127 gThe Setup Menu 0 133 uThe Retouch Menu 0 149 wRecent Settings 0 166 nTechnical Notes 0 167 i i i i i ...

Страница 91: ...er or a remote control 33 Can I reduce shutter noise in quiet surroundings quiet shutter release 31 Focus Can I choose how the camera focuses 35 36 Can I choose the focus point 40 Image Quality and Size How do I take pictures for printing at large sizes 44 46 How can I get more pictures on the memory card Exposure Can I make photos brighter or darker 63 How do I preserve details in shadows and hig...

Страница 92: ...r 20 Can I display a framing grid in the monitor 85 How do I set the camera clock 16 137 How do I format memory cards 19 How do I restore default settings 128 134 Is there any way to stop the camera beeping 141 How do I get help for a menu or message 9 193 Connections 0 How do I copy photos to a computer 111 113 How do I print photos 114 121 Can I print the date of recording on my photos 116 121 1...

Страница 93: ... Battery 12 Insert the Battery 13 Attach a Lens 14 Basic Setup 16 Insert a Memory Card 18 Format the Memory Card 19 Adjust Viewfinder Focus 20 Basic Photography 21 Battery Level and Card Capacity 21 Point and Shoot Photography i and j Modes 22 Creative Photography Scene Modes 25 k Portrait 25 l Landscape 25 p Child 25 m Sports 26 n Close up 26 o Night Portrait 26 Guide Mode 27 The Guide 27 Guide M...

Страница 94: ... 53 Shutter Speed and Aperture 53 Mode P Programmed Auto 54 Mode S Shutter Priority Auto 55 Mode A Aperture Priority Auto 56 Mode M Manual 57 Exposure 60 Metering 60 Autoexposure Lock 61 Exposure Compensation 63 Flash Compensation 65 Preserving Detail in Highlights and Shadows 67 Active D Lighting 67 White Balance 69 Fine Tuning White Balance 71 Preset Manual 72 Picture Controls 76 Selecting a Pic...

Страница 95: ...Full Frame Thumbnail and Calendar Playback 106 The Playback Menu 107 Slide Shows 109 Connections 111 Connecting to a Computer 111 Before Connecting the Camera 111 Connecting the Camera 112 Printing Photographs 114 Connecting the Printer 114 Printing Pictures One at a Time 115 Printing Multiple Pictures 117 Creating a DPOF Print Order Print Set 120 Viewing Photographs on TV 122 Standard Definition ...

Страница 96: ...r Reduction 136 Time Zone and Date 137 Language 137 Image Comment 138 Auto Image Rotation 138 Image Dust Off Ref Photo 139 Auto off Timers 140 Self Timer 141 Remote on Duration 141 Beep 141 Rangefinder 142 File Number Sequence 142 Buttons 143 Slot Empty Release Lock 144 Print Date 144 Storage Folder 146 GPS 147 Eye Fi Upload 148 Firmware Version 148 N The Retouch Menu CreatingRetouchedCopies 149 C...

Страница 97: ...eedlights 172 The Nikon Creative Lighting System CLS 173 Other Accessories 176 Approved Memory Cards 177 Attaching a Power Connector and AC Adapter 178 Caring for the Camera 179 Storage 179 Cleaning 179 The Low Pass Filter 180 Caring for the Camera and Battery Cautions 184 Caring for the Camera 184 Caring for the Battery 185 Available Settings 187 Memory Card Capacity 188 Troubleshooting 189 Displ...

Страница 98: ...the battery take the equipment to a Nikon authorized service center for inspection ADo not use in the presence of flammable gas Do not use electronic equipment in the presence of flammable gas as this could result in explosion or fire AKeep out of reach of children Failure to observe this precaution could result in injury In addition note that small parts constitute a chocking hazard Should a chil...

Страница 99: ...ge remains When the battery is not in use attach the terminal cover and store in a cool dry place The battery may be hot immediately after use or when the product has been used on battery power for an extended period Before removing the battery turn the camera off and allow the battery to cool Discontinue use immediately should you notice any changes in the battery such as discoloration or deforma...

Страница 100: ...ian ICES 003 ATTENTION Cet appareil numérique de la classe B est conforme à la norme NMB 003 du Canada Notices for Customers in Europe This symbol indicates that this product is to be collected sepa rately The following apply only to users in European countries This product is designated for separate collection at an appropriate collection point Do not dispose of as household waste For more inform...

Страница 101: ...cuit different from that to which the receiver is connected Consult the dealer or an experienced radio television technician for help CAUTIONS Modifications The FCC requires the user be notified that any changes or modifications made to this device that are not expressly approved by Nikon Corporation may void the user s authority to operate the equipment Interface Cables Use the interface cables s...

Страница 102: ...creative works such as books music paintings woodcuts prints maps drawings movies and photographs is governed by national and international copyright laws Do not use this product for the purpose of making illegal copies or to infringe copyright laws Disposing of Data Storage Devices Please note that deleting images or formatting memory cards or other data storage devices does not completely erase ...

Страница 103: ...mmends that the camera be inspected by the original retailer or a Nikon authorized service representative once every one to two years and that it be serviced once every three to five years note that fees apply to these services Frequent inspection and servicing are particularly recommended if the camera is used professionally Any accessories regularly used with the camera such as lenses or optiona...

Страница 104: ... Movie record button 88 8 AF assist illuminator 37 Self timer lamp 33 Red eye reduction lamp 49 9 Infrared receiver front 33 10 Body cap 11 CPU contacts 12 Built in flash 47 13 M Y button Flash mode 47 Flash compensation 66 14 Speaker 92 15 Focal plane mark E 43 16 Eyelet for camera strap 17 Microphone 88 18 Connector cover 19 Fn button Using the Fn button 8 143 20 Mounting mark 14 21 Lens release...

Страница 105: ...ommand dial 7 14 a button Live view 80 Movie 88 15 Multi selector 10 16 Memory card slot cover 18 17 J OK button 10 18 I E button Release mode 31 Self timer 33 Remote control 33 19 Memory card access lamp 18 23 20 Power connector cover for optional power connector 178 21 Battery chamber cover latch 13 22 Battery chamber cover 13 23 O button Deleting pictures during playback 106 24 Battery latch 13...

Страница 106: ...p of an on screen guide Auto Modes Select these modes for simple point and shoot photography i Auto 0 22 j Auto flash off 0 22 Scene Modes The camera automatically optimizes settings to suit the scene selected with the mode dial Match your selection to the scene being photographed k Portrait 0 25 l Landscape 0 25 p Child 0 25 m Sports 0 26 n Close up 0 26 o Night portrait 0 26 A Scene Auto Selecto...

Страница 107: ...tor 72 Exposure compensation value 63 Flash compensation value 65 ISO sensitivity 51 8 K appears when memory remains for over 1000 exposures 21 9 Flash ready indicator 24 10 Flexible program indicator 54 11 Exposure indicator 57 Exposure compensation display 64 Electronic rangefinder 142 12 Flash compensation indicator 65 13 Exposure compensation indicator 63 14 Auto ISO sensitivity indicator 129 ...

Страница 108: ...tracking indicator 38 Focus point 40 7 Eye Fi connection indicator 148 8 Manual flash indicator 132 Flash compensation indicator for optional flash units 175 9 Print date indicator 144 10 Auto ISO sensitivity indicator 129 11 Active D Lighting 67 12 Picture Control 76 13 Beep indicator 141 14 Battery indicator 21 15 GPS connection indicator 147 16 Help icon 193 17 Exposure indicator 57 Exposure co...

Страница 109: ...ted 90 shooting information rotates to match camera orientation A The Shutter Speed and Aperture Displays These displays provide visual indications of shutter speed and aperture Fast shutter speed large aperture low f number Slow shutter speed small aperture high f number While the mode dial is rotated this display is replaced by an image of the mode dial A See Also For information on choosing a d...

Страница 110: ... of aperture and shutter speed mode P 0 54 Mode P Command dial Information display Choose a shutter speed mode S or M 0 55 57 Mode S or M Command dial Information display Choose an aperture mode A 0 56 Mode A Command dial Information display Choose an aperture mode M 0 57 Mode M E N button Command dial Information display Command dial M Y button Fn button Mode dial E N button ...

Страница 111: ...n mode P S A or M 0 65 P S A or M M Y button E N button Command dial Information display The role of the Fn button can be selected using the Buttons Assign Fn button option in the setup menu 0 143 allowing the following settings to be adjusted by pressing the Fn button and rotating the command dial Fn button Command dial Imagequality size 044 ISOsensitivity 051 Whitebalance 069 ActiveD Lighting 06...

Страница 112: ... d If a d icon is displayed at the bottom left corner of the monitor help can be displayed by pressing the W Q button A description of the currently selected option or menuwillbedisplayedwhilethebuttonispressed Press 1 or 3 to scroll through the display A Guide Mode To display the on screen guide rotate the mode dial to g 0 27 G button Slider shows position in current menu Current settings are sho...

Страница 113: ...the menus Press the G button to display the menus 2 Highlight the icon for the current menu Press 4 to highlight the icon for the current menu 3 Select a menu Press 1 or 3 to select the desired menu Select highlighted item or display sub menu Move cursor up Move cursor down J button select highlighted item Cancel and return to previous menu G button ...

Страница 114: ... 1 or 3 to highlight an option 8 Select the highlighted item Press J to select the highlighted item To exit without making a selection press the G button Note the following Menu items that are displayed in gray are not currently available While pressing 2 generally has the same effect as pressing J there are some cases in which selection can only be made by pressing J To exit the menus and return ...

Страница 115: ...Adapter Depending on the country or region of purchase a plug adapter may be supplied with the charger The shape of the adapter varies with the country or region of purchase If a plug adapter is supplied raise thewall plug and connect theplug adapter as shownat right making sure the plug is fully inserted Attempting to forcibly remove the plug adapter could damage the product D Charging the Batter...

Страница 116: ...rnings and cautions on pages ix x and 184 186 of this manual Do not use the battery at ambient temperatures below 0 C 32 F or above 40 C 104 F failure to observe this precaution could damage the battery or impair its performance Capacity may be reduced and charging times may increase at battery temperatures from 0 C 32 F to 15 C 59 F and from 45 C 113 F to 60 C 140 F If the CHARGE lamp flashes qui...

Страница 117: ...n the camera s bayonet mount q Being careful not to press the lens release button rotate the lens counter clockwise until it clicks into place w Slide the A M mode switch to A autofocus if the lens has an M A M mode switch select M A for autofocus with manual override D Autofocus Autofocus is supported with only AF S and AF I lenses which are equipped with autofocus motors Autofocus is not availab...

Страница 118: ...y sliding the vibration reduction switch to OFF Turn vibration reduction off when the camera is securely mounted on a tripod but leave it on if the tripod head is not secured or when using a monopod A Detaching the Lens Be sure the camera is off when removing or exchanging lenses To remove the lens press and hold the lens release button q while turning the lens clockwise w After removing the lens ...

Страница 119: ...time zone the UTC field shows the difference between the selected time zone and Coordinated Universal Time or UTC in hours and press J 4 Choose a date format Press 1 or 3 to choose the order in which the year month and day will be displayed Press J to proceed to the next step 5 Turn daylight saving time on or off Daylight saving time options will be displayed Daylight saving time is off by default...

Страница 120: ... message warning that the clock is not set is displayed when the camera is turned on the clock battery is exhausted and the clock has been reset Set the clock to the correct time and date A The Camera Clock The camera clock is less accurate than most watches and household clocks Check the clock regularly against more accurate time pieces and reset as necessary A The Setup Menu Language and date ti...

Страница 121: ...before inserting or removing memory cards D Inserting Memory Cards Inserting memory cards upside down or backwards could damage the camera or the card Check to be sure the card is in the correct orientation A Removing Memory Cards After confirming that the memory card access lamp is off turn the camera off open the memory card slot cover and press the card in to eject it q The card can then be rem...

Страница 122: ...Be sure to copy any photographs and other data you wish to keep to a computer before proceeding 0 111 D Memory Cards Memory cards may be hot after use Observe due caution when removing memory cards from the camera Turn the power off before inserting or removing memory cards Do not remove memory cards from the camera turn the camera off or remove or disconnect the power source during formatting or ...

Страница 123: ...ur eye to the viewfinder be careful not to put your fingers or fingernails in your eye A Adjusting Viewfinder Focus If you are unable to focus the viewfinder as described above select single servo autofocus AF S 0 35 single point AF c 0 38 and the center focus point 0 40 and then frame a high contrast subject in the center focus point and press the shutter release button halfway to focus the camer...

Страница 124: ...he information displayandviewfindershowthe number of photographs that can be taken at current settings values over 1 000 are rounded down to the nearest hundred e g values between 1 200 and 1 299 are shown as 1 2 K If a warning is displayed stating that there is not enough memory for additional photographs insert another memory card 0 18 or delete some photos 0 106 Battery Level and Card Capacity ...

Страница 125: ...uto flash off mode by rotating the mode dial to j Otherwise rotate the dial to i auto 3 Ready the camera When framing photographs in the viewfinder hold the handgrip in your right hand and cradle the camera body or lens with your left Keep your elbows propped lightly against your torso for support and place one foot half a pace ahead of the other to keep your upper body stable When framing photogr...

Страница 126: ...0 32 will be displayed in the viewfinder 7 Shoot Smoothly press the shutter release button the rest of the way down to release the shutter and record the photograph The memory card access lamp will light and the photograph will be displayed in the monitor for a few seconds the photo will automatically clear from the display when the shutter release button is pressed halfway Do not eject the memory...

Страница 127: ...ure meters on A The Built in Flash If additional lighting is required for correct exposure in i mode the built in flash will pop up automatically when the shutter release button is pressed halfway 0 47 If the flash is raised photographs can only be taken when the flash ready indicator M is displayed If the flash ready indicator is not displayed the flash is charging remove your finger briefly from...

Страница 128: ...dial kPortrait Use for portraits with soft natural looking skin tones If the subject is far from the background or a telephoto lens is used background details will be softened to lend the composition a sense of depth lLandscape Use for vivid landscape shots in daylight The built in flash and AF assist illuminator turn off useof a tripod is recommended to prevent blur when lighting is poor pChild U...

Страница 129: ...ator turn off nCloseup Use for close up shots of flowers insects and other small objects a macro lens can be used to focus at very close ranges Use of a tripod is recommended to prevent blur o NightPortrait Use for a natural balance between the main subject and the background in portraits taken under low light Use of a tripod is recommended to prevent blur ...

Страница 130: ...guide is displayed when the mode dial is rotated to g The Guide Choose from the following items Shoot View delete Set up Take pictures View and or delete pictures Change camera settings Battery indicator 0 21 Shootingmode A guide mode indicator appears on the shooting mode icon Number of exposures remaining 0 21 ...

Страница 131: ...pture the colors in sunsets 7 Landscapes 6 Portraits Take bright photos Adjust exposure compensation to take bright high key or dark low key photos Night portrait Take dark low key photos Reduce blur Adjust auto ISO sensitivity control for poorly lit subjects or telephoto lenses Highlight an option and press J Use the viewfinder Use live view Shoot movies If More settings is displayed you can high...

Страница 132: ...os Choose a date View a slide show Delete photos Image quality Image size Auto off timers Print date Display and sound settings Monitor brightness Info background color Auto info display Beep Movie settings Frame size frame rate Movie quality Microphone Flicker reduction Output settings HDMI Video mode Playback folder Playback display options DPOF print order Clock and language Time zone and date ...

Страница 133: ...ions in displays like that shown at right Select highlighted menu or option Press J to select the highlighted menu or option Return to previous display Press 4 to return to the previous display To cancel and return to the previous display from displays like that shown at right highlight and press J View help W Q button If a d icon is displayed at the bottom left corner of the monitor help can be d...

Страница 134: ...Self timer Use self timer for self portraits or to reduce blurring caused by camera shake 0 33 Delayed remote Shutter is released 2 s after shutter release button on optional ML L3 0 177 remote control is pressed 0 33 Quick responseremote Shutter is released when shutter release button on optional ML L3 0 177 remote control is pressed 0 33 J Quietshutterrelease As for single frame except that mirr...

Страница 135: ...ot turn off until all images in the buffer have been recorded If the battery is exhausted while images remain in the buffer the shutter release will be disabled and the images transferred to the memory card A Continuous Release Mode Continuous release mode I can not be used with the built in flash rotate the mode dial to j 0 22 or turn the flash off 0 47 49 For information on the number of photogr...

Страница 136: ... halfway to focus and then press the button the rest of the way down The self timer lamp will start to flash and a beep will begin to sound Two seconds before the photo is taken the lamp will stop flashing and the beeping will become more rapid The shutter will be released ten seconds after the timer starts Remote control mode From a distance of 5 m 16 ft or less aim the transmitter on the ML L3 a...

Страница 137: ...ce the flash has charged In auto or scene modes in which the flash pops up automatically the flash will begin charging when a remote control mode is selected once the flash is charged it will automatically pop up and fire when required In flash modes that support red eye reduction the red eye reduction lamp will light for about one second before the shutter is released in quick response remote mod...

Страница 138: ...ay focus mode options Highlight the current focus mode in the information display and press J 3 Choose a focus mode Highlight a focus mode and press J To return to shooting mode press the shutter release button halfway Option Description AF A Auto servo AF Camera automatically selects single servo autofocus if subject is stationary continuous servo autofocus if subject is moving Shutter can only b...

Страница 139: ...nable to focus under these conditions or the in focus indicator I may be displayed and the camera may sound a beep allowing the shutter to be released even when the subject is not in focus In these cases focus manually 0 42 or use focus lock 0 40 to focus on another subject at the same distance and then recompose the photograph There is little or no contrast between the subject and the background ...

Страница 140: ...ode 0 38 40 In shooting modes in which the AF assist illuminator can not be used 0 187 If Off has been selected for the Built in AF assist illuminator option in the shooting menu 0 131 The illuminator has a range of about 0 5 3 0 m 1 ft 8 in 9 ft 10 in when using the illuminator use a lens with a focal length of 18 200 mm and remove the lens hood The AF assist illuminator will turn off automatical...

Страница 141: ...us point only Use with stationary subjects d Dynamic area AF InAF AandAF Cfocusmodes user selects focus point using multi selector 0 40 but camera will focus based on information from surrounding focus points if subject briefly leaves selected point Use with erratically moving subjects f 3D tracking 11 points InAF AandAF Cfocusmodes user selects focus point using multi selector 0 40 If subject mov...

Страница 142: ...in the shooting menu 0 127 AF area mode selections made in shooting modes other than P S A or M are reset when another shooting mode is selected A 3D tracking 11 Points When the shutter release button is pressed halfway the colors in the area surrounding the focus point are stored in the camera Consequently 3D tracking may not produce the desired results with subjects that are the same color as th...

Страница 143: ...ocus Lock Focus lock can be used to change the composition after focusing in AF A AF S and AF C focus modes 0 35 making it possible to focus on a subject that will not be in a focus point in the final composition If the camera is unable to focus using autofocus 0 36 focus lock can also be used to recompose the photograph after focusing on another object at the same distance as your original subjec...

Страница 144: ... finger from the shutter release button Focus can also be locked by pressing the A L button see above 3 Recompose the photograph and shoot Focus will remain locked between shots if you keep the shutter release button pressed halfway AF S or keep the A L button pressed allowing several photographs in succession to be taken at the same focus setting Do not change the distance between the camera and ...

Страница 145: ...not in focus TheElectronicRangefinder If the lens has a maximum aperture of f 5 6 or faster the viewfinder focus indicator can be used to confirm whether the subject in the selected focus point is in focus the focus point can be selected from any of the 11 focus points After positioning the subject in the selected focus point press the shutter release button halfway and rotate the lens focus ring ...

Страница 146: ...he mode selected with the lens A Focal Plane Position To determine the distance between your subject and the camera measure from the focal plane mark on the camera body The distance between the lens mounting flange and the focal plane is 46 5 mm 1 83 in A The Exposure Indicator If desired the exposure indicator can be used to determine whether the focus point for manual focus is in front of or beh...

Страница 147: ...options Highlight the current image quality in the information display and press J 3 Choose a file type Highlight an option and press J To return to shooting mode press the shutter release button halfway Option File type Description NEF RAW JPEG fine NEF JPEG Two images are recorded one NEF RAW image and one fine quality JPEG image NEF RAW NEF Raw 12 bit data from the image sensor are saved direct...

Страница 148: ... 2 CD JPEG copies of NEF RAW images can be created using the NEF RAW processing option in the retouch menu 0 157 A NEF RAW JPEG Fine When photographs taken at NEF RAW JPEG fine are viewed on the camera only the JPEG image will be displayed When photographs taken at these settings are deleted both NEF and JPEG images will be deleted A The Shooting Menu Image quality can also be adjusted using the I...

Страница 149: ...turn to shooting mode press the shutter release button halfway Image size Size pixels Print size cm in Large 6 016 4 000 50 9 33 9 20 1 13 3 Medium 4 512 3 000 38 2 25 4 15 10 Small 3 008 2 000 25 5 16 9 10 6 7 Approximate size when printed at 300 dpi Print size in inches equals image size in pixels divided by printer resolution in dots per inch dpi 1 inch approximately 2 54 cm A The Shooting Menu...

Страница 150: ...nd fire when a photograph is taken If the flash does notpopupautomatically DO NOT attempttoraiseit by hand Failure to observe this precaution could damage the flash UsingtheBuilt inFlash P S A andMModes 1 Raise the flash Press the M Y button to raise the flash 2 Choose a flash mode 0 48 3 Take pictures The flash will fire whenever a picture is taken A Lowering the Built in Flash To save power when...

Страница 151: ...de in the information display and press J 3 Choose a flash mode Highlight a mode and press J To return to shooting mode press the shutter release button halfway i k p n o No Auto NYr Auto slow sync red eye NYo Auto red eye reduction Nr Auto slow sync j Flash off j Flash off P A S M N Fill flash N Fill flash NY Red eye reduction NY Red eye reduction NYp Slow sync red eye Nq Rear curtain sync Np Slo...

Страница 152: ...ight behind moving light sources below at right If this icon is not displayed flash will fire as the shutter opens front curtain sync the effect this produces with moving light sources is shown below at left Front curtain sync Rear curtain sync A Choosing a Flash Mode The flash mode can also be selected by pressing the M Y button and rotating the command dial in P S A and M modes raise the flash b...

Страница 153: ...ync and slow sync red eye reduction modes A Aperture Sensitivity and Flash Range Flash range varies with sensitivity ISO equivalency and aperture Aperture at ISO equivalent of Approximate range 100 200 400 800 1600 3200 6400 m ft 1 4 2 2 8 4 5 6 8 11 1 0 8 5 3ft 3in 27ft 11n 2 2 8 4 5 6 8 11 16 0 7 6 0 2ft 4in 19ft 8in 2 8 4 5 6 8 11 16 22 0 6 4 2 2ft 13ft 9in 4 5 6 8 11 16 22 32 0 6 3 0 2ft 9ft 1...

Страница 154: ...ty automatically in response to lighting conditions 1 Place the cursor in the information display If shooting information is not displayed in the monitor press the P button Press the P button again to place the cursor in the information display 2 Display ISO sensitivity options Highlight the current ISO sensitivity in the information display and press J 3 Choose an ISO sensitivity Highlight an opt...

Страница 155: ...y option in the shooting menu the value selected for Maximum sensitivity 0 129 will be used instead A The Shooting Menu ISO sensitivity can also be adjusted using the ISO sensitivity settings option in the shooting menu 0 127 A See Also For information on enabling auto ISO sensitivity control in P S A or M modes see page 129 For information on using the Noise reduction option in the shooting menu ...

Страница 156: ...ackground into focus M Manual 0 57 User controls both shutter speed and aperture Set shutter speed to Bulb or Time for long time exposures D Lens Aperture Rings When using a CPU lens equipped with an aperture ring 0 168 lock the aperture ring at the minimum aperture highest f number Type G lenses are not equipped with an aperture ring A Shutter Speed and Aperture The same exposure can be achieved ...

Страница 157: ...ure can be selected by rotating the commanddial flexible program Rotate the dial to the right for large apertures low f numbers that blur background details or fast shutter speeds that freeze motion Rotate the dial to the left for small apertures high f numbers that increase depth of field or slow shutter speeds that blur motion All combinations produce the same exposure While flexible program is ...

Страница 158: ...ing moving subjects fast shutter speeds to freeze motion To take photographs in shutter priority auto 1 Rotate the mode dial to S 2 Choose a shutter speed Shutter speed is shown in the viewfinder and information display Rotate the command dial to choose the desired shutter speed from values between 30 s and 1 4 000 s 3 Frame a photograph focus and shoot Fast shutter speed 1 1 600 s Slow shutter sp...

Страница 159: ... the background and foreground Short field depths are generally used in portraits to blur background details long field depths in landscape photographs to bring the foreground and background into focus To take photographs in aperture priority auto 1 Rotate the mode dial to A 2 Choose an aperture Aperture is shown in the viewfinder and information display Rotate the command dial to choose the desir...

Страница 160: ...the command dial choose from values between the minimum and maximum for the lens Shutter speed and aperture are shown in the viewfinder and information display 3 Frame a photograph focus and shoot Shutter speed Aperture Command dial E N button Command dial A The Exposure Indicator If a CPU lens is attached and a shutter speed other than Bulb or Time is selected the exposure indicator in the viewfi...

Страница 161: ...level surface To prevent light entering via the viewfinder interfering with exposure remove the rubber eyecup and cover the viewfinder with the supplied DK 5 eyepiece cap 0 34 To prevent loss of power before the exposure is complete use a fully charged EN EL14 battery or an optional EH 5b AC adapter and EP 5A power connector Note that noise bright spots randomly spaced bright pixels or fog may be ...

Страница 162: ... way down Keep the shutter release button pressed until the exposure is complete Time Press the ML L3 shutter release button all the way down 5 Close the shutter Bulb Take your finger off the shutter release button Time Press the ML L3 shutter release button all the way down Shooting ends automatically after thirty minutes ...

Страница 163: ...ra uses 420 pixel RGB sensor to meter a wide area of the frame and set exposure according to tone distribution color composition and with type G or D lenses 0 168 distance information 3D color matrix metering II with other CPU lenses the camera uses color matrix metering II which does not include 3D distance information M Center weighted metering Camera meters entire frame but assigns greatest wei...

Страница 164: ... I appears in the viewfinder 2 Lock exposure With the shutter release button pressed halfway q and the subject positioned in the focus point press the A L button w to lock exposure While exposure lock is in effect an AE L indicator will appear in the viewfinder 3 Recompose the photograph Keeping the A L button pressed recompose the photograph and shoot A Autoexposure Lock If On is selected for But...

Страница 165: ...e While exposure lock is in effect the following settings can be adjusted without altering the metered value for exposure Mode Setting Programmed auto Shutter speed and aperture flexible program 0 54 Shutter priority auto Shutter speed Aperture priority auto Aperture The metering method itself can not be changed while exposure lock is in effect ...

Страница 166: ... 1 Place the cursor in the information display If shooting information is not displayed in the monitor press the P button Press the P button again to place the cursor in the information display 2 Display exposure compensation options Highlight exposure compensation in the information display and press J 3 Choose a value Highlight a value and press J To return to shooting mode press the shutter rel...

Страница 167: ...lected value is shown in the viewfinder and information display E N button Command dial 0 3 EV 2 EV A Mode M In mode M exposure compensation affects only the exposure indicator shutter speed and aperture do not change A Using a Flash When a flash is used exposure compensation affects both background exposure and flash level ...

Страница 168: ...he cursor in the information display If shooting information is not displayed in the monitor press the P button Press the P button again to place the cursor in the information display 2 Display flash compensation options Highlight flash compensation in the information display and press J 3 Choose a value Highlight a value and press J To return to shooting mode press the shutter release button half...

Страница 169: ...ton Command dial 0 3 EV 1 EV A Optional Flash Units Flash compensation is also available with optional flash units that support the Nikon Creative Lighting System CLS see page 173 The SB 910 SB 900 SB 800 SB 700 and SB 600 also allow flash compensation to be set using the controls on the flash unit The flash compensation selected with the optional flash unit is added to the flash compensation sele...

Страница 170: ...n photographing brightly lit outdoor scenery through a door or window or taking pictures of shaded subjects on a sunny day It is most effective when used with L Matrix metering 0 60 1 Display Active D Lighting options Press the G button to display the menus Highlight Active D Lighting in the shooting menu and press 2 2 Choose an option Highlight On or Off and press J To return to shooting mode pre...

Страница 171: ...e used at an ISO sensitivity of Hi 1 A Active D Lighting Versus D Lighting The Active D Lighting option in the shooting menu adjusts exposure before shooting to optimize the dynamic range while the D Lighting option in the retouch menu 0 151 optimizes dynamic range in images after shooting A See Also For information on using the Fn button and command dial to turn Active D Lighting on and off see p...

Страница 172: ...urrent white balance setting in the information display and press J 3 Choose a white balance option Highlight an option and press J To return to shooting mode press the shutter release button halfway Option Description v Auto Automatic white balance adjustment Recommended in most situations J Incandescent Use under incandescent lighting I Fluorescent Use with the light sources listed on page 70 H ...

Страница 173: ...light in the same wavelengths While light sources with a color temperature in the neighborhood of 5 000 5 500 K appear white light sources with a lower color temperature such as incandescent light bulbs appear slightly yellow or red Light sources with a higher color temperature appear tinged with blue The camera white balance options are adapted to the following color temperatures I sodium vapor l...

Страница 174: ...er than Preset manual and press 2 if Fluorescent is selected highlight a lighting type and press 2 The fine tuning options shown at right will be displayed Fine tuning is not available with Preset manual white balance 3 Fine tune white balance Use the multi selector to fine tune white balance 4 Save changes and exit Press J A White Balance Fine Tuning The colors on the fine tuning axes are relativ...

Страница 175: ...light White balance in the shooting menu and press 2 to display white balance options Highlight Preset manual and press 2 3 Select Measure Highlight Measure and press 2 The menu shown at right will be displayed highlight Yes and press J The message shown at right will be displayed before the camera enters preset measurement mode When the camera is ready to measure white balance a flashing D L will...

Страница 176: ...le to measure a value for white balance the message shown at right will be displayed and a will flash in the viewfinder for about eight seconds before the camera returns to shooting mode To return to shooting mode immediately press the shutter release button halfway If lighting is too dark or too bright the camera may be unable to measure white balance A message will appear in the information disp...

Страница 177: ...asuring white balance when shooting in mode M adjust exposure so that the exposure indicator shows 0 0 57 A Other Methods for Measuring Preset White Balance To enter preset measurement mode see above after selecting preset white balance in the information display 0 69 press J for a few seconds If white balance has been assigned to the Fn button 0 143 and preset white balance selected by pressing t...

Страница 178: ...ress 2 2 Select Use photo Highlight Use photo and press 2 3 Choose Select image Highlight Select image and press 2 to skip the remaining steps and use the image last selected for preset white balance select This image 4 Choose a folder Highlight the folder containing the source image and press 2 5 Highlight the source image To view the highlighted image full frame press and hold the X button 6 Cop...

Страница 179: ...he G button Highlight Set Picture Control in the shooting menu and press 2 to display a list of Picture Controls 2 Choose a Picture Control Highlight an option and press J Option Description Q Standard Standard processing for balanced results Recommended for most situations R Neutral Minimal processing for natural results Choose for photographs that will later be extensively processed or retouched...

Страница 180: ... and press 2 2 Select a Picture Control Highlight the desired Picture Control and press 2 3 Adjust settings Press 1 or 3 to highlight the desired setting and press 4 or 2 to choose a value 0 78 Repeat this step until all settings have been adjusted or select Quick adjust to choose a preset combination of settings Default settings can be restored by pressing the O button 4 Save changes and exit Pre...

Страница 181: ...isty landscapes and other low contrast subjects Brightness Choose 1 for reduced brightness 1 for enhanced brightness Does not affect exposure Manual adjustments non monochrome only Saturation Control the vividness of colors Select A to adjust saturation automatically according to the type of scene or choose from values between 3 and 3 lower values reduce saturation and higher values increase it Hu...

Страница 182: ...alue for the setting Use this as a reference when adjusting settings A Filter Effects Monochrome Only The options in this menu simulate the effect of color filters on monochrome photographs The following filter effects are available Option Description Y Yellow Enhances contrast Can be used to tone down the brightness of the sky in landscape photographs Orange produces more contrast than yellow red...

Страница 183: ...point will flash red note that pictures can be taken even when the focus point flashes red check focus in the monitor before shooting Except in i and j modes exposure can be locked by pressing the A L button 4 Take the picture Press the shutter release button the rest of the way down The monitor turns off and the memory card access lamp lights during recording Do not remove the battery or memory c...

Страница 184: ...ocus options Highlight the current focus mode in the information display and press J 3 Choose a focus option Highlight an option and press J To return to live view press P Option Description AF S Single servo AF For stationary subjects Focus locks when shutter release button is pressed halfway AF F Full time servo AF For moving subjects Camera focuses continuously until shutter release button is p...

Страница 185: ... 3 Choose an AF area mode Highlight an option and press J To return to live view press P Option Description 8 Face priority AF The camera automatically detects and focuses on portrait subjects Use for portraits 9 Wide area AF Use for hand held shots of landscapes and other non portrait subjects Use the multi selector to select the focus point Normal area AF Use for pin point focus on a selected sp...

Страница 186: ...a the border will no longer be displayed 9 wide and normal area AF Use the multi selector to move the focus point anywhere in the frame or press J to position the focus point in the center of the frame subject tracking AF Position the focus point over your subject and press J The focus point will track the selected subject as it moves through the frame To end focus tracking press J a second time D...

Страница 187: ...y accordingly Left L and right R channel indicators appear when optional ME 1 or other stereo microphone is used 90 y Focus mode The current focus mode 81 u AF area mode The current AF area mode 82 i Time remaining movie mode The recording time remaining in movie mode 88 o Movie frame size The frame size of movies recorded in movie mode 90 0 Manual movie settings indicator Displayed when On is sel...

Страница 188: ...ze the subject and select the appropriate shooting mode when autofocus is enabled The selected mode is shown in the monitor 0 84 t Portrait Human portrait subjects u Landscape Landscapes and cityscapes v Close up Subjects close to the camera w Night portrait Portrait subjects framed against a dark background r Auto Subjects suited to i or j mode or that do not fall into the categories listed above...

Страница 189: ...n could result in damage to the camera s internal circuitry Live view ends automatically if the lens is removed the mode dial is rotated to g or the mode dial is rotated from g to another setting Live view may end automatically to prevent damage to the camera s internal circuits exit live view when the camera is not in use Note that the temperature of the camera s internal circuits may rise and no...

Страница 190: ...ed The subject appears smaller than the focus point The subject is dominated by regular geometric patterns e g blinds or a row of windows in a skyscraper The subject is moving Note that the focus point may sometimes be displayed in green when the camera is unable to focus A Manual Focus To focus in manual focus mode 0 42 rotate the lens focus ring until the subject is in focus To magnify the view ...

Страница 191: ...ing movie recording 3 Start recording Press the movie record button to start recording A recording indicator and the time available are displayed in the monitor Except in i and j modes exposure can be locked by pressing the A L button 0 61 or in modes P S and A altered by up to 3 EV in steps of 1 3 EV using exposure compensation 0 63 note that depending on the brightness of the subject changes to ...

Страница 192: ... light sources Failure to observe this precaution could result in damage to the camera s internal circuitry The camera can record both video and sound do not cover the microphone on the front of the camera during recording Note that the built in microphone may record lens noise during autofocus and vibration reduction Flash lighting can not be used during movie recording Live view may end automati...

Страница 193: ...e quality Maximum length Frame size pixels Frame rate1 Maximum bit rate Mbps high quality Normal r 1920 1080 30p2 24 12 20 min s 25p3 k 24p l 1280 720 60p2 o 50p3 n 640 424 30p2 5 3 p 25p3 1 Listed value Actual frame rates for 60p 50p 30p 25p and 24p are 59 94 50 29 97 25 and 23 976 fps respectively 2 Available when NTSC is selected for Video mode 0 136 3 Available when PAL is selected for Video m...

Страница 194: ...ted for ISO sensitivity settings Auto ISO sensitivity control in the shooting menu 0 129 1 Select Movie settings Press the G button to display the menus Highlight Movie settings in the shooting menu and press 2 2 Choose movie options Highlight the desired item and press 2 then highlight an option and press J A Using an External Microphone The optional ME 1 stereo microphone 0 177 can be used to re...

Страница 195: ...frame is indicated by h in top right corner of monitor last frame by i If playback is paused movie rewinds or advances one frame at a time hold for continuous rewind or advance Skip 10 s Rotate the command dial to skip ahead or back 10 s Adjust volume X W Q Press X to increase volume W Q to decrease Edit movie A L To edit movie press A L while movie is paused 0 93 Return to full frame playback K P...

Страница 196: ...t is displayed 2 Choose a starting or end point Play the movie back as described on page 92 pressing J to start and resume playback and 3 to pause Your approximate position in the movie can be ascertained from the movie progress bar 3 Display movie edit options Press the A L button to display movie edit options Option Description f Choose start end point Create a copy from which the opening or clo...

Страница 197: ...ection from start point w to end point x or vice versa press A L Once you have selected the start point and or end point press 1 All frames before the selected start point and after the selected end point will be removed from the copy 6 Save the copy Highlight one of the following and press J Save as new file Save the copy to a new file Overwrite existing file Replace the original movie file with ...

Страница 198: ...e current position will be displayed in red in Step 5 and no copy will be created The copy will not be saved if there is insufficient space available on the memory card Copies have the same time and date of creation as the original A The Retouch Menu Movies can also be edited using the Edit movie option in the retouch menu 0 149 ...

Страница 199: ...e edit options 3 Choose Save selected frame Highlight Save selected frame and press J 4 Create a still copy Press 1 to create a still copy of the current frame 5 Save the copy Highlight Yes and press J to create a fine quality 0 44 JPEG copy of the selected frame Except in the photo information image only page 0 98 movie stills are indicated by a f icon in full frame playback A Save Selected Frame...

Страница 200: ...the thumbnail display Zoom in on photograph X See page 104 for more information on playback zoom Delete images O Confirmation dialog will be displayed Press O again to delete photo Change protect status A L To protect image or to remove protection from protected image press A L button 0 105 Return to shooting mode Press shutter release button halfway Monitor will turn off photographs can be taken ...

Страница 201: ...ber total number of images 4 File name 188 5 Image quality 44 6 Image size 46 7 Time of recording 16 137 8 Date of recording 16 137 9 Folder name 146 1 Protect status 105 2 Retouch indicator 150 3 Image highlights 4 Camera name 5 Frame number total number of images 100D3200 15 04 2012 10 02 27 DSC_0001 JPG 1 12 6016x4000 N NOR ORMAL AL 100D3200 DSC_0001 JPG 1 250 F11 100 35mm 15 04 2012 10 02 27 6...

Страница 202: ...ta for the portion of the image visible in the monitor A Histograms Camera histograms are intended as a guide only and may differ from those displayed in imaging applications Some sample histograms are shown below If the image contains objects with a wide range of brightnesses the distribution of tones will be relatively even If the image is dark tone distribution will be shifted to the left If th...

Страница 203: ...UE AUTO A6 M1 sRGB STANDARD 0 3 0 0 0 0 1 12 14 15 16 17 18 19 20 21 22 NOI SE REDUC ACT D L I GHT RETOUCH COMMENT HI ISO LOW AUTO D L IGHTING WARM FILTER CYANOTYPE TRI M SPRI NG HAS COME NIKON D3200 1 12 23 24 25 26 1 Protect status 105 2 Retouch indicator 150 3 Metering 60 Shutter speed 55 57 Aperture 57 4 Shooting mode 22 25 27 53 ISO sensitivity 1 51 5 Exposure compensation 63 6 Focal length 1...

Страница 204: ...ones in the image 0 99 6 Image quality 44 7 Image size 46 8 File name 188 9 Time of recording 16 137 10 Date of recording 16 137 11 Folder name 146 12 Metering 60 13 Shooting mode 22 25 27 53 14 Shutter speed 55 57 15 Aperture 56 57 16 ISO sensitivity 1 51 17 Focal length 171 18 GPS data indicator 147 19 Image comment indicator 138 20 Active D Lighting 2 67 21 Picture Control 76 22 Color space 130...

Страница 205: ...ages are displayed press to view highlighted image full frame Highlight images Use multi selector or command dial to highlight images for full frame playback playback zoom 0 104 deletion 0 106 or protection 0 105 Viewhighlighted image Press J to display the highlighted image full frame Delete highlighted photo O See page 106 for more information Change protect status of highlighted photo A L See p...

Страница 206: ... photo X Date list Exit to 72 frame playback Thumbnail list Press and hold X button to zoom in on highlighted picture Highlight dates Highlight images Date list Highlight date Thumbnail list Highlight picture Toggle full frame playback Date list View pictures taken on selected date Thumbnail list View highlighted picture Delete highlighted photo s O Date list Delete all pictures taken on selected ...

Страница 207: ...ther areas of frame Navigation window is displayed when zoom ratio is altered area currently visible in monitor is indicated by yellow border View other areas of image Select zoom in on or out from faces P Faces up to 35 detected during zoom are indicated by white borders in navigation window Press P and 1 or 3 to zoom in or out press P and 4 or 2 to view other faces View other images Rotate comma...

Страница 208: ...e playback or playback zoom or highlight it in the thumbnail list in thumbnail or calendar playback 2 Press the A L button The photograph will be marked with a P icon To remove protection from the photograph so that it can be deleted display the photograph or highlight it in the thumbnail list and then press the A L button Full frame playback Thumbnail playback Calendar playback A Removing Protect...

Страница 209: ...umbnail and Calendar Playback 1 Select an image Display the image or highlight it in the thumbnail list in thumbnail or calendar playback 2 Press the O button A confirmation dialog will be displayed 3 Press the O button again To delete the photograph press the O button again To exit without deleting the photograph press the K button Full frame playback Thumbnail playback Calendar playback thumbnai...

Страница 210: ...t a picture to view the highlighted picture full screen press and hold the X button 4 Select the highlighted picture Press the W Q button to select the highlighted picture Selected pictures are marked by a O icon Repeat steps 3 and 4 to select additional pictures to deselect a picture highlight it and press W Q 5 Press J to complete the operation A confirmation dialog will be displayed highlight Y...

Страница 211: ...or to scroll through the pictures or press and hold X to view the current picture full screen Press W Q to return to the date list 3 Select the highlighted date Press 2 to select all pictures taken on the highlighted date Selected dates are marked with a M icon Repeat steps 2 and 3 to select additional dates to deselect a date highlight it and press 2 4 Press J to complete the operation A confirma...

Страница 212: ...ect Image type and choose from Still images and movies Still images only and Movies only To choose how long still images are displayed select Frame interval and choose from the options shown at right To choose the transition between still images select Transition effects and choose from the following options Zoom fade Frames fade into one another with a zoom effect Cube This transition takes the f...

Страница 213: ... Use Description Skip back skip ahead Press 4 to return to previous frame 2 to skip to next frame View additional photo info Change photo info displayed 0 98 Pause resume slide show Pause show Press again to resume Raise lower volume X W Q Press X during movie playback to increase volume W Q to decrease Exit to playback mode K End show and return to playback mode Exit to shooting mode Press shutte...

Страница 214: ... 7 Home Basic Home Premium Professional Enterprise Ultimate Service Pack 1 Windows Vista Home Basic Home Premium Business Enterprise Ultimate Service Pack 2 or 32 bit editions of Windows XP Home Edition Professional Service Pack 3 All installed programs may run as 32 bit applications in 64 bit editions of Windows 7 and Windows Vista This application is not compatible with computers running 64 bit ...

Страница 215: ...nsfer 2 If a message is displayed prompting you to choose a program select Nikon Transfer 2 D USB Hubs Connect the camera directly to the computer do not connect the cable via a USB hub or keyboard A Windows 7 If the following dialog is displayed select Nikon Transfer 2 as described below 1 Under Import pictures and videos click Change program A program selection dialog will be displayed select Im...

Страница 216: ...ied to the computer for more information on using Nikon Transfer 2 start ViewNX 2 or Nikon Transfer 2 and select ViewNX 2 Help from the Help menu 7 Turn the camera off and disconnect the USB cable when transfer ends Nikon Transfer 2 will close automatically when transfer is complete Start Transfer ...

Страница 217: ... E17 USB cable 1 Turn the camera off 2 Connect the USB cable Turn the printer on and connect the USB cable as shown Do not use force or attempt to insert the connectors at an angle 3 Turn the camera on A welcome screen will be displayed in the monitor followed by a PictBridge playback display D USB Hubs Connect the camera directly to the printer do not connect the cable via a USB hub q w ...

Страница 218: ...to display PictBridge printing options D Selecting Photographs for Printing NEF RAW photographs 0 44 can not be selected for printing JPEG copies of NEF RAW images can be created using the NEF RAW processing option in the retouch menu 0 157 A Printing Via Direct USB Connection Be sure the EN EL14 battery is fully charged or use an optional EH 5b AC adapter and EP 5A power connector When taking pho...

Страница 219: ... J to select and exit to the previous menu Time stamp Highlight Printer default use current printer settings Print time stamp print times and dates of recording on photos or No time stamp and press J to select and exit to the previous menu Cropping This option is available only if supported by the printer To exit without cropping highlight No cropping and press J To crop the current picture highli...

Страница 220: ...rinting Selectdate Print one copy of all the pictures taken on a selected date Print DPOF Print an existing print order created with the DPOF print order option in the playback menu 0 120 The current print order will be displayed in Step 3 Index print To create an index print of all JPEG pictures on the memory card proceed to Step 4 Note that if the memory card contains more than 256 pictures only...

Страница 221: ...ecify the number of prints up to 99 to deselect the picture press 3 when the number of prints is 1 Continue until all the desired pictures have been selected If you chose Select date in Step 2 press 1 or 3 to highlight a date and press 2 to toggle the highlighted date on or off To view the pictures taken on the selected date press W Q Use the multi selector to scroll through the pictures or press ...

Страница 222: ...nting options Choose page size border and time stamp options as described on page 116 a warning will be displayed if the selected page size is too small for an index print 6 Start printing Select Start printing and press J to start printing To cancel before all copies have been printed press J ...

Страница 223: ...res Use the multi selector to scroll through the pictures on the memory card To display the current picture in full screen press and hold the X button To select the current picture for printing press the W Q button and press 1 The picture will be marked with a Z icon and the number of prints will be set to 1 Keeping the W Q button pressed press 1 or 3 to specify the number of prints up to 99 to de...

Страница 224: ...nt DPOF in the PictBridge menu and follow the steps in Printing Multiple Pictures to modify and print the current order 0 117 DPOF print date and shooting data options are not supported when printing via direct USB connection to print the date of recording on photographs in the current print order use the PictBridge Time stamp option The DPOF print order option can not be used if there is not enou...

Страница 225: ... 1 Turn the camera off Always turn the camera off before connecting or disconnecting the A V cable 2 Connect the A V cable as shown 3 Tune the television to the video channel 4 Turn the camera on and press the K button During playback images will be displayed on the television screen Note that the edges of images may not be displayed A Video Mode If no image is displayed check that camera is corre...

Страница 226: ...sion or video device Note that the edges of images may not be displayed D Close the Connector Cover Close the connector cover when the connectors are not in use Foreign matter in the connectors can interfere with data transfer A Audio When a movie with sound recorded in stereo using an optional ME 1 stereo microphone 0 91 177 is viewed on a television connected to the camera via an A V cable the a...

Страница 227: ...play shown at right will appear on the television and the television remote can be used in place of the camera multi selector and J button during full frame playback and slide shows If Off is selected the television remote can not be used to control the camera A HDMI CEC Devices When the camera is connected to an HDMI CEC device will appear in the viewfinder in place of the number of exposures rem...

Страница 228: ...Still images and movies Frame interval 2 s Transition effects Zoom fade DPOF print order 120 Option Default 0 Playback Folder G button D playback menu Option Description Current Only photos in the folder currently selected for Storage folder in the setup menu 0 146 are displayed during playback This option is selected automatically when a photo is taken If a memory card is inserted and this option...

Страница 229: ...the camera itself is already in the appropriate orientation during shooting images are not rotated automatically during image review Playback Display Options G button D playback menu Additional photo info Press 1 or 3 to highlight an option then press2to selecttheoptionforthephotoinformationdisplay A M appears next to selected items to deselect highlight and press 2 To return to the playback menu ...

Страница 230: ...46 White balance Auto 69 Fluorescent Cool white fluorescent 70 ISO sensitivity settings ISO sensitivity P S A M 100 51 Other modes Auto Auto ISO sensitivity control Off 129 Active D Lighting On 67 Auto distortion control Off 130 Color space sRGB 130 Noise reduction On 131 AF area mode Viewfinder n Single point AF 38 m Dynamic area AF Other modes Auto area AF Live view movie k l p o Face priority A...

Страница 231: ... displayed if e Auto area AF is selected for AF area mode Viewfinder Option Default 0 Release mode i j k l p n o P S A M Single frame 31 m Continuous Focus point Center 40 Flexible program Off 54 A L button hold Off 143 Focus mode Viewfinder Auto servo AF 35 Live view movie Single servo AF 81 Flash mode i k p n Auto front curtain sync 48 o Auto slow sync P S A M Front curtain sync Exposure compens...

Страница 232: ...M sensitivity will be adjusted for optimal exposure at the shutter speed selected by the user If Auto available only with CPU lenses is selected the camera will choose the minimum shutter speed based on the focal length of the lens Slower shutter speeds will be used only if optimum exposure can not be achieved at the ISO sensitivity value selected for Maximum sensitivity When On is selected the vi...

Страница 233: ... Color Space G button C shooting menu A Color Space Color spaces define the correspondence between colors and the numeric values that represent them in a digital image file The sRGB color space is widely used while the Adobe RGB color space is typically used in publishing and commercial printing sRGB is recommended when taking photographs that will be printed without modification or viewed in appl...

Страница 234: ... lighting is poor Noise Reduction G button C shooting menu Built in AF assist Illuminator G button C shooting menu Option Description On The AF assist illuminator lights when lighting is poor viewfinder photography only AF assist illumination is only available when both of the following conditions are met 1 AF S is selected for focus mode 0 35 or single servo autofocus is selected when the viewfin...

Страница 235: ... mode for the SB 400 to be selected from TTL and Manual A Flash Control The following types of flash control are supported when a CPU lens is used in combination with the built in flash 0 47 or optional flash units 0 172 i TTL Balanced Fill Flash for Digital SLR Information from the 420 pixel RGB sensor is used to adjust flash output for a natural balance between the main subject and the backgroun...

Страница 236: ...lean at startup shutdown 180 Lockmirrorupfor cleaning1 182 Video mode2 136 HDMI Output resolution Auto 124 Device control On 124 Flicker reduction Auto 136 Time zone and date2 Daylightsavingtime Off 137 Language2 137 Image comment 138 Auto image rotation On 138 Image Dust Off ref photo 139 Auto off timers Normal 140 Self timer Self timer delay 10 s 141 Number of shots 1 141 Remote on duration 1 mi...

Страница 237: ...alues for reduced brightness Choose from the following two formats for the information display 0 5 1 Select a format Highlight an option and press 2 2 Select a background color Highlight a background color and press J Choose from blue black or orange Classic or white black or brown Graphic Reset Setup Options G button B setup menu Monitor Brightness G button B setup menu Info Display Format G butt...

Страница 238: ... indicator 144 16 Manual flash indicator 132 Flash compensation indicator for optional flash units 175 17 Shutter speed 55 57 18 Exposure indicator 57 Exposure compensation indicator 64 19 Aperture f number 56 57 20 Active D Lighting 67 21 Picture Control 76 22 Auto area AF indicator 38 3D tracking indicator 38 Focus point 40 23 Beep indicator 141 24 Eye Fi connection indicator 148 25 Battery indi...

Страница 239: ... 0 80 or movie recording 0 88 Choose Auto to allow the camera to automatically choose the correct frequency or manually match the frequency to that of the local AC power supply Auto Info Display G button B setup menu Video Mode G button B setup menu Flicker Reduction G button B setup menu A Flicker Reduction If Auto fails to produce the desired results and If you are unsure as to the frequency of ...

Страница 240: ... Description Time zone Choose a time zone The camera clock is automatically set to the time in the new time zone Date and time Set the camera clock 0 16 Date format Choose the order in which the day month and year are displayed Daylight saving time Turn daylight saving time on or off The camera clock will automatically be advanced or set back one hour The default setting is Off Language G button B...

Страница 241: ... pressing 2 Photographs taken while On is selected contain information on camera orientation allowing them to be rotated automatically during playback or when viewed in ViewNX 2 or Capture NX 2 available separately 0 176 The following orientations are recorded Camera orientation is not recorded when Off is selected Choose this option when panning or taking photographs with the lens pointing up or ...

Страница 242: ...ject in the viewfinder With the lens about ten centimeters four inches from a well lit featureless white object frame the object so that it fills the viewfinder and then press the shutter release button halfway In autofocus mode focus will automatically be set to infinity in manual focus mode set focus to infinity manually 3 Acquire Image Dust Off reference data Press the shutter release button th...

Страница 243: ...battery D Image Dust Off Reference Data The same reference data can be used for photographs taken with different lenses or at different apertures Reference images can not be viewed using computer imaging software A grid pattern is displayed when reference images are viewed on the camera Auto off Timers G button B setup menu Option Description all times are approximate C Short D Normal E Long Auto ...

Страница 244: ...times for longer battery life Choose the pitch High or Low of the beep that sounds when the camera focuses using single servo AF AF S or when single servo AF is selected for AF A 0 35 when focus locks in live view while the release timer is counting down in self timer and delayed remote release modes 0 33 and when a photograph is taken in quick response remote mode 0 33 Select Off to prevent the b...

Страница 245: ...ic rangefinder requires a lens with a maximum aperture of f 5 6 or faster The desired results may not be achieved in situations in which the camera would be unable to focus using autofocus 0 36 The electronic rangefinder is not available during live view File Number Sequence G button B setup menu Option Description On When a new folder is created the memory card formatted or a new memory card inse...

Страница 246: ...t image quality and size 0 44 w ISO sensitivity Press the Fn button and rotate the command dial to select ISO sensitivity 0 51 m White balance Press the Fn button and rotate the command dial to select white balance P S A and M modes only 0 69 Active D Lighting Press the Fn button and rotate the command dial to select an Active D Lighting option P S A and M modes only 0 67 Option Description B AE A...

Страница 247: ... setup menu Print Date G button B setup menu Option Description Off The time and date do not appear on photographs a Date The date or date and time are imprinted on photographs taken while this option is in effect b Date and time c Date counter New photos are imprinted with a time stamp showing the number of days between the date of shooting and a selected date 0 145 A Print Date The date is recor...

Страница 248: ...r format highlight Display options and press 2 to display the menu shown at right Highlight an option and press J Highlight Done in the date counter menu and press J when settings are complete Pictures taken while this option is in effect are imprinted with the number of days remaining until a future date or the number of days elapsed since a past date Use it to track the growth of a child or coun...

Страница 249: ... folder name Storage Folder G button B setup menu D Folder Names On the memory card folder names are preceded by a three digit folder number assigned automatically by the camera e g 100D3200 Each folder can contain up to 999 photographs During shooting pictures are stored in the highest numbered folder with the selected name If a photograph is taken when the current folder is full or contains a ph...

Страница 250: ...ion Description Enable Exposure meters turn off automatically if no operations are performed for the time selected for Auto off timers Standby timer in the setup menu 0 140 to allow the camera time to acquire GPS data the delay is extended by up to one minute after exposure meters are activated or the camera is turned on This reduces the drain on the battery Disable Exposure meters do not turn off...

Страница 251: ...setup menu D Eye Fi Cards Eye Fi cards may emit wireless signals when Disable is selected If a warning is displayed in the monitor 0 193 turn the camera off and remove the card See the manual provided with the Eye Fi card and direct any inquiries to the manufacturer The camera can be used to turn Eye Fi cards on and off but may not support other Eye Fi functions A Supported Eye Fi Cards As of Dece...

Страница 252: ... outline 160 1 Can only be selected by pressing G button and selecting N tab 2 Available only if J button is pressed in full frame playback when a retouched image or original is displayed A Retouching Copies Most options can be applied to copies created using other retouch options although with the exceptions of Image overlay and Edit movie Choose start end point each option can be applied only on...

Страница 253: ...create a retouched copy Except in the photo information image only page 0 98 retouched copies are indicated by a N icon A Retouch The camera may not be able to display or retouch images created with other devices If the image was recorded at an image quality setting of NEF RAW JPEG fine 0 44 retouch options apply only to the JPEG copy Image overlay and NEF RAW processing excepted A Creating Retouc...

Страница 254: ...tions of the image that are not affected by red eye check the preview thoroughly before proceeding D Lighting G button N retouch menu Before After Red Eye Correction G button N retouch menu To Use Description Zoom in X Press X button to zoom in W Q button to zoom out While photo is zoomed in use multi selector to view areas of image not visible in monitor Keep multi selector pressed to scroll rapi...

Страница 255: ...W Q Press the W Q button to reduce the size of the crop Change crop aspect ratio Rotate the command dial to switch between aspect ratios of 3 2 4 3 5 4 1 1 and 16 9 Move crop Use multi selector to move the crop to another area of the image Create copy Save the current crop as a separate file A Trim Image Quality and Size Copies created from NEF RAW or NEF RAW JPEG photos have an image quality of J...

Страница 256: ... the monitor Red intensifier Intensify reds Red intensifier greens Green intensifier or blues Blue intensifier Press 1 to increase the effect 3 to decrease Green intensifier Blue intensifier Cross screen Add starburst effects to light sources Number of points Choose from four six or eight Filter amount Choose the brightness of the light sources affected Filter angle Choose the angle of the points ...

Страница 257: ...displayed in the monitor press the X button The histogram will be updated to show data only for the portion of the image displayed in the monitor While the image is zoomed in press the A L button to toggle back and forth between color balance and zoom When zoom is selected you can zoom in and out with the X and W Q buttons and scroll the image with the multi selector Increase amount of magenta Inc...

Страница 258: ...46 all options are available To create an NEF RAW copy choose an image quality of NEF RAW 1 Select Image overlay Highlight Image overlay in the retouch menu and press 2 The dialog shown at right will be displayed with Image 1 highlighted press J to display a list of the NEF RAW pictures created with this camera 2 Select the first image Use the multi selector to highlight the first photograph in th...

Страница 259: ...place the cursor in the Preview column and press 1 or 3 to highlight Overlay Press J to preview the overlay as shown at right to save the overlay without displaying a preview select Save To return to Step 4 and select new photos or adjust gain press W Q 6 Save the overlay Press J while the preview is displayed to save the overlay After an overlay is created the resulting image will be displayed fu...

Страница 260: ...p 3 Adjust NEF RAW processing settings Adjust the settings listed below Note that white balance is not available with pictures created with image overlay and that exposure compensation can only be set to values between 2 and 2 EV 4 Copy the photograph Highlight EXE and press J to create a JPEG copy of the selected photograph The resulting image will be displayed full frame in the monitor To exit w...

Страница 261: ...n option and press J 3 Choose pictures Highlight Select image and press 2 Highlight pictures using the multi selector and press the W Q button to select or deselect to view the highlighted picture full screen press and hold the X button Selected pictures are marked by a 0 icon Press J when the selection is complete 4 Save the resized copies A confirmation dialog will be displayed Highlight Yes and...

Страница 262: ... selector or select Manual to reduce distortion manually note that Auto is not available with photos taken using auto distortion control see page 130 Press 2 to reduce barrel distortion 4 to reduce pin cushion distortion the effect can be previewed in the edit display note that greater amounts of distortion control result in more of the edges being cropped out Press J to copy the photograph or pre...

Страница 263: ...isplay Press J to copy the photograph Create a copy of a photograph that resembles a sketch made with colored pencils Press 1 or 3 to highlight Vividness or Outlines and press 4 or 2 to change Vividness can be increased to make colors more saturated or decreased for a washed out monochromatic effect while outlines can be made thicker or thinner Thicker outlines make colors more saturated The resul...

Страница 264: ...ector to adjust perspective note that greater amounts of perspective control result in more of the edges being cropped out The results can be previewed in the edit display Press J to copy the photograph or press K to exit to playback without creating a copy Perspective Control G button N retouch menu Before After ...

Страница 265: ... focus Choose area in focus If area of effect is in wide orientation press 1 or 3 to position frame showing area of copy that will be in focus Ifareaofeffectisintallorientation press4or2 to position frame showing area of copy that will be in focus Choose size If area of effect is in wide orientation press 4 or 2 to choose height If area of effect is in tall orientation press 1 or 3 to choose width...

Страница 266: ...h and proceed to the next step 3 Select a color Use the multi selector to position the cursor over an object and press A L to select the color of the object as one that will remain in the final copy the camera may have difficulty detecting unsaturated colors choose a saturated color To zoom in on the picture for precise color selection press X Press W Q to zoom out 4 Highlight the color range Rota...

Страница 267: ... can be previewed in the edit display 6 Select additional colors To select additional colors rotate the command dial to highlight another of the three color boxes at the top of the display and repeat Steps 3 5 to select another color Repeat for a third color if desired To deselect the highlighted color press O To remove all colors press and hold O A confirmation dialog will be displayed select Yes...

Страница 268: ...o create the copy listed at the top of the display Press 4 or 2 to switch between the source image and the retouched copy To view the highlighted picture full frame press and hold the X button If the copy was created from two images using Image overlay press 1 or 3 to view the other source image If multiple copies exist for the current source image press 1 or 3 to view the other copies To exit to ...

Страница 269: ...enu lists the twenty most recently used settings Press 1 or 3 to highlight an option and press 2 to select G button A Removing Items from the Recent Settings Menu To remove an item from the recent settings menu highlight it and press the O button A confirmation dialog will be displayed press O again to delete the selected item ...

Страница 270: ... z z z z z2 Other AF NIKKOR except lenses for F3AF z7 z z z z2 AI P NIKKOR z8 z z z z2 1 Use AF S or AF I lenses to get the most from your camera Vibration Reduction VR supported with VR lenses 2 Spot metering meters selected focus point 0 60 3 Can not be used with shifting or tilting 4 The camera s exposure metering and flash control systems may not function as expected when the lens is shifted a...

Страница 271: ...d D Lenses CPU lenses can be identified by the presence of CPU contacts type G and D lenses by a letter on the lens barrel Type G lenses are not equipped with a lens aperture ring CPU contacts Aperture ring CPU lens Type G lens Type D lens ...

Страница 272: ... used 3 Can be used at shutter speeds slower than flash sync speed by one step or more 4 Can not be used with shifting or tilting 5 With maximum effective aperture of f 5 6 or faster 6 Attach in vertical orientation can be used in horizontal orientation once attached D Incompatible Accessories and Non CPU Lenses The following accessories and non CPU lenses can NOT be used with the D3200 TC 16AS AF...

Страница 273: ... 35 mm No vignetting AF S DX Zoom Nikkor 17 55mm f 2 8G IF ED 28 mm 1 5 m 4 ft 11 in 35 mm 1 0 m 3 ft 3 in 45 55 mm No vignetting AF Zoom Nikkor 18 35mm f 3 5 4 5D IF ED 24 mm 1 0 m 3 ft 3 in 28 35 mm No vignetting AF S DX Zoom Nikkor 18 70mm f 3 5 4 5G IF ED 18 mm 1 0 m 3 ft 3 in 24 70 mm No vignetting AF S DX NIKKOR 18 105mm f 3 5 5 6G ED VR 18 mm 3 0 m 9 ft 10in 24 mm 1 0 m 3 ft 3 in AF S DX Zo...

Страница 274: ...anges under 1 m 3 ft 3 in the following lenses may block the AF assist illuminator and interfere with autofocus when lighting is poor AF S NIKKOR 16 35mm f 4G ED VR AF S Zoom Nikkor 17 35mm f 2 8D IF ED AF S DX Zoom Nikkor 17 55mm f 2 8G IF ED AF S DX NIKKOR 18 105mm f 3 5 5 6G ED VR AF S DX VR Zoom Nikkor 18 200mm f 3 5 5 6G IF ED AF S DX NIKKOR 18 200mm f 3 5 5 6G ED VR II AF S NIKKOR 24 70mm f ...

Страница 275: ...e flash unit for details The built in flash will not fire when an optional flash unit is attached A The AS 15 Sync Terminal Adapter When the AS 15 sync terminal adapter available separately is mounted on the camera accessory shoe flash accessories can be connected via a sync cable D Use Only Nikon Flash Accessories Use only Nikon flash units Negative voltages or voltages over 250 V applied to the ...

Страница 276: ... 46 1 If a color filter is attached to the SB 910 SB 900 or SB 700 when AUTO or N flash is selected for white balance the camera will automatically detect the filter and adjust white balance appropriately 2 Wireless flash control is not available with the SB 400 3 Controlled remotely using optional SB 910 SB 900 SB 800 or SB 700 flash unit or SU 800 wireless Speedlight commander 4 m ft 20 C 68 F S...

Страница 277: ... SU 800 is used to control other flash units The SU 800 itself is not equipped with a flash 2 CPU lens required 3 Standard i TTL flash for digital SLR is used with spot metering or when selected with flash unit 4 Standard i TTL flash for digital SLR is used with spot metering 5 Selected with flash unit 6 Auto aperture AA is used regardless of mode selected with flash unit 7 Can be selected with ca...

Страница 278: ...tering to select standard i TTL flash control Take a test shot and view the results in the monitor In i TTL use the flash panel or bounce adapter provided with the flash unit Do not use other panels such as diffusion panels as this may produce incorrect exposure If the controls on the optional SB 910 SB 900 SB 800 SB 700 or SB 600 flash unit or SU 800 wireless Speedlight commander are used to set ...

Страница 279: ...See the filter manual for details Viewfinder eyepiece accessories DK 20C Eyepiece Correction Lenses Lenses are available with diopters of 5 4 3 2 0 0 5 1 2 and 3 m 1 when the camera diopter adjustment control is in the neutral position 1 m 1 Use eyepiece correction lenses only if the desired focus can not be achieved with the built in diopter adjustment control 1 7 to 0 5 m 1 Test eyepiece correct...

Страница 280: ...n accessory terminal for MC DC2 remote cords 0 58 and GP 1 GPS units 0 147 which connect with the 4 mark on the connector aligned with the 2 next to the accessory terminal close the connector cover when the terminal is not in use USB and A V connector accessories UC E17 and UC E6 USB cables 0 112 Wireless Mobile Adapter WU 1a Supports two way communication between the camera and smart devices runn...

Страница 281: ...ep the orange battery latch pressed to one side The latch locks the connector in place when the connector is fully inserted 3 Close the battery chamber cover Position the power connector cable so that it passes through the power connector slot and close the battery chamber cover 4 Connect the AC adapter Connect the AC adapter power cable to the AC socket on AC adapter e and the EP 5A power cable t...

Страница 282: ...ered under warranty Lens mirror and viewfinder These glass elements are easily damaged Remove dust and lint with a blower If using an aerosol blower keep the can vertical to prevent the discharge of liquid To remove fingerprints and other stains apply a small amount of lens cleaner to a soft cloth and clean with care Monitor Remove dust and lint with a blower When removing fingerprints and other s...

Страница 283: ...turned on or off CleanNow 1 Place the camera base down Image sensor cleaning is most effective when the camera is placed base down as shown at right 2 Select Clean image sensor in the setup menu Press the G button to display the menus Highlight Clean image sensor in the setup menu 0 133 and press 2 3 Select Clean now Highlight Clean now and press J The camera will check the image sensor and then b...

Страница 284: ...d off 7 Clean at startup shutdown The image sensor is cleaned automatically at startup and at shutdown Cleaning off Automatic image sensor cleaning off D Image Sensor Cleaning Using camera controls during startup interrupts image sensor cleaning Image sensor cleaning may not be performed at startup if the flash is charging Cleaning is performed by vibrating the low pass filter If dust can not be f...

Страница 285: ...dapter 2 Remove the lens Turn the camera off and remove the lens 3 Select Lock mirror up for cleaning Turn the camera on and press the G button to display the menus Highlight Lock mirror up for cleaning in the setup menu and press 2 note that this option is not available at battery levels of H or below 4 Press J The message shown at right will be displayed in the monitor To restore normal operatio...

Страница 286: ... about two minutes End cleaning or inspection immediately D Foreign Matter on the Low Pass Filter Nikon takes every possible precaution to prevent foreign matter from coming into contact with the low pass filter during production and shipping The D3200 however is designed to be used with interchangeable lenses and foreign matter may enter the camera when lenses are removed or exchanged Once inside...

Страница 287: ... effect in photographs Turn the product off before removing or disconnecting the power source Do not unplug the product or remove the battery while the product is on or while images are being recorded or deleted Forcibly cutting power in these circumstances could result in loss of data or in damage to product memory or internal circuitry To prevent an accidental interruption of power avoid carryin...

Страница 288: ... soft cloth or chamois leather Should the monitor break care should be taken to avoid injury from broken glass and to prevent liquid crystal from the monitor touching the skin or entering the eyes and mouth Moiré Moiré is an interference pattern created by the interaction of an image containing a regular repeating grid such as the pattern of weave in cloth or windows in a building with the camera ...

Страница 289: ...mperature indicates that it requires replacement Purchase a new EN EL14 battery Charge the battery before use When taking photographs on important occasions ready a spare EN EL14 battery and keep it fully charged Depending on your location it may be difficult to purchase replacement batteries on short notice Note that on cold days the capacity of batteries tends to decrease Be sure the battery is ...

Страница 290: ... z z z z z z z z Color space z z z z z z z z z z z z Noise reduction z z z z z z z z z z z z AF area mode Viewfinder z z z z z z z z z z z z Live view movie z z z z z z z z z z Built in AF assist illuminator z z z z z z z z z z Metering z z z z Movie settings z z z z z z z z z z z z Flash cntrl for built in flash Optional flash z z z z Other settings Release mode z z z z z z z z z z z z AE L AF L ...

Страница 291: ...ISO 100 Drops when noise reduction 0 131 or auto distortion control 0 130 is on 3 Image size applies to JPEG images only Size of NEF RAW images can not be changed File size is the total for NEF RAW and JPEG images A File Names Photographs are stored as image files with names of the form DSC_nnnn xxx where nnnn is a four digit number between 0001 and 9999 assigned automatically in ascending order b...

Страница 292: ... to avoid burns and turn the camera on again or if you are using an AC adapter available separately disconnect and reconnect the adapter and turn the camera on again If the problem persists after removing the battery from the camera contact your retailer or Nikon authorized service representative Camera takes time to turn on Delete files or folders Shutter release disabled Memory card is locked fu...

Страница 293: ...htening the effects of noise 0 67 No photo taken when remote control shutter release button is pressed Replace battery in remote control 0 177 Choose remote control release mode 0 33 Flash is charging 0 24 Time selected for Remote on duration 0 141 has elapsed Bright light is interfering with remote Beep does not sound Off is selected for Beep 0 141 Camera is in quiet shutter release mode 0 31 or ...

Страница 294: ... saturation For consistent results over a series of photos choose another setting 0 78 Metering can not be changed Autoexposure lock is in effect 0 61 Exposure compensation can not be used Choose mode P S or A 0 53 63 Noise reddish areas or other artifacts appears in long time exposures Turn noise reduction on 0 131 NEF RAW image is not played back Photo was taken at image quality of NEF RAW JPEG ...

Страница 295: ...not transfer photos to computer OS not compatible with camera or transfer software Use card reader to copy photos to computer 0 111 Photos are not displayed in Capture NX 2 Update to latest version 0 176 Image Dust Off option in Capture NX 2 does not have desired effect Image sensor cleaning changes the position of dust on the low pass filter Image Dust Off reference data recorded before image sen...

Страница 296: ...n camera off and then on again d k flashes Turn camera off remove and replace battery and then turn camera on again 2 13 Battery level is low Completeoperationandturn camera off immediately End cleaning and turn camera off and recharge or replace battery 183 Clock not set Set camera clock 16 137 No SD card inserted S s flashes Turn camera off and confirm that card is correctly inserted 18 Memory c...

Страница 297: ... a higher ISO sensitivity 51 Use flash 47 In mode S Lower shutter speed 55 A Choose a larger aperture lower f number 56 No Bulb in S mode A flashes Change shutter speed or select manual exposure mode 55 57 N flashes Flash has fired at full power Check photo in monitor if underexposed adjust settings and try again N s flashes Use the flash 47 Change distance to subject aperture flash range or ISO s...

Страница 298: ...mory card or select a different folder 18 125 Cannot display this file File can not be played back on camera Cannot select this file Images created with other devices can not be retouched 150 No image for retouching Memory card does not contain NEF RAW images for use with NEF RAW processing 157 Check printer Check printer To resume select Continue if available Check paper Paper is not selected siz...

Страница 299: ... compression NEF RAW JPEG Single photograph recorded in both NEF RAW and JPEG formats Picture Control System Standard Neutral Vivid Monochrome Portrait Landscape selected Picture Control can be modified Media SD Secure Digital and UHS I compliant SDHC and SDXC memory cards File system DCF Design Rule for Camera File System 2 0 DPOF Digital Print Order Format Exif Exchangeable Image File Format for...

Страница 300: ... values Self timer 2 s 5 s 10 s 20 s 1 9 exposures Exposure Metering TTL exposure metering using 420 pixel RGB sensor Metering method Matrix metering 3D color matrix metering II type G and D lenses color matrix metering II other CPU lenses Center weighted metering Weight of 75 given to 8 mm circle in center of frame Spot metering Meters 3 5 mm circle about 2 5 of frame centered on selected focus p...

Страница 301: ...with built in flash and SB 910 SB 900 SB 800 SB 700 SB 600 or SB 400 i TTL balanced fill flash for digital SLR is used with matrix and center weighted metering standard i TTL flash for digital SLR with spot metering Flash mode Auto auto with red eye reduction auto slow sync auto slow sync with red eye reduction fill flash red eye reduction slow sync slow sync with red eye reduction rear curtain wi...

Страница 302: ... is selected for video mode Actual frame rate when 24p is selected is 23 976 fps File format MOV Video compression H 264 MPEG 4 Advanced Video Coding Audio recording format Linear PCM Audio recording device Built in monaural or external stereo microphone sensitivity adjustable ISO sensitivity ISO 200 6400 can also be set to approx 1 EV above ISO 6400 ISO 12800 equivalent Monitor Monitor 7 5 cm 3 i...

Страница 303: ...Czech Danish Dutch English Finnish French German Greek Hindi Hungarian Indonesian Italian Japanese Korean Norwegian Polish Portuguese Portugal and Brazil Romanian Russian Spanish Swedish Thai Turkish Ukrainian Power source Battery One rechargeable Li ion EN EL14 battery AC adapter EH 5b AC adapter requires EP 5A power connector available separately Tripod socket Tripod socket 1 4 in ISO 1222 Dimen...

Страница 304: ...2 104 F Dimensions W H D Approx 38 53 14 mm 1 5 2 1 0 6 in Weight Approx 48 g 1 7 oz excluding terminal cover Type Type G AF S DX NIKKOR zoom lens with built in CPU and F mount for use exclusively with Nikon DX format digital SLR cameras Focal length 18 55 mm Maximum aperture f 3 5 5 6 Lens construction 11 elements in 8 groups including 1 aspherical element Angle of view 76 28 50 Focal length scal...

Страница 305: ... with a focal of 20 mm or more vignetting will occur at a focal length of 18 mm D Lens Care Keep the CPU contacts clean Use a blower to remove dust and lint from the lens surfaces To remove smudges and fingerprints apply a small amount of ethanol or lens cleaner to a soft clean cotton cloth or lens cleaning tissue and clean from the center outwards using a circular motion taking care not to leave ...

Страница 306: ...us point If the subject does not fill the focus point the camera may focus on the background and the subject may be out of focus Example A far off portrait subject at some distance from the background 2 The subject contains many fine details The camera may have difficulty focusing on subjects that contain many fine details or that are lacking in contrast Example A field of flowers In these cases u...

Страница 307: ...ithout first transferring them to a computer HDMI High Definition Multimedia Interface is a standard for multimedia interfaces used in consumer electronics and AV devices capable of transmitting audiovisual data and control signals to HDMI compliant devices via a single cable connection Trademark Information Macintosh Mac OS and QuickTime are registered trademarks of Apple Inc in the United States...

Страница 308: ... 6G VR lens under the following test conditions vibration reduction off continuous release mode focus mode set to AF C image quality set to JPEG basic image size set to M medium white balance set to v ISO sensitivity set to ISO 100 shutter speed 1 250 s focus cycled from infinity to minimum range three times after shutter release button has been pressed halfway for 3 s six shots are then taken in ...

Страница 309: ...ew 171 Aperture 53 56 Aperture priority auto 56 Assign AE L AF L button 143 Assign Fn button 8 143 Attaching the lens 14 Auto White balance 69 Auto distortion control 130 Auto flash 49 Auto image rotation 138 Auto info display 136 Auto ISO sensitivity control 129 Auto off timers 140 Auto area AF AF area mode 38 Autoexposure lock 61 Autofocus 35 41 81 83 Auto servo AF 35 Available settings 187 B Ba...

Страница 310: ... 44 Image review 126 Image size 46 Incandescent White balance 69 Info display format 134 In focus indicator 23 40 42 61 Information 5 98 134 Infrared receiver 33 ISO sensitivity 51 129 i TTL 132 i TTL balanced fill flash for digital SLR 132 J JPEG 44 JPEG basic 44 JPEG fine 44 JPEG normal 44 L Landscape Set Picture Control 76 Language 16 137 Large Image size 46 Lens 14 15 167 Lens cap 14 Lens focu...

Страница 311: ... Shutter priority auto 55 Shutter release button 23 24 40 61 Shutter release button AE L 144 Side by side comparison 165 Single frame Release mode 31 Single point AF AF area mode 38 Single servo AF 35 81 Size 46 90 Skylight Filter effects 153 Slide show 109 Slot empty release lock 144 Slow sync 49 Small Image size 46 Soft Filter effects 153 Speedlight 172 Spot metering 60 sRGB 130 Standard Set Pic...

Страница 312: ...reproduction in any form of this manual in whole or in part except for brief quotation in critical articles or reviews may be made without written authorization from NIKON CORPORATION SB2C01 11 6MB14011 01 ...

Страница 313: ......

Страница 314: ......

Страница 315: ......

Страница 316: ......

Страница 317: ......

Страница 318: ......

Страница 319: ......

Отзывы: