background image

43

More on Playback

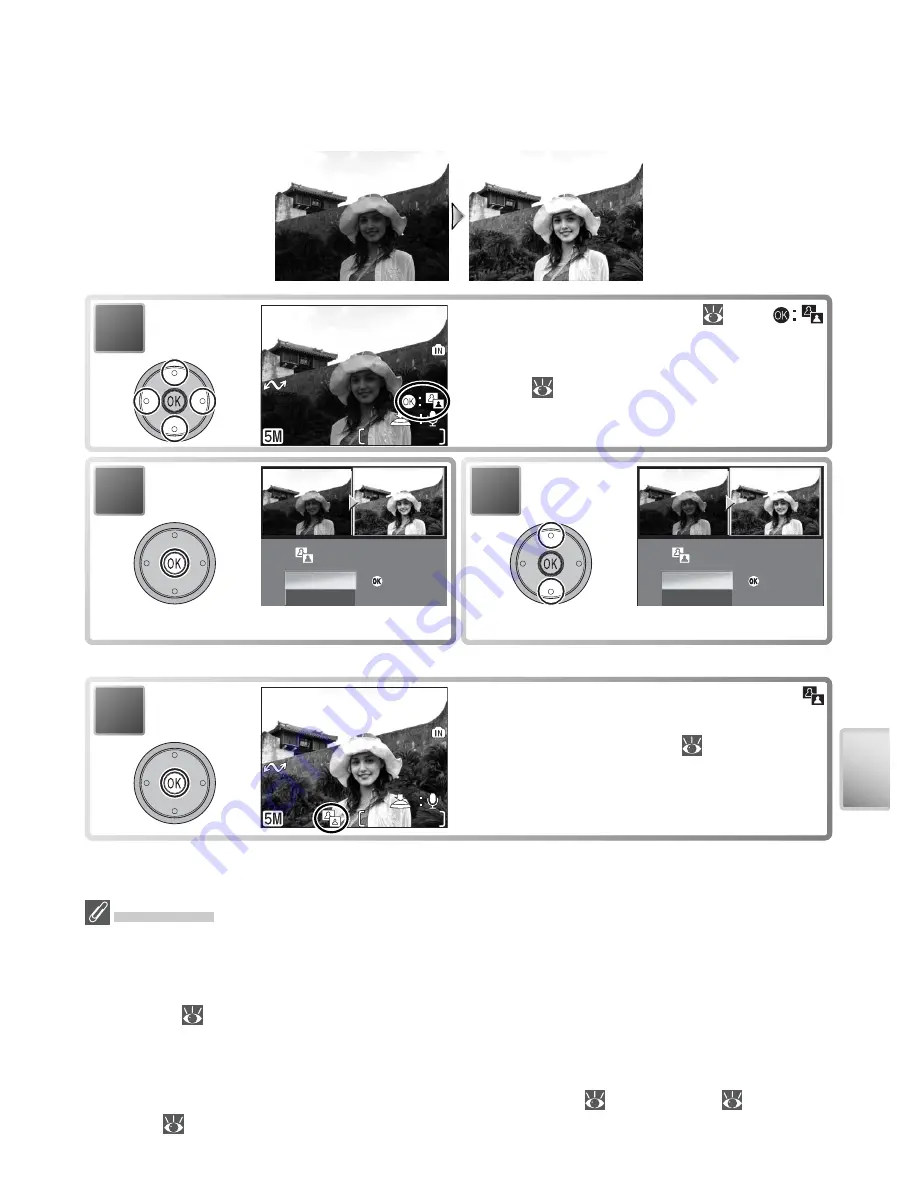
Enhancing Contrast: D-Lighting

D-lighting can be used to create a copy of a picture with enhanced brightness 
and contrast, brightening dark or backlit subjects.

3

:Confirm

:Confirm

:Confirm

Cancel

D-Lighting

OK

Highlight 

OK

.

 *

2

:Confirm

:Confirm

:Confirm

Cancel

D-Lighting

OK

Confi rmation dialog displayed.

Original (without 

D-lighting)

Copy (with
D-lighting)

* To exit without creating copy, highlight 

Cancel 

and press center of multi selector.

 D-Lighting

Copies are created with the same transfer marking and date and time or recording as 
the original, but any changes to transfer marking or to protect and print attributes must 
be made separately.  See the Appendix for more information on how D-lighting copies 
are stored (

 93–94).

Copies can only be created if suffi cient memory is available.  Copies created with 
D-lighting may not display or transfer correctly when viewed on other models of Nikon 
camera.   D-lighting is not available with cropped copies (

 42), movies (

 40), small 

pictures (

 70), or copies created with D-lighting.

Display picture full-frame (

 41).  


(D-lighting) guide will be displayed if 
D-lighting is available with selected 
picture (

 4).

Create copy.  During playback, 


(D-lighting) icon is displayed on copies 
created with D-lighting (

 4).

4

1

1

/

1

04.20.2005

04.20.2005

16:30

16:30

100NIKON

100NIKON

0008.JPG

0008.JPG

04.20.2005

16:30

100NIKON

0008.JPG

1

/

1

1

/

1

04.20.2005

04.20.2005

16:30

16:30

100NIKON

100NIKON

0011.JPG

0011.JPG

04.20.2005

16:30

100NIKON

0011.JPG

1

/

1

Содержание Coolpix S1

Страница 1: ...En The Nikon Guide to Digital Photography with the DIGITAL CAMERA En ...

Страница 2: ...e and Acrobat are registered trademarks of Adobe Systems Inc PictBridge is a trademark D Lighting technology is provided by Apical Limited Face priority AF technology is provided by Identix All other trade names mentioned in this manual or the other documentation provided with your Nikon product are trademarks or registered trademarks of their respective holders Attaching the Camera Strap Attach t...

Страница 3: ...rmation is available elsewhere in this manual or in the Quick Start Guide Memory Cards Pictures taken with this camera can be stored in the camera s internal memory or on removable memory cards If a memory card is inserted all new pictures will be stored on the memory card and delete playback and format operations will apply only to the pictures on the memory card The memory card must be removed b...

Страница 4: ...on after unplugging the product and or removing the battery Do not use the camera or AC adapter in the presence of flammable gas Do not use electronic equipment in the presence of flammable gas as this could result in explosion or fire Handle the camera strap with care Never place the strap around the neck of an infant or child Keep out of reach of children Particular care should be taken to pre v...

Страница 5: ...immediately should you notice any change in the battery such as discoloration or deformation Use appropriate cables When connecting cables to the input and output jacks use only the cables provided or sold by Nikon for the pur pose to maintain compliance with product regulations Handle moving parts with care Be careful that your fingers or other ob jects are not pinched by the lens cover or other ...

Страница 6: ...equires the user to be notified that any changes or modifications made to this device that are not expressly approved by Nikon Corporation may void the user s authority to operate the equipment Interface Cables Use the interface cables sold or provided by Nikon for your equipment Using other interface cables may exceed the limits of Class B Part 15 of the FCC rules Notice for customers in the Stat...

Страница 7: ...rtificates etc commuter passes or coupon tickets except when a minimum of necessary copies are to be provided for business use by a com pany Also do not copy or reproduce passports issued by the government licenses issued by public agencies and private groups ID cards and tickets such as passes and meal coupons Comply with copyright notices The copying or reproduction of copy righted creative work...

Страница 8: ...tep 1 Select Mode 14 Step 2 Frame the Picture 15 Step 3 Focus and Shoot 16 Step 4 View the Results 17 More on Photography 18 Using the Flash 18 Taking Pictures with the Self Timer 20 Easy Close ups Macro Close up Mode 21 Scene Mode 22 Framing Assist and 23 Other Scenes 28 Voice Recordings 33 Movies 36 Movie Mode 36 Recording Movies 38 Viewing Movies 40 More on Playback 41 Viewing Pictures on the C...

Страница 9: ...Small Picture 70 Copy 71 The Setup Menu 72 Welcome Screen 73 Date 74 Monitor Settings 76 Date Imprint 77 Sound Settings 78 Blur Warning 78 Auto Off 79 Format Memory Format Card 79 Language 80 Interface 80 AF Assist 80 Reset all 80 Menus 81 Firmware Version 81 Technical Notes 82 Optional Accessories 82 Caring for the Camera 83 Error Messages 86 Troubleshooting 89 Appendix Focus Lock File Storage an...

Страница 10: ... camera are engineered and proven to operate within the operational and safety requirements of this electronic circuitry THE USE OF NON NIKON ELECTRONIC ACCESSORIES COULD DAMAGE THE CAMERA AND MAY VOID YOUR NIKON WARRANTY The use of third party rechargeable Li ion batteries not approved by Nikon could interfere with normal operation of the camera or result in the batteries overheating igniting rup...

Страница 11: ...st profits that may result from product malfunction Life Long Learning As part of Nikon s Life Long Learning commitment to ongoing product support and education continually updated information is available on line at the following sites For users in the U S A http www nikonusa com For users in Europe and Africa http www europe nikon com support For users in Asia Oceania and the Middle East http ww...

Страница 12: ...des Scene 22 Choose from sixteen scenes suited to different sub jects or shooting conditions and let the camera do the rest An additional voice recording mode is available for creating audio recordings 33 Power on lamp 12 14 Shutter release button 16 Eyelet for camera strap Power switch 12 Speaker 33 40 44 Self timer lamp 20 AF assist illuminator LED 16 80 83 95 Microphone 33 36 44 Built in flash ...

Страница 13: ...5 72 Multi selector Menu navigation Display sub menu move cursor right or make selection Menu navigation Move cursor up Shooting Display flash mode menu 18 Menu navigation Cancel and re turn to previous menu or move cursor left Shooting Display self timer mode menu 20 Menu navigation Move cursor down Shooting Display macro mode menu 21 Press center to make selec tion ...

Страница 14: ... settings Shooting Playback 100NIKON 100NIKON 9999 9999 9999 9999 9999 9999 01 01 2005 01 01 2005 01 01 2005 00 00 00 00 00 00 100NIKON 9999 JPG 9999 JPG 9999 JPG START START START 13 12 10 14 1 2 3 6 5 7 8 9 11 4 19 18 17 16 15 1 0 1 0 1 0 AUTO AUTO AUTO 999 999 999 10 10 10 50 100 200 400 AUTO 1 3 2 4 5 6 7 12 14 13 15 16 17 18 20 21 10 8 9 11 19 ...

Страница 15: ...is pressed 2 Displayed when shutter release button is pressed halfway 3 Appears when batteries are running low 4 Appears at slow shutter speeds to warn that pic tures may be blurred 5 Appears when camera clock has not been set 1 Current folder 93 94 2 File number and type 93 94 3 Internal memory memory card indicator 14 16 41 4 Battery level indicator1 14 5 D Lighting guide 43 6 Volume indicator 3...

Страница 16: ...he camera in the COOL STATION as shown below making sure that the connector is fully inserted in the match ing connector on the COOL STATION Removing the Camera from the COOL STATION Remove the camera as shown below The EH 63 AC Adapter The supplied EH 63 AC adapter can be connected directly to the camera or via the MV 11 COOL STATION to charge the battery or power the camera 8 Camera connector 8 ...

Страница 17: ...irst Steps Inserting the Battery The camera uses a rechargeable Nikon EN EL8 lithium ion battery supplied 1Open the battery chamber cover Slide the cover in the direction shown until it opens 2Insert the battery Insert the battery as shown in the label inside the battery chamber cover The orange battery latch is pushed aside as the battery is inserted 3Close the battery chamber cover Close the cov...

Страница 18: ...N s DC IN connector and then plug the power cord into a household AC power outlet The power lamp on the AC adapter will light 2Turn the camera off Charging the Battery Check that the camera power on lamp is off The battery will not charge when the camera is on 3Place the camera in the COOL STATION Place the camera in the COOL STATION with the monitor facing forwards and the connector fully inserte...

Страница 19: ...t the battery slide the battery latch in the direction shown The battery can then be removed by hand Note that the battery may become hot during use observe due caution when removing the battery EN EL8 Batteries Before using the EN EL8 read and follow the warnings and cautions on pages ii iii and 85 of this manual The EH 63 AC Adapter The supplied EH 63 AC adapter can also be connected di rectly t...

Страница 20: ...card must be removed from the camera before internal memory can be formatted or used to record delete or view pictures To insert a memory card 1Confirm that the power on lamp is off Inserting Memory Cards Turn the camera off before inserting or removing memory cards 2Insert the memory card Open the memory card slot cover and slide the memory card in termi nals first until it clicks into place Inse...

Страница 21: ...era setup menu 79 Removing Memory Cards Memory cards can be removed without loss of data when the camera is off To remove memory cards turn the camera off and confirm that the power on lamp is off Do not open the memory card slot cover while the power on lamp is lit Open the memory card slot cover and press the card in to par tially eject the card The card can then be removed by hand ...

Страница 22: ...power on lamp is off Do not remove the battery or memory card or disconnect the AC adapter until the power on lamp has gone out Auto Power off Stand by Mode If no operations are performed for about five seconds the monitor will gradually dim to save power Full brightness can be restored by pressing the shutter release button or operating any of the controls next to the monitor If no operations are...

Страница 23: ...ect Month Repeat steps 8 9 to edit Month Year hour and minute 12 AUTO AUTO AUTO 10 10 10 Exit to current mode 11 DATE DATE DATE Confirm Confirm Confirm 2005 04 20 15 10 Y M M D Choose date display order The Camera Clock The clock battery charges when the main battery is installed or an AC adapter is con nected and can provide several days of backup power after about 10 hours of charg ing The clock...

Страница 24: ...93 Battery indicator ap pears when battery is running low five options depending on how picture will be used 59 Default is Shooting mode indi cates auto mode Flash mode choose from five modes according to light ing and creative intent 18 Default is AUTO The Battery Indicator Display Description NO ICON Battery fully charged Low battery prepare to recharge or change battery If flash fires monitor w...

Страница 25: ...your sub ject increasing the area visible in the frame Press the button to zoom in on your subject so that it fills a larger area of the frame When the camera is zoomed in to maximum magnification holding the button down for over a second will trigger digital zoom and the zoom indicator will turn yellow Use the and buttons to adjust zoom in the digital zoom range To cancel digital zoom press until...

Страница 26: ...e shutter release button the rest of the way down to take the picture To prevent blur press the shutter release button down smoothly a blur warn ing may appear at slow shutter speeds 78 Focus indicator Indicator lamp flash lamp During Recording While pictures are being recorded the internal memory memory card indicator or will blink The camera can continue to take pictures until the wait icon is d...

Страница 27: ...he monitor press the button A confirmation dia log will be displayed press the multi selector up or down to highlight an option and then press the center of the multi selector to make a selection No Exit without deleting the picture Yes Delete the picture Step 4 View the Results 1Press the button A picture will be displayed in the monitor Confirm Confirm Confirm Erase 1 image s Erase 1 image s Era...

Страница 28: ...ed Flash Cancel off Flash will not fire even when lighting is poor Use to capture natural lighting under dim light or where use of flash is prohib ited If camera shake icon appears care should be taken to avoid blurring Anytime Flash fill flash Flash fires whenever picture is taken Use to fill in illuminate shadows and back lit subjects Slow sync Auto flash combined with slow shutter speeds Use to...

Страница 29: ...ause the subject s pupils to contract before the flash fires The camera then analyzes the image for red eye if red eye is detected the image will be processed to reduce its ef fects In Camera Red Eye Fix This slightly increases the amount of time needed to record each picture If red eye reduction does not produce the desired results try again at another flash setting Default Flash Mode When the ca...

Страница 30: ... seconds Selection is shown by icon in display AUTO AUTO AUTO 10 10 10 10 10 10 Set focus and exposure 4 AUTO AUTO AUTO 10 10 10 9 9 Start timer display in monitor shows seconds remaining before shutter is released To stop timer before picture is taken press shutter release button again or press multi selector left 5 Taking Pictures with the Self Timer The camera is equipped with a ten second time...

Страница 31: ...ro close up mode the camera focuses continuously even when the shutter re lease button is not pressed halfway 2 OFF ON OFF OFF OFF Macro close up Confirm Confirm Confirm Highlight ON 1 Macro close up OFF ON Confirm Confirm Confirm OFF OFF OFF Display macro close up menu 4 AUTO AUTO AUTO 10 10 10 Frame picture Minimum focus dis tance varies with zoom position if zoom is adjusted until icon turns gr...

Страница 32: ...up menu 72 image mode Select an image mode setting from the menu shown at right 59 voice recording Create a voice recording 33 To display any of the above options highlight the corresponding icon and press the center of the multi selector IMAGE MODE IMAGE MODE IMAGE MODE Exit Exit Exit Confirm Confirm Confirm High 2592 Normal 2048 PC screen 1024 TV screen 640 Help For help on the current menu opti...

Страница 33: ...menu 4 10 10 10 Framing guides displayed in monitor 3 PORTRAIT LEFT PORTRAIT LEFT PORTRAIT LEFT Exit Exit Exit Confirm Confirm Confirm Help Help Help Highlight composition type 10 10 10 Position subject in framing guides and take picture 5 Using the Guides Your subject does not have to fit exactly in the framing guides Depending on the mode selected restrictions may apply to flash mode 18 the self...

Страница 34: ...ace in top half of frame Camera focuses on face area in framing guide Portrait couple Compose shot with two subjects side by side Camera fo cuses on closest subject Portrait figure Compose shot in tall orientation Camera focuses on sub ject in framing guide Other modes can be selected Face priority AF Frame up to three subjects from waist up Camera focuses until it detects face of portrait subject...

Страница 35: ...era focuses at infinity AF indicator lights whenever shutter release button is pressed halfway Architecture Photograph buildings Framing gird helps keep verticals and horizontals aligned with the frame Camera focuses at infinity AF indicator lights whenever shutter release button is pressed halfway Group right Compose shot with portrait subjects at right and landmark or other object in background ...

Страница 36: ... white balance for all pictures are determined by the first shot in each series Sport spectator Shutter release button can be pressed in one motion with out pausing halfway to check focus Camera focuses at about 4 5m 14 9 to infinity at widest angle 6m 20 to infinity at maximum zoom AF indica tor lights whenever shutter release button is pressed halfway While shut ter release button is fully press...

Страница 37: ...ocuses on subject in center of frame Portrait left Compose shot with subject in left half of frame Camera fo cuses on subject in framing guide Portrait right Compose shot with subject in right half of frame Camera focuses on subject in framing guide Portrait close up Compose shot with subject s face in top half of frame Camera focuses on face area in framing guide Portrait couple Compose shot with...

Страница 38: ...ons are noted on the pages that follow 2 10 10 10 Return to shooting mode Icon for selected scene appears in monitor 1 PARTY INDOOR PARTY INDOOR PARTY INDOOR Exit Exit Confirm Confirm Exit Confirm Help Help Help Highlight scene Camera Shake At slow shutter speeds a icon appears in the monitor to warn that pictures may be blurred The following indicate the precautions that can be taken to avoid blu...

Страница 39: ... infinity AF indicator lights when ever shutter release button is pressed halfway AF as sist illuminator can not be used Off Auto Beach Snow Captures the brightness of such subjects as snowfields beaches or sunlit expanses of water Noise Reduction Noise in the form of randomly spaced brightly colored pixels tends to appear in pic tures taken at slow shutter speeds This effect is particularly notic...

Страница 40: ...d art galleries or in other set tings in which you do not want to use the flash Best Shot Selector BSS 63 turns on automatically AF assist illuminator can not be used Photography may be prohibited in some settings Ob tain permission first On Auto Hold camera steady Close up Use to photograph flowers insects and other small objects at ranges as close as 4cm 1 6 with the back ground artistically blu...

Страница 41: ...erly sealed Leakage could not only cause irreparable damage to the camera but could also result in fire electric shock or the release of poisonous gas See the WP CP5 instruction manual for details Panorama Assist Flash mode 18 the self timer 20 and macro close up 21 can be adjusted after the pan direction is selected Once the first shot in each series is taken the pan direction zoom flash mode mac...

Страница 42: ...on view through lens if pan direction is left to right picture will appear on left side of monitor AE L icon turns white to show that white balance and exposure settings for this picture apply to all shots in series 5 8 End series Shooting will also end if a new mode is selected or camera enters standby mode 7 Take next shot Repeat steps 6 7 un til all shots in series have been taken 6 Compose nex...

Страница 43: ...ng While recording is paused self timer and indicator lamps will blink To create an index press the multi selector up down left or right during recording Camera can skip to any index during playback Start of recording is index number 01 other numbers are assigned in ascending order to maximum of 98 VOICE RECORDING VOICE RECORDING VOICE RECORDING Back Back Back Max rec time 04 20 2005 15 46 00 20 1...

Страница 44: ...er 5 Progress indicator 6 Date of recording 7 Length of recording 8 Volume 9 Index 3 SELECT SOUND FILE SELECT SOUND FILE SELECT SOUND FILE Play Play Play Copy Copy Copy 002 04 20 2005 15 51 003 04 20 2005 15 53 Select recording Press multi selector left or right to highlight control press center to select Control Description Pause playback Resume playback Recording advances while center of multi s...

Страница 45: ... 46 Display list of voice recording files COPY SOUND FILES COPY SOUND FILES COPY SOUND FILES Exit Exit Exit Confirm Confirm Confirm 7 Exit Exit Exit Confirm Confirm Confirm CAMERA TO CARD CAMERA TO CARD CAMERA TO CARD Selected files will be copied OK Yes No No Confirmation dialog displayed To copy files highlight Yes and press 6 SELECT SOUND FILES SELECT SOUND FILES SELECT SOUND FILES Exit Confirm...

Страница 46: ...ame size of 640 480 38 Shoot flowers opening butterfly emerging from cocoon etc 9 5s 143 frames 120s 1800 frames Approximate maximum total length may vary with make of card Shooting can continue to limit of available memory Regardless of actual maximum total length maximum value shown in camera expo sure count display is 999 To choose the type of movie that will be recorded Movies 1 0h 0m 47s 0h 0...

Страница 47: ...ion to prevent sound of camera focusing from interfering with recording Continuous AF Camera adjusts focus continuously To choose a focus option highlight Auto focus mode in the MOVIE menu 36 and press the multi selector to the right then follow the steps below 3 Return to shooting mode 2 MOVIE MOVIE MOVIE Exit Exit Exit Confirm Confirm Confirm Help Help Help SET UP Movie options Auto focus mode M...

Страница 48: ...4 Recording Time Lapse Movies Selecting Time lapse movie from the MOVIE menu 36 displays the menu shown in Step 1 below 2 Exit Exit Exit SET INTERVAL TIME 1 2 SET INTERVAL TIME 1 2 SET INTERVAL TIME 1 2 Confirm Confirm Confirm 1m 5m 10m 30m 30s Display interval options 1 TIME LAPSE MOVIE TIME LAPSE MOVIE TIME LAPSE MOVIE Exit Exit Exit Confirm Confirm Confirm AE lock Set interval time Highlight Se...

Страница 49: ...APSE MOVIE Exit Exit Exit Confirm Confirm Confirm Set interval time AE lock AE lock Highlight AE lock Exit Exit Exit SET INTERVAL TIME 1 2 SET INTERVAL TIME 1 2 SET INTERVAL TIME 1 2 Confirm Confirm Confirm 30s 5m 10m 30m 1m Choose interval between shots Press center of multi selector to make selec tion and exit 3 Use a Reliable Power Source If possible use the supplied EH 63 AC adapter when recor...

Страница 50: ...n the thumbnail list 41 press the button A confirmation dialog will be displayed press the multi selector up or down to highlight an option then press the center of the multi selector Yes delete movie No exit without deleting movie Playback display Control Description Movie rewinds while center of multi selector is pressed Playback resumes when multi selector is released Movie advances while cente...

Страница 51: ... following operations can be performed while thumbnails are displayed 1 1 3 3 2 2 4 4 1 1 2 2 3 3 4 4 To Press Description Highlight pictures Use multi selector to highlight pictures Change number of pictures displayed W T With four thumbnails displayed press W button once to view nine thumbnails Press T to zoom in from nine to four thumbnails or when four thumbnails are displayed to view highligh...

Страница 52: ...ector up or down to highlight option press center to select Select No to exit without creating cropped copy Select Yes to create new picture contain ing only area visible in monitor Confirm Confirm Confirm Save this image Save this image as displayed as displayed Save this image as displayed Yes No Cropped Copies Cropped copies are stored as JPEG files with a compression ratio of 1 8 Depending on ...

Страница 53: ...ust be made separately See the Appendix for more information on how D lighting copies are stored 93 94 Copies can only be created if sufficient memory is available Copies created with D lighting may not display or transfer correctly when viewed on other models of Nikon camera D lighting is not available with cropped copies 42 movies 40 small pictures 70 or copies created with D lighting Display pi...

Страница 54: ...rked by voice memo playback guide and icons Press shutter release but ton to play voice memo Playback ends when voice memo ends or shutter release button is pressed again Change volume Zoom button controls volume during playback Press to lower volume to increase Delete picture or voice memo Confirmation dialog displayed Press multi selector up or down to highlight option press center to select Sel...

Страница 55: ...ION s A V out connector Insert the yellow plug into the video in jack on the television or VCR Connect the white plug to the audio in jack 3Tune the television to the video channel If in doubt consult the documentation for your television or VCR 4Turn the camera on Press the button for about a second to turn the camera on The camera monitor will remain off and the television will show the image no...

Страница 56: ...transferred using Camera multi selector button PictureProject button Windows XP Home Edition Windows XP Professional Windows 2000 Professional Windows Millennium Edition Me Windows 98 Second Edition SE Choose Mass Storage 1 2 Mac OS X 10 1 5 or later Choose PTP Choose Mass Storage1 or PTP 1 The center of the multi selector can not be used to transfer pictures from internal memory or from locked wr...

Страница 57: ...it Confirm Confirm Confirm PTP g Mass storage Highlight PTP or Mass storage 4 INTERFACE INTERFACE INTERFACE Exit Exit Exit Confirm Confirm Confirm Video mode Auto transfer USB USB Select highlighted option Connecting the USB Cable 1Place the camera in the COOL STATION Turn the camera off and place it in the COOL STATION 2Connect the USB cable If the computer is not already running turn it on and w...

Страница 58: ...N while data are being transferred Failure to observe this precaution could result in product or computer malfunction Transferring Pictures from Internal Memory Data in internal memory can not be copied to the computer when a memory card is inserted in the camera Remove the memory card before attempting to transfer data from internal memory Voice Recordings PictureProject can not be used to transf...

Страница 59: ...e Safely Remove Hardware icon in the taskbar and select Safely remove USB Mass Storage Device from the menu that appears Windows 2000 Professional Click the Unplug or Eject Hardware icon in the taskbar and select Stop USB Mass Storage Device from the menu that appears Windows Millennium Edition Me Click the Unplug or Eject Hardware icon in the taskbar and select Stop USB Disk from the menu that ap...

Страница 60: ...ible printers or devices that support DPOF 1 100NIKON 100NIKON 1 1 1 1 04 20 2005 04 20 2005 04 20 2005 15 30 15 30 15 30 100NIKON 0001 JPG 0001 JPG 0001 JPG Select playback mode 2 PLAYBACK MENU PLAYBACK MENU 1 2 1 2 PLAYBACK MENU 1 2 Help Help Help Exit Exit Exit Confirm Confirm Confirm SET UP Slide show Delete Protect rint set rint set Display playback menu 3 PLAYBACK MENU PLAYBACK MENU 1 2 1 2 ...

Страница 61: ... are marked with a Date Print date of recording on all pictures in print order Info Print shutter speed and aperture on all pictures in print order To complete print order and return to playback highlight Done and press center of multi selector To exit without altering print order press button Done Done Done Print Set and Digital Print Order Format DPOF Print set creates a print order in Digital P...

Страница 62: ...ault option is Mass storage 2Connect the USB cable After confirming that the camera is off place it in the COOL STATION and connect the UC E10 USB cable as shown below 3Turn the camera on Turn the camera and printer on A PictBridge start up screen will be dis played The camera will then enter full frame playback with the PictBridge logo displayed in the monitor 1 1 1 1 1 The Thumbnail Display To v...

Страница 63: ...ist Select picture for printing Select number of copies and choose page size 54 Print picture 54 Printing Multiple Pictures Press button Print Selected pictures 56 All pictures 55 Current print order 57 Choose page size 55 Printing Pictures To reduce the drain on the battery when printing use the supplied EH 63 AC adapter PictBridge PictBridge is an industry standard for direct printing that ensur...

Страница 64: ... and return to print menu Paper size Highlight this option and press multi selector right to display menu shown at right Press multi selec tor up or down to highlight Default default page size for current printer 3 5 x5 5 x7 Postcard 100mmx150mm 4 x6 8 x10 Letter A3 or A4 then press center to select and return to print menu Printing Pictures One at a Time To print the picture currently displayed f...

Страница 65: ...dge menu before all im ages have been printed press center of multi selector When printing is complete message shown below at right will be displayed for about two seconds followed by PictBridge menu Turn camera off and disconnect USB cable DPOF printing Print current DPOF print order 57 Paper size Menu shown at right will be displayed Press multi selector up or down to highlight Default default p...

Страница 66: ...elec tor down when number of prints is 1 Repeat steps 1 2 to select additional pictures 3 Printing Selected Pictures Print Selection Choosing Print selection in the PictBridge menu see previous page displays the menu shown in Step 1 Done Done Done When printing is complete message shown at left is displayed for about two seconds followed by PictBridge menu Turn camera off and disconnect USB cable ...

Страница 67: ...isplay Select Start print to start printing without viewing current print order Select Cancel to exit to PictBridge menu without printing Printing Printing 002 006 002 006 Printing 002 006 Cancel Cancel Cancel Start printing to interrupt printing press center of multi selector 3 Done Done Done When printing is complete message shown at left is displayed for about two seconds followed by PictBridge...

Страница 68: ...t Exit Confirm Confirm Confirm Help Help Help SET UP Image mode White balance Exp Continuous Continuous Highlight menu item 2 CONTINUOUS CONTINUOUS CONTINUOUS Exit Exit Exit Confirm Confirm Confirm Continuous Multi shot 16 Intvl timer shooting Single Display options 3 CONTINUOUS CONTINUOUS CONTINUOUS Exit Exit Exit Confirm Confirm Confirm Single Multi shot 16 Intvl timer shooting Continuous Contin...

Страница 69: ...40 480 1 8 Can be displayed full screen on television or 13 monitor Suited to distribution by e mail or web 5 4 2 1 Smaller images create smaller files that require less memory and are suited to trans mission by e mail or use in web pages When printed at larger sizes however small images will be rough and uneven in appearance To reduce the amount of memory each shot occupies pictures are compresse...

Страница 70: ...ith mixed lighting or to compensate for light sources with a strong color cast for example to make pictures taken under a lamp with a red shade look as though they had been taken under white light When White bal preset is selected from the white balance menu the camera will zoom in and the following options will be displayed Option Description Cancel Recalls the most recent value for preset white ...

Страница 71: ...teen consecutive pictures 648 486 pixels in size at rate of about 2fps and arranges them in four rows to form a single picture measuring 2 592 1 944 pixels Image mode automatically set to Normal 2592 Digital zoom can not be used Intvl timer shooting Camera takes pictures automatically at specified interval See In terval Timer Photography 62 Flash turns off automatically Focus exposure and white ba...

Страница 72: ...x for in formation on how pictures taken during interval timer shooting are stored 93 94 INTVL TIMER SHOOTING INTVL TIMER SHOOTING INTVL TIMER SHOOTING Exit Exit Exit Confirm Confirm Confirm AE lock Set interval time Set interval time Highlight Set interval time or AE lock and press center of multi selector to display sub menu Press multi selector up or down to highlight option press center to sel...

Страница 73: ...while shutter release button is fully pressed Exposure BSS Selecting this option displays sub menu shown at right Choose from Highlight BSS picture with smallest area of overexposure is selected Shadow BSS picture with smallest area of un derexposure is selected Histogram BSS of pictures with least under and over exposure camera chooses picture with overall exposure closest to optimum Camera takes...

Страница 74: ...e g when the subject is moving Noise may appear in pictures taken at settings above this value 100 Approximately equivalent to ISO 100 200 Approximately equivalent to ISO 200 400 Approximately equivalent to ISO 400 Sensitivity At settings other than Auto the current sensitivity setting is shown in the display 4 5 Color Options At settings other than Standard color the current color option setting ...

Страница 75: ...rrent picture 70 Copy Copy files between memory card and internal memory 71 Setup Display the setup menu 72 To display the playback menu 1 100NIKON 100NIKON 1 1 1 1 04 20 2005 04 20 2005 04 20 2005 15 30 15 30 15 30 100NIKON 0001 JPG 0001 JPG 0001 JPG Select playback mode 2 PLAYBACK MENU PLAYBACK MENU 1 2 1 2 PLAYBACK MENU 1 2 Help Help Help Exit Exit Exit Confirm Confirm Confirm SET UP Slide show...

Страница 76: ...CT 04 20 2005 15 30 1 4 ON OFF Select current picture Selection shown by icon 3 Repeat steps 1 2 to select addi tional pictures To deselect pic ture select and press multi se lector down To cancel changes and exit press button 4 Done Done Done Complete operation Selecting Multiple Pictures To select multiple pictures in the Erase selected images 68 Print set 50 51 Protect 68 Transfer marking Selec...

Страница 77: ... paused the menu shown at right will be displayed Highlight Restart and press the center of the multi selector to restart the show or select End to end the show and return to the playback menu Pause Pause Pause Restart Exit Exit Exit Confirm Confirm Confirm Slide Shows The camera will enter standby mode if no operations are performed for thirty minutes Copies created with the small picture option ...

Страница 78: ...is inserted pictures will be deleted from internal memory If a memory card is inserted pictures will be deleted from the memory card DELETE DELETE DELETE Exit Exit Exit Confirm Confirm Confirm Erase 1 image s Erase 1 image s Erase 1 image s Yes No No DELETE DELETE DELETE Exit Exit Exit Confirm Confirm Confirm Yes Erasing all images excluded No Delete Protect Select pictures for protection from acc...

Страница 79: ...re identified by a icon as shown at below 100NIKON 100NIKON 1 1 1 1 04 20 2005 04 20 2005 04 20 2005 15 30 15 30 15 30 100NIKON 0001 JPG 0001 JPG 0001 JPG 1 1 3 3 2 2 4 4 1 1 2 2 3 3 4 4 Thumbnail playback Full frame playback Restrictions on Auto Transfer No more than 999 pictures can be transferred using Auto transfer To transfer more than 999 pictures use PictureProject or select and transfer pi...

Страница 80: ...onfirm Confirm Confirm 320 x 240 160 x 120 640 x 480 Highlight option After displaying picture in full frame playback or highlighting picture in thumbnail display 41 select Small pic from play back menu 65 1 Small Picture Copies are stored as JPEG files with a compression ratio of 1 16 Copies are created with the same transfer marking and date and time or recording as the original but any changes ...

Страница 81: ...lti selec tor up or down to highlight option press center to select Select No to exit without copying pictures Select Yes to copy all pictures CAMERA TO CARD CAMERA TO CARD CAMERA TO CARD Exit Exit Exit Confirm Confirm Confirm All images Selected images Selected imag Copy See Copying Voice Recordings for information on copying voice recordings 35 The camera may be unable to copy pictures that were...

Страница 82: ...camera menus and messages 80 Interface Adjust settings for connection to television or computer 80 AF assist Turn AF assist illuminator on or off 80 Reset all Restore camera settings to default values 80 81 Menus Choose how menus are displayed 81 Firmware version Display camera firmware version 81 To display the setup menu Menu Options For help on the selected option press the T button 22 To displ...

Страница 83: ...it without changing welcome screen press button Back Back Back SELECT IMAGE SELECT IMAGE SELECT IMAGE Confirm Confirm Confirm 04 20 2005 15 30 1 4 Welcome Screen If Select an image is chosen after a custom welcome screen has been selected the confirmation dialog shown at right will be displayed Select Yes to replace the existing picture with the new welcome screen No to exit leaving the welcome sc...

Страница 84: ...irm Confirm DaylightSaving London Casablanca DaylightSaving 04 20 2005 14 20 Madrid Paris Berlin Highlight or 2 TIME ZONE TIME ZONE TIME ZONE Exit Exit Exit Confirm Confirm Confirm DaylightSaving DaylightSaving 04 20 2005 13 20 Madrid Paris Berlin London Casablanca Set clock to time in selected zone Dot marks current selection To turn daylight saving time on or off highlight DaylightSaving and pre...

Страница 85: ...os Angeles Seattle Vancouver GMT 7 MST MDT Denver Phoenix La Paz GMT 6 CST CDT Chicago Houston Mexico City GMT 5 EST EDT New York Toronto Lima GMT 4 Caracas Manaus GMT 3 Buenos Aires São Paulo GMT 2 Fernando de Noronha GMT 1 Azores GMT London Casablanca GMT Location GMT 1 Madrid Paris Berlin GMT 2 Athens Helsinki GMT 3 Moscow Nairobi GMT 4 Abu Dhabi Dubai GMT 5 Islamabad Karachi GMT 6 Colombo Dhak...

Страница 86: ...how info Indicators are displayed in moni tor Hide info Indicators are not displayed in monitor Brightness Press the multi selector up or down to increase or decrease the brightness of the monitor by moving the arrow to the left of the display up or down Press the center of the multi selector to put the new setting into effect AUTO AUTO AUTO 10 10 10 100NIKON 100NIKON 1 1 1 1 04 20 2005 04 20 2005...

Страница 87: ... select existing date highlight and press center of multi selector Display options Choose date format from Number of days Years and days or Yrs mnths days Press multi selector up or down to highlight option press center to select Date Imprint Data imprinted at an Image mode setting of TV screen 640 may be difficult to read Choose a setting of PC screen 1024 or larger when using the date imprint op...

Страница 88: ...Off mutes shutter and start up sounds and sets play back volume to lowest level Blur Warning If On is selected for this option the warning shown at right will be displayed after shooting in situations in which pictures may be blurred Select Yes to record the picture No to delete the picture and try again The picture will be recorded automatically if no operations are performed for about twenty sec...

Страница 89: ...d Format memory and for mats internal memory Otherwise it is named Format card and formats the memory card for use in the camera Note that formatting permanently deletes all data including protected pictures and any other files that may be present Before formatting be sure to transfer any valued pictures to a computer 46 49 The following options will be displayed if a memory card is inserted Optio...

Страница 90: ...ssist illuminator will not light if Off is selected for AF assist landscape assist sports assist Dusk Dawn Night landscape Close up Museum Fireworks show or Under water is selected in scene mode a setting other than PORTRAIT is selected in portrait assist mode or a setting other than NIGHT PORTRAIT is selected in night portrait assist mode Reset all Select Reset to restore the following settings t...

Страница 91: ...ither deleting all pic tures 68 or formatting the memory card or internal memory 79 Menus This option controls how the movie 37 shooting 58 playback 65 and setup menus are displayed Choose from Text and Icons SHOOTING MENU 1 2 SHOOTING MENU 1 2 SHOOTING MENU 1 2 Exit Exit Exit Confirm Confirm Confirm Help Help Help SET UP White balance Exp Continuous Image mode Image mode Text Image mode Image mod...

Страница 92: ...8MB 256MB 512MB 1GB Toshiba 16MB 32MB 64MB 128MB 128MB 256MB 256MB 512MB High speed 10MB s Operation is not guaranteed with other makes of card For more details on the above cards please contact the manufacturer Memory Cards Use only Secure Digital SD memory cards Format memory cards before first use Do not eject the memory card turn the camera off remove the battery disconnect the AC adapter or r...

Страница 93: ...or deleted Forcibly cutting power in these circumstances could result in loss of data or in damage to product memory or in ternal circuitry To prevent an accidental interruption of power avoid carrying the product from one place to another while the AC adapter is connected Do not drop The product may malfunction if sub jected to strong shocks or vibration Keep away from strong magnetic fields Do n...

Страница 94: ...g the eyes or mouth Body Use a blower to remove dust dirt or sand then wipe gently with a soft dry cloth After using the camera at the beach or seaside wipe off any sand or salt with a dry cloth lightly dampened with fresh water then dry thoroughly The camera may be damaged if foreign matter gets inside the camera body Nikon cannot accept liability for damage caused by dirt or sand Do not use alco...

Страница 95: ... use the battery at ambient temperatures below 0 C 32 F or above 40 C 104 F During charging the temperature should be in the vicinity of 5 35 C 41 95 F Note that the battery may become hot during use wait for the battery to cool before charging Failure to observe these precautions could damage the battery impair its performance or prevent it from charging normally On cold days the capacity of batt...

Страница 96: ... off or button pressed during recording Message clears from display automatically when recording is complete 16 MEMORY CARD IS WRITE PROTECTED Write protect switch is in lock position Slide write protect to write position 10 THIS CARD CANNOT BE USED Error accessing memory card Use approved card Check that connectors are clean Turn camera off and confirm that memory card is correctly inserted 82 10...

Страница 97: ... CANNOT BE USED Original does not support D lighting D lighting can not be used with copies 43 FILE CONTAINS NO IMAGE DATA File created by computer or different make of camera View file on computer or cor rect make of camera THIS IMAGE CANNOT BE DELETED Attempt to delete protected picture Remove protection before de leting picture 68 NO SOUND FILE No sound file available for playback Press button ...

Страница 98: ...reconnect cable then turn camera on and print or transfer pictures Turn camera off and dis connect cable then choose new USB setting in camera setup menu and reconnect camera If error persists use Transfer button in Pic ture Project to transfer pic tures 46 49 52 57 47 PRINTER ERROR CHECK PRINTER STATUS Printer error Check printer To resume printing highlight Resume and press center of multi se le...

Страница 99: ...tor is blank Camera is off Battery is not correctly inserted or battery chamber cov er is not properly latched Battery is exhausted AC adapter is not properly connected Standby mode press shutter release button halfway Camera in COOL STATION camera connected to com puter or audio video cable connected Voice recording is being recorded Camera is shooting time lapse movie Interval timer shooting in ...

Страница 100: ...es can be selected Option other than Time lapse movie is selected in movie mode Continuous or Multi shot 16 is selected for Continuous BSS is enabled 25 26 29 31 29 31 36 61 63 Randomly spaced bright pixels noise appear in image Shutter speed too slow Noise can be reduced by Using the flash Selecting scene mode and choosing Night portrait Night landscape or Dusk Dawn as appropriate to subject and ...

Страница 101: ...cable is connected disconnect USB cable Video output is not available when USB cable is connected 80 47 52 PictureProject does not start when cam era is connected or memory card insert ed in card reader or card slot Camera is off Supplied AC adapter is not properly connected or bat teries are exhausted USB cable is not correctly connected or card not prop erly inserted in card reader or card slot ...

Страница 102: ... is pressed halfway and remain locked while the shutter release button is held in this position focus lock Focus lock can be used to take pictures of off center subjects or in situations in which the camera is unable to focus using autofocus Do not change distance between camera and subject while focus lock is in effect If subject moves release shutter release button and focus again at new distanc...

Страница 103: ...ntifier a four digit file number assigned automatically by the camera in ascend ing order and a three letter extension e g DSCN0001 JPG Movies are recorded as QuickTime movie files and can be played back on a computer after transfer Type Identifier Extension Original Still picture DSCN JPG 17 Movie DSCN MOV 40 Time lapse movie INTN MOV 38 Copy Cropped copy RSCN JPG 42 Small copy SSCN JPG 70 Copy c...

Страница 104: ...number in memory Copy All images Copy all files copies all fold ers from the source device file names do not change but new folder numbers are assigned in ascending order starting from the largest folder number on the destina tion device 35 71 The picture displayed when playback mode is selected is the picture with the largest file number in the folder with the largest folder number File Storage I...

Страница 105: ...ogrammed auto exposure with exposure compensation 2 0 2 0EV in steps of 1 3 EV W 1 2 15 2EV T 2 9 17 3EV Aperture Range f 3 0 and f 8 5 W Electronically controlled ND filter selection Shutter Speed Mechanical and charge coupled electronic shutter 2 1 350 s Approximate frame coverage Shooting mode 97 horizontal and 97 vertical Playback 100 horizontal and 100 vertical Monitor 2 5 110 000 dot TFT LCD...

Страница 106: ...ndensation Industry standard for measuring life of camera batteries Measured at 25 C 77 F zoom adjusted with each shot flash fired with every other shot image mode set to NORMAL Unless otherwise stated all figures are for a camera with a fully charged EN EL8 battery operated at an ambient temperature of 25 C 77 F MV 11 COOL STATION Supported languages Chinese Simplified and Traditional Dutch Engli...

Страница 107: ...79mm 1 6 0 9 3 1 W H D Length of cord Approximately 1700mm 66 9 Rated input AC 100 240V 50 60Hz 0 18 0 1A EN EL8 Rechargeable Li ion Battery Weight Approximately 17g 0 6oz excluding terminal cover Rated capacity 3 7 V 730mAh Dimensions 35 mm 47 mm 5 mm 1 4 1 9 0 2 W H D exclud ing projections Type Rechargeable lithium ion battery EH 63 AC Adapter Operating temperature 0 40 C 32 104 F ...

Страница 108: ...68 Deleting pictures 17 34 40 41 44 68 all pictures 68 in full frame playback 17 selected pictures 68 Design rule for Camera File system 95 Digital Print Order Format 51 Direct Print see PictBridge D lighting 43 DPOF see Digital Print Order Format Dusk Dawn 29 E E mail 59 70 EH 63 see AC adapter EN EL8 see Batteries Error messages 86 88 Exif 2 2 95 Exif Print see Exif 2 2 Exp 61 Exposure BSS 63 Ex...

Страница 109: ... Self timer 20 Self timer lamp 2 20 Sensitivity 4 19 64 Sepia 64 Setup menu 72 81 SHOOTING menu 58 64 Shutter release button 16 Size see Image mode Slide show 67 Small picture 70 Smear 84 Sound 33 35 36 44 Sound settings 78 Speedlight see Flash Sports 26 Standard color 64 Standby mode see Auto off Strap camera 2 Sunset 29 Support information 1 T Telephoto see Zoom Television 45 59 80 connecting to...

Страница 110: ...pan SB5I00200701 11 6MA08311 No reproduction in any form of this manual in whole or in part except for brief quotation in critical articles or reviews may be made without written authorization from NIKON CORPORATION ...

Отзывы: