background image

34  

Scene Mode


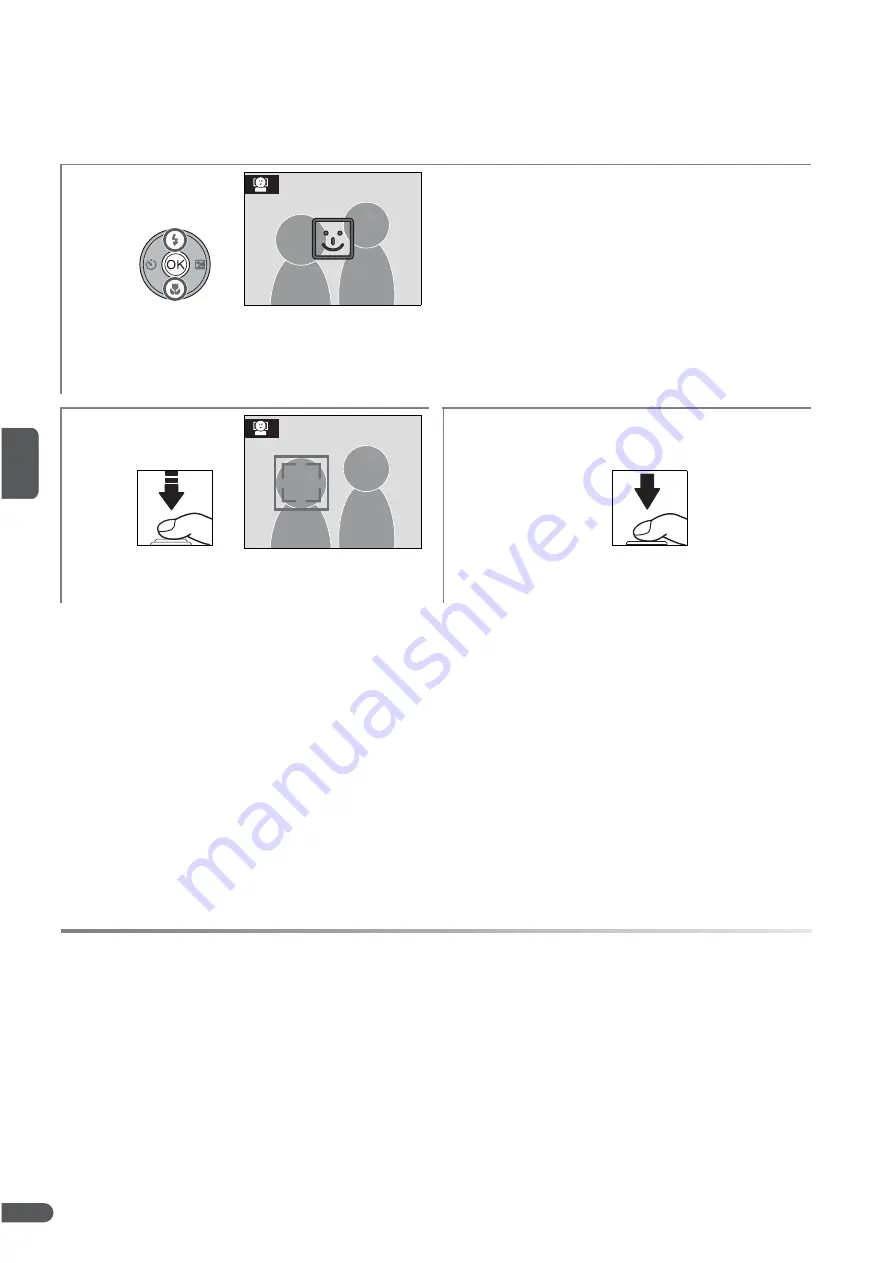
Taking Pictures in Face-Priority AF Mode

When 

K

 (face-priority AF) is selected in the scene menu (

B

 29), a 

m

 icon is dis-

played in the center of the monitor.  Take pictures as described below.

1

Frame  picture  using 

m

  icon  as  guide.

When  camera  detects  face, 

m

  will  change

to double yellow border.  If camera detects
multiple faces, it will focus on closest sub-
ject; other subjects are indicated by single
border.    If  camera  can  no  longer  detect
subject  (for  example,  because  subject  has
looked away from camera), borders will no
longer be displayed; recompose picture.

2

3

Set focus and exposure.  Double border 

turns green.

Take picture.

A

 Face-Priority AF

The camera’s ability to detect faces depends on a variety of factors, including whether or
not the subject is facing the camera.  The camera may be unable to detect faces that are
hidden by sunglasses or other obstructions or that occupy too much or too little of the
frame.  If no face is detected when the shutter-release button is pressed halfway, the cam-
era will focus on the subject in the center of the frame.

The camera will focus continuously until a face is detected.  If the double border flashes yel-
low when the shutter-release button is pressed halfway, the camera is unable to focus; re-
lease the button and try again.

Содержание Coolpix P5000

Страница 1: ...User s Manual DIGITAL CAMERA En ...

Страница 2: ...ion here Help Use the camera s on board help feature for help on menu items and other topics See page 7 for details Trademark Information Macintosh Mac OS and QuickTime are registered trademarks of Apple Computer Inc Microsoft and Windows are registered trademarks of Microsoft Corporation The SD logo is a trademark of the SD Card Association Adobe and Acrobat are registered trademarks of Adobe Sys...

Страница 3: ...on that should be read before using the cam era C This icon marks tips additional informa tion that may be helpful when using the camera B This icon indicates that more informa tion may be found elsewhere in this manual or in the Quick Start Guide Introduction First Steps BasicPhotographyandPlay back Scene Mode P and T Modes P S A and M Modes More on Playback Movies Voice Recordings Connecting to ...

Страница 4: ...this could result in explosion or fire Handle the camera strap with care Never place the strap around the neck of an infant or child Keep out of reach of children Particular care should be taken to prevent infants from putting batteries or other small parts into their mouths Observe caution when handling batteries Batteries may leak or explode if improperly handled Observe the following precau tio...

Страница 5: ...Use appropriate cables When connecting cables to the input and output jacks use only the cables sold or provided by Nikon for the purpose to maintain compliance with product regula tions Handle moving parts with care Be careful that your fingers or other ob jects are not pinched in the lens or other moving parts CD ROMs The CD ROMs supplied with this device should not be played back on audio CD eq...

Страница 6: ...terference will not occur in a particular installation If this equipment does cause harmful interference to radio or television reception which can be determined by turn ing the equipment off and on the user is encouraged to try to correct the interference by one or more of the following measures Reorient or relocate the receiving antenna Increase the separation between the equip ment and receiver...

Страница 7: ...ecurities issued by private companies shares bills checks gift certificates etc commuter passes or cou pon tickets except when a minimum of nec essary copies are to be provided for business use by a company Also do not copy or reproduce passports issued by the govern ment licenses issued by public agencies and private groups ID cards and tickets such as passes and meal coupons Comply with copyrigh...

Страница 8: ...h the Self Timer 26 Choosing a Focus Mode 27 Exposure Compensation 28 Scene Mode 29 P and T Modes 36 P Anti Shake Mode 36 T High Sensitivity Mode 37 P S A and M Modes 38 More on Playback 43 Viewing Multiple Pictures Thumbnail Playback 43 Taking a Closer Look Playback Zoom 43 Creating Retouched Copies 44 Voice Memos Recording and Playback 46 Movies 47 Recording Movies 47 Movie Playback 50 Voice Rec...

Страница 9: ... d Slide Show 81 j Delete 81 O Protect 81 X Transfer Marking 82 Z Hide Image 82 w Small Pic 45 f Copy 82 Basic Camera Setup The Setup Menu 83 a Menus 83 P Quick Startup 83 s Welcome Screen 84 W Date 84 r Brightness 85 h Date Imprint 86 K Vibration Reduction 87 B AF Assist 87 0 Digital Zoom 87 e Sound Settings 88 L Auto Off 88 q Format Memory Q Format Card 88 o Language 88 m Interface 89 N FUNC But...

Страница 10: ...er lenses 92 What optional flash units can I use Optional Speedlights 93 What memory cards can I use Approved memory cards 91 How do I clean the camera Cleaning the camera 96 Question Key phrase B How do I keep the monitor from turning off Auto off 88 How do I turn the monitor on and off The Q button 8 How do I adjust monitor brightness Brightness 85 How do I set the clock Date 84 How do I set the...

Страница 11: ...take bigger photographs How can I get more photos on the memory card Question Key phrase B Can I view my photographs on the camera Camera playback 22 How do I get rid of an unwanted photo Deleting individual photos 22 Can I delete several photos at once Delete 81 Can I zoom in on pictures to make sure they re in focus Playback zoom 43 Can I protect photos from accidental deletion Protect 81 Can I ...

Страница 12: ...perational and safety requirements of this electronic circuitry THE USE OF NON NIKON ELECTRONIC ACCESSORIES COULD DAMAGE THE CAMERA AND MAY VOID YOUR NIKON WARRANTY The use of third party rechargeable Li ion batteries not bearing the Nikon holographic seal shown below could interfere with normal operation of the cam era or result in the batteries overheating igniting rupturing or leaking For more ...

Страница 13: ...ld liable for damages or lost profits that may result from product malfunction CLife Long Learning As part of Nikon s Life Long Learning commitment to ongoing product support and edu cation continually updated information is available on line at the following sites For users in the U S A http www nikonusa com For users in Europe and Africa http www europe nikon com support For users in Asia Oceani...

Страница 14: ...ory shoe cover 93 8 Accessory shoe for optional flash unit 93 9 Shutter release button 20 21 10 Eyelet for camera strap 2 3 11 Zoom control 19 M thumbnail playback 43 O playback zoom 43 L help 7 12 Cable connector 55 58 61 13 Connector cover 55 58 61 14 Power connector cover for optional AC adapter kit 90 15 Self timer lamp 26 94 AF assist illuminator 25 94 16 Microphone 46 47 51 17 Lens ring 92 1...

Страница 15: ...Flash lamp 24 9 Autofocus AF lamp 20 10 Monitor 4 5 16 17 18 85 96 108 u o q w e r t y i 2 1 0 3 4 6 5 7 11 Multi selector 7 12 B button 7 N transfer button 58 13 Tripod socket 14 Battery chamber memory card slot cover 10 14 15 Memory card slot 14 16 Battery chamber 10 17 Battery latch 10 Attaching the Camera Strap Attach the strap as shown at right Repeat for the second eyelet ...

Страница 16: ...e built in flash 24 8 Flash mode optional flash unit 25 9 Internal memory indicator 17 21 10 Battery level indicator 16 11 ISO sensitivity 25 71 12 Vibration reduction 87 13 Focus area 20 33 76 14 Self timer indicator 26 15 Date not set indicator 97 16 Time zone indicator 85 17 Date imprint date counter 86 18 Number of exposures remaining 16 67 Movie length 47 19 Aperture 38 39 41 42 20 Exposure d...

Страница 17: ...17 4 Battery level indicator 16 5 File number and type 106 6 Volume indicator 46 50 7 Voice memo recording guide 46 8 Voice memo playback guide 46 9 Current frame number total number of frames 22 Movie length 50 10 D Lighting icon 44 11 Movie playback indicator 50 12 Voice memo icon 46 13 Image quality 66 14 Image size 66 15 Small picture indicator 45 16 Protect icon 81 17 Print order icon 64 18 T...

Страница 18: ...ng moni tor brightness V Movie B 47 Choose from seven movie modes S Scene B 29 Make voice recordings or choose from sixteen scenes suited to differ ent subjects or shooting conditions and let the camera do the rest U Auto B 16 A simple point and shoot mode recommended for first time users of digital cam eras P Anti shake B 36 Pre vent or reduce blur using vibration reduction and the Best Shot Sele...

Страница 19: ...ng the zoom control to T L To return to the original menu press the zoom control to T L again Press up to display D flash mode menu B24 or move cursor up Press left to display H self timer menu B26 Press center B to make selection Press right to display b exposure compensation menu B28 Press down to display E focus mode menu B27 or move cursor down Press up to move cursor up Press left to return t...

Страница 20: ...osure compensation ISO sensitivity and histogram for the current picture Shooting data are not displayed if the current picture is a movie Exposure mode P S A or M B 38 P is also displayed on pictures taken in A auto P anti shake T high sensitivity and scene modes Histogram A graph showing tone distribution The horizontal axis corresponds to pixel brightness with dark tones to the left and bright ...

Страница 21: ...y to the indentations in the charger 3Charge the battery The CHARGE lamp will blink as the battery recharges If the lamp flickers rapidly either the temperature is not in the range of 5 35 C 41 95 F supported by the charger or the battery is faulty If the battery is faulty unplug the charger immediately and bring the battery and charger to a Nikon authorized service representative for inspection A...

Страница 22: ... another make or model of AC adapter Failure to observe this precaution could result in overheating or in damage to the camera 1Open the battery chamber memory card slot cover 2Insert the battery Insert the battery in the orientation shown in the label inside the battery chamber The orange battery latch is pushed aside as the battery is inserted The battery is fully inserted when the latch clicks ...

Страница 23: ... inserting batteries To eject the battery open the battery chamber memory card slot cover and slide the bat tery latch in the direction shown The battery can then be removed by hand Note that the battery may become hot during use observe due caution when removing the battery ...

Страница 24: ...d on Use the multi selector to choose a language and set the time and date as described below in the steps that follow the multi selector controls used are highlighted in white 1 2 Turn camera on Highlight language 3 4 Confirmation dialog displayed Highlight Yes 5 6 Time zone menu displayed Display map of world time zones If daylight saving time is in effect press multi selector down to highlight ...

Страница 25: ...isplay Date menu 9 10 Edit Day order of day month and year may differ in some areas Select Month Repeat Steps 9 10 to edit Month Year hour and minute 11 12 Choose date display order Set clock and exit to shooting mode 9 9 1 125 1 125 F4 3 F4 3 ...

Страница 26: ... while data are being recorded deleted or copied to a computer Failure to observe these precautions could result in loss of data or in damage to the camera or card Do not disassemble or modify Do not bend drop or subject to strong physical shocks Do not touch the card terminals with your fingers or metal objects Do not affix labels or stickers to memory cards Do not leave in direct sunlight closed...

Страница 27: ...ore use Note that formatting permanently deletes all pictures and other data on the memory card Be sure to make cop ies of any pictures you wish to keep before beginning for matting To begin formatting press the multi selector up to highlight Format and then press B Do not turn the camera off or remove the battery or memory card until formatting is complete AThe Write Protect Switch SD cards are e...

Страница 28: ...lamp will blink and the monitor can be reactivated by pressing the shutter release button halfway The camera will turn off auto matically if no operations are performed for another three minutes 1Select U mode Rotate the mode dial to U 2Turn the camera on 2 1 Turn the camera on Press the power switch to turn the camera on The green power on lamp lights the monitor turns on and the lens extends 2 2...

Страница 29: ...and size n B 66 9 9 1 125 1 125 F4 3 F4 3 Internal memory indicator If q is displayed pictures will be recorded to internal memory If memory card is inserted q icon is no longer displayed and pictures are recorded to memory card Shooting mode 0 is dis played in U auto mode Image quality and size Choose image quality B 66 and size B 66 according to how pic ture will be used Default settings are nor...

Страница 30: ...ame the picture with the subject posi tioned in approximately the center of the monitor or viewfinder AThe Viewfinder Use the viewfinder to frame pictures when bright light makes it difficult to see the dis play in the monitor Note that because the image in the viewfinder may differ from the final picture the monitor should be used at distances of about 1m 3ft 3in or less at image sizes of 3 648 2...

Страница 31: ... qual ity If the crop would be smaller than the current image size additional pixels are added through a process known as interpolation creating a slightly grainy image The amount of zoom available before interpolation is used depends on the option currently selected for image size as shown in the following table 2 is displayed when interpolation is in effect Using digital zoom at sizes of 3 648 2...

Страница 32: ...m The focus area is not displayed when digital zoom is in effect CGetting Good Results with Autofocus Autofocus performs best when there is contrast between the subject and the back ground and the subject is evenly lit It does not perform well if the subject is very dark or moving rapidly if there are objects of sharply differing brightness in the scene e g the sun is behind the subject and their ...

Страница 33: ...ing the battery chamber memory card slot cover or removing memory cards or batteries while the Q or q icon is blinking or the o icon is displayed could affect pictures or damage the camera or card CThe Shutter Release Button To set focus and exposure press the shutter release button about halfway stopping when you feel resistance Focus and exposure lock while the shutter release button is held in ...

Страница 34: ...es are played back from internal memory If a memory card is inserted the q icon will not be displayed and pictures will be played back from the memory card Press the G button again or press the shutter release button to return to shoot ing mode when playback is complete Deleting Unwanted Pictures 1 2 Confirmation dialog displayed Highlight Yes To exit without deleting picture highlight No and pres...

Страница 35: ...ove the memory card or use the Copy option in the playback menu to copy the pictures to the memory card B 82 To Use Description B View other pictures or Press multi selector to down or right or rotate com mand dial right to view pictures in order recorded Press multi selector up or left or rotate command dial left to view pictures in reverse order Zoom picture in T O Zoom current picture in 3 with...

Страница 36: ...n subject slow shutter speeds capture background at night or under dim light N Rear curtain sync Flash fires just before shutter closes creating effect of a stream of light behind moving subjects 1 2 Display options Highlight mode 3 Make selection to exit without changing mode wait five seconds Selection is shown by icon in display if S is selected S icon is displayed for five seconds only Except ...

Страница 37: ...30 33 and can also be turned off manually B 87 although in this case the camera may not focus when lighting is poor COptional Flash Units See page 93 for information on using optional flash units mounted on the camera acces sory shoe The flash modes available with optional flash units are the same as for the built in flash Advanced Red Eye Reduction This camera uses advanced red eye reduction In C...

Страница 38: ...nal sec ond to warn that the shutter is about to be released 1 Display self timer menu 2 Highlight option 10s 10s timer Use for self portraits 3s 3s timer Use to reduce blur 3 Make selection to exit without changing mode wait five seconds Selection appears next to Y icon in display 4 Frame picture and press shutter release button halfway to set focus and exposure 5 Start timer display in monitor s...

Страница 39: ...6ft 5in or more Flash turns off automatically b Focusing limit Use for faster focus at ranges of 2m 6ft 7in or more E Macro close up Use for close ups If zoomed in or out until E icon in display turns green camera can focus on objects as close as 4cm 1 6in to lens Camera focuses continuously until shutter release button is pressed halfway 1 2 Display options Highlight mode 3 Make selection to exit...

Страница 40: ...ed when camera is turned off Using Exposure Compensation The camera tends to lower exposure when the frame is dominated by brightly lit objects and to increase exposure when the frame is mostly dark Positive compensation may therefore be required to capture the brilliancy of very bright objects that fill the frame for example sunlit expanses of water sand or snow or when the background is much bri...

Страница 41: ... Indoor F Beach Snow G Sunset H Dusk Dawn I Night landscape J Close up K Museum L Fireworks show M Copy N Back light O Panorama assist B Voice recording B 51 j Image quality B 66 n Image size B 66 1 2 Display last selected scene Display scene menu To skip Steps 2 4 press A button and rotate command dial until desired scene is displayed in monitor 3 4 Highlight option Exit to selected scene To exit...

Страница 42: ...nator will not light even if lighting is poor D U H OFF E a b 0 C Sports Freeze action with fast shutter speeds The camera focuses contin uously on the subject in center of frame until the shutter release button is pressed halfway to lock focus While the shutter release button fully pressed the camera shoots up to eight pictures at about 0 8fps image quality Normal image size 3 648 2 736 j frame r...

Страница 43: ...or is displayed in green whenever shutter release button is pressed halfway AF assist illuminator will not light even if lighting is poor D U H OFF E a b 0 I Night Landscape UJ Slow shutter speeds produce stunning night landscapes Camera focuses at infinity AF lamp lights and focus indicator is displayed in green whenever shutter release button is pressed halfway AF assist illuminator will not lig...

Страница 44: ...turns off and the camera takes up to ten shots while the shutter release button is pressed using the Best Shot Selector BSS B 75 to select the clearest picture Photography may be prohibited altogether in some settings Be sure to obtain permis sion first Hold camera steadily in both hands to prevent blur D U H OFF E Z b 0 L Fireworks Show U Slow shutter speeds are used to capture the expanding burs...

Страница 45: ...t throwing their features into shadow The built in flash fires automatically to fill in illuminate shadows Camera focuses on subject in center of frame D D H OFF E Z b 0 O Panorama Assist Use when taking a series of pictures that will later be joined together in PictureProject to form a panorama B 35 D U H OFF E Z b 0 Other options can be selected 1 2 3 Display focus area Select focus area Exit to...

Страница 46: ... displayed recompose picture 2 3 Set focus and exposure Double border turns green Take picture AFace Priority AF The camera s ability to detect faces depends on a variety of factors including whether or not the subject is facing the camera The camera may be unable to detect faces that are hidden by sunglasses or other obstructions or that occupy too much or too little of the frame If no face is de...

Страница 47: ...osed on view through lens AE L icon turns white to show that white balance and exposure settings for this pic ture apply to all shots in series 4 5 Compose next shot to overlap with previous picture Take next shot Repeat steps 4 5 until all shots in series have been taken 6 End series Shooting will also end if new mode is selected or camera enters standby mode B 16 APanorama Assist Flash self time...

Страница 48: ... in anti shake mode AP Anti Shake Mode Pictures taken in anti shake mode may be affected by noise in the form of bright ran domly spaced bright dots The flash turns off automatically and the self timer can not be used Slower shutter speeds are not available and consequently T high sensitivity mode is recommended to reduce blur when the subject is dark Date imprint B 86 is not available in anti sha...

Страница 49: ...off and use a tripod for best results The camera may be unable to focus if the subject is very dark CThe Shooting Menu Pressing the F button in T mode brings up a menu of shooting options B 65 The ISO sensitivity option in the shooting menu is not available in T mode CT High Sensitivity Versus P Anti Shake T high sensitivity mode is recommended when shooting indoors or under low light P anti shake...

Страница 50: ...r blur motion A Aperture priority auto B 41 User chooses aperture camera selects shutter speed for best results Use to blur background or bring both foreground and background into focus M Manual B 42 User controls both shutter speed and aperture CShutter Speed and Aperture The same exposure can be achieved with different combinations of shutter speed and aperture allowing you to freeze or blur mot...

Страница 51: ...am Rotate the command dial to the right for large apertures small f numbers that blur background details or fast shutter speeds that freeze motion Rotate the command dial to the left for small apertures large f numbers that increase depth of field or slow shutter speeds that blur motion All combinations produce the same exposure While flexible program is in effect an aster isk appears next to the ...

Страница 52: ... again At speeds slower than 1 4s the shutter speed indicator will turn red to show that noise reduction B 78 is recommended to reduce noise in the form of randomly spaced brightly colored dots 1 2 Rotate mode dial to S Choose shutter speed 3 Take pictures Camera automatically com pares distances to subjects in nine focus areas and sets focus and exposure for clos est subject B 76 AShutter Speed A...

Страница 53: ...he lens to the effective diameter of the opening aperture through which light enters the camera Large apertures expressed by small f numbers let more light into the camera small aper tures large f numbers less When the camera is zoomed out the focal length of the lens diminishes and the f number decreases When the camera is zoomed in the focal length and f number increase In modes A and M this eff...

Страница 54: ...ssed to right 3 Set selected item Exposure display shows amount pictures will over or under exposed at current settings see below Shutter speeds slower than 1 4s are dis played in red B 40 Shutter speed of 1 2 000s is only available if camera is zoomed all the way out and aperture is set to f 7 6 4 Select remaining item aperture or shutter speed Repeat steps 3 4 until desired exposure is achieved ...

Страница 55: ...e current picture in 3 with the center of the picture displayed in the monitor quick playback zoom The following operations can be performed while pictures are zoomed in 15 05 2007 30 15 05 2007 30 To Use B Page through pictures Highlight picture 7 Change number of pictures displayed W M T O To Use B Delete highlighted picture I Exit to full frame playback B 22 Exit to shooting mode G Shutter butt...

Страница 56: ...are independent of the originals deleting the copy has no effect on the original deleting the original no effect on the copy Copies are created with the same transfer marking and date and time of recording as the original but any subsequent changes to transfer marking or to protect and print attributes must be made separately Copies can not be created from pictures with a size of 3 648 2 432 h or ...

Страница 57: ... or 160 120 t pixels in size Sizes of 320 240 and 160 120 are indicated by a gray border during playback Creating Small Copies Small Pic To create small copy of the picture currently selected in full frame or thumbnail playback press the F button and select Small pic from the playback menu B 80 The following options will be displayed highlight a size and press B A confirmation dialog will be displ...

Страница 58: ...cated by z and g icons Press B to start and stop playback Use the zoom control to adjust volume select W to lower volume T to increase Deleting Voice Memos To delete the voice memo for the current picture press the I button The dialog shown at right will be displayed press the multi selector up or down to highlight an option and press B to select No Exit without deleting the picture or voice memo ...

Страница 59: ...f the camera is pointed at the sun or other bright light source during recording vertical comet like streaks smear may appear in the movie Avoid pointing the camera at bright light sources while filming movies 1 Rotate mode dial to p and select desired movie option B 48 Exposure count dis play shows length of movie that can be recorded 2 Press shutter release button all the way down to start recor...

Страница 60: ...160 15fps frame size 160 120 v Time lapse movie Camera takes up to 1 800 stills at specified intervals and joins them into silent movie up to 60s long Use for time lapse movies of such subjects as flowers opening or butterflies emerging from cocoons B 49 k Sepia movie 320 Record sepia movies at 15fps frame size 320 240 l B W movie 320 Record black and white movies at 15fps frame size 320 240 Auto ...

Страница 61: ...harged battery or optional EH 62A AC adapter kit Do not rotate the mode dial to a different setting during recording 1 2 Choose interval between shots Select and exit to movie options menu Press F button to exit menu 3 Press shutter release button all the way down to start recording Camera will take pictures at specified interval until shutter release button is pressed again memory is full or 1 80...

Страница 62: ...e display it in full frame playback or select it in the thumbnail list and press the I button A confirmation dialog will be displayed highlight Yes and press B to delete or highlight No and press B to exit without deleting the movie 1 Rewind recording Playback resumes when B button is released 2 Advance recording Playback resumes when B button is released 3 Pause playback 4 Go ahead one frame Adva...

Страница 63: ... recording press B AF lamp will blink Press again to resume To create index press multi selector up down left or right during recording Camera can skip to any index during playback Start of recording is index number 01 other numbers are assigned in ascending order to maximum of 98 2 Press shutter release button all the way down a second time to end recording Recording will end automatically after ...

Страница 64: ...he message No sound file will be dis played when the G button is pressed To copy voice recordings from internal memory to the memory card press the F button and follow the instructions on page 53 1 Select recording 2 Play recording To delete recording press I 3 Pause playback 8 Resume playback 2 Advance recording Playback resumes when B button is released 1 Rewind recording Playback resumes when B...

Страница 65: ...Confirmation dialog will be displayed highlight Yes and press B 4 5 Display list of voice recording files Highlight file 6 7 Selected files shown by S Repeat steps 5 6 to select additional files Confirmation dialog displayed To copy files highlight Yes and press B To deselect file highlight and press multi selector right ACopying Voice Recordings to a Computer PictureProject can not be used to tra...

Страница 66: ... Copy pictures to a computer for storage and editing B 56 59 Print pictures on a home printer B 60 63 or order prints from a photofinisher Before connecting the camera to another device it may be necessary to change the interface settings in the setup menu B 89 To prevent the camera from turning off unexpectedly use a fully charged battery or an optional EH 62A AC adapter kit ...

Страница 67: ...ect the black plug to the camera the yellow plug to the video in jack on the TV and the white plug to the audio in jack 3Tune the television to the video channel If in doubt consult the documen tation for the TV 4Press and hold the G button to turn the camera on The camera monitor will remain off and the television will show the image normally displayed in the monitor DConnecting Cables Do not use...

Страница 68: ...utton Do NOT select MTP PTP If MTP PTP is selected when camera is connected wait until Windows hardware wizard is displayed then click Cancel and disconnect camera Select Mass storage in camera USB menu before reconnecting camera When connecting to a printer B 61 set USB to MTP PTP Computer operating system Pictures transferred using Camera B button PictureProject Transfer button Windows Vista 32 ...

Страница 69: ...57 Follow the steps below to choose a USB option 1 2 Rotate mode dial to R Highlight Interface 3 4 Display options Highlight USB 5 6 Display USB options Highlight desired option 7 Select option Rotate mode dial to differ ent setting to exit setup menu ...

Страница 70: ...f the memory card is locked B 15 or if Mass storage is selected for Interface USB and no memory card is inserted Transfer pictures using the PictureProject Transfer button see below 6The pictures will be displayed in PictureProject when transfer is complete Disconnect the camera as described on the following page The PictureProject Transfer Button To copy both marked and unmarked pictures to the c...

Страница 71: ...from the system as described be low before turning the camera off and disconnecting the USB cable Windows Vista Windows XP Click the Safely Remove Hard ware icon in the taskbar and select Safely remove USB Mass Storage Device Windows 2000 Professional Click the Unplug or Eject Hard ware icon in the taskbar and select Stop USB Mass Storage Device Macintosh Drag the untitled camera volume NO NAME in...

Страница 72: ...ed to select pictures for printing B 64 See the printer manual for details Takingmemory cardstoadigitalprintservice If the service supports DPOF the camera Print set option can be used to select pictures for printing B 64 Transferring pictures to a computer Once transferred to a computer B 56 59 pictures can be printed using imaging software or uploaded to a digital print service See the applicati...

Страница 73: ...on must be selected for Interface USB in the camera setup menu before the camera can be connected to a printer B 57 2Turn the printer on 3Connect the camera to the printer using the supplied USB cable 4Turn the camera on A PictBridge start up screen will be displayed followed by the PictBridge playback screen Print selection ...

Страница 74: ...display when printing is complete repeat from Step 1 to print additional pictures Copies Choose number of copies up to 9 Paper size Choose from Default default page size for current printer 3 5 5in 5 7in Post card 100 150mm 4 6in 8 10in Letter A4 and A3 Only sizes supported by the current printer will be displayed APaper Size Paper size can not be selected from the camera if the printer does not s...

Страница 75: ...el Return to print menu Paper size Choose page size B 62 Step 3 1 2 Scroll through pictures command dial can be used in place of multi selector Select picture and set number of prints to 1 Selected items marked by icon Press zoom control to T O to display selected picture full frame Press zoom control to W M to return to thumbnail list 3 Choose number of prints up to 9 To deselect picture press mu...

Страница 76: ...ep 4 is displayed Shutter speed and aperture are not printed when the camera is connected directly to the printer 1 2 Highlight Print selected Display selection dialog To delete current print order highlight Delete print set and press B 3 Select pictures as described in steps 1 3 on page 63 4 Highlight option and press B Date Print date of recording on all pictures in print order Info Print shutte...

Страница 77: ...l be used 66 C Optimize image Control contrast sharpness and saturation 68 69 k White balance Match white balance to the light source 70 n ISO sensitivity Control the camera s sensitivity to light not available in T mode 71 p Metering Choose how the camera meters exposure 72 a Continuous Take pictures one at a time or in a sequence 73 74 L BSS Use BSS to choose the sharpest picture 75 a Auto brack...

Страница 78: ... quality prints l Normal default Normal image quality compression of 1 8 suited to most applications k Basic Basic image quality compression of 1 16 suitable for pictures that will be distributed by e mail or used in web pages n Image Size Option Description print sizes assume printer resolution of 300dpi j 3648 2736 default Will print at size of about 31 23cm 12 9in f 2592 1944 Will print at size...

Страница 79: ...g 2048 1536 Fine 14 155 Normal 27 305 Basic 51 575 e 1600 1200 Fine 22 255 Normal 43 485 Basic 77 865 d 1280 960 Fine 35 390 Normal 63 705 Basic 116 1300 i 1024 768 Fine 51 575 Normal 93 1040 Basic 155 1730 k 640 480 Fine 116 1300 Normal 175 1950 Basic 280 3120 h 3648 2432 Fine 5 55 Normal 10 110 Basic 19 215 9 3584 2016 Fine 6 65 Normal 12 135 Basic 24 265 All figures are approximate Actual capac...

Страница 80: ...turated colors Enhanced for more vivid colors C Optimize Image Option Description D Normal default Recommended in most situations E Softer Softens outlines producing natural results suitable for portraits or retouching on a computer H Vivid Enhances saturation contrast and sharpness to produce vivid images with vibrant reds greens and blues G More vivid Maximizes saturation contrast and sharpness ...

Страница 81: ...harpen ing as described on the preceding page Custom also offers a Monochrome filter option for the following color filter effects Option Description None No color filter effect Yellow Enhances contrast Can be used to tone down the brightness of the sky in land scape photographs Orange produces more contrast than yellow red more con trast than orange Orange Red Green Softens skin tones Can be used...

Страница 82: ...Neutral colored object used as a reference to set white balance under unusual lighting conditions see below n Daylight White balance adjusted for direct sunlight p Incandescent Use under incandescent lighting o Fluorescent Use under most types of fluorescent lighting m Cloudy Use when taking pictures under overcast skies r Flash Use with the flash 1 Place white or gray reference object under light...

Страница 83: ...ng ISO sensitivity to a maximum of ISO 800 note that ISO sensitivity is fixed at 64 in mode M The current ISO sensitivity is displayed in the monitor at settings other than Auto B 4 If Auto is selected an ISO icon will be displayed when sensitivity is raised above ISO 64 n ISO Sensitivity AISO 3200 Image sizes over 2 592 1 944 f are not available at ISO 3200 B 66 If 3 648 2 736 j 3 648 2 432 h or ...

Страница 84: ...r of monitor see right Ensures that subject in metering target is correctly exposed even if background is much lighter or darker Can be used with focus lock B 77 to meter off cen ter subjects s Spot AF area Camera meters selected focus area B 76 Not available when Center is selected for AF area mode if Center is selected for AF area mode when spot AF area metering is in effect Metering will be set...

Страница 85: ... Continuous While shutter release button is pressed camera takes up to eight pictures at up to 0 8 frames per second fps 0 Continuous flash While shutter release button is pressed camera takes 3 shots at up to 0 8 fps using flash Once shooting ends no additional pictures can be taken until flash has charged Pictures may be affected by noise randomly spaced brightly colored dots e Intvl timer shoot...

Страница 86: ...g recording See the Appendix for information on how pictures taken using interval timer photography are stored B 106 1 Choose interval between shots Press B to make selection then press F to return to shooting mode 2 Press shutter release button all the way down to start recording Camera will take pictures at specified interval until shutter release button is pressed again memory is full or 1 800 ...

Страница 87: ...flash turns off automatically when auto bracketing is on L BSS Option Description On Camera takes up to ten shots while shutter release button is pressed These images are compared and sharpest picture picture with highest level of detail is saved Flash turns off automatically and focus exposure and white balance for all photos are determined by first picture in series Off default BSS off a Auto Br...

Страница 88: ...relatively stationary subjects not in center of frame Press multi selector up down left or right to select from 99 focus areas in large frame shown at right Pictures can be taken while focus area selection screen is displayed To end focus area selec tion and adjust flash focus self timer and exposure compensation settings press B Press B again to change focus area H Center Camera focuses on subjec...

Страница 89: ...the selected focus area in the final composition or in situations in which the camera is unable to focus B 20 1 2 Position subject in focus area Press shutter release button halfway and check focus 3 4 Recompose picture keeping shutter release button pressed halfway Take picture 5 5 1 125 1 125 F4 3 F4 3 9 9 1 125 1 125 F4 3 F4 3 9 9 1 125 1 125 F4 3 F4 3 ...

Страница 90: ...whether aperture varies with zoom position At slow shutter speeds pictures may be affected by noise in the form of ran domly spaced brightly colored dots concentrated in dark parts of the image Use this option to reduce noise at slow shutter speeds When noise reduction is on a h icon is displayed in the monitor t Flash Exp Comp o Flash Control d Fixed Aperture Option Description On In A and M mode...

Страница 91: ...inal picture Distortion control off No distortion correction performed Zoom can be adjusted manually while Wide angle converter is in effect note however that best results will be achieved with camera zoomed out Focal length at widest angle is 24mm 35 mm format equivalent distor tion control off f Telephoto converter Use with TC E3ED telephoto converter Camera will zoom all the way in optical zoom...

Страница 92: ...w View pictures in an automatic slide show 81 j Delete Delete all or selected pictures 81 O Protect Protect selected pictures from accidental deletion 81 X Transfer marking Change transfer marking for existing pictures 82 Z Hide image Hide selected pictures during playback 82 w Small pic Create small copy of current picture 45 f Copy Copy files between memory card and internal memory 82 1 2 Scroll...

Страница 93: ...amera will turn off auto matically if no operations are performed for 30 minutes during the show even if Loop is selected B 88 Choose Erase all images to delete all pictures or Erase selected images to select pictures for deletion B 80 Pictures marked with a O icon will not be deleted Protect selected pictures from accidental deletion B 80 Protected pictures are marked with a O icon B 5 and can no...

Страница 94: ...mation dialog will be displayed highlight Yes and press B X Transfer Marking Option Description All on default Mark all images for transfer All off Remove transfer marking from all images Selected image s Mark selected images for transfer B 80 Z Hide Image f Copy Option Description q Q Copy pictures from internal memory to memory card Q q Copy pictures from memory card to internal memory ACopy Voi...

Страница 95: ...mera is turned on 84 W Date Set clock and choose home and destination time zones 84 85 r Brightness Adjust monitor brightness 85 h Date imprint Imprint date or birthday counter on pictures 86 K Vibration reduction Reduce blur caused by camera shake 87 B AF assist Enable or disable AF assist illumination 87 0 Digital zoom Enable or disable digital zoom 87 e Sound settings Adjust sound and volume se...

Страница 96: ...ion default Animation displayed at start up Select an image Select picture from internal memory or memory card Copy of selected image is created for use in welcome screen and remains when original is deleted or memory card is removed W Date Option Description Date Set camera clock to current date and time see below Time zone Choose home or travel destination time zone B 85 turn daylight saving tim...

Страница 97: ...or monitor brightness the default setting is 3 1 2 Select s travel destination time zone or n home time zone Set clock to time in selected time zone If s is selected s will be displayed when camera is in shooting mode To turn daylight saving time in selected zone on or off highlight Daylight saving and press B Clock will automatically be adjusted one hour Press F button to skip steps 3 6 3 4 To ch...

Страница 98: ...alog and press B Press the multi selector up or down to highlight an option and press B h Date Imprint Option Description Off default Time and date do not appear on pictures Date Date or date and time are imprinted on pictures taken while this option is in effect Date and time Date counter Time stamp shows number of days remaining until or elapsed since selected date see below Use to track growth ...

Страница 99: ... used to assist the focus opera tion when the subject is poorly lit AF assist illumination is unavailable in some modes B 30 33 Choose Off to disable AF assist illumination note that the camera may be unable to focus if lighting is poor When On the default setting is selected digital zoom functions as described on page 19 cropping is used when possible to increase magnification without affecting i...

Страница 100: ...manently deletes all pictures and other data Be sure to make copies as required before formatting DFormat Do not turn the camera off or remove memory cards during formatting Choose a language for camera menus and messages from the following options e Sound Settings Option Description Button sound When On default is selected a beep will sound once when operations are completed successfully three ti...

Страница 101: ...sitivity options B 71 Rotate command dial to highlight desired option and release A button Image quality Pressing A button displays image quality options B 66 Rotate command dial to highlight desired option and release A button Image size Pressing A button displays image size options B 66 Rotate command dial to highlight desired option and release A button White balance Pressing A button displays ...

Страница 102: ...n the power connector cover and ensure that the power connec tor cord passes through the opening before closing the battery chamber memory card slot cover Failure to observe this precaution could cause damage to the battery chamber memory card slot cover USB cable UC E6 USB cable A V cable EG CP14 audio video cable Converter lenses require UR E20 lens adapter ring WC E67 wide angle converter 0 67 ...

Страница 103: ...urer High speed 10MB s High speed 20MB s Other Panasonic 256MB 512MB 1GB 2GB 64MB 128MB 256MB 512MB 1GB 2GB 4GB SanDisk 512MB 1GB 2GB 1GB 2GB 64MB 128MB 256MB 512MB 1GB 2GB 4GB Toshiba 128MB 256MB 512MB 1GB 64MB 128MB 256MB 512MB 1GB 2GB 4GB When using card reader or other device check that device supports 2 GB cards Pictures can still be copied to computer if camera is connected using supplied US...

Страница 104: ...option in the camera shooting menu B 79 to None when no converter is attached 1Remove the lens ring Turn the camera off and remove the lens ring as shown at right 2Remove the rear cap from the converter lens 3Attach the UR E20 adapter ring Attach the UR E20 to the camera lens as shown at right 4Attach the converter lens Screw the converter lens into the UR E20 as shown at right 5Choose a Converter...

Страница 105: ... Flash mode can be set as described on page 24 Power zoom can be used with SB 800 and SB 600 Speedlights although a wide panel may be needed to illuminate the edges of the picture at ranges under 2m 2ft 7in when the camera is zoomed out Refer to the Speedlight manual for detailed in instructions When set to STBY stand by the optional Speedlight will power on and off at the same time as the camera ...

Страница 106: ...ss of data or in damage to product memory or circuitry To prevent an accidental interrup tion of power do not move the product while the AC adapter is connected D Keep dry The device will be damaged if immersed in water or subjected to high levels of moisture D Do not drop The product may malfunction if subjected to strong shocks or vibration D Keep away from strong magnetic fields Do not use or s...

Страница 107: ...temperature should be in the vicinity of 5 35 C 41 95 F Note that the battery may become hot during use wait for the battery to cool before charging Failure to observe these precautions could damage the battery impair its performance or prevent it from charging normally On cold days the capacity of batteries tends to decrease Be sure that the battery is fully charged before heading outside to take...

Страница 108: ...void touching glass parts with your fingers Remove dust or lint with a blower typically a small device with a rubber bulb attached to one end that is pumped to produce a stream of air out the other To remove fingerprints or other stains that can not be removed with a blower wipe with a soft cloth using a spiral motion that starts in the center of the lens and works outwards to the edges If this fa...

Страница 109: ...d is cor rectly inserted 91 14 O Warning Thiscardcannotberead O Cardisnotformatted No Format Memory card has not been formatted for use in camera Highlight Format and press B to format card or turn camera off and replace card 15 N Outofmemory Internal memory or memory card is full Lower image quality or size Delete files Insert new memory card Remove memory card and use internal memory 66 52 81 14...

Страница 110: ...ing D lighting can not be used with copies 44 N Newcityisin thecurrenttimezone Destination is in same time zone as home No need to change time zone 85 O WARNING Modedial isnotintheproperposition Mode dial is between two modes Rotate mode dial to select desired mode 6 C Lenserror Lens error Turn camera off and then on again If error persists contact retailer or Nikon representative 12 O Communicati...

Страница 111: ...press B OM Printererror outofink Printer is out of ink Replace ink then highlight Resume and press B OM Printererror filecorrupt File is corrupt image can not be printed Highlight Cancel and press B to end printing Electronically Controlled Cameras In extremely rare instances unusual characters may appear in the monitor and the cam era may stop functioning In most cases this phenomenon is caused b...

Страница 112: ...er press shutter release button halfway Adjust monitor brightness Monitor is dirty clean monitor 18 16 85 96 Camera turns off without warning Battery is low Camera has turned off automatically to save power Battery is cold 16 16 95 Camera clock is not correct Check camera clock regularly against more accurate time pieces and reset as required 84 85 No indicators appear in monitor Press Q button un...

Страница 113: ...Turn flash off 24 Built in flash does not fire Flash is off Note that flash turns off automatically in p mode Time lapse movie excepted and some scene modes when Continuous is selected for Continuous when BSS or bracketing is on when an option other than None is selected for Converter when Built in off is selected for Flash control or when optional flash unit is attached 24 30 33 47 73 75 78 79 93...

Страница 114: ... 24 71 30 33 78 Pictures are too dark underexposed Rotate mode dial to T or choose higher ISO sensitivity Flash is off Flash window is blocked Subject is outside of range of flash Exposure compensation is too low Subject is backlit select N scene mode or use fill flash 37 71 24 18 24 28 24 33 Pictures are too bright overexposed Exposure compensation is too high 28 Unexpected results when flash set...

Страница 115: ...is played on television Choose correct video mode Memory card contains no pictures Insert memory card containing pictures or remove card to view pictures in internal memory 89 14 15 PictureProject does not start when cam era is connected Camera is off Battery is exhausted USB cable is not correctly connected Appropriate USB option is not selected Computer can not detect camera PictureProject auto ...

Страница 116: ...mal Image size 3648 2736 j Optimize image Normal Custom Contrast Auto Image sharpening Auto Saturation Auto Black and white Standard Custom Contrast Auto Image sharpening Auto Monochrome filter None White balance Auto ISO sensitivity Auto Metering Matrix Continuous Single Interval timer shooting 30s BSS Off Auto bracketing Off Option Default Shooting menu continued AF area mode Auto Auto focus mod...

Страница 117: ...nted on the camera accessory shoe can still be used Self timer B 26 If self timer is on only one shot will be taken each time shutter is released regardless of settings chosen for Continuous BSS and Auto bracketing Original Continuous BSS and Auto bracketing settings are restored when picture is taken or self timer is turned off Continuous B 73 Selecting option other than Single for Continuous tur...

Страница 118: ... will be created by adding one to the current folder number If a picture is taken when the current folder is numbered 999 and contains 200 pictures or a picture numbered 9999 no further pictures can be taken until the medium is formatted B 88 or a new memory card is inserted Files copied using Copy Selected images or COPY SOUND FILES Selected files are copied to the current folder where they are a...

Страница 119: ... local time B 84 GMT Location 11 Midway Samoa 10 Hawaii Tahiti 9 Alaska Anchorage 8 PST Los Angeles Seattle Vancouver 7 MST Denver Phoenix La Paz 6 CST Chicago Houston Mexico City 5 EST New York Toronto Lima 4 Caracas Manaus 3 Buenos Aires São Paulo 2 Fernando de Noronha 1 Azores 0 London Casablanca GMT Location 1 Madrid Paris Berlin 2 Athens Helsinki 3 Moscow Nairobi 4 Abu Dhabi Dubai 5 Islamabad...

Страница 120: ...o T Focus area selection Auto 9 focus areas manual 99 focus areas center AF assist illumination Class 1 LED product IEC 60825 1 Edition 1 2 2001 max output 1 500 W Viewfinder Real image optical viewfinder with LED indication Frame coverage Approx 80 vertical and 80 horizontal Monitor 2 5 in 230 000 dot wide viewing angle TFT LCD with anti reflection coating and 5 level brightness adjustment Frame ...

Страница 121: ...ed 1 2 000s to 8s Aperture 6 blade iris diaphragm Number of stops 10 steps of 1 3EV Self timer Can be selected from 10 and 3 seconds duration Built in flash Range approx W 0 3 to 8m 1 to 26ft T 0 3 to 4m 1 to 13ft Flash control Sensor flash system Accessory shoe ISO 518 hot shoe contact with safety lock Sync contact X contact only Interface USB Video output Can be selected from NTSC and PAL I O te...

Страница 122: ...xif compliant printers PictBridge A standard developed in cooperation with the digital camera and printer industries allowing photographs to be output directly to a printer without connecting the camera to a computer Rated input 100 to 240V AC 50 60Hz 0 12 to 0 08A Rated capacity 11 to 16VA Rated output DC 4 2V 950mA Supported batteries EN EL5 rechargeable Li ion batteries supplied Charging time A...

Страница 123: ...er iii 9 90 110 Battery level indicator 4 5 16 Best Shot Selector See BSS 75 105 Black and white See Movies Optimize image 68 69 Blur 21 25 26 87 101 See also P anti shake mode 6 36 Bracketing See Auto bracketing 75 105 Brightness 85 BSS 75 105 Burst See Continuous Scene mode Sports C 73 74 30 C Cleaning 96 Clock See Date 12 13 84 85 Close ups See Focus mode Scene mode Close up J 7 27 32 Color 68 ...

Страница 124: ... aperture 41 78 Flash iii 24 25 73 78 built in 2 24 78 105 109 compensation 78 mode 7 24 102 optional 25 73 78 90 93 105 Flash control 78 Flash exp comp 78 Flash lamp 3 24 A FUNC button 3 29 48 89 See also FUNC button 89 Focus 20 27 76 101 108 area 4 20 33 76 face priority 34 indicator 4 20 97 lock 77 mode 7 27 Folders 8 106 Format card 88 Format memory 88 Formatting 81 82 88 97 internal memory Se...

Страница 125: ...o mode 55 89 Panorama 33 35 PictBridge 60 63 110 PictureProject 53 56 58 103 Playback 5 22 23 43 46 full frame 22 23 menu 44 45 64 80 82 movies 50 thumbnail 23 43 voice memos 46 voice recording 52 zoom 23 43 Portraits 24 26 30 33 34 72 Power saving See Auto off 16 88 Power switch 2 12 Power on lamp 2 12 Print set 60 64 Print size 66 Printing 60 63 See also Date and time printing Date imprint Digit...

Страница 126: ...ccessories Converter Zoom 90 79 92 19 Television 55 103 connecting to 55 Thumbnail playback 43 Time lapse See Continuous Movies time lapse 73 74 106 49 Time zone 12 13 85 107 See also Date 12 13 84 85 Time See Date 12 13 84 85 Timer See Self timer 2 26 105 Transfer mark 43 56 103 marking pictures for 56 82 89 103 Transfer marking 82 Tripod 3 25 26 31 35 U USB 56 57 59 60 61 89 See also Interface 5...

Страница 127: ... Japan SB7B02 11 6MA28511 No reproduction in any form of this manual in whole or in part except for brief quotation in critical articles or reviews may be made without written authorization from NIKON CORPORATION ...

Отзывы: