background image

100

When using exposure compensation (

 64), you may be unsure

of the appropriate exposure-compensation value for your subject,
and yet not have time to check the results and change the compen-
sation value after each shot.  Auto-exposure bracketing allows you
to vary exposure by 

1

/

3

EV over a series of five photographs without

the need to adjust exposure compensation manually.

O F F

1

2

MENU

SELECT

SET

AE Lock

Auto Bracketing

EXP. +/–

QUAL.

C

AUTO BRACKETING

Off
On

Option

Description

Off

Restores normal auto exposure

On

Camera varies shutter speed to modify exposure in order +

2

/

3

EV, +

1

/

3

EV, 

±

0 EV,

1

/

3

EV, –

2

/

3

EV with each photograph taken after 

On 

is selected.  Values are added

to normal exposure-compensation value.

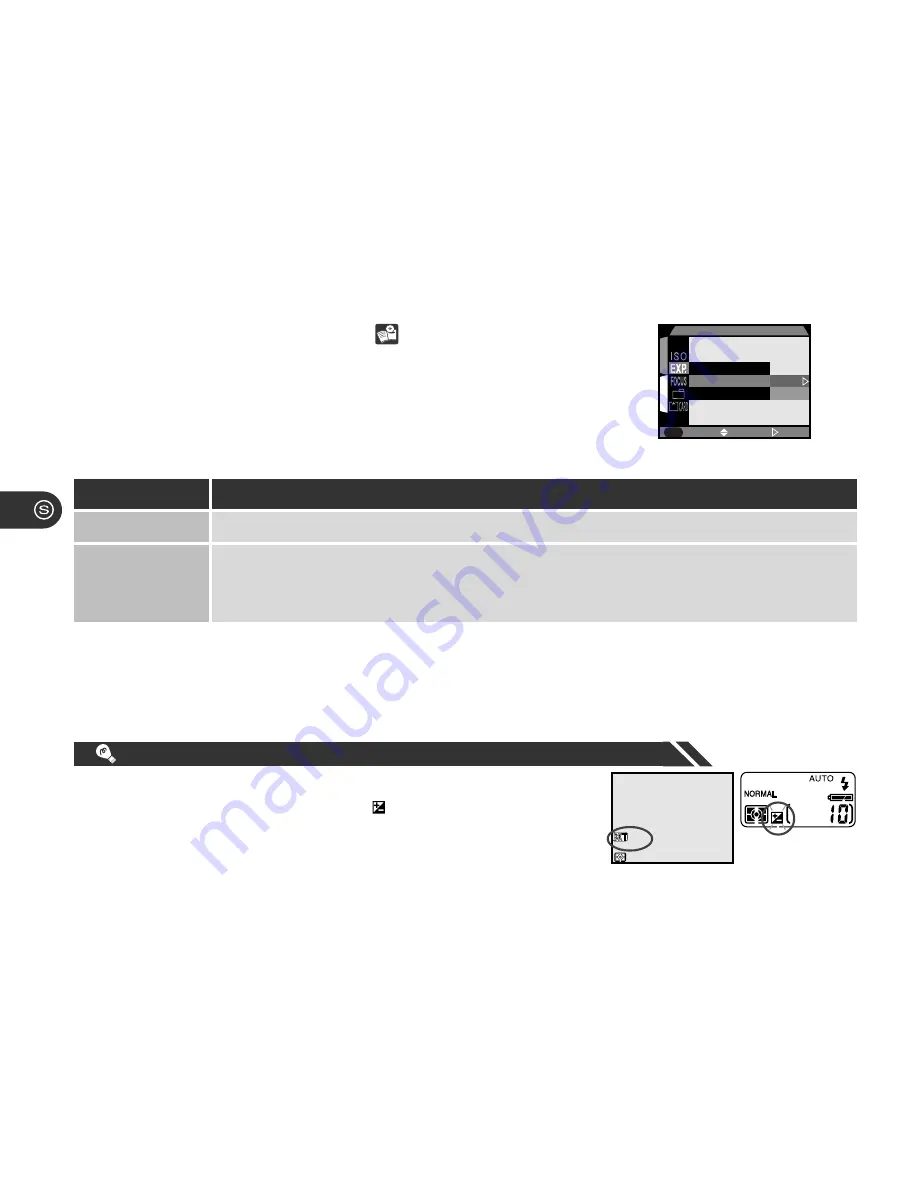
While bracketing is in effect, the exposure modification appears with

BKT

 icon in the monitor, and the   icon in the control panel

flashes.

Varying Exposure over a Series of Photographs: Auto-Exposure Bracketing

P

1/60

1/60 F2.8

2.8

+0.7

0.7

NORMAL

NORMAL

[

    10 

10 

]

Содержание Coolpix 880

Страница 1: ...En DIGITAL CAMERA The Guide to Digital Photography with the ...

Страница 2: ... FastTrack Guide provides a quick overview of camera settings ForYour Safety printed on the reverse of the FastTrack Guide lists warnings and cautions that should be observed when using and storing your camera together with legal information Please keep this document where all those who use the product will read it Menu Guide This reference is your guide to camera menus Keep it handy when you use ...

Страница 3: ...and Deletion Quick Review 39 Putting the Camera Away 44 Where Do I Go from Here 45 Getting the Most from Digital Images Your Camera andYour Computer 46 Viewing Photos onTV 48 Ordering Prints Digital Print Order Format DPOF 48 Taking Photographs for E Mail and theWeb 49 Taking Photographs for Printing 50 Reference 51 Beyond Point and Shoot Shooting Controls forAll Modes 52 Framing Photographs Optic...

Страница 4: ...re Distinct The Image Sharpening Menu 96 Modifying Sensitivity from a Menu The ISO Menu 98 Exposure Options 98 Focus Options 103 Settings for Optional Lens Converters 106 Restoring Default Shooting Settings The Reset Menus 109 Playing Images Back Playback Mode 111 Basic Playback 112 Single Image Playback 113 Viewing Multiple Images Thumbnail Playback 118 Deleting Individual Photographs 119 The Pla...

Страница 5: ...elease Confirmation and Photo Information 156 The Date Menu 158 TheVideo Mode Menu 158 The Language Menu 159 The Distance Units Menu 159 Restoring Default Settings The Reset All Menu 160 Connections ConnectingYour Camera to a Computer TV orVCR 162 Connecting to aTelevision orVCR 162 Connecting to a Computer 164 Using NikonView Software 164 ConnectingYour Camera to a Computer 166 Reading Photograph...

Страница 6: ...This section may be all you need to read if you want to take advantage of the simplicity and immediacy of digital photography Once you have taken a few photographs Where Do I Go from Here outlines how to view them on a computer or television set and order prints using digital print orders that you create with the camera It also provides some tips on how to take photographs for electronic distribut...

Страница 7: ... the icon gives the page on which more information may be found This icon marks cross references to the Fast Track Guide This icon marks cross references to ForYour Safety This icon marks cross references to the Menu Guide As part of Nikon s Life Long Learning commitment to ongoing product support and education con tinually updated information is available on line at www nikon euro com Visit this ...

Страница 8: ...d the camera menus Takes you step by step through the process of setting up your camera Outlines the steps involved in taking photographs and playing them back Tutorial Using the Menus Parts of the COOLPIX 880 This section First Steps Taking Photographs ...

Страница 9: ...d socket 4 Battery chamber cover 5 Battery chamber latch 6 DC IN connector 7 USB serial connector 8 Eyelet for camera strap 9 Flash 10 Red eye reduction lamp Refer to the page numbers in parentheses for more information 11 Flash ready lamp 12 Autofocus lamp 13 Memory card slot 14 VIDEO OUT connector 14 162 5 15 3 12 11 2 181 11 11 13 18 1 26 10 56 9 55 8 4 15 7 166 6 A B C D E F G H I K J L M N ...

Страница 10: ... picture A The Power Switch The power switch is used to turn the camera on and off C The Zoom Buttons Use the zoom buttons to frame photographs The button zooms the camera out increas ing the area visible in the final photograph The button zooms the camera in enlarging small or distant objects to fill the frame When an image is played back full screen the button is used to zoom in on the image dis...

Страница 11: ...e of set tings for specific scenes such as sunsets and portraits 68 73 Puts you in complete control of all settings including exposure mode 68 73 You control all camera settings in cluding shutter speed and aper ture 68 69 This mode puts the camera in charge of exposure while leaving you in control of all other settings Auto Scene CSM Custom A Aperture priority auto M Manual P Programmed auto Play...

Страница 12: ...ttons used Function Mode Operation Function Focus mode Mode AUTO SCENE P A M CSM Operation Press 58 61 Manual focus distance P A M CSM 76 77 Photo information display Press 114 Exposure compensation AUTO SCENE P A CSM expo sure mode P A 64 65 Shutter speed aperture A M CSM expo sure mode A M 71 72 Sensitivity ISO equivalency P A M CSM 74 75 Single image deletion Press 119 ...

Страница 13: ...lti selector to select items from the camera menus or to scroll through the images in memory in quick review or playback modes 39 43 117 12 13 14 G The Button The button controls Function Flash mode Thumbnail display Mode AUTO SCENE P A M CSM Operation Press Press 55 57 118 The button is used to review photographs while shooting In playback mode its function is to start and stop movie playback ...

Страница 14: ...ation in dicator 5 Sensitivity ISO equivalency indicator 6 Metering method 7 Image quality 8 Self timer indicator 9 Focus mode 10 Continuous setting Refer to the page numbers in parentheses for more information 10 91 9 58 8 62 7 139 6 85 5 74 4 64 3 24 2 16 1 55 Monitor on information icons displayed Monitor on information icons hidden Monitor off Press Press Press The monitor can not be turned of...

Страница 15: ...y 74 11 Image adjustment 95 12 Image size 141 13 Image quality 139 14 Number of exposures remain ing at current settings 24 15 Exposure compensation 64 16 Aperture f number 71 17 Shutter speed 72 18 Exposure mode 71 19 Metering method 86 20 Continuous setting 91 21 Exposure bracketing indica tor 100 22 Auto exposure lock 99 23 White balance lock 99 24 Best shot selection 93 25 Lens converter setti...

Страница 16: ...atus Lamp Meaning AF Lamp Green Glows steadily Flash Lamp Red Flash will fire when photograph is taken Blinks Flash charging 55 Off Flash not required or flash set to off Subject in focus Glows steadily Flashes rapidly Camera unable to focus using autofo cus Use focus lock 29 or manual focus 76 Blinks Camera recording image s to memo ry card Do not eject card or remove or disconnect power source w...

Страница 17: ...displayed P A M CSM SHOOTING Using the Camera Menus Changes to some settings can be made with the help of menus that appear in the monitor Separate menus are available for scene P A M CSM playback and setup modes no menu is available in AUTO mode Mode Menu SETUP SET UP Advanced shooting options e g white balance metering Two menus are available one for P A and M modes the other for CSM mode Change...

Страница 18: ...ht option 1 2 MENU SELECT SET A A A PAGE2 METERING 4 Make selection Camera menus Pg For more information on To go back one step press the multi selector to the left The selection for some menu options is made from a sub menu Repeat steps 3 and 4 to select the desired setting from the sub menu Changes to settings apply as soon as the selection is made In SCENE P A M and CSM modes the view through t...

Страница 19: ... To move between pages of a multi page menu 1 Position cursor in main menu PAGE2 1 2 MENU SHOOTING MENU1 SELECT SET A A A 2 Highlight page tab 3 Highlight page number IMAGE SIZE QUALITY 4 Display selected page You can also go from the first to the second page of a multi page menu by pressing the MENU button once ...

Страница 20: ... proceeding to the next step First Steps Getting Ready to UseYour Camera Before using your camera for the first time you will need to Check the contents of the package see the packing list included in the Open Me First envelope Attach the camera strap and lens cap string as described in ForYour Safety Put the battery in the camera Insert the memory card Choose a language for the camera menus and m...

Страница 21: ... the control panel Battery fully charged Low battery Replace the battery as soon as possible Battery exhausted No photographs can be taken until the battery has been replaced 3 Insert the battery Insert a 2CR5 DL245 lithium battery or a rechargeable Nikon EN EL1 lithium ion battery available separately as shown at right The battery level indicator may briefly show battery fully charged after an ex...

Страница 22: ...ooting or playback Alternative Power Sources The battery can be removed without affecting photographs stored on the camera s memory card All settings other than date and language will however be reset The clock calendar is powered by a separate rechargeable battery which is charged as necessary when the main battery is installed If the camera has been stored for a long period of time with the main...

Страница 23: ...lip it open 2 Slide the card in 3 until it is firmly in place and the eject button pops up Memory cards can be removed without loss of data when the cam era is off To remove memory cards turn the camera off and open the card slot cover 5 Press the eject button to partially eject the card 6 and then remove the card by hand Removing memory cards ...

Страница 24: ...ty Image Size Confirmation dialog displayed Press multi selector down to highlight Format then press to right to format card Do not turn camera off or remove card until FORMATTING message has disappeared from display All data on card will be permanently deleted PAGE2 1 2 MENU SELECT SET Folders Monitor Options Auto Off Seq Numbers CF Card Format SET UP1 Image Quality Image Size 3 H i g h l i g h t...

Страница 25: ...GE1 1 2 MENU SELECT SET Controls Pic data Confirm Date Video Mode Language Distance Units Reset All SET UP2 3 Highlight Language Press 1 2 SELECT SET LANGUAGE Controls Pic data Confirm Date Video Mode Language Distance Units Reset All E D F J 4 1 2 SELECT SET LANGUAGE Controls Pic data Confirm Date Video Mode Language Distance Units Reset All E D F J 5 Highlight option Press 6 PAGE2 1 2 MENU SELEC...

Страница 26: ...e Language Distance Units Reset All SET UP2 3 Highlight Date Press to display DATE menu 1 2 SELECT SET 2 0 0 0 0 0 0 0 0 0 0 0 Y M D DATE 4 1 2 SELECT SET 2 0 0 0 0 1 0 1 0 0 0 0 Y M D DATE 5 Highlight desired item Year Month or Day Edit selected item 6 1 2 SELECT SET 2 0 0 0 0 2 0 1 0 0 0 0 Y M D DATE PAGE2 1 2 MENU SELECT SET Folders Monitor Options Auto Off Seq Numbers CF Card Format SET UP1 Im...

Страница 27: ...gh settings as shown below 1 2 SELECT SET 2 0 0 0 0 3 0 2 2 3 0 5 Y M D DATE 8 To save changes to settings highlight Y M D and press multi selector to right Any photographs taken before the time and date have been set will have a time stamp of 2000 01 01 0 00 Until you have set the time and date a flashing clock icon will be displayed in the top right corner of the monitor when the camera is in sh...

Страница 28: ...olled by the camera in response to lighting conditions and focus distance producing the best possible results Getting the Camera Ready for Use AUTO Mode Release latch and remove cap 1 Remove the lens cap If you turn the camera on with the lens cap in place and the mode dial set to AUTO SCENE P A M or CSM an error mes sage will appear in the monitor To clear the message from the display turn the ca...

Страница 29: ...sert a new memory card or delete some pictures 122 before you will be able to take more photo graphs It may be possible to record more photographs at a different image quality or size 137 3 Turn the camera on After a short pause current settings will be displayed in the monitor and control panel 1 60 F2 8 NORMAL NORMAL 10 P 1 60 F2 8 NORMAL NORMAL 10 P Number of exposures remaining ...

Страница 30: ... For information on changing these settings refer to the page numbers given below Setting Flash mode Focus mode self timer Default Auto Autofocus Image quality NORMAL Image size FULL Description Flash fires automatically when lighting is poor Camera focuses automatically at distances over 40 cm 16 self timer off Photographs compressed for best balance between file size and image quality Photograph...

Страница 31: ... macro close up 59 you are using digital zoom 52 you are using a lens converter 106 you want direct confirmation of camera settings or the view through the lens Frame photographs in the viewfinder when you want to save power by turning the monitor off 9 bright ambient lighting conditions make it difficult to see the display in the monitor Keep your fingers and other objects away from the lens and ...

Страница 32: ...at right 2 Select your subject Frame the photograph using the zoom buttons Press the button to zoom out from your subject increasing the area vis ible in the frame Press the button to zoom in on your subject decreasing the area visible in the frame Indicator in LCD monitor displays amount of zoom while either but ton is pressed Zoom out Zoom in 1 60 F2 8 NORMAL NORMAL 10 P ...

Страница 33: ...lash lamp red next to the viewfinder Lamp Meaning 66 Manual focus area selection Pg For more information on AF Lamp Green Flashes rapidly Camera unable to focus using autofocus Use focus lock to focus on another subject at the same distance then recompose photograph Glows steadily Subject in focus Glows steadily Flash will fire when photograph is taken Flash charging Remove finger briefly from shu...

Страница 34: ...the focus target in the viewfinder and press the shutter release button halfway b Check the AF lamp With the shutter release button held halfway down check that the green AF lamp next to the viewfinder glows steadily indicat ing that the subject is in focus Focus will remain locked while the shutter release button is held halfway down c Recompose the photograph and shoot Keeping the shutter releas...

Страница 35: ...aph is transferred to the memory card it will be displayed briefly in the monitor The following operations can be per formed while the photograph is being displayed Function Button Operation Press Delete dialog is displayed Press multi selector up or down to highlight option press to right to select DELETE SELECT SET 1 ERASE IMAGES YES OR NO No Yes Select Yes to delete photograph Select No to save...

Страница 36: ...n hold about five full sized normal quality images When buffer is full hourglass icon will be displayed and shutter release disabled New photographs can be taken as soon as enough memory is available in buffer and icon is no longer displayed Shutter release Full press Record photograph and return to shooting mode Shutter release Press halfway While photographs are recorded to the memory card the g...

Страница 37: ...ly adjusts settings to produce the best possible results This section outlines how to take photographs in SCENE mode 1 Ready the camera Turn the camera on and check the number of exposures remaining as described above under Getting the Camera Ready for Use AUTO Mode 23 Do not use SCENE mode when taking photographs that will later be retouched on a computer Depending on the subject SCENE mode setti...

Страница 38: ...ape Sunset b Press to display S C E N E m o d e menu d Press to put selec tion into effect and return to shooting mode OFF 1 2 MENU SCENE 1 SELECT DONE Portrait Party Indoor Night Portrait Beach Snow Landscape Sunset c Highlight desired composition type When the MENU button is pressed to display the SCENE mode menu the most recently selected setting will be highlighted Pressing the MENU button a s...

Страница 39: ...the scene selected you may be able to select the focus area manually allowing you to focus on an off center subject without using focus lock see following pages The camera shake ratings on the following pages indicate settings at which caution is advised to prevent blurring caused by camera shake While the use of a tripod is recommended in such cases the other methods available to prevent camera s...

Страница 40: ...available Party Indoor Use at parties and other indoor events for atmospheric photo graphs that include details of the background behind the subject Flash mode Auto with Red Eye Reduction Slow Synch Focus mode Can be chosen from autofocus and autofocus self timer Camera shake The SCENE mode Menu The SCENE mode menu contains two pages of options The types of composition available are described belo...

Страница 41: ...t vividly capture the brightness of such subjects as snowfields beaches or sunlit oceans and lakes Flash mode No restrictions Focus mode No restrictions Landscape Use for vivid landscape photo graphs that enhance outlines colors and contrast in subjects such as skyscapes and forests Flash mode Flash Cancel off Focus mode Infinity Sunset Use for photographs that cap ture the beautiful reds in sunse...

Страница 42: ...you won t miss the chance to take the perfect shot Flash mode Flash Cancel off Focus mode Infinity Camera shake Notes Follow the firework as it ascends and press the shutter release button just as the firework ex plodes Sparkler Use when taking atmospheric shots of sparklers with your fam ily and friends Flash mode Auto with Red Eye Reduction Slow Synch Focus mode Can be chosen from autofocus and ...

Страница 43: ...res of text or drawings on a white board business card or in printed matter Flash mode No restrictions Focus mode No restrictions Notes If the subject is colored text or drawings may be faint and hard to distinguish in the final photograph Back Light Use when light is coming from behind your subject throwing their features into shadow or when your subject is in the shade but the background is brig...

Страница 44: ...4 25 14 20 14 20 NORMAL NORMAL 5 9 5 9 100NIKON 0005 JPG 0005 JPG Shooting Mode AUTO SCENE P A M or CSM Quick Review Photographs stored on memory card are displayed in top left corner of monitor al lowing you to view results of previous photographs while setting up your next shot Full Screen Review Photographs stored on memory card are displayed full screen or in thumbnail menus of four or nine im...

Страница 45: ...in current folder Press up or left to view photo graphs recorded before current photo down or right to view images re corded after current photo Hold down to scroll rapidly to desired frame number Shutter release Press halfway Return to shooting mode and focus Shutter release Full press Return to shooting mode and take photograph Press Enter full screen review mode with current photograph displaye...

Страница 46: ...tion Function Press View other photographs in current folder Press up or left to view photo graphs recorded before current photo down or right to view images re corded after current photo Hold down to scroll rapidly to desired frame number Press Zoom in on current photograph use multi selector to view other areas of image Press Cancel zoom Press Display menu of nine thumbnail images see overleaf P...

Страница 47: ...ss Select highlighted thumbnail for deletion When the mode dial is set to playback you can perform any of the operations covered in this section under Full Screen Review Thumbnail Playback and Deleting Photographs In addition you can play back movies using the button and have access to a menu of playback options where you can delete multiple photographs choose the folder for playback protect and h...

Страница 48: ...nail review Delete dialog is displayed Press multi selec tor up or down to highlight option press right to select Select Yes to delete photograph Select No to save photograph and return to shooting mode DELETE SELECT SET 1 ERASE IMAGES YES OR NO No Yes 2000 04 25 2000 04 25 14 20 14 20 NORMAL NORMAL 5 9 100NIKON 0005 JPG 0005 JPG Press button ...

Страница 49: ...u have finished using the camera follow these steps before putting the camera away 1 Turn the camera off To avoid wasting batteries check that the camera is off before putting it away 2 Replace the lens cap Release latch and replace cap ...

Страница 50: ...This section lists some of the options available including viewing photographs on a computer or television ordering prints using digital print orders This section also outlines how to adjust camera settings to produce photographs suitable for sending by e mail or posting on a website output on a color printer A detailed explanation of the concepts used here may be found in the Reference section Th...

Страница 51: ...s via e mail or saved to removable media for example a floppy or Zip disk for delivery to a photofinisher There are two ways to copy data to your computer from the COOLPIX 880 Direct USB or serial connection using NikonView software If you have NikonView installed on your computer you can connect your camera to the computer using the UC E1 Universal Serial Bus USB cable included with your camera O...

Страница 52: ...be dragged and dropped into another folder for storage or directly into an application for immediate use note that images can not be saved to the camera from the computer Camera icon Windows Camera icon Macintosh PC card adapter or PC card reader If your computer is equipped with a PC card reader or if you have a computer with a PC card slot and a PC card adapter you can remove the memory card fro...

Страница 53: ...g Prints Digital Print Order Format DPOF 132 The mode menu contains an option for creating digital print orders that are stored on the camera s memory card in Digital Print Order Format DPOF Once you have prepared a print order using this option the card can be removed from the camera inserted in a DPOF compatible device whether your personal photo printer or a photofinisher s print system and pho...

Страница 54: ...settings your camera produces high resolution images about 800 KB in size while TIFF images taken at an image quality setting of HI can reach sizes of approximately 9 MB Larger file sizes mean longer data transfer times even an 800 KB file takes about five minutes to upload or download over a 28 8 Kbps connection making file size the single most important consideration when taking photographs for ...

Страница 55: ...lution for an ink jet printer is about 200 pixels per inch At this resolution aVGA photograph will be output at a size of 3 2 2 4 inches 8 1 6 1 cm a full size image at a size of about 10 2 7 7 inches 26 0 19 5 cm The second consideration is contrast You may find that the colors in the images produced by your printer are indistinct or muddy as compared to the photograph viewed on the camera monito...

Страница 56: ...uters and television sets and explains how to care for your camera and what to do when it does not function as expected Camera specifications and a list of the optional accessories available for the COOLPIX 880 are included in the final section Reference This section Camera menus Pg For more information on The Shooting Menu Camera Controls Playback Camera Setup ...

Страница 57: ...s This chapter covers operations that can be performed in AUTO and SCENE modes In these modes the majority of camera settings are made automatically by the camera to produce the best results By means of the buttons on the back of the camera the user controls the following settings directly restrictions may apply in SCENE mode depending on the scene selected optical and digital zoom flash settings ...

Страница 58: ... maximum optical zoom position holding the button down for two seconds triggers digital zoom AF lamp blinks slowly to show that photos can not be accurately framed in viewfinder Zoom factor displayed in monitor X2 0 X2 0 1 60 F4 2 NORMAL NORMAL 10 10 P Hold for two seconds 1 60 1 60 F4 2 4 2 NORMAL NORMAL 10 P Maximum optical zoom position 1 60 F2 8 NORMAL NORMAL 10 P Zoom out Zoom in ...

Страница 59: ... set It can not be used when image quality is set to HI 138 a setting of Black White is chosen in the IMAGE ADJUSTMENT sub menu 94 Ultra HS or Movie is chosen in the CONTINUOUS sub menu 88 the Digital Zoom item in the CONTROLS sub menu is not checked 155 66 Focus area selection While digital zoom is in effect the zoom factor increases each time the button is pressed to a maximum of 4 0 Pressing th...

Страница 60: ... the monitor on the back of the camera 1 2 Press Confirm flash setting in control panel or monitor setting not displayed in monitor when flash set to auto A short pause is required between exposures for the flash system to charge While the flash is charging the red flash lamp next to the viewfinder will blink when the shutter release button is pressed halfway Try again after briefly removing your ...

Страница 61: ...re subject is outside range of flash or to capture natural lighting un der dim light Auto with red eye reduction Pre flash lamp fires before main flash to minimize red eye effect caused by flash reflecting from retina Use for portraits works best when subjects are well within range of flash and are looking directly at pre flash Anytime Flash fill flash Flash fires whenever photo is taken Use to fi...

Страница 62: ...uivalency 74 or setting the exposure mode to aperture priority auto and choosing the larger of the two aperture settings smallest f number 71 The built in flash will automatically be set to Off when you use autofocus with a setting of Infinity 59 Landscape Sunset Night Landscape Fireworks Show or Close Up is selected in SCENE mode 32 you choose a CONTINUOUS setting of Continuous Multi shot 16 VGA ...

Страница 63: ...something closer than 40 cm a close up shot of a flower plant or business card The COOLPIX 880 offers focus modes for just these situations Some of these modes can be combined with a self timer to delay shutter release to reduce camera shake or allow you to appear in your own photographs To select the focus mode press the button P 1 60 F2 8 NORMAL NORMAL 10 1 2 Confirm focus mode set ting in contr...

Страница 64: ...era shake when tak ing close ups NO ICON Autofocus Camera automatically adjusts focus according to distance to subject Use with subjects 40 cm 16 or more from lens Infinity Focus is fixed at infinity Flash is dis abled Use for photographing distant scenes through foreground objects e g through window manual focus setting of Inf is available for use with flash Macro close up Focus adjusted automati...

Страница 65: ...usts focus continuously PROS Photographs can be taken only when camera is in focus Saves batteries CON Slight delay before camera focuses Single Camera focuses when shutter release button pressed halfway In AUTO mode autofocus mode is determined by whether the monitor is on or off continuous AF is used when the monitor is on single AF when it is off P A M and CSM modes offer additional settings th...

Страница 66: ...e camera For example autofocus may not perform well when photographing an object inside a cage as the bars of the cage will be closer to the camera than the main subject The subject is very dark the subject should not however be too much brighter than the back ground The subject is moving rapidly If the camera is unable to focus using autofocus use focus lock 29 to focus on another subject at the ...

Страница 67: ... steps 1 Position the camera Mount the camera on a tripod recommended or rest it on a flat stable surface 2 Select a self timer mode Press the button until either autofocus self timer for photographs at ranges of 40 cm 16 or more or macro close up self timer for photographs at ranges of 4 cm 1 6 or more appears in the control panel or monitor P 1 60 F2 8 NORMAL NORMAL 10 Self timer icon displayed ...

Страница 68: ...mer press the shutter release button a third time The red eye reduction lamp next to the flash window will start to blink when the shutter release button is pressed and continue to blink until one second before the shutter is released The red eye reduction lamp will stay lit during the final second to warn that the shutter is about to be released Count down timer in monitor shows number of seconds...

Страница 69: ...using exposure compensation Exposure compensation can be set to values between 2 0 EV overexposure and 2 0 EV underex posure in increments of 1 3 EV Press the multi selector up or down while holding the button P 1 60 F2 8 NORMAL NORMAL 10 0 3 1 2 Press multi selector up to in crease exposure value down to decrease exposure value Confirm exposure value in control panel or monitor Effects of compens...

Страница 70: ...the exposure compensa tion value 155 restoring it the next time the mode dial is set to AUTO SCENE P A or CSM exposure mode P or A Exposure compensation can also be set using the EXPOSURE OPTIONS Exp item in the SHOOTING menu 102 Exposure compensation is not available in manual exposure mode when the user adjusts exposure directly by adjusting shutter speed and aperture 72 ...

Страница 71: ... or CSM mode 103 the focus target can be chosen from one of five focus areas This makes it possible to focus on an off center subject without using focus lock The focus area can be selected using the multi selector Center focus area selected Use multi selector to select new focus area P 1 60 F2 8 NORMAL NORMAL 10 P 1 60 F2 8 NORMAL NORMAL 10 Right focus area selected Manual focus area selection is...

Страница 72: ...to the default setting is selected in the FOCUS OPTIONS AF Area Mode sub menu for P A M or CSM mode 103 the camera automatically selects the focus area containing the subject closest to the camera No focus area indicators appear in the monitor until the shutter release button is pressed halfway when the active focus area is shown in red Focus area selection can be deactivated in P A M and CSM mode...

Страница 73: ...trol the following settings by means of the mode dial and the buttons on the back of the camera exposure mode sensitivity ISO equivalency focus distance manual focus Menus in these modes also give the user control over white balance metering frame advance rate best shot selection contrast brightness and image type image sharpening exposure and autofocus options settings for optional lens converter...

Страница 74: ...nd choose A as the exposure mode If you want to adjust the shutter speed to freeze action or to suggest motion by blurring moving objects or if you want to modify exposure from the value suggested by the camera choose a mode setting of M or turn the mode dial to CSM and choose M as the exposure mode Another factor to consider is that menu settings for P A and M modes are stored separately from set...

Страница 75: ...blurring small aperture large f number increases depth of field bringing both main subject and background into focus M Manual User sets shutter speed and chooses aperture from maxi mum and minimum settings Use when you want complete control over exposure Choose high shutter speeds to freeze action low shutter speeds to suggest movement by blurring moving objects Aper ture is set as above Adjusting...

Страница 76: ... Press multi selector to left for maximum aperture small f number to right for minimum aperture large f number Confirm aperture setting in control panel and monitor In aperture priority auto the camera automatically selects a shutter speed that will produce the best exposure If the aperture you have selected would result in the photograph being over or under exposed the aperture value displayed in...

Страница 77: ...tip on following page M 1 1000F7 8 NORMAL NORMAL 10 1 2 Press multi selector up for slower shutter speeds down for faster shutter speeds Confirm shutter speed in control panel and monitor In manual mode the amount the photograph would be over or under exposed at the selected combi nation of aperture and shutter speed is displayed in the monitor Display shows values between 2 and 2 EV in increments...

Страница 78: ...as a remote shutter release cable and a tripod Long time exposure At a CONTINUOUS setting of Ultra HS 89 the lowest available shutter speed is 1 30 s At a setting of Movie 89 shutter speed can not be set to a value slower than 1 15 s bulb is only available at a setting of Single 88 Note that if the shutter is open for more than 1 4 s at any setting mottling noise may appear in the final photograph...

Страница 79: ... In a digital camera increased sensitivity has a similar effect higher sensitivities allow higher shutter speeds at the expense of mottling or noise the digital equivalent of film grain appearing in the final image Adjusting Sensitivity In AUTO mode the camera sets sensitivity automatically in response to lighting conditions When the mode dial is set to P A M or CSM you can choose a fixed value fo...

Страница 80: ...00 Approximately equivalent to ISO rating of 400 A slight amount of mottling noise may appear in photographs taken at settings other than 100 If sensitivity is set to AUTO in manual exposure mode 72 sensitivity will be fixed at ISO 100 equivalent and will not vary with lighting conditions ensuring that the exposure specified by the user will be achieved Changes to sensitivity have no effect in AUT...

Страница 81: ...ing down the button P 1 60 F2 8 2 8 NORMAL NORMAL INF INF 10 1 2 Press to increase the fo cus distance to maximum of infinity Inf to decrease Focus distance is displayed in monitor and in control panel while button is pressed After zoom buttons are released flashing and or icons in control panel indicate that manual focus is in effect The focus distances available depend on the focus mode setting ...

Страница 82: ... by pressing the button To use the self timer in combination with manual focus select a focus mode of autofocus self timer or macro close up self timer before choosing the focus distance The flash can be used while manual focus is in effect This makes it possible to combine the flash with a focus setting of infinity The units used for manual focus can be chosen from meters or feet using the Distan...

Страница 83: ... settings you use frequently you can turn the mode dial to P A or M and set the camera to these settings The camera will remember this combination of settings even after being turned off and will automati cally restore the settings the next time you select any of P A and M modes You can create a second combination of settings for CSM mode and switch instantly from one combination of settings to th...

Страница 84: ...escent Fluorescent Fluorescent Cloudy loudy Speedlight peedlight WHITE BALANCE 81 Metering Control how camera sets exposure 1 2 MENU SELECT SET Matrix Spot Center Weighted Spot AF Area A A A OFF METERING 85 Image Adjustment Modify contrast and brightness of photos take photos in black and white 1 2 MENU SELECT SET A A A OFF IMAGE ADJUSTMENT A 94 Continuous Set camera to take photographs in sequenc...

Страница 85: ...e camera OFF 1 2 MENU SELECT SET AE Lock Auto Bracketing EXP QUAL C EXPOSURE OPTIONS 98 Reset Shooting Options Reset menu settings for current mode to default values CLEAR SETTING 109 Focus Options Autofocus options OFF 1 2 MENU SELECT SET AF Area Mode Auto Focus Mode Focus Confirmation QUAL C FOCUS OPTIONS 103 Shooting Menu Page 2 Sensitivity Adjust sensitivity setting for current mode mirrors se...

Страница 86: ...nd compen sate for such changes in color with the result that a white object will look white to humans whether viewed in sunlight under overcast skies or indoors under incandescent or fluorescent lighting To a camera however the whites produced by these different sources of light vary in color some being slightly blue and others yellow or red A digital camera can adjust colors according to lightin...

Страница 87: ...tting in most circumstances White Bal Preset White or neutral gray object used as reference to set white balance under unusual lighting conditions Fine White balance set for direct sunlight Incandescent Use when taking photographs indoors under incandescent light Fluorescent Use when taking photographs indoors under fluorescent light Cloudy Use when taking photographs under overcast skies Speedlig...

Страница 88: ...pe of bulb from the following sub menu Option OFF 1 2 MENU A WHITE BALANCE Auto White hite Bal Pres Fine Incandescent Incandescent Fluorescent Fluorescent Cloudy loudy Speedlight A A 1 1 0 SELECT SET Description Raising white balance gives images a blue cold cast lowering white balance makes photos appear warmer that is slightly yellow or red After selecting the desired adjustment press the multi ...

Страница 89: ...ite balance to this value Measure Camera measures white balance using object displayed in center of monitor as reference To use this option first place white or neutral gray object under lighting that will be used in final photograph then aim camera at object and press multi selector to right camera will zoom out but no photograph will be taken At settings other than A auto the current white balan...

Страница 90: ...rame Best choice in most circumstances The metering method is the method your camera uses to mea sure light when determining exposure In P A M and CSM modes the METERING menu offers a choice of four metering methods Spot Camera measures light in area in center of frame occupying roughly 1 32 of total shown by square in center of monitor Ensures that subject in metering target will be correctly exp...

Страница 91: ... digital zoom 52 is used Can be used in combination withAE hold 87 Spot AF Area Camera measures light in current focus area only Use to link spot metering to currently selected focus area when manual or auto focus area selection is in effect Equiva lent to Matrix when focus area selec tion 103 is off equivalent to Spot when manual focus 76 is used The metering method is shown by icons in the contr...

Страница 92: ...meter your main subject and then adjust the composition before taking the photograph 1 Set metering to spot or center weighted 2 Position the subject in the center of the frame and press the shutter release button halfway to lock focus 29 and expo sure 3 Keeping the shutter release button held halfway recompose your photograph Press the shutter release button the rest of the way down to shoot Spot...

Страница 93: ...ailable at image quality setting of HI 138 Multi Shot 16 Camera takes sixteen consecutive thumbnail images and combines them into collage This option is only available at image size setting of FULL 140 Using the CONTINUOUS menu you can set the camera to take photographs one at a time shoot multiple photographs in sequence or even record short movies VGA Sequence Camera takes series of photographs ...

Страница 94: ...tton is fully pressed Movie is stored in QuickTime format DOS file extension MOV Each frame has image quality of NORMAL and is 320 240 pixels in size QVGA At settings other than Single the flash is set to Off and will not fire even when lighting is poor 55 At settings other than Single and Movie the focus exposure and white balance settings used for the first image apply to all other images in the...

Страница 95: ...omes available in the buffer At settings of Continuous and VGA Sequence you can continue to take photographs as long as the shutter release button is held down although the rate at which photographs are taken will drop when the buffer fills up While images are being transferred from the buffer to the memory card for permanent storage the green AF lamp next to the viewfinder will blink Do not remov...

Страница 96: ... is shown by icons in the control panel and monitor VGA sequence Multi shot 16 Continuous Single Ultra HS exposure count display shows number of seventy exposure sequences remaining Movie exposure count display shows number of seconds that can be recorded ...

Страница 97: ...st photo photo with highest level of detail saved to memory card BSS may not produce the desired results with a moving subject or if you change the composition during shooting The options in the BSS sub menu are Best shot selection BSS compensates for camera movement It is most effective in situations in which inadvertent camera move ment may affect the outcome of the photograph for example when t...

Страница 98: ...ce The flash is set to Off when BSS is on 55 BSS is not available at CONTINUOUS settings other than Single 88 an image quality setting of HI 138 Selecting any of the above options automatically cancels BSS BSS can not be selected while the above options are in effect When BSS is on a BSS icon is displayed in the monitor P 1 60 F2 8 NORMAL NORMAL 10 BSS BSS ...

Страница 99: ...results adjustment performed differs from image to image this setting is automatically selected inAUTO mode When you take a photograph the camera automatically performs image compensation for optimal brightness and contrast before recording the photograph to the memory card The image adjustment sub menu gives you control over this image compensation operation allowing you to control not only brigh...

Страница 100: ... memory as color images but show higher level of detail When this option is in effect view through lens shown in monitor is in black and white White balance settings 81 and digital zoom 52 can not be used while this option is in effect Only one image adjustment setting can be used at a time Selecting a new image adjustment option cancels the previous setting The effects of adjustments to brightnes...

Страница 101: ... all images Low Amount of sharpening reduced below normal level Off No sharpening performed A Auto Camera sharpens edges for optimal results adjustment performed differs from im age to image The effects of sharpening are not visible in the monitor When you take a photograph the camera automatically outlines edges making the image appear sharper The image sharpening sub menu gives you control over ...

Страница 102: ...97 A sharpening icon appears in the monitor at settings other than Normal P 1 60 F2 8 NORMAL NORMAL 10 ...

Страница 103: ...ing EXP P A M The exposure options sub menu provides control over exposure Exposure Options Modifying Sensitivity from a Menu The ISO Menu SENSITIVITY The ISO menu mirrors the sensitivity ISO equivalency value set with the button in combination with the zoom buttons 74 As with the button sensitivity can be set to AUTO 100 200 or 400 Choosing a new sensitivity value from the ISO sub menu changes th...

Страница 104: ...rst photograph taken after On is selected sets exposure for all subsequent photo graphs If white balance is set to A auto white balance for first photograph applies to all other photographs in series WhileAE lock is in effect flash will be set to Off Reset Clears existing exposure sensitivity and white balance settings First photograph taken after this option is selected sets exposure sensitivity ...

Страница 105: ... MENU SELECT SET AE Lock Auto Bracketing EXP QUAL C AUTO BRACKETING Off On Option Description Off Restores normal auto exposure On Camera varies shutter speed to modify exposure in order 2 3 EV 1 3 EV 0 EV 1 3 EV 2 3 EV with each photograph taken after On is selected Values are added to normal exposure compensation value While bracketing is in effect the exposure modification appears with a BKT ic...

Страница 106: ...the sensitivity value used for the first photograph in each series of five photographs applies to the remaining four Auto exposure bracketing starts over from 2 3 EV when changes are made to any of the following the flash setting 55 sensitivity 74 exposure compensation 64 Auto exposure bracketing can not be used in combination with CONTINUOUS settings of Multi Shot 16 Ultra HS or Movie 88 best sho...

Страница 107: ... with the button exposure compensation can be set to values between 2 0 EV and 2 0 EV in increments of 1 3 EV Choosing a new exposure compensation value from the Exp sub menu changes the value selected with the button while changing exposure compensation with the button changes the value selected in the Exp sub menu OFF 1 2 MENU SELECT SET AE Lock Auto Bracketing EXP QUAL C EXP ...

Страница 108: ...as appear in monitor This option can be used in combination with focus lock to focus on off center subject 29 Auto Camera automatically selects focus area containing subject closest to camera Ac tive focus area displayed in red when shutter release button pressed halfway This setting is useful when you have little time to compose photographs Manual User selects focus area manually 66 This option c...

Страница 109: ... 1 2 MENU SELECT SET Single AF AF Area Mode Auto Focus Mode Focus Co QUAL C Continuous AF AUTO FOCUS MODE Option Description Continuous AF Camera adjusts focus continuously focus is locked when shutter release button is pressed halfway and remains locked as long as shutter release button is held in this position 29 Single AF Camera focuses when shutter release button is pressed halfway focus is lo...

Страница 110: ...n the monitor no indicators of focus appear in the final photograph OFF 1 2 MENU SELECT SET MF On Off AF Area Mode Auto Focus Mode Focus Confirmation QUAL C FOCUS CONFIRMATION Option Description OFF No indication of focus is given MF Manual Focus Objects that are in focus will be sharply outlined in monitor when manual focus is used 76 ON Objects that are in focus will be sharply outlined in monit...

Страница 111: ...ombination of settings including focus mode zoom position and metering method Using the lens sub menu you can select combi nations of settings suited to particular lens converters Option Normal Telefoto1 for TC E2 2 telephoto converter Description No modifications are made to settings Use this option when no lens con verter is attached Camera zooms in to maximum optical zoom position 52 Optical zo...

Страница 112: ...sabled 55 Four corners of frame blacked out to create circular frame Fisheye2 for FC E8 fisheye converter Zoom fixed at maximum optical zoom position 52 Flash disabled 55 Image fills entire frame Slide Copy Adptr for ES E28 slide copying adapter Optical zoom 52 adjustable between maximum position 24 mm and third step in monitor zoom display 14 mm Focus mode fixed at macro close up 58 Flash disable...

Страница 113: ...108 A lens converter icon appears in the monitor at settings other than Normal P 1 60 F2 8 NORMAL NORMAL 10 ...

Страница 114: ...ode Both menus contain the following options Restoring Default Shooting Settings The Reset Menus In P A M and CSM modes a reset option is available to restore settings in the P A M and CSM SHOOTING menus to their de fault values Only settings in the selected menu are affected the reset option in the P A M menu clears shooting settings for P A and M modes but has no effect on CSM settings while the...

Страница 115: ...y Auto AE Lock Off Auto Bracketing Off Exp 0 AF Area Mode Auto Autofocus Mode Continuous AF Focus Confirm MF Settings common to all modes image quality and size and the folder selected for recording or playback are not affected To reset settings for all modes to their default values select Reset All from the SETUP mode menu 160 All the settings listed above for both P A M and CSM will be reset as ...

Страница 116: ... photo information zooming in on images to view fine details deleting individual photographs The above operations can be performed using the buttons on the back of the camera In addition the following operations can be performed from the playback menu deleting multiple photographs slide shows or automated sequential display of the photographs in memory protecting photographs from deletion hiding p...

Страница 117: ...message CARD CONTAINS NO IMAGE DATA will be displayed in the monitor To select another folder for playback or to view photographs in all folders use the Folders item in the playback menu In single image playback photographs are displayed briefly at low resolution while being read from memory This makes it possible to scroll rapidly through the photographs in memory without waiting for each image t...

Страница 118: ...t the bottom right corner of the monitor will increase or decrease rapidly Release the selector when the desired frame number is reached The first and last photographs in memory are linked Pressing the multi selector up or to the left while the first photo in memory is displayed takes you to the last photo Pressing the multi selector down or to the right while the last photo is displayed takes you...

Страница 119: ...ethod Exposure mode Shutter speed Aperture Exposure compensation Focal length Focus mode or manual focus dis tance Flash status Image adjustment Sensitivity ISO equivalency White balance Sharpening Digital zoom Lens converter status File size kilobytes Page 2 Page 3 VGA 2000 04 25 2000 04 25 14 20 100NIK 100NIKON ON 0005 JPG 0005 JPG NORMAL NORMAL 5 5 CAMERA CAMERA E990 E990 FIRM FIRMVER VER E990 ...

Страница 120: ...umber of pixels of each brightness in image 1 File number and type 2 Focal length 3 Aperture 4 Shutter speed 5 Focus mode or manual focus distance 6 Focus confirmation portions of image in focus sharply outlined active focus area shown in red Page 5 focus confirmation 3 File number and type 4 Metering method 5 Shutter speed 6 Aperture 7 Exposure compensation 8 Sensitivity ISO equivalency 0005 JPG ...

Страница 121: ...reases each time button is pressed to maximum of 4 0 While image is zoomed in indicator and zoom factor are displayed in monitor Press Cancel zoom Press up left down or right Scroll to another area of image To use the multi selector to view other photographs in memory first cancel zoom by pressing the button 2 0 SCR SCROLL OLL ZOOM ZOOM ...

Страница 122: ...k is controlled by the button Operation Function Press Start movie While movie is in progress press to pause movie press again to resume movie playback Press up or left While movie is in progress end playback and display previous photo While movie is paused go back one frame Press down or right While movie is in progress end playback and display next photo While movie is paused go forward one fram...

Страница 123: ...our thumbnail images Press again to view highlighted thumbnail at full size Press up left down or right Highlight thumbnail press up left when first thumbnail highlighted to view last page of thumbnails down right when last thumbnail high lighted to view first page of thumbnails Press Select highlighted thumbnail for deletion Viewing Multiple Images Thumbnail Playback ...

Страница 124: ... button Full screen review Thumbnail review Delete dialog is displayed Press multi selec tor up or down to highlight option press to right to select Select Yes to delete photograph Select No to save photograph and return to shooting mode DELETE SELECT SET 1 ERASE IMAGES YES OR NO No Yes 2000 04 25 2000 04 25 14 20 NORMAL NORMAL 5 9 100NIKON 0005 JPG 0005 JPG Press button ...

Страница 125: ...utomatic slide shows You can also create digital print orders for printing photographs on a device compatible with the Digital Print Order Format DPOF and set the length of time before the monitor turns off automatically in playback mode To display the playback menu 1 2 OFF 1 MENU SELECT SET PLAY BACK MENU Delete Folders Slide Show Protect Hide Image Print Set Auto Off 30S Select Press 12 Using th...

Страница 126: ...s OFF 1 MENU SELECT SET DELETE 122 Folders Select folder from which photos will be played back create rename and delete folders 1 FOLDER OFF MENU SELECT SET Options All Folders N O V S H O W 126 Print Set Create digital print order files DONE SET PRINT 132 Slide Show Automated playback of photos in current folder 1 SLIDE SHOW OFF MENU SELECT SET Pause Start Frame Intvl 127 OFF 1 MENU Slide Show Hi...

Страница 127: ... Deleting print order files Pg For more information on Highlight Selected Images Using the Delete option in the playback menu you can delete selected photographs delete all photographs delete folders delete print order files created with the Print Set option Note that once deleted photographs can not be recovered Be sure to back up any photographs you want to keep Deleting Selected Photographs To ...

Страница 128: ...press multi selector up or down DELETE SELECT SET 1 ERASE IMAGES YES OR NO No Yes 5 Confirmation dialog displayed Select Yes to delete all selected images Select No to return to playback menu without deleting images Photos hidden with the Hide Image option are not displayed in the thumbnail menu and can not be deleted Thumbnails marked with a icon are protected and can not be selected for deletion...

Страница 129: ...d Select Yes to delete all images on memory card images that are hidden or protected will not be deleted Select No to return to playback menu with out deleting images Deleting Folders To delete a folder and all images it contains Press to right to display list of fold ers OFF 1 MENU SELECT SET DELETE 1 2 1 ERASE FOLDER OFF MENU SELECT SET N O V S H O W Highlight folder name 3 1 ERASE FOLDER OFF ME...

Страница 130: ...for deletion If the selected folder contains hidden or protected images the folder will not be deleted Any images it contains that are neither hidden nor protected will however be deleted Each series of seventy photographs taken at a setting of Ultra HS is stored in a separate folder with a name consisting of N_ followed by a three digit number assigned by the camera The Delete Folder item can be ...

Страница 131: ...ders select All Folders Most recent photograph in selected folder is dis played Each series of seventy photographs taken at a setting of Ultra HS is stored in a separate folder with a name consisting of N_ followed by a three digit number assigned by the camera To view photographs taken at this setting select the appropriate folder from the Folders menu The Folders item in the playback menu can be...

Страница 132: ...ded starting from oldest photo Pho tos hidden using Hide Image option will not be displayed Any movies in the slide show will be played back as still images showing the movie s first frame Starting a Slide Show The slide show option in the playback menu allows unattended se quential playback All images in the current folder that have not been hidden using Hide Image will be played back one after t...

Страница 133: ...e dialog shown at right will be displayed Select Restart to restart or Frame Intvl to change the length of time each image is displayed Press the MENU button to end the slide show and return to single image playback 1 PAUSE OFF MENU SELECT SET Restart Frame Intvl If no operations are performed during the slide show the monitor will turn off after thirty minutes Press End slide show and return to s...

Страница 134: ...ange the length of time each image is displayed highlight the de sired setting and press the multi selector to the right 1 FRAME INTVL OFF MENU SELECT SET 5 s Owing to differences in the file size of the images in the slide show and the speed at which they can be read from the memory card the actual interval may differ from the value shown in the interval menu ...

Страница 135: ...ted files will be deleted when the memory card is for matted Press up or down to select image for protection PROTECT SET DONE 1 2 PROTECT SET DONE Press to complete operation 3 Press to left or right to highlight desired thumbnail Selected images are marked by icon Repeat steps 1 and 2 to select more images To deselect highlight and press multi selector up or down To exit without changing pro tect...

Страница 136: ...how or showing photographs to an audi ence you may want to use the Hide Image option to hide some of the photographs in the current folder Hidden images are only visible in the Hide Image menu They can not be deleted in single image playback or from the Delete sub menu Selected images are marked by icon Repeat steps 1 and 2 to select more images To deselect highlight and press multi selector up or...

Страница 137: ...rint Or der Format DPOF The card can then be removed from the cam era and inserted in a DPOF compatible device whether your per sonal photo printer or a photofinisher s print system and the se lected images printed directly from the card Press up to select image for printing Selected images are marked by icon DONE SET PRINT 1 2 DONE SET PRINT Press to left or right to highlight de sired thumbnail ...

Страница 138: ... speed and aperture on all selected photographs highlight Info and press multi selector to right to check item To print date of recording on all selected photographs highlight Date and press multi selector to right to check item To deselect checked options highlight and press multi selector to right To complete print order and return to playback highlight Done and press multi selector to right To ...

Страница 139: ... to set image quality and size and choose a folder for storing images and for playback Some of the options in the setup menu can also be accessed from the P A M CSM and playback menus PAGE2 1 2 MENU SELECT SET Folders Monitor Options Auto Off Seq Numbers CF Card Format SET UP1 Image Quality Image Size 12 Using the menus Pg For more information on The SET UP menu is displayed automatically when the...

Страница 140: ...uto Off Seq Numbers CF Card Format IMAGE QUALITY HI FINE NORMAL BASIC Image Quality Image Size 138 Image Size Choose image size for all modes 1 2 SELECT SET IMAGE SIZE FULL XGA VGA Folders Monitor Options Auto Off Seq Numbers CF Card Format Image Quality Image Size 140 Seq Numbers Control automatic file naming 1 2 SELECT SET Folders Monitor Options Auto Off Seq Numbers CF Card Format SEQ NUMBERS O...

Страница 141: ... CONFIRM Controls Pic data Confirm Date Language Distance Units Reset All Shot Confirm info txt 156 Distance Units Choose units used for manual fo cus from meters and feet 1 2 SELECT SET DISTANCE UNITS Controls Pic data Confirm Date Video Mode Language Distance Units Reset All m ft 159 Date Set date and time 1 2 SELECT SET 2 0 0 0 0 0 0 0 0 0 0 0 Y M D DATE 158 Reset All Reset menu settings for al...

Страница 142: ...single memory card The number of images that can be stored on 8 MB 16 MB 64 MB and 96 MB cards at different combinations of image quality and size is illustrated in the following table Size FULL Quality HI FINE NORMAL BASIC XGA VGA 8MB 16MB 64MB 96MB 8MB 16MB 64MB 96MB 8MB 16MB 64MB 96MB 0 1 6 10 5 10 40 61 19 40 159 239 48 100 392 588 10 20 81 121 38 79 311 446 91 187 734 1101 19 40 159 239 73 15...

Страница 143: ... or printer and on the type of subject 1 2 SELECT SET Folders Monitor Options Auto Off Seq Numbers CF Card Format IMAGE QUALITY HI FINE NORMAL BASIC Image Quality Image Size You can control the amount of compression using the image quality sub menu Image quality settings can be accessed from the SETUP mode menu and the Image Size Quality sub menu in the P A M and CSM SHOOTING menus 78 Changes to i...

Страница 144: ...educed to roughly 1 16 of original The current image quality setting is displayed in the control panel and monitor While a setting of NORMAL represents the best trade off between file size and image quality in most cases a setting of BASIC can be used to save memory or create smaller files suitable for electronic distribution Settings of HI or FINE are suitable for photographs that will be enlarge...

Страница 145: ...78 Changes to image size in any of these menus apply to all modes The following image sizes are available 1 2 SELECT SET IMAGE SIZE FULL XGA VGA Folders Monitor Options Auto Off Seq Numbers CF Card Format Image Quality Image Size Option Size Pixels Notes FULL 2048 1536 XGA 1024 768 Not available at image quality of HI VGA 640 480 Not available at image quality of HI 50 Choosing an image size for p...

Страница 146: ...141 At settings of XGA and VGA the current image size is displayed in the monitor and the image quality indicator in the control panel flashes P 1 60 1 60 F2 8 2 8 NORMAL NORMAL 93 93 VGA VGA ...

Страница 147: ...yback you can create additional folders and organize photographs by theme The Folders sub menu is used to create rename and delete folders and to select the folder in which subsequent photo graphs will be stored or from which photographs are played back 1 2 SELECT SET Folders Monitor Options Auto Off Seq Numbers CF Card Format FOLDERS Options N I K O N Image Quality Image Size ...

Страница 148: ...e g 101NIKON For most purposes the folder number can be ignored when viewed from the camera folders with the same name but differ ent folder numbers are the same folder For example the camera shows the folders 100NIKON and 101NIKON as the single folder NIKON with no folder number When the memory card is viewed on a computer however folders with the same name but different folder numbers will be tr...

Страница 149: ...be used to create rename or delete folders 1 2 SELECT SET New Rename Delete OPTIONS Creating New Folders Press to right 1 2 SELECT SET New Rename Delete OPTIONS 1 2 1 2 SELECT SET N I K O N O P L M NEW Press to left or right to highlight letter 3 1 2 SELECT SET N I K O N J K G H NEW Highlight New ...

Страница 150: ...uppercase letters A Z numbers and spaces Repeat steps 3 and 4 to create new five letter folder name Highlight last letter and press multi selector to right to create new folder Press MENU button to exit without creating folder Until a different folder is selected from the Folders menu all subsequent photographs will be stored in the new folder ...

Страница 151: ...SELECT SET New Rename Delete OPTIONS 1 2 1 2 SELECT SET SHOW NOV RENAME Highlight folder name 3 1 2 SELECT SET SHOW NOV RENAME Highlight Rename 1 2 SELECT SET S H O W T U Q R RENAME 4 Press to right Edit name as described in steps 3 5 of Creating New Folders on preced ing pages ...

Страница 152: ...on 3 2 1 ERASE FOLDER OFF MENU SELECT SET N O V S H O W Highlight Delete DELETE OFF SELECT SET Deleting folder No Yes MENU N O V 4 Select Yes to delete se lected folder Select No to return to playback menu without deleting folder Press to right If the selected folder contains hidden or protected images the folder will not be deleted Any images it contains that are neither hidden nor protected will...

Страница 153: ...hotographs taken at a setting of Ultra HS is stored in a separate folder with a name consisting of N_ followed by a three digit number assigned by the camera The Folders menu can be used to select the folder for playback or to delete the entire folder and all images it contains Note however that such folders can not be used to store photographs taken after the folder was created 1 2 SELECT SET Fol...

Страница 154: ...l turn on automatically and to specify whether or not photo graphs are displayed in the monitor after shooting 1 2 SELECT SET Monitor On Preview Only Review Only Monitor Off DISPLAY MODE Option Description Monitor On Monitor turns on at start up photographs are displayed in monitor after shooting Review Only Monitor turns on only to display photographs immediately after shooting Choose this option...

Страница 155: ...RIGHTNESS Adjusting MonitorTone The Hue Menu This option controls the hue tone of the monitor Press the multi selector up or down to alter the hue by moving the arrow at the right side of the display up or down Once you have adjusted hue to your satisfaction press the multi selector to the right to put the change into effect 1 2 SELECT SET HUE Increasing monitor brightness also increases the brigh...

Страница 156: ... Auto Off from the playback menu To set the time limit for playback to the value used in recording mode select As REC mode from the playback Auto Off menu 1 2 SELECT SET Folders Monitor Options Auto Off Seq Numbers CF Card Format AUTO OFF 30S 1M 5M 30M Image Quality Image Size Setup mode OFF 1 MENU Slide Show Hide Image Print Set SELECT SET PLAY BACK MENU Delete Folders Protect Auto Off As REC mod...

Страница 157: ...n or by pressing the shutter release button halfway While the camera is being powered by the EH 21 AC adapter battery charger available separately the camera will remain on for thirty minutes if no operations are performed regardless of the setting in the Auto Off menu If the camera is connected to a television set video output will continue indefi nitely after the monitor has turned off ...

Страница 158: ...e name causing confusion when the files are copied to a computer This can be prevented using the options in the Seq Numbers menu 1 2 SELECT SET Folders Monitor Options Auto Off Seq Numbers CF Card Format SEQ NUMBERS On Off Reset Image Quality Image Size Option Description On When new folder is created numbering continues from last number used All files will have unique names Off When new folder is...

Страница 159: ...ed No Format CF CARD FORMAT Confirmation dialog displayed Select Format to format card see Step 3 Select No to return to previous menu with out formatting card PAGE2 1 2 MENU SELECT SET Folders Monitor Options Auto Off Seq Numbers CF Card Format SET UP1 Image Quality Image Size 1 H i g h l i g h t C F Card Format 2 Press 3 Formatting begins as soon as multi selector is pressed to right to select F...

Страница 160: ...e save Digital Zoom Done CONTROLS Option save save save Setting Affected Flash setting Focus mode Exposure compensation Default Auto Autofocus 0 The fourth item Digital Zoom is used to turn digital zoom on and off If it is checked digital zoom functions normally 52 If this item is not checked digital zoom can not be used and pressing the button at the maximum optical zoom position has no effect To...

Страница 161: ...nu If desired the red eye reduction lamp next to the viewfinder win dow can be used to let your subjects know that the shutter has been released This can be useful when taking portraits without the flash Shot confirmation can be turned on or off in the Shot Confirm Lamp sub menu Video Mode 1 2 SELECT SET Controls Date Language Distance Units Reset All Pic data Confirm Shot Confirm info txt Off On ...

Страница 162: ... Pic data Confirm Shot Confirm Date Language Distance Units Reset All info txt Off On Option Description On Photo information recorded in text format Off Text format photo information not recorded does not affect playback photo infor mation display The info txt file gives the following information for each image in the folder File number and type Camera type and firmware version Metering mode Expo...

Страница 163: ...eo Mode Menu The Video Mode sub menu sets the standard used for video out put Adjust this setting to match the standard used in any video device to which you connect the camera 162 1 2 SELECT SET VIDEO MODE Controls Pic data Confirm Date Video Mode Language Distance Units Reset All NTSC PAL Option Description NTSC Use when connecting to NTSC devices PAL Use when connecting to PAL devices ...

Страница 164: ... 20 1 2 SELECT SET LANGUAGE Controls Pic data Confirm Date Video Mode Language Distance Units Reset All E D F J The Distance Units Menu In this sub menu you can choose the units used when displaying manual focus distance 76 The options available are meters m or feet ft 1 2 SELECT SET DISTANCE UNITS Controls Pic data Confirm Date Video Mode Language Distance Units Reset All m ft ...

Страница 165: ...lt values The Reset All menu contains the following options Restoring Default Settings The Reset All Menu The Reset All option in the SETUP mode menu is used to restore settings for all modes to their default values 1 2 SELECT SET Reset No Reset all settings to d e fa u l t va l u e s RESET ALL ...

Страница 166: ... the settings affected and their default values see 110 In addition the following settings are restored to default values Setting Default Setting Default Shot Confirm Lamp Off Info txt Off Image Quality all modes Normal Image Size all modes Full Hue 6 Auto Off all modes 30 s Controls All options on Folders all modes NIKON Display Mode On Brightness 3 All other settings are unaffected SCENE mode Po...

Страница 167: ...eo cable provided with your camera you can connect the COOLPIX 880 to a television orVCR The video device will mirror the image displayed in the camera monitor 1 Insert the black plug on the EG 900 into the camera s VIDEO OUT connector 2 Connect the yellow plug to the video in jack on the television orVCR 3 Tune the television to the video channel 4 Turn the camera on The television will mirror th...

Страница 168: ... when the monitor is off The Video Mode item in the SETUP mode menu 158 offers a choice of NTSC and PAL stan dards for video output Select a standard that matches that used in your television set Note that when the PAL video standard is selected the monitor will turn off when the camera is connected to a video device while recording is taking place at CONTINUOUS settings of Ultra HS or Movie 89 ho...

Страница 169: ...rd drive where it will function as an additional disk Using NikonView Software BeforeYou Start Before using Nikon View read the documentation provided The manuals for NikonView are divided into two parts both on the reference CD provided with your camera Quick Start Guide HTML This installation guide can be viewed in Internet Explorer version 3 0 or later or in Netscape Navi gator version 3 0 or l...

Страница 170: ... icon Once installation is complete you can view the on line documentation by clicking the INDEX pdf icon in the root directory of the reference CD After reading the documentation install NikonView as directed in the Quick Start Guide You are now ready to connect the camera to your computer The SC EW3 serial cable available separately for PC computers is for connection to a male nine pin serial co...

Страница 171: ...cintosh Connect UC E1 USB cable to camera USB serial connector Connect optional SC EW3 serial cable to camera USB serial connector Connect optional SC EM3 serial cable to camera USB serial connector 2 2 2 Connect cable to computer USB connector Connect cable to computer serial port Connect cable to computer modem or printer port ...

Страница 172: ...splay in the control panel will flash on and off in sequence to form a marching ants marquee Do not unplug the serial or USB cables while data transfer is in progress If you are using a USB cable check the progress indicator displayed on the computer to verify that data transfer is complete Do not use NikonView with the camera while battery power is low or the battery is exhausted If the battery i...

Страница 173: ... has been inserted it will function as a disk as described in Step 3 of Using a PCMCIA Card Slot below Using a PCMCIA Card Slot 1 Insert the memory card into the PC card adapter 2 Insert the adapter into your computer s PC card slot as instructed in the documentation provided with your computer or PC card drive 3 The card will now function as a disk Photographs may be found in the folder DCIM in t...

Страница 174: ...r or by another make of camera It may also not be able to display files that have been renamed or moved to a different folder on the memory card using a computer You may need to install an ATA RAM card driver before you will be able to read memory cards on a computer running Windows 3 1 Nikon View can be used to browse photographs on memory cards See the Nikon View Reference Manual for details ...

Страница 175: ...specifications Caring forYour Camera Cleaning Lens Viewfinder Use blower to remove dirt or dust Wipe carefully with soft cloth to remove fingerprints and other stains Do not touch with fingers Monitor Clean with soft dry cloth Body Clean with damp cloth dry immediately Do not use alcohol thinner or other volatile cleaners ...

Страница 176: ...attery before putting the camera away Do not store your camera in locations that are poorly ventilated or damp are next to equipment that produces strong magnetic fields such as televisions or radios are hotter than 50 C 122 F or colder than 10 C 14 F are subject to humidities of over 60 ...

Страница 177: ...ns converter F 8 mm view angle approximately 183 WC E24 WC E63 wide angle lens converters shortens focal length to 24 60 mm 24 60 mm TC E2 2 telephoto lens converter doubles focal length to 132 190 mm TC E3ED 3 telephoto lens converter uses two ED glass elements triples focal length to 285 mm Focal lengths converted to 35 mm 135 format Optional Accessories At the time of writing the following opti...

Страница 178: ... have been tested and approved for use in the COOLPIX 880 SanDisk SDCFB series 48 MB 64 MB and 96 MB Lexar Media 4 USB series 8 MB 16 MB 32 MB 48 MB 64 MB Lexar Media 8 USB series 16 MB 32 MB 48 MB 64 MB 80 MB Lexar Media 10 USB series 128 MB 160 MB Operation is not guaranteed with other cards For more details on the above cards please contact the manufacturer Serial cables SC EW3 serial cable for...

Страница 179: ...tton Camera is off Battery is not correctly inserted or battery chamber cover is not fully closed Battery is dead EH 21 AC adapter battery charger available separately is not properly connected Control panel display is blank 9 149 Monitor is off Press MONITOR button Monitor Off is selected in Monitor Options Display Mode sub menu setup mode Monitor is blank 9 127 Indicators are hidden Press MONITO...

Страница 180: ... CARD PRESENT appears in monitor no memory card has been inserted in camera No photo is taken when shutter release button is fully pressed 72 71 186 64 Shutter speed indicator in monitor blinks shutter speed too low or too high Aperture indicator in monitor blinks aperture too large or too small Subject outside range of flash Exposure compensation too high or too low Photos are over or under expos...

Страница 181: ...in card reader or adapter or adapter not correctly inserted in computer Application does not support JPEG TIFF or QuickTime ATA RAM drivers not installed Windows 3 1 Computer can not read files on memory card Flash indicator in control panel and monitor shows flash is off Battery level is low Focus mode of infinity selected Setting other than Single selected in CONTINUOUS sub menu Best shot select...

Страница 182: ... not registered in Device Manager Windows Reinstall driver from root directory of NikonView CD FIFO buffer size too large Windows Another application is using COM or modem port Virus checking disk doubling or RAM doubling software is interfereing with operation of NikonView NikonView displays commu nications error ...

Страница 183: ...ition W A R N I N G 6 Mode dial is positioned between two modes Adjust mode dial to select desired mode No menu in AUTO mode Please use another mode W A R N I N G 134 Menu button pressed inAUTO mode Turn mode dial to SETUP to adjust AUTO mode menu settings Please wait for camera to finish recording W A R N I N G Camera turned off or new mode se lected while images are being record ed to memory car...

Страница 184: ...rd further photographs at current settings Reduce image quality or size Delete photographs Insert new card I M A G E C A N N O T B E S A V E D 142 153 154 Error encountered while saving photo Camera has run out of folder or file numbers Create new folder Turn Seq Numbers option off Reformat memory card T H I S C A R D C A N N O T B E U S E D 173 Error accessing memory card Use approved memory card...

Страница 185: ... S T E M E R R O R 15 Error has occurred in camera s inter nal circuitry Turn camera off unplug optional AC adapter if using remove and re insert battery and turn camera on If error persists contact retailer or Nikon rep resentative A L L I M A G E S A R E H I D D E N 131 All images in current folder are hid den Select another folder or use Hide Image to change hidden status of im ages in current ...

Страница 186: ...pixels Digital zoom Use zoom buttons to zoom in up to 4 in steps of 0 2 Lens 2 5 Zoom Nikkor F 8 20 mm 35 mm 135 format equivalent to 38 95 mm f 2 8 4 2 with macro Nine elements in seven groups all elements made of environ mentally friendly glass Nikon Super Integrated Coating SIC applied Autofocus Contrast detect through the lens TTL AF Five area multi AF and spot AF available ...

Страница 187: ... 1 0 Approximately 80 Magnification Frame coverage Auto off mode 30 s can also be set manually 1 5 30 min The monitor may contain a few pixels that are always lit or that do not light This is common to all LCD displays and does not indicate a malfunction The monitor is lit by a fluorescent backlight Should the display begin to dim or flicker contact your Nikon service representative Monitor 1 8 11...

Страница 188: ...ndscape Sunset Night Land scape Fireworks Show Sparkler Close Up Copy Back Light Programmed auto P Aperture priority auto A Manual M Custom CSM Shooting menu White balance Exposure metering Continuous Best Shot Selector BSS Lens Converters Image Adjustment Auto Normal More Contrast Less Con trast Lighten Darken Black White Image Sharpening Image Size quality Sensitivity Exposure options Focus opti...

Страница 189: ...mately 30 fps Movie up to 40 s of QVGA frames at 15 fps Shutter Mechanical and charge coupled electronic shutter 8 1 1000 s Bulb Speed Exposure metering Four modeTTL metering 256 segment Matrix Center Weighted Spot AF Spot Modes Aperture Electronically controlled preset aperture Two stops f 2 8 and f 7 8 W f 4 2 and f 11 3 T Range ...

Страница 190: ...ive steps within 2 3 EV Exposure control EV 0 to 16 W EV 1 2 to 17 2 T Range ISO 100 equivalent Sensitivity ISO equivalent 100 200 400 Auto can be set in any exposure mode White balance Matrix AutoWhite Balance with TTL control Five mode Manual with fine tuning Fine Incandescent Fluores cent Cloudy Speedlight Preset Self timer 10 s or 3 s duration ...

Страница 191: ...etes all or selected frames Delete function Hide and protect attributes can be set for each image Attributes Single frame Movie Thumbnail four or nine images Slide show Zoom playback up to 4 Histogram indication highlight point display Focus confirmation indication Playback modes 0 4 2 5 m 1 4 8 2 T 0 4 3 7 m 1 4 12 2 W Macro mode 0 2 2 5 m 8 8 2 T Shooting range ...

Страница 192: ...r later pre installed model CPU MMX Pentium or later OS Mac OS 8 6 or later Only built in USB ports supported Models iMac iBook Power Macintosh G3 Blue White or Power Mac G4 or later PowerBook G3 with built in USB port or later Serial OS Windows 95 98 98SE Windows NT 4 0 Windows 2000 or later pre installed model optional SC EW3 serial cable required OS Mac OS 8 1 or later optional SC EM3 serial ca...

Страница 193: ...registered trademarks of International Business Machines Corporation PowerPC is a trademark of International Business Machines Corporation used under license Microsoft is a registered trademark and Windows MS Windows and Windows NT trademarks of Microsoft Corporation Internet Explorer is a product of Microsoft Corpora tion Pentium and i486 are trademarks of Intel Corporation Internet is a trademar...

Отзывы: