background image

18 

Multi-position XYZT Experiments


1.  Enable the Z and Time options and set up these parameters as described above 


2.  Enable the XY check box in the ND Acquisition window 


3.

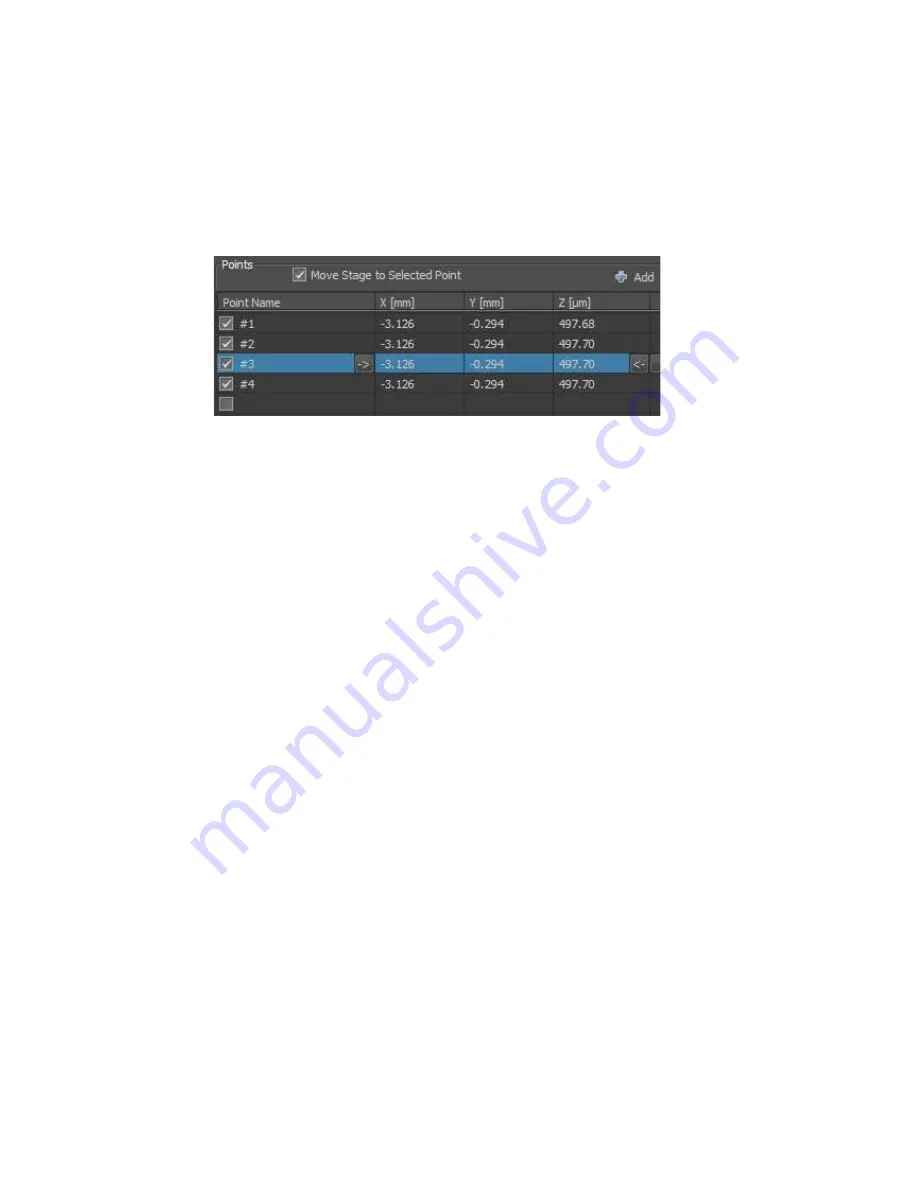
  Here you can add multiple stage positions.  Move to the position of interest and 

select the check box under the Point Name column


4.  Repeat this process to add multiple xy positions to the list 


5.  If you enable the Move Stage to Selected Point check box, when you select a 

position in the list the stage will move to that point 


6.

  To update a positions XYZ coordinates select it from the list, adjust the 

focus/position on the microscope and then press the horizontal arrows that point 
towards the XY and Z coordinates.


Содержание A1+

Страница 1: ...l cmvm datastore ed ac uk igmm Imaging Users User Manuals Confocal Firefly Facility Usage Policy 1 You must have the relevant Risk Assessment COSHH form for the work you are undertaking before using imaging facility resources 2 Users must be trained before using facility equipment 3 Please leave the microscope clean and tidy for the next user 4 Please report any issue even if it seems minor to fac...

Страница 2: ...ge 13 Image Window Options 13 Adding a scale bar 13 Capture images with Optical Zoom 14 Z Stack Acquisition 15 Z stack viewing options 16 XYZT Experiments 17 Multi position XYZT Experiments 18 Tile Scan Experiments 19 FRAP Bleaching Experiments 21 Appendix 24 Saving Images 24 Export images in tiff format 24 Kohler Illumination 25 Perfect Focus System PFS Operation 26 Frequently Asked Questions 27 ...

Страница 3: ...ller button on left side of tower 5 XY stage controller on shelf 6 MCL Piezo controller on shelf only if required 7 PC Additional devices required for Live Cell Imaging Incubation chamber heater chamber doors must be on while heater is in use CO2 controllers see labelled diagram CO2 flow valve on wall see labelled diagram 8 Log in to Windows using the User account 9 If using the 640nm laser launch...

Страница 4: ...4 List of devices ...

Страница 5: ...bed anticlockwise to the vertical position Mounting a sample 1 Ensure the correct stage insert is mounted see facility staff if unsure 2 Select a low magnification 10 20x lens from the touchpad objective menu 3 Use the joystick to move the stage if necessary Change the speed of the stage by twisting the joystick 4 Before mounting the slide on the stage turn the microscope focus knob if the Z value...

Страница 6: ...en it will not lower any more Z position on microscopes LCD display stays constant start to turn the focus knob towards you while looking down the eyepieces 4 Use the OC Panel to switch filters check your labelling at each wavelength 5 Press the Fluorescence Off OC button to turn off the fluorescence LED 6 You can check brightfield by eye using the Brightfield Eyes button 7 At this point you can e...

Страница 7: ...n denotes that the Confocal layout cannot be altered 3 The User layout can be selected if you want to customise the layout of the software If you change this layout profile any changes will only be applied within your Nis Elements user account Selecting a confocal channel setup 1 Some default channel presets are available from the OC Panel under the Confocal Channel Settings heading Selecting one ...

Страница 8: ...tion press the Brightfield Eyes Optical Config button 6 Press the Eye Port button at the top of the A1Plus Compact GUI window Capture an image 1 Before you can scan with the lasers you have to remove the laser interlock by pressing the red Remove Interlock button 2 You can see the live image at any time by pressing the Scan button 3 To acquire an image press the Capture button 4 The captured image...

Страница 9: ...e 512 or 1024 4 Now choose a scan speed start by selecting the lowest number when the control by Pixel dwell option is enabled Higher values represent a longer pixel dwell and hence a slower scan You may need to use a slower scan speed if your signal is low but this could increase the photobleaching rate 5 Ensure that the Normal and Ch Series buttons are enabled green Channel Series enables sequen...

Страница 10: ...is to enable the Channel Setup tick box When selected the square tick box next to each detector changes to a radio button circle the active detector is the one with the filled in grey circle You can toggle between the different channels by clicking in the circle next to the channel heading 6 Note that when Channel Setup is enabled you will only see the image generated by that selected detector 7 I...

Страница 11: ...11 ...

Страница 12: ...n the image that have reached the 4095 maximum intensity value The colour given to over saturated pixels can be selected through the down arrow next to the button An image window must be open in order for the Pixel Saturation Indicator button to appear 3 Images showing the saturation indicator turned on and off Saturated pixels in this case have been coloured yellow 4 Continue to scan using the Ch...

Страница 13: ...bs at the bottom of the image window 2 To see a montaged view of all channels select this icon from the top of the image window Adding a scale bar 1 Every Nis Elements image window contains a scale bar icon Press the button to add a scale bar to the image 2 To adjust the scale bars length width or colour select the down arrow next to the icon and select Scale Properties 3 The scale bar is an image...

Страница 14: ...evel of zoom is to use the Nyquist XY button found in the A1Plus Scan Area window 3 Nyquist xy sets the zoom level based on the optimal pixel size for the selected lens 4 A green ROI in the Scan Area window shows the area of the image that will be included in the new zoomed in image A text box displays the actual zoom level applied in this case 2 92x 5 If you move the green ROI zoom box or shrink ...

Страница 15: ...o the top of the sample then press the Top button 8 Now move the focus away from you to move to the bottom of the sample then press the Bottom button 9 Press Scan again to halt the scanning process 10 To set the optimal step size between slices press this button The calculated size determines what step is required to produce optimal sampling according to the Nyquist Shannon theorem 11 To acquire t...

Страница 16: ...display the XY and YZ orthogonal views as well as the standard XY view 3 To display a volume rendering of the stack press the Volume View button 4 To see all slices of the stack displayed as a montage press the Tiles View button 5 To generate a Maximum Intensity Projection press this button 6 To save an image of any of these views select Edit Create new document from current view Then Select File ...

Страница 17: ... column You can add multiple time phases which will run sequentially 4 The Interval time sets the delay between image captures 5 Set the total time lapse time under the Duration column 6 Once these parameters are filled in the number of loops will be calculated 7 Tick the Save to file check box and input a destination for the data 8 Select the Run Now button to start the time lapse ...

Страница 18: ...erest and select the check box under the Point Name column 4 Repeat this process to add multiple xy positions to the list 5 If you enable the Move Stage to Selected Point check box when you select a position in the list the stage will move to that point 6 To update a positions XYZ coordinates select it from the list adjust the focus position on the microscope and then press the horizontal arrows t...

Страница 19: ...d Tiling 1 Select Acquire Scan Large Image from the top menu 2 In the Capturing section select the lens to use to capture a low magnification overview Macro image from which you will decide how big an area you will tile at a high magnification Scanning 3 At this stage you can also choose the high magnification lens to be used for the actual tile scan Scanning 4 You can see the live image and choos...

Страница 20: ...he final output is the tiled image or the individual tiles 11 You can select whether the tile scan is automatically saved if you set up a file path 12 To acquire a tiled Z stack enable the Z Series option 13 Select the number of Z planes and the step size 14 The Z stack will be acquired symmetrically around the current Z plane 15 If the ultimate aim is to generate a maximum intensity projection of...

Страница 21: ...window to configure the required phases Select the tick box under the phase column to add a phase 5 Under the Acq Stim heading you can select what procedure happens during that particular phase i e acquisition or bleaching 6 The Interval Duration and Loops columns are used to configure over what time period that particular phase runs 7 So for an Acquisition phase the images will be acquired with t...

Страница 22: ...OI Editor menu option 16 Select either the Rectangle or Ellipse ROI tool and draw the ROI onto the image The ROI can be resized by moving to the edge of the ROI when the cursor changes to a double headed arrow The ROI can be moved around the image when the cursor changes to a four headed arrow 17 To Delete a single ROI click on it then press the Delete key on the keyboard 18 To delete all ROIs pre...

Страница 23: ... function S1 R2 and B3 25 Now that a Stimulation ROI has been defined the Apply Stimulation Settings button is available in the ND Stimulation menu When this button is pressed the Run Now button becomes available 26 Press Run Now to start the FRAP experiment ...

Страница 24: ... use this option This will save the images as a 16bit tiff but the pixel intensities will not be changed and remain within the 12bit range 0 4095 as they were when the image was acquired Scale 12bit to 16bit A 16bit tiff is created and the intensities will be within the 16bit 0 65520 range You cannot use this image for intensity quantification Scale 12bit to 8bit An 8bit tiff is created and the in...

Страница 25: ...ser aperture fully 5 Close down the field aperture fully 6 If the image of the field aperture is not in sharp focus adjust the focus by moving the condenser up down 7 Centre the image of the field aperture using the centring screws 8 Open the field aperture until you can see the full field of view but no more 9 Remove an eyepiece and look down if you open and close the condenser aperture you can n...

Страница 26: ...interface is detected the lens will move in the same direction to compensate this maintains the same offset value and therefore the focal plane is unchanged 1 Focus on the sample 2 On the front of the microscope a green LED will light next to the word Focus if the PFS can be turned on This indicates the refractive index interface has been found 3 Press the On button the front of the microscope to ...

Страница 27: ... will only see the average result but the capture will take 4x as long to acquire in this case 5 Note that when Averaging is turned on it applies it to the continuous scan as well as the captured image so the live refresh rate will be affected 6 Only use averaging when necessary and turn it on just before acquiring the final image Remember that it decreases the frame rate by the factor of averagin...

Страница 28: ...ou can scan an area that is bigger than the field of view at the current magnification either by switching to a lower magnification lens or if you want to maintain the resolution you can perform a tiling experiment See the section on tiling for how to set this up ...

Отзывы: