background image

51

Movies

 Recording   Movies

To record silent movies up to fi fteen seconds in length:
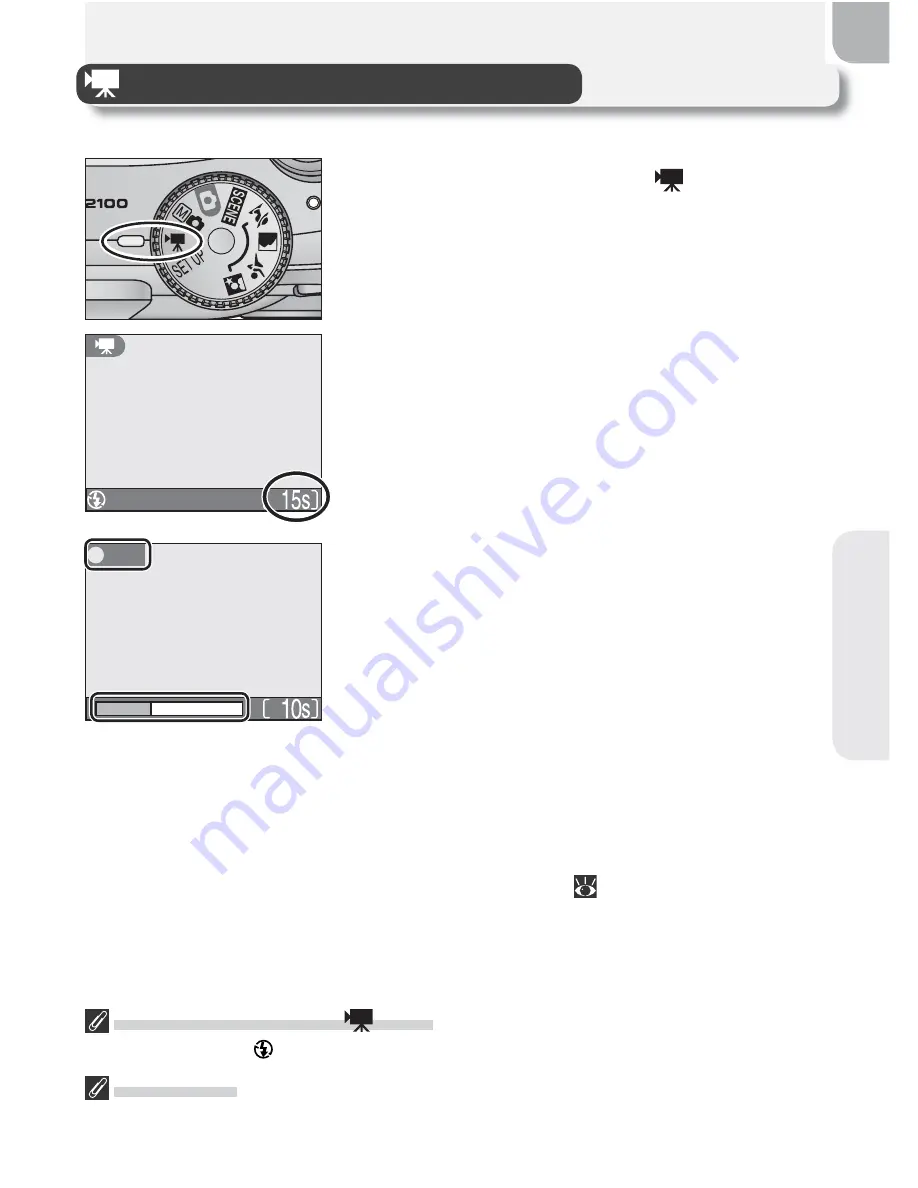
1

  Rotate the mode dial to 

2

  Turn the camera on

The exposure count display in the monitor 
shows the length of the movie that can be 
recorded.

3

  Start recording

Press the shutter-release button all the way 
down to start recording.  During recording, 

REC 

icon will be displayed and progress 

will be shown by the indicator at the bottom 
of the monitor.

4

  End recording

Press the shutter-release button all the way 
down a second time to end recording.  Re-
cording will end automatically after fi fteen 
seconds (seven seconds when 

TV movie 

(640) 

is selected; 

  52) or when no more 

memory is available on the memory card.

  Flash Mode Selection in 

 Mode

The fl ash turns off ( ) automatically when movie mode is selected.

 Digital Zoom

Digital zoom can not be used while recording is in progress.

REC

Содержание 2100 - Coolpix Digital Camera

Страница 1: ...En DIGITAL CAMERA The Guide to Digital Photography with the En ...

Страница 2: ...gistered trademarks of Microsoft Corporation Internet is a trademark of Digital Equipment Corpora tion CompactFlash is a trademark of SanDisk Corporation Lexar Media is a trademark of Lexar Media Corpora tion Adobe and Acrobat are registered trademarks of Adobe Systems Inc All other trade names mentioned in this manual or the other documentation provided with your Nikon product are trademarks or r...

Страница 3: ...mable gas as this could result in explosion or fire Observe caution when using the cam era strap Never place the strap around the neck of an infant or child Do not disassemble Touching the product s internal parts could result in injury In the event of mal function the product should be repaired only by a qualified technician Should the product break open as the result of a fall or other accident ...

Страница 4: ...intain compliance with product regulations Keep out of reach of children Particular care should be taken to prevent infants from putting the batteries or other small parts into their mouths Removing memory cards Memory cards may become hot during use Observe due caution when remov ing memory cards from the camera CD ROMs The CD ROMs on which the software and manuals are distributed should not be p...

Страница 5: ...nal circuitry To prevent an accidental interruption of power avoid carrying the product from one place to another while the AC adapter available separately is connected Do not drop The product may malfunction if subjected to strong shocks or vibration Keep away from strong magnetic fields Do not use or store this device in the vicinity of equipment that generates strong electromagnetic radiation o...

Страница 6: ...the instructions may cause harmful interference to radio communications However there is no guarantee that interference will not occur in a particular installation If this equipment does cause harmful interference to radio or television reception which can be determined by turning the equipment off and on the user is encour aged to try to correct the interference by one or more of the following me...

Страница 7: ...rmission of the government has been obtained the copying or reproduction of unused post age stamps or post cards issued by the government is prohibited The copying or reproduction of stamps issued by the government and of cer tified documents stipulated by law is prohibited Cautions on certain copies and re productions The government has issued cautions on copies or reproductions of securities is ...

Страница 8: ... Nikon COOLPIX camera is designed to the highest standards and includes com plex electronic circuitry Only Nikon brand electronic accessories including battery chargers batteries and AC adapters certified by Nikon specifically for use with your Nikon digital camera are engineered and proven to operate within the operational and safety requirements of this electronic circuitry THE USE OF NON NIKON ...

Страница 9: ... the Picture 18 Step 3 Focus and Shoot 20 Step 4 View the Results 22 More on Photography 24 When Lighting Is Poor Using the Flash 24 Taking a Self Portrait Using the Self Timer 26 Easy Close ups Macro Close up Mode 27 Assist and Scene Modes 28 Framing Assist 29 Scene Mode 34 More on Playback 38 Viewing Pictures on the Camera 38 The Picture Enhance Menu 40 Retouching Pictures 41 Small Picture 42 Cr...

Страница 10: ...Sharpening Only 66 CF Card Format 67 The Playback Menu 68 Using the Playback Menu 68 Slide Show 69 Delete 72 Protect 74 Auto Transfer 75 The Setup Menu 77 Using the Setup Menu 77 Welcome Screen 78 Brightness 79 Volume 79 Auto Off 79 Video Mode 80 Reset All 80 Technical Notes 81 Optional Accessories 81 Caring for Your Camera 82 Error Messages 84 Troubleshooting 87 Specifications 90 Index 92 ...

Страница 11: ...before using your camera This icon indicates that more infor mation is available elsewhere in this manual or in the Quick Start Guide Life Long Learning As part of Nikon s Life Long Learning commitment to ongoing product support and education continually updated information is available on line at the following sites For users in the U S A http www nikonusa com For users in Europe http www nikon e...

Страница 12: ...Camera Self timer lamp 26 Built in Speedlight 24 Viewfinder 18 Lens 18 Power switch 12 Memory card slot cover 10 Eyelet for camera strap Shutter release button 7 Power on lamp 12 Mode dial 6 Attaching the Camera Strap ...

Страница 13: ...or 7 play transfer button 22 45 Battery chamber cover 8 Battery chamber cover latch 8 Tripod socket 25 26 menu button 56 monitor button 5 Monitor 5 18 Viewfinder 18 DC in connector 9 Green AF lamp 20 Red lamp 20 Interface connector cover delete button 22 23 Interface connector cover ...

Страница 14: ...51 10 Flash mode 24 11 Image quality size indicator 58 12 Exposure compensation 62 13 Sensitivity gain indicator5 25 14 Continuous shooting mode 64 15 Best Shot Selector BSS 65 16 White balance 60 17 Macro close up mode 27 18 Image sharpening 66 19 Shooting mode 6 16 1 Displayed when zoom buttons are pressed 2 Appears when camera clock has not been set 3 Appears at slow shutter speeds to warn that...

Страница 15: ...of recording 14 15 10 Date of recording 14 15 1 Appears when batteries are running low Controlling the Monitor To hide or display indicators in the monitor press the button In and modes you can also use the button to turn the monitor off 12 15 2003 03 06 2003 03 06 14 20 14 20 100NIKON 100NIKON 0012 JPG 0012 JPG 1 2 3 4 5 7 6 8 9 10 Monitor shows current settings and view through lens Monitor show...

Страница 16: ... ing menu options available in auto mode you have access to such menu items as white balance and image sharpening Portrait Assist Landscape Assist Sports Assist Night Portrait Assist Use framing assist to help compose pictures suited to a particular type of subject 28 33 Auto 16 A simple point and shoot mode in which the majority of camera settings are con trolled by the camera Rec ommended for fi...

Страница 17: ...cursor down The Shutter Release Button Your camera has a two stage shutter release button The camera sets focus and exposure when the button is pressed halfway The green AF lamp next to the viewfinder will light when the focus operation is complete Focus and exposure will remain locked while the shutter release button is pressed halfway To take the picture press the shutter release button the rest...

Страница 18: ...over Pressing the battery chamber latch 1 slide the battery chamber cover out 2 and flip it open 3 2 Insert the batteries Insert the batteries as shown in the label inside the battery chamber 3 Close the battery chamber cover Close the battery chamber cover 1 and slide it in until it latches 2 Be sure that the battery chamber cover is properly latched CRV3 EN MH1 AA 1 2 3 1 2 ...

Страница 19: ...ttery charger charge EN MH1 batteries before first use Charge each pair of batteries at the same time do not charge batteries one at a time or mix batteries with different charges Note that EN MH1 batteries may discharge quickly immediately after purchase or after the batteries have been left unused for an extend ed period This is normal and the batteries will retain a charge for longer periods af...

Страница 20: ...ction of the arrow as shown in the label on the underside of the memory card slot cover The memory card is fully inserted when the eject button is level with the top of the memory card Inserting Memory Cards Insert the memory card terminals first In serting the card upside down or backwards could damage the camera or the card Check to be sure the card is in the correct orientation 4 Close the memo...

Страница 21: ... memory cards may become hot during use observe due caution when re moving memory cards 1 2 Approved Memory Cards In addition to the card provided with your camera the following memory cards have been tested and approved for use with your Nikon digital camera Nikon EC CF All capacities SanDisk SDCFB 32MB 64MB 128MB 256MB 512MB 1GB SDCFH Ultra 128MB 192MB 256MB 384MB 512MB Lexar Media 4 USB 16MB 32...

Страница 22: ...cond Your most recent picture will be displayed in the monitor 22 15 2 Check the battery level in the monitor Display Meaning NO ICON Batteries fully charged Low battery Fewer shots can be taken consecutively in continuous mode if flash fires monitor will turn off while flash recharges Ready spare batteries WARNING BATTERY EXHAUSTED Batteries exhausted Replace with fully charged batteries The red ...

Страница 23: ...hirty minutes While the camera is in standby mode the power on lamp will blink The camera will be reactivated when you Rotate the power on switch Press or press the shutter release button halfway Press the button to view the last picture taken Press the MENU button to display the menu for the current mode Rotate the mode dial to select a new mode The length of time before the camera enters standby...

Страница 24: ...LANGUAGE English En Français Fr Deutsch De SET Choose language from Deutsch German English Français French Japanese or Español Spanish 5 Date Welcome screen Language SET UP En SET Return to setup menu 6 Date Welcome screen Language SET UP En SET Highlight Date The Icon If the date not set icon 4 flashes in the top right corner of the monitor when the camera is in shooting mode the date and time ha...

Страница 25: ...menu The Clock Battery When the main batteries are installed or the camera is powered by an AC adapter the clock battery will charge in about ten hours When fully charged the clock battery can provide several days of back up power Setting the Clock from Nikon View Windows XP Mac OS X Only If the camera is connected with the USB option set to PTP 45 Nikon View version 6 0 0 or later can be used to ...

Страница 26: ...rolled by the camera in response to shooting conditions producing optimal results in most situations 1 Rotate the mode dial to Shooting mode indicates auto mode Image quality size Choose from four op tions depending on how you plan to use the picture 58 The default setting is 15 Flash mode Choose from four modes depend ing on lighting and your creative intent 24 The default setting is auto Number ...

Страница 27: ...displayed in the monitor No further pictures can be taken until you choose a lower Image quality size setting 58 insert a new memory card 10 delete some pictures 22 23 72 73 Mode manual mode provides additional menu options that give you full control over such settings as white balance and image sharpening See The Shooting Menu 56 ...

Страница 28: ...the image up to 4 for a total of 12 Use the zoom buttons to frame your subject in the center of the monitor Press the W button to zoom out from your subject increasing the area visible in the frame Press the T button to zoom in on your subject so that it fills a larger area of the frame When the camera is zoomed in to maxi mum magnification holding the T button down for about two seconds will trig...

Страница 29: ...lti Shot 16 2 is selected in the CON TINUOUS menu 64 When Lighting Is Poor When lighting is poor sensitivity is raised to compensate and the image in the monitor may be slightly mottled This is normal and does not indicate a malfunction Monitor or Viewfinder Use the monitor to confirm camera settings at a glance while at the same time viewing an image that shows how the final picture will appear T...

Страница 30: ...dicated by the red flash ready lamp next to the viewfinder Red lamp On Flash will fire when picture is taken Blinks Flash charging Briefly lift finger from shutter release button then try again Off Flash off or not required Green AF lamp focus indicator On Subject in focus Flashes Camera unable to focus on subject at center of frame Using focus lock focus on another subject at same distance then r...

Страница 31: ...es from the camera at the center of the frame e g your subject is inside a cage Focusing on Off Center Subjects Focus Lock If your subject is not at the center of the frame when the shutter release button is pressed halfway your picture may be out of focus To focus on an off center subject 1 Focus Position the subject in the center of the frame and press the shutter release button halfway 2 Check ...

Страница 32: ...s press and hold the multi selector To cancel full screen playback and return to shooting mode press the button again Deleting Unwanted Pictures To delete the picture displayed in the moni tor press the button A confirmation dia log will be displayed Press the multi selector up or down to highlight YES and then press the multi selector to the right To exit with out deleting the picture highlight N...

Страница 33: ... number assigned automatically by the camera in ascending order and a three letter extension e g DSCN0001 JPG Picture type Identifier Extension Original Still picture DSCN JPG 22 Movie DSCN MOV 53 Copy Copy created using Pic enhance menu option FSCN JPG 41 Small copy SSCN JPG 42 Cropped copy RSCN JPG 43 When a picture is viewed in the monitor the file number and extension appear in the top right c...

Страница 34: ...ended when quick shutter response is required Flash Cancel off Flash will not fire even when lighting is poor Use to capture natural lighting under dim light or where use of flash is pro hibited If camera shake icon ap pears care should be taken to avoid blurring Anytime Flash fill flash Flash fires whenever picture is taken Use to fill in illuminate shadows and back lit subjects To select the fla...

Страница 35: ...When the camera is zoomed all the way out the flash has a range of 0 4 3 0m 1 4 9 10 The range at maximum zoom is 0 4 1 7m 1 4 5 7 Close Ups The flash may not be able to light the entire subject at distances of less than 40cm 1 4 When taking close ups play each picture back after shooting to check the results Flash Mode Selection Depending on the mode selected the flash mode may change automatical...

Страница 36: ...e up or low light shots from being blurred by the camera movement that occurs when the shutter release button is pressed When using this option you should either mount the camera on a tripod recommended or rest it on a flat level surface Taking a Self Portrait Using the Self Timer 1 Display self timer menu 15 2 Highlight ON to exit without changing mode wait two seconds or press multi selector to ...

Страница 37: ...hat will appear in the final picture Use the monitor for close ups In macro close up mode the camera focuses continuously even when the shutter re lease button is not pressed halfway 1 Display macro close up menu 15 3 Exit menu icon appears in monitor when camera is in macro close up 15 4 Frame picture If camera is zoomed out until icon turns green camera can focus at distance of 4cm 1 6 15 2 High...

Страница 38: ...portrait assist Use for portraits taken against a dimly lit backdrop 33 Scene Modes Scene modes are selected by rotating the mode dial to and selecting the desired scene from a menu Mode Description Party Indoor Use to capture background details or the effects of candlelight and other indoor lighting 35 Beach Snow Use for bright subjects such as snowfields beaches and sunlit expanses of water 35 S...

Страница 39: ...ject or subjects in framing guide as described on following pages 3 Make selection and return to shoot ing mode Framing guide appears in monitor 15 Using the Guides Your subject does not have to fit exactly in the framing guides When framing pic tures pay attention to your surroundings be careful not to trip and fall Assist Modes Depending on your subject assist modes may not always produce the de...

Страница 40: ...half of frame Camera will focus on subject in fram ing guide Portrait left SET Portrait right Use to compose shot with subject centered in right half of frame Camera will focus on subject in fram ing guide Portrait right SET Portrait close up Use to compose shot with your subject s face positioned in top half of frame Camera will focus on face area in framing guide Portrait close up SET Flash Mode...

Страница 41: ...ark or other object in background at right of frame Both portrait subject and background object will be in focus Group left SET Use to photograph buildings A grid is displayed in the monitor to help keep verticals and horizontals aligned with the frame Architecture SET Use to compose landscapes with sky in top third of frame distant ob jects in middle third and closer objects in bottom third Match...

Страница 42: ...ubject is moving unpredictably leaving you no time to com pose pictures Camera focuses continuously even when shutter release button is not pressed Sport spectator SET Flash Mode Selection in Mode The flash turns off automatically in mode The Self Timer The self timer turns off automatically in mode Macro Close up Mode Macro close up turns off automatically in mode Date Imprint 63 Date imprint tur...

Страница 43: ... subject and the back ground Pictures taken at slow shutter speeds are adjusted to improve quality slightly increas ing processing time to prevent blurring mount the camera on a tripod or rest it on a flat stable surface For more information on framing assist options see Portrait Assist 30 Flash Mode Selection in Mode Flash mode is automatically set to auto with red eye reduction ...

Страница 44: ...er 26 These restric tions are noted on the pages that follow The Camera Shake Icon When the icon appears in the monitor pictures may be blurred In this section the precautions that you can take to avoid blur are indicated by stars hold camera in both hands and brace elbows against your body use a tripod or rest the camera on a flat level surface 3 Make selection and return to shoot ing mode Select...

Страница 45: ...odes can be selected No restrictions OFF No restrictions Party Indoor Use for shots that include details of the background or to capture the effects of candlelight and other indoor back ground lighting No restrictions OFF The following scenes are available Dusk Dawn and Night Landscape In these modes pictures taken at slow shutter speeds are processed to improve quality slightly increasing time be...

Страница 46: ...To focus on objects as close as 4cm 1 6 to the lens adjust zoom until the macro close up icon in monitor turns green No restrictions ON No restrictions Museum Flash turns off automatically Use this mode indoors where flash photography is prohibited for example in mu seums and art galleries or in other indoor settings in which you do not want to use the flash The Best Shot Selector BSS 65 turns on ...

Страница 47: ...e but the background is brightly lit The flash will fire automatically to fill in illuminate shadows OFF No restrictions Fireworks show Slow shutter speeds are used to capture the expanding burst of light from a firework The camera responds more rapidly to the shutter release button ensuring that you can capture the start of the burst Focus is fixed at infinity Follow the firework as it ascends an...

Страница 48: ... played to view highlighted picture full screen Delete highlighted picture Confirmation dialog will be displayed Press multi selector up or down to highlight option press to right to select No Yes DELETE SET Erase 1 image s Erase 1 image s Viewing Multiple Pictures Thumbnail Playback Pressing the W button in full screen play back displays the pictures on the memory card in contact sheets of four t...

Страница 49: ... ratio are displayed in top left corner of monitor View other areas of picture Use multi selector to scroll to areas of picture not visible in monitor To use multi selector to view other pictures cancel zoom Zoom out W Zoom decreases each time button is pressed To cancel zoom zoom picture out until entire picture is displayed Crop picture Shutter button Press shutter release but ton to create new ...

Страница 50: ... original no effect on the copy The copy will be created with the same transfer marking and date and time of creation as the original print and protect attributes will be off Movies Pressing the MENU button with a movie displayed in full screen playback or high lighted in the thumbnail list will display a menu selection screen containing PLAYBACK MENU and MOVIE TRIM MENU options 54 The PIC ENHANCE...

Страница 51: ...ctor down until the copy is displayed The copy will be displayed after the last picture recorded Copies are stored as NORMAL quality JPEG files compression ratio 1 8 with names of the form FSCNnnnn JPG where nnnn is a four digit number assigned automatically by the camera 2 Save edited image as a copy No Yes SET Confirmation dialog displayed Se lect Yes to create retouched copy No to exit without ...

Страница 52: ...mall pictures can not be created from resized copies cropped copies or from copies created using the options in the PIC ENHANCE MENU Small Picture To view the new resized copy press the multi selector down until the copy is displayed The copy will be displayed after the last picture recorded in thumbnail playback small pictures are indicated by a gray border To reduce file size copies are stored o...

Страница 53: ... 1 280 960 1 024 768 640 480 320 240 or 160 120 pixels in size Copies are stored in sepa rate files on the memory card with names of the form RSCNnnnn JPG where nnnn is a four digit number assigned automatically by the camera Pictures can also be cropped as described in Taking a Closer Look Playback Zoom 39 Photo Trim Resized copies cropped copies and copies created using the options in the PIC EN...

Страница 54: ...nnecting or disconnecting the video cable 2 Connect the video cable Open the interface cover and insert the black plug into the camera s interface connector the yellow plug into the video in jack on the television or VCR 3 Tune the television to the video channel If in doubt consult the documentation for your television or VCR 4 Turn the camera on Press the button for about a second to turn the ca...

Страница 55: ...pends on your computer s operating system and the USB option selected in the camera setup menu After consulting the following table select the appropriate option using the USB item in the camera setup menu The default option is Mass Storage Operating system Pictures transferred using Camera button Nikon View button Windows XP Home Edition Windows XP Professional Choose Mass Storage or PTP Mac OS X...

Страница 56: ...ore reconnecting the camera Windows 2000 Professional A dialog will be displayed welcoming you to the Found New Hardware Wizard Click Cancel to close the dialog and then disconnect the camera Windows Millennium Edition Me After displaying a message stating that the hardware information database is being updated the computer will start the Add New Hardware Wizard Click Cancel to exit the wizard and...

Страница 57: ...Hardware icon in the taskbar and select Safely remove USB Mass Storage Device from the menu that appears Windows 2000 Professional Click the Unplug or Eject Hardware icon in the taskbar and select Stop USB Mass Storage Device from the menu that appears Windows Millennium Edition Me Click the Unplug or Eject Hardware icon in the taskbar and select Stop USB Disk from the menu that appears Windows 98...

Страница 58: ...ystem To create a digital print order press the MENU button during playback and select PLAYBACK MENU from the menu selection screen 68 then follow the steps below PRINT SET Print selected Delete print set SET Display PRINT SET menu 2 1 PLAYBACK MENU Print set Slide show Delete SET Highlight Print set PRINT SELECTION Done Set Pictures on memory card displayed as thumbnail images 4 3 PRINT SET Print...

Страница 59: ...ete print order and display menu of print options To print date of recording on all pic tures in print order highlight Date and press multi selector to right Check will appear in box next to item To print shutter speed and aperture on all pictures in print order high light Info and press multi selector to right Check will appear in box next to item To deselect checked item highlight and press mult...

Страница 60: ... camera clock was set incorrectly when the picture was taken 14 15 The date will not be printed if the print system does not support the DPOF date function The date stamp recorded when Date or Date and time is selected for Date imprint 63 forms a permanent part of the image and will appear whenever the pictures are printed even if the printer does not spport the DPOF date function Print set can no...

Страница 61: ...g a REC icon will be displayed and progress will be shown by the indicator at the bottom of the monitor 4 End recording Press the shutter release button all the way down a second time to end recording Re cording will end automatically after fifteen seconds seven seconds when TV movie 640 is selected 52 or when no more memory is available on the memory card Flash Mode Selection in Mode The flash tu...

Страница 62: ...s B W movie 320 Movies are recorded in black and white at a rate of 15 frames per second Each frame has a size of 320 240 pixels file size is the same as for Small movies Sepia movie 320 Movies are recorded in sepia at a rate of 5 frames per second Each frame has a size of 320 240 pixels file size is the same as for Small movies Movies Movies are recorded as Quick Time movie files with the extensi...

Страница 63: ...selector down while movie is in progress pauses display To resume press multi selector down again Rewind Press and hold to rewind movie Fast forward Press and hold to fast forward through movie Playback ends at last frame once playback has ended first frame of movie will be displayed Rewind movie one frame When movie is paused press multi selector once to left to rewind movie one frame Advance mov...

Страница 64: ...enu selection screen 2 PLAYBACK MENU MOVIE TRIM MENU Highlight MOVIE TRIM MENU 3 Begin trim Cancel Mark new start stop with shutter press Confirmation dialog displayed 4 Begin trim Cancel Mark new start stop with shutter press Highlight Begin trim to exit without trimming movie highlight Cancel and press multi selector to right 5 Begin movie playback Editing Movies Any sections cut from a movie ar...

Страница 65: ...ovie Yes SET Highlight Review select Yes and press multi selector to right to skip to Step 13 No to exit without editing movie 12 Save trimmed movie No Review movie Yes SET Highlight Yes to exit without editing movie highlight No and press multi selector to right 11 View edited movie use multi selec tor to pause rewind and advance or press W to end playback 13 Save edited movie to memory card Sect...

Страница 66: ... a sequence 64 BSS mode only Turn the Best Shot Selector BSS on or off 65 Image sharpening mode only Control how much outlines in your pictures are sharp ened 66 CF card format Format memory cards for use in the camera 67 In auto and manual modes the shooting menu is displayed when the MENU button is pressed To display the shooting menu in scene or assist modes 2 SCENE MENU SHOOTING MENU SET Displ...

Страница 67: ...he shooting menu 1 SHOOTING MENU Image quality size Exp Date imprint SET Highlight menu item 2 0 3 0 0 3 EXP Display options 3 EXP 0 3 0 7 0 SET Highlight option to return to previ ous step press multi selector to left 4 SHOOTING MENU Image quality size Exp Date imprint SET Make selection To exit menu and re turn to shooting mode press MENU button ...

Страница 68: ...mputer monitors 17 or larger 9 7 3 5 2 5 TV screen 640 640 480 NORMAL 1 8 Can be displayed full screen on a television or 13 moni tor Suited to distribution by e mail or the web 5 4 2 1 5 To reduce the amount of memory each shot occupies pictures are compressed as they are saved to the memory card Compression selectively reduces the quality of the image The more a picture is compressed the more no...

Страница 69: ...The figure shown in the monitor for the number of exposures remaining is only an approximation The file size of compressed images varies with the scene recorded producing wide variations in the number of pictures that can be stored on the memory card Image Size Smaller images create smaller files suited to transmission by e mail or use in web pages When printed at larger sizes however small images...

Страница 70: ...on A Auto White balance automatically adjusted to suit light ing conditions Best choice in most situations White bal preset Gray object used as reference to set white balance under unusual lighting conditions Daylight White balance adjusted for direct sunlight Incandescent Use under incandescent lighting Fluorescent Use under most types of fluorescent lighting Cloudy Use when taking pictures under...

Страница 71: ... the most recent value for preset white balance from memory and sets white balance to this value Measure To measure a new value for white balance place a gray object such as a piece of cardboard under the lighting that will be used in the final picture Frame this object so that it fills the square in the center of the menu shown above Highlight Measure and press the multi selector to the right to ...

Страница 72: ... the background is much brighter than the main subject Choose negative values when large areas of the frame are very dark for example when photographing a forest of dark green leaves or when the background is much darker than the main subject This is because the camera in order to avoid extreme over or under exposure tends to lower exposure when the frame is very bright and raise exposure when the...

Страница 73: ...anent part of the image and will appear whenever the image is printed regard less of whether the date option is chosen in the Print set menu At settings other than Off a DATE icon is displayed in the monitor during shooting Check be fore shooting to make sure that the camera clock is set to the correct time and date The date is recorded in the order selected in the DATE menu You will not be able t...

Страница 74: ...frames per second while shutter release button is held down Shooting ends after four seconds or when you release shutter release button From these pictures camera selects sixteen frames at regular intervals and arranges them in four rows to form a single picture 1 600 1 200 pixels in size Remaining images are discarded Continuous Only Restrictions on Camera Settings At settings other than Single t...

Страница 75: ... Flash turns off automatically and focus exposure and auto white balance for all photos are determined by the first picture in each series BEST SHOT SELECTOR Off On SET Best Shot Selector Only Notes on BSS BSS may not produce the desired results with a moving subject or if you change the composition while the shutter release button is pressed all the way down Continuous and BSS CONTINUOUS is autom...

Страница 76: ...rmed Option Description Auto Camera sharpens edges for optimal results amount of sharp ening varies from shot to shot High Pictures processed to increase sharpness making edges more distinct Normal Camera performs same standard level of sharpening on all images Low Sharpening reduced below normal level Off No sharpening performed IMAGE SHARPENING Auto High Normal SET Taking Pictures for Retouching...

Страница 77: ...be on the card Before formatting be sure to transfer to a computer any pictures you would like to keep 45 47 Selecting CF card format displays the confirmation dialog shown above To format the memory card During Formatting Do not turn the camera off remove the batteries or memory card or unplug the AC adapter available separately while formatting is in progress 1 CF CARD FORMAT WARNING All images ...

Страница 78: ...w pictures on the memory card in an automatic slide show 69 71 Delete Delete all or selected pictures 72 73 Protect Protect selected pictures from accidental deletion 74 Auto transfer Mark all or selected pictures for transfer to a computer turn auto transfer marking on or off 75 76 To display the playback menu 2 PLAYBACK MENU Print set Slide show Delete SET Display playback menu 1 PIC ENHANCE MEN...

Страница 79: ... Pictures in the Order Recorded SLIDE SHOW Select all Select image s SET Slide Show 4 Begin slide show 1 SLIDE SHOW Select all Select image s SET Highlight Select all 3 SLIDE SHOW SLIDE SHOW Pause Pause Start Loop Highlight Start Loop If Loop is selected in the starting screen the slide show will repeat automatically To select or deselect the loop option highlight Loop and press the multi selector...

Страница 80: ...light Select image s 2 Done SELECT IMAGE S Set Pictures on memory card displayed as thumbnail images 7 SLIDE SHOW SLIDE SHOW Pause Pause Start Loop Starting screen displayed Start slide show as described in steps 3 4 of Viewing All Pictures in the Order Recorded 3 Done SELECT IMAGE S Set Highlight picture 4 SELECT IMAGE S Done Set Select highlighted picture Selected picture marked by number showin...

Страница 81: ... to resume show Highlight End and press multi selector to right to end show Skip to next frame Press multi selector to right to skip to next slide Hold multi selector down to fast forward through show Return to previ ous frame Press multi selector to left to return to previous slide Hold multi selector down to rewind through show End slide show End slide show and return to playback SLIDE SHOW SLID...

Страница 82: ... 3 and 4 to select additional pictures To deselect picture highlight and press W or T button To exit without deleting pictures press button 1 DELETE Eraseselectedimages Erase all images SET Highlight Erase selected images 4 Done ERASE SELECTED IMAGES Set Select highlighted picture Selected pictures marked by icon 2 ERASE SELECTED IMAGES Done Set Pictures on memory card displayed as thumbnail image...

Страница 83: ...cted Pictures Pictures marked with a icon are protected and can not be deleted 74 6 No Yes DELETE SET Erase 1 image s Erase 1 image s Confirmation dialog displayed Select Yes to delete pictures No to exit with out deleting pictures 2 DELETE Erasing all images Exclude No Yes SET Confirmation dialog displayed Se lect Yes to delete pictures No to exit without deleting pictures 1 DELETE Eraseselectedi...

Страница 84: ... deleted when the memory card is formatted PROTECT Done Set 3 Repeat steps 1 and 2 to select additional pictures To de select picture highlight and press W or T button To exit without changing protected status of pictures press button Protect 2 Done PROTECT Set Select highlighted picture Selected pictures marked by icon 1 Done PROTECT Set Highlight picture 4 Done Complete operation and return to p...

Страница 85: ...d for transfer If the memory card contains more than 999 pictures transfer all pictures using Nikon View See the Nikon View Reference Manual on CD for details Hidden Pictures Some Nikon digital cameras allow you to hide pictures during playback Hidden pic tures can be viewed on the COOLPIX 2100 but can not be selected for transfer The Icon Pictures that have been selected for transfer are identifi...

Страница 86: ...s button 3 AUTO TRANSFER Done Set Highlight picture 4 AUTO TRANSFER Done Set Select highlighted picture Selected pictures marked by icon Marking Selected Pictures for Transfer 1 AUTO TRANSFER All on All off Select image s SET Highlight Select image s Marking Pictures for Transfer with Other Cameras Pictures selected for transfer with another model of Nikon camera can not be trans ferred when the m...

Страница 87: ...t memory cards for use in the camera 67 USB Choose PTP or Mass Storage according to your comput er s operating system 45 Video mode Select the video mode from NTSC and PAL 80 Reset all Restore camera settings to default values 80 Language and Date The Language and Date options are described in First Steps 14 15 CF Card Format The CF card format option is described in The Shooting Menu 67 USB The U...

Страница 88: ...new picture for the welcome screen No to exit leaving the welcome screen unchanged WELCOME IMAGE SELECT Replace original image No Yes This option is used to choose the welcome screen displayed when the camera is turned on WELCOME IMAGE SELECT Disable welcome Welcome image Coolpix SET Welcome Screen Option Description Disable welcome No welcome screen is displayed when camera is turned on Coolpix I...

Страница 89: ...rom menus or release the shutter When operated on battery power the camera will enter standby mode if no operations are performed for the length of time selected in the AUTO OFF menu Choose from thirty seconds 30s the default setting one minute 1m five minutes 5m or thirty minutes 30m Regard less of the option chosen in the AUTO OFF menu the monitor will remain on for three minutes when menus are ...

Страница 90: ...e balance Auto Exp 0 Date imprint Off Continuous Single Best Shot Selector Off Image sharpening Auto Auto transfer All on Welcome screen Coolpix Brightness 3 Volume On Auto off 30s Choosing Reset also clears the current file number 23 from memory Numbering will continue from the lowest number available on the memory card All other settings are unaffected Resetting File Numbering to 0001 To reset f...

Страница 91: ...the following optional accessories were available for your Nikon digital camera Contact your local retailer or Nikon representative for details Rechargeable battery Additional EN MH1 NiMH batteries are available from your retailer or local Nikon representative Battery charger MH 70 battery charger for EN MH1 batteries AC adapter EH 61 AC adapter Carrying case CS CP14 soft case CompactFlash memory ...

Страница 92: ... or mouth Body Use a blower to remove dust and lint then wipe gently with a soft dry cloth After using the camera at the beach or seaside wipe off any sand or salt with a cloth lightly dampened with fresh water then dry thoroughly Do not use alcohol thinner or other volatile chemicals Notes on the Monitor The monitor may contain a few pixels that are always lit or that do not light This is a chara...

Страница 93: ... the camera on and release the shutter a few times before put ting the camera away again Store the batteries in a cool dry place Batteries When turning the camera on check that the batteries are charged The monitor will display a warning when batteries are low Carry a fresh CRV3 battery as a replacement when taking pictures on important occa sions You may find it difficult to purchase replacement ...

Страница 94: ... turned off or button pressed during re cording Message clears from display automatically when record ing is complete 21 MONITOR OFF Monitor has been left on for an extended period ac tivating internal circuit pro tection Use viewfinder or turn cam era off and wait a few min utes before turning camera on again NO CARD PRESENT Camera can not detect memory card Turn camera off and confirm that memor...

Страница 95: ...y card Insert new memory card or delete pictures Copies can not be created from movies or from other copies 67 10 22 23 72 73 41 43 CARD CONTAINS NO IMAGES No pictures on memory card Press button to return to shooting mode 22 FILE CONTAINS NO IMAGE DATA File created by computer or different make of camera View file on computer or correct make of camera COMMUNICATIONS ERROR USB cable disconnected o...

Страница 96: ...re transferred to computer Check that camera is con nected and that batteries are fully charged 12 46 LENS ERROR Error has occurred during lens operation Turn camera off and then on again If error persists con tact retailer or Nikon repre sentative SYSTEM ERROR Error has occurred in cam era s internal circuitry Turn camera off unplug op tional AC adapter if using remove and reinsert batter ies and...

Страница 97: ...e that disconnecting the power source as described above may result in the loss of any data not recorded to the memory card at the time the problem occurred Data already recorded to the memory card will not be affected Problem Possible cause Monitor is blank Camera is off Batteries are not correctly inserted or battery chamber cover is not properly latched Batteries are exhausted EH 61 AC adapter ...

Страница 98: ...ndow is blocked Subject is outside range of flash Exposure compensation is too low 24 18 25 62 Pictures are too bright overexposed Exposure compensation is too high 62 Pictures are out of focus Subject was not in focus area when shutter release button was pressed halfway Green AF lamp flickers camera unable to focus 20 20 Pictures are blurred Camera shook during shot Blurring caused by cam era sha...

Страница 99: ... not enough free space on memory card to store new copy 53 41 43 16 17 Can not zoom in on picture Picture is a movie Picture was created with small picture option Picture has been cropped to size less than 320 240 53 42 43 Nikon View does not start when cam era is connected or memory card insert ed in card reader or card slot Camera is off EH 61 AC adapter available separately is not properly conn...

Страница 100: ... viewfinder with LED indication Magnification 0 34 0 94 Frame coverage Approximately 82 horizontal and 82 vertical Monitor 1 5 75 000 dot TFT LCD monitor with five level brightness adjustment Frame coverage shooting mode Approximately 97 horizontal and 97 vertical Storage Media Type I CompactFlash CF cards File system Compliant with Design Rule for Camera File System DCF Exif 2 2 and Digital Print...

Страница 101: ...ard temperature 20 C 68 F with fully charged bat teries under standard Nikon test conditions zoom ad justed with each shot flash used in approximately one third of shots image type set to Normal Dimensions W H D 87 5 65 38mm 3 44 2 56 1 50 Approximate weight 150g 5 3oz without battery or memory card Operating environment Temperature 0 40 C 32 104 F Humidity Less than 85 no condensation Design Rule...

Страница 102: ...C in connector 3 DCF see Design rule for Cam era File system Delete 68 72 73 Deleting pictures 38 72 73 74 all pictures 73 during shooting 23 in full screen playback 22 selected pictures 72 73 Design rule for Camera File system 90 91 Digital Print Order Format 48 50 90 DPOF see Digital Print Order Format Dusk Dawn 28 35 88 E E mail 42 58 59 EN MH1 see Batteries Error messages 84 86 Exif 2 2 90 91 ...

Страница 103: ... 56 SCENE MENU 56 Scene menu the 34 37 scene mode 6 28 34 37 Self portraits 26 Self timer 26 32 37 65 91 Self timer lamp 2 26 Sensitivity 25 91 Sepia movies 52 still pictures 41 Setup menu the 77 80 setup mode 6 14 15 77 80 SHOOTING MENU 56 Shooting menu the 56 67 Shutter release button 2 7 20 Shutter release delay see Self timer Size see Image quality size Slide show 68 69 71 Slide shows 69 71 cr...

Страница 104: ...Printed in Japan SB3H15000701 11 6MAA5211 ...

Отзывы: