background image

21

s

Take a few moments to familiarize yourself with camera controls
and displays.  You may find it helpful to bookmark this section
and refer to it as you read through the rest of the manual.

The Camera Body

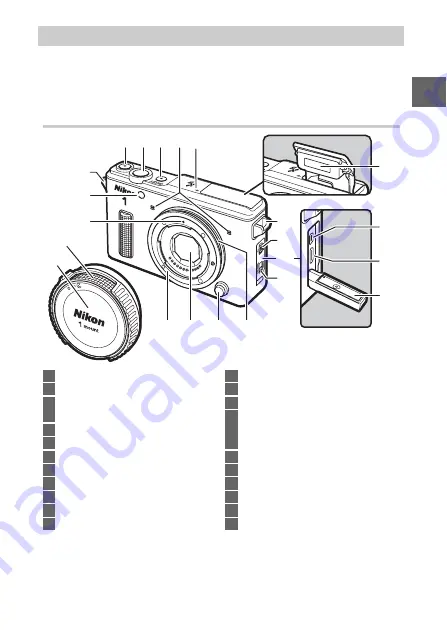
Parts of the Camera

1 2 3 4 5

17

6

16

7

9

15

14

6

18

13

11

12

10

19

20

21

8

1

Movie-record button ............77, 79, 84

2

Shutter-release button............... 42, 80

3

Power switch........................................36
Power lamp ..........................................36

4

Microphone

5

Focal plane mark (

E

)

6

Eyelet for camera strap......................31

7

Connector cover latch .....................105

8

Connector cover................................105

9

Connector cover security lock .......105

10

O-ring .................................... 33, 73, 108

11

Lens release button............................35

12

Dust shield ................................114, 115

13

Lens mount

14

Mounting mark ................................... 34

15

AF-assist illuminator
Self-timer lamp ................................... 89
Red-eye reduction lamp ................... 92

16

Body cap .............................................108

17

O-ring protector................................110

18

Built-in flash......................................... 91

19

USB connector...................................105

20

HDMI mini-pin connector

21

Watertight channel ............................ 62

Содержание 1 AW 1

Страница 1: ... 6MVA6011 01 No reproduction in any form of this manual in whole or in part except for brief quotation in critical articles or reviews may be made without written authorization from NIKON CORPORATION DIGITAL CAMERA User s Manual En ...

Страница 2: ... Data GPS GLONASS 14 Notices 15 Introduction 20 Package Contents 20 Parts of the Camera 21 First Steps 31 Taking and Viewing Photographs 40 Point and Shoot Photography Auto Mode 40 Viewing Photographs 44 Deleting Pictures 45 Live Image Control 47 Choosing a Creative Mode 49 Choosing a Mode That Matches the Subject or Situation 50 Underwater 4 5 6 50 Night landscape j 50 Night portrait o 51 Backlig...

Страница 3: ...rol 67 The Built in Flash 67 The Depth Gauge 68 After Using the Camera Underwater 71 The O Ring 73 Recording and Viewing Movies 77 Recording HD Movies 78 Taking Photographs During HD Movie Recording 80 Viewing Movies 81 Deleting Movies 82 Recording Slow Motion Movies 83 More on Photography 87 Continuous Mode 87 Self Timer Modes 89 The Built in Flash 91 The C Action Button 95 Shooting Choosing a Sh...

Страница 4: ...uter 105 Transferring Pictures 105 Viewing Pictures 107 Technical Notes 108 Optional Accessories 108 Non Waterproof 1 NIKKOR Lenses 110 Approved Memory Cards 113 Storage and Cleaning 114 Underwater Use 114 Storage 114 Cleaning 114 Caring for the Camera and Battery Cautions 115 Troubleshooting 119 Battery Display 119 Shooting All Modes 119 Movies 120 Playback 120 Miscellaneous 120 Error Messages 12...

Страница 5: ...e taken in any mode by pressing the shutter release button See page 27 for more information Shutter release button Shoot movies with the movie record button Movies can be recorded by pressing the movie record but ton in auto 0 40 creative 0 49 and advanced movie 0 77 modes Movie record button ...

Страница 6: ...e cast in pic tures taken under water 0 65 Distortion control for underwater photographs and movies 0 67 A built in flash that can be used for additional lighting under water 0 67 Access altitude depth heading virtual horizon location data GPS GLONASS and log options When shooting in locations with a clear view of the sky you can Access a variety of information including a virtual horizon and your...

Страница 7: ... to find the information you need the following sym bols and conventions are used The lens generally used in this manual for illustrative purposes is a 1 NIKKOR AW 11 27 5mm f 3 5 5 6 D This icon marks cautions information that should be read before use to prevent damage to the camera A This icon marks notes information that should be read before using the camera 0 This icon marks references to ot...

Страница 8: ...ick the CD Nikon 1 AW1 icon in Computer or My Computer Windows or on the desktop Mac OS 3 Double click the INDEX pdf icon to display a language selec tion screen and click a language to display the Reference Man ual Product Documentation User s Manual this manual Describes how to take and view pictures Reference Manual on CD A complete guide to using your digital camera included as a pdf file on t...

Страница 9: ...burns Continued operation could result in injury After removing the battery take the equip ment to a Nikon authorized service center for inspection ADo not use in the presence of flammable gas Do not use electronic equipment in the presence of flammable gas as this could result in explosion or fire AObservecautioninthepresenceofwateror rain or when using the camera with wet hands The camera can be...

Страница 10: ...not remain in contact with the camera battery or charger for extended periods whilethedevicesareonorin use Parts of the device become hot Leaving the device in direct contact with the skin for extended periods may result in low temperature burns ADo not leave the product where it will be exposed to extremely high temperatures such as in an enclosed automobile or in direct sunlight Failure to obser...

Страница 11: ...y to cool Discontinue use immediately should you notice any changes in the battery such as discoloration or deformation AObserveproperprecautionswhenhandling thecharger Keep dry Failure to observe this precaution could result in fire or electric shock Do not short the charger terminals Failure to observe this precaution could result in overheating and damage to the charger Dust on or near the meta...

Страница 12: ... damage or destruction 1 Using a test method derived from MIL STD 810F Method 516 5 Shock the product is dropped from a height of 200 cm 6 6 ft onto a plywood surface 5 cm 2 in thick Exterior deformation and surface damage are not tested 2 An American military test standard that involves dropping 5 samples at a time from a height of 122 cm 4 ft to test the effect of impact on a total of 26 surface...

Страница 13: ...uct to depths greater than 15 m 49 ft or to rapids waterfalls or other water under high pressure Damage due to user error is not covered under warranty Precautions Water and Dust Proofing Observe the following precautions when using the camera with special pur pose waterproof lenses Apart from the special purpose waterproof lens the accessories supplied with the camera are not waterproof Special p...

Страница 14: ...onnector and battery chamber memory card slot covers should be removed immediately with a soft dry cloth Other foreign matter should be removed from these surfaces with a blower taking care to remove any small particles from the sides and corners of the watertight channels Foreign matter on the camera body can be removed with a soft dry cloth Do not use soap cleansers or other chemicals and be sur...

Страница 15: ...s in the microphone and speaker covers Prolonged contact with cold metal can damage exposed skin Wear gloves when handling the camera for extended periods at low temperatures Select a dry location when attaching or removing special purpose water proof lenses and avoid leaving the camera with the body cap removed or the battery chamber memory slot or connector cover open or the lens with the rear c...

Страница 16: ...the Internet or other locations where they can be viewed by third parties See Disposing of Data Storage Devices 0 18 for information on erasing location data before disposing of the camera or memory cards Navigation The position altitude depth and other location data reported by the device are approximations only and are not intended for surveying or navigation Be sure to take appropriate maps or ...

Страница 17: ...tronic equipment is to be col lected separately The following apply only to users in European countries This product is designated for sepa rate collection at an appropriate col lection point Do not dispose of as household waste Separate collection and recycling helps conserve natural resources and prevent negative consequences for human health and the environ ment that might result from incor rec...

Страница 18: ... on a circuit different from that to which the receiver is connected Consult the dealer or an experienced radio television technician for help CAUTIONS Modifications The FCC requires the user be notified that any changes or modifications made to this device that are not expressly approved by Nikon Corpo ration may void the user s authority to operate the equipment InterfaceCables Use the interface...

Страница 19: ...ted The copying or reproduction of stamps issued by the government and of certified documents stipu lated by law is prohibited Cautions on certain copies and reproduc tions Thegovernmenthasissuedcautionson copies or reproductions of securities issued by private companies shares bills checks gift certificates etc com muter passes or coupon tickets except when a minimum of necessary copies are tobe ...

Страница 20: ...ER LICENSED TO PROVIDE AVC VIDEO NO LICENSE IS GRANTED OR SHALL BE IMPLIED FOR ANY OTHER USE ADDITIONAL INFORMATION MAY BE OBTAINED FROM MPEG LA L L C SEE http www mpegla com Temperature Warnings The camera may become warm to the touch during use this is normal and does not indicate a malfunction At high ambient temperatures after extended periods of continuous use or after several photographs hav...

Страница 21: ...en the camera is inspected or serviced ABefore Taking Important Pictures Before taking pictures on important occasions such as at weddings or before taking the camera on a trip take a test shot to ensure that the camera is functioning normally Nikon will not be held liable for dam ages or lost profits that may result from product malfunction ALife Long Learning As part of Nikon s Life Long Learnin...

Страница 22: ... before use EN EL20 rechargeable Li ion battery withterminalcover MH 27 battery charger ACwall adapter supplied in countriesorregionswhere required shapedepends oncountryofsale Lens suppliedonly if lenskitis purchasedwith camera comeswith frontandrearlens caps AN N1000 strap intendedexclusivelyforuse onland Silicon grease UC E19 USB cable ViewNX 2 Short Movie Creator CD Warranty User s Manual this...

Страница 23: ...Shutter release button 42 80 3 Power switch 36 Power lamp 36 4 Microphone 5 Focal plane mark E 6 Eyelet for camera strap 31 7 Connector cover latch 105 8 Connector cover 105 9 Connector cover security lock 105 10 O ring 33 73 108 11 Lens release button 35 12 Dust shield 114 115 13 Lens mount 14 Mounting mark 34 15 AF assist illuminator Self timer lamp 89 Red eye reduction lamp 92 16 Body cap 108 1...

Страница 24: ...ber memory card slot cover 32 8 Battery chamber memory card slot cover latch 32 9 Battery chamber memory card slot cover security lock 32 10 Speaker 11 Tripod socket 12 Pressure equalization vent 13 G menu button 26 14 Memory card access lamp 43 15 K playback button 44 16 J OK button 30 17 Multi selector 30 feature 29 E exposure compensation M flash mode 91 92 C continuous shooting self timer 87 8...

Страница 25: ...Move cursor up Select highlighted item Return to previous menu Select highlighted item or display sub menu Move cursor down AHolding the Camera When framing photographs hold the camera as shown below Hold the camera in your right hand Keep your elbows propped lightly against your torso Cradle the lens with your left hand ...

Страница 26: ...ty 1 99 12 Focus mode 1 99 100 13 AF area mode 1 99 100 14 Face priority 1 46 99 15 Focus area 42 99 100 16 AF area brackets 1 17 Flash compensation 99 18 Exposure compensation 19 Flash ready indicator 91 20 K appears when memory remains for over 1000 exposures 21 Number of exposures remaining 39 Number of shots remaining before memory buffer fills White balance recording indicator Card warning in...

Страница 27: ... 41 35 HDR 57 36 Auto distortion control 99 37 Self timer 89 38 Heading 2 39 Virtual horizon 2 40 Track log indicator1 2 41 Satellite signal indicator 1 2 42 Altimeter depth gauge 2 68 101 43 Altitude depth 2 68 101 Press to cycle through shooting or playback indicators button ASee Also For information on adjusting monitor brightness see page 100 ...

Страница 28: ... icon for the desired menu and press J G button Playback menu 0 98 Shooting menu 0 99 Adjust playback settings Adjust settings for still photography Movie menu 0 100 Setup menu 0 100 Adjust movie recording options Adjust basic camera settings Image processing menu 0 100 Adjust white balance ISO sensitivity Picture Controls and other image processing settings for photographs and movies Shootingmode...

Страница 29: ...he highlighted option Motion Snapshot mode Best moment capture mode Auto mode 0 40 Creative mode 0 49 Advanced movie mode 0 77 z Motion Snapshot mode Choose a theme for Motion Snapshots which combine photographs with brief movie vignettes Beauty 1 Relaxation 3 Waves 2 Tenderness 4 AThe C Button When the view through the lens is displayed in the monitor you can also select the shoot ing mode by hol...

Страница 30: ...nd composition Slow view t Smart Photo Selector y C Auto mode Take photographs using live controls 0 47 Active D Lighting Y Motion control 6 Background softening 5 Brightness control E wCreative mode Choose a scene 0 49 Programmed auto P Night portrait o Shutter priority auto S Backlighting m Aperture priority auto A Easy panorama p Manual M Soft q Underwater 4 5 6 Miniature effect r Night landsca...

Страница 31: ...7 and slow motion movies 0 83 Programmed auto P Manual M Shutter priority auto S Slow motion y Aperture priority auto A A Feature The options for each mode can also be dis played by pressing 1 on the multi selec tor after selecting the shooting mode ...

Страница 32: ...ted item Press 1 or 3 to highlight the desired option and press J to select AUsing the Menus The items listed may vary with camera settings Items displayed in gray are not currently available To exit the menus and return to shooting mode press the shutter release button halfway 0 42 AChoosing a Menu To display another menu press 4 in Step 1 and then press 1 or 3 to highlight the desired icon Press...

Страница 33: ...q and plug the charger in w An exhausted battery fully charges in about two hours Unplug the charger and remove the battery when charging is complete First Steps AThe Plug Adapter Depending on the country or region of purchase a plug adapter may be sup plied with the charger The shape of the adapter varies with the country or region of purchase If a plug adapter is supplied raise the wall plug and...

Страница 34: ...the memory card until it clicks into place t Close y latch u and lock i the cover and confirm that the latch and security lock are in the positions shown A AFormatting Memory Cards If this is the first time the memory card will be used in the camera or if the card has been formatted in another device select Format memory card in the setup menu and follow the on screen instruc tions to format the c...

Страница 35: ...IKKOR AW 11 27 5mm f 3 5 5 6 When attaching the lens care should be taken to avoid damage to the camera and lens and to ensure that dust and other foreign matter does not enter the camera or adhere to the O ring or surrounding area Remove therear lens cap Remove the camera body cap Inspect the O ring Isitnickedorcracked Ifso replacethe O ring 0 108 Isitoutofposition Ifso repositionthe O ring 0 73 ...

Страница 36: ...mera or lens do not use excessive force Mounting mark camera Mounting mark lens Align the mounting marks Place the lens over the O ring and press it into position Rotatethelensasshownuntil it stops Checkthelens Removeanydustorother foreign matter from the lens O ring seal 0 73 ...

Страница 37: ...hair dust sand and other foreign objects Do not exchange lenses when your hands are wet or have salt on them or in areas exposed to wind spray dust or sand and be careful that water does not drop into the interior of the camera or lens ASilicon Grease The O ring can be lubricated with the supplied silicon grease or with optional WP G1000 silicon grease preventing wear and making waterproof lenses ...

Страница 38: ...green and the monitor will turn on Be sure to remove the lens cap before shooting ATurning the Camera Off To turn the camera off press the power switch again The monitor will turn off A language selection dialog will be displayed the first time the camera is turned on Use the multi selector and J button to choose a language ...

Страница 39: ...light date format and press J Press 1 or 3 to highlight daylight saving time option and press J Press 4 or2to select year month or date and press 1 or 3 to change Press 2 to proceed Note Language and clock can be changed at any time using Language 0 101 and Time zone and date 0 101 options in setup menu Press 4 or 2 to select hour minute or second and press 1 or 3 to change Press J when finished ...

Страница 40: ...before using the camera for the first time Press 4 or 2 to scroll through the messages To exit press J when the last mes sage is displayed ANote If you remove and reinsert the battery the first of these messages may be dis played again for a few seconds To view all messages press while the first mes sage is displayed and then press 4 or 2 to scroll through the remaining mes sages To exit press J ...

Страница 41: ...39 s 9Check the battery level and memory card capacity Check the battery level and number of exposures remaining in the moni tor 0 24 Battery level Exposures remaining ...

Страница 42: ...r hard to time shots or to capture the emotion surrounding special moments Follow the steps below to take photographs in auto mode a point and shoot mode in which the camera automatically detects the subject type and adjusts settings according to the subject and situation 1Turn the camera on 2Select C mode Point and Shoot Photography Auto Mode Press the power switch to turn the camera on Press the...

Страница 43: ... when taking pic tures in tall portrait orientation Position your subject in the center of the frame AUsing a Zoom Lens Use the zoom ring to zoom in on the subject so that it fills a larger area of the frame or zoom out to increase the area visible in the final photo graph select longer focal lengths on the lens focal length scale to zoom in shorter focal lengths to zoom out Zoom in Zoom out Zoom ...

Страница 44: ...assist illuminator 0 21 may light to assist the focus operation If the camera is able to focus the selected focus area will be highlighted in green and a beep will sound a beep may not sound if the subject is moving If the camera is unable to focus the focus area will be displayed in red Focus area ...

Страница 45: ...be displayed in the monitor for a few seconds the photo will automatically clear from the display when the shutter release button is pressed halfway Do not eject the memory card or remove the battery until the lamp has gone out and recording is complete Memory card access lamp AThe Framing Grid A framing grid can be displayed by selecting On for Display Grid display in the setup menu 0 100 ...

Страница 46: ...dditional pictures To zoom in on the current picture press X To view multiple pictures press W when a picture is displayed full frame W button X button AThe C Button During playback you can also select pictures for display by holding the C button tilting the camera left or right to highlight the desired image and then releasing the button to display the highlighted picture full frame 0 96 ASee Als...

Страница 47: ... you wish to delete as described on the preceding page 2Press O 3Delete the photograph A confirmation dialog will be dis played O button Press O again to delete the picture and return to playback or press K to exit without deleting the picture ADeleting Multiple Pictures The Delete option in the playback menu 0 98 can be used to delete all or selected pictures ...

Страница 48: ...mera automatically ana lyzes the subject and selects the appropriate scene The selected scene is shown in the monitor Scene icon c Portrait Human portrait subjects d Landscape Landscapes and cityscapes f Night portrait Portrait subjects framed against dark backgrounds e Close up Subjects close to the camera g Night landscape Poorly lit landscapes and cityscapes Z Auto Subjects that do not fall int...

Страница 49: ...ect then press 1 or 3 to adjust the control and press J to return to shooting mode To cancel the control press 1 again Active D Lighting Preserve details in high lights and shadows for natural contrast Increase effect Reduce effect Active D Lighting High Active D Lighting Low Background softening Soften background details to make your subject stand out or bring both background and foreground into ...

Страница 50: ...tion Blur motion Freeze motion Blur motion Brightness control Make pictures brighter or darker Brighter Darker Brighter Darker DLive Image Control Continuous shooting is not available 0 87 and the built in flash can not be used when live image control is in effect Pressing the movie record button cancels live image control ...

Страница 51: ... and aperture 1Select w mode 2Choose a scene Choosing a Creative Mode Press the G button to display the menus Select Shooting mode then highlight w creative mode and press J 0 27 Press 1 and highlight a scene using the multi selector 0 50 Press J to select the highlighted scene Your selection is indicated by an icon in the display ...

Страница 52: ...ects a shut ter speed for best results 0 54 Use to blur the background or bring both foreground and back ground into focus Manual M You control both shutter speed and aperture 0 55 Underwater 4 5 6 Take pictures under water 0 65 66 Night landscape j Capture low lighting in night scenes Each time the shutter release button is fully pressed the camera takes a series of shots and combines them during...

Страница 53: ...rning will be displayed and the camera will take a single picture using the flash Backlighting m Photograph backlit subjects 0 57 Easy panorama p Shoot panoramas for later viewing on the camera 0 58 Soft q Shoot photographs with a soft filter effect To choose the amount of softening press J when the view through the lens is dis played highlight an option using the multi selector and press J to sel...

Страница 54: ... speed and aperture chosen by the camera will produce optimal results you can also choose from other com binations that will produce the same expo sure flexible program Press X for large apertures low f numbers that blur back ground details or fast shutter speeds that freeze motion W for small apertures high f numbers that increase depth of field or slow shutter speeds that blur motion U is displa...

Страница 55: ...lurring moving subjects fast shutter speeds to freeze motion Choosing a Shutter Speed Use the X and W buttons to choose from shutter speeds between 30 s and 1 16 000 s Press X for faster shutter speeds W for slower shutter speeds Fast shutter speed 1 1600 s Slow shutter speed 1 s AContinuous Shooting The selected shutter speed may change if the frame rate for continuous shooting 0 87 is 15 fps or ...

Страница 56: ...of the main subject Small apertures high f numbers increase depth of field bringing out details in the background and foreground Short field depths are generally used in portraits to blur back ground details long field depths in landscape photographs to bring the foreground and background into focus Choosing an Aperture Press W for larger apertures lower f numbers X for smaller apertures higher f ...

Страница 57: ...d W buttons to choose a value then repeat for the remaining item Press X for faster shutter speeds or smaller apertures higher f numbers W for slower shutter speeds and larger apertures lower f numbers Shutter speeds can be set to values as fast as 1 16 000 s or as slow as 30 s or to Bulb to hold the shutter open indefinitely for a long time exposure W button X button Shutter speed Press 2 to high...

Страница 58: ...dicator When shutter speeds other than Bulb are selected the exposure indicator shows whether the photograph would be under or over exposed at current settings Optimal exposure Underexposed by 1 3EV Overexposed by over 2 EV ...

Страница 59: ...e displayed when processing is complete First exposure darker Second exposure brighter Combined HDR image Off The flash fires to fill in illuminate shadows in back lit subjects Only one shot is taken when the shutter release button is fully pressed and the flash fires with each shot No pictures will be taken if the built in flash is not raised raise the flash before shooting DFraming HDR Photograp...

Страница 60: ...lfway Guides will appear in the display 2Start shooting Press the shutter release button the rest of the way down and then lift your fin ger from the button a c d and b icons will appear in the display to indicate the possible pan directions 3Pan the camera Slowly pan the camera up down left or right as shown below Shooting will start when the camera detects the pan direction and a progress indica...

Страница 61: ...ted about 30 seconds when B Wide panorama is selected APanoramas High distortion wide angle lenses may fail to produce the desired results An error message will be displayed if the camera is panned too quickly or unsteadily The completed panorama will be slightly smaller than the area visible in the display during shooting No panorama will be recorded if shoot ing ends before the halfway point if ...

Страница 62: ...original pan direction The following operations can be performed Navigation window Guide To Use Description Pause Pause playback Play J Resume playback when the panorama is paused or during rewind advance Advance rewind Press 4 to rewind 2 to advance If playback is paused the panorama rewinds or advances a segment at a time keep the button pressed for continuous rewind or advance Return to full fr...

Страница 63: ...ter when a waterproof lens is not attached nor waterproof lens to water when not attached to the camera The sudden change in temperature caused by taking the cam era into the water after it has been left on the beach in direct sunlight or in other locations exposed to high temperatures could result in water droplets forming inside the camera or lens potentially damaging the products Do not remove ...

Страница 64: ...oes not float Be careful not to drop the camera while in or on the water Condensation may form inside the lens or monitor if the prod uct is exposed to rapid changes in temperature such as occur when the product is taken into cold water from a hot shore location into a warm room from a cold exterior or the battery chamber memory card slot cover is opened or closed or lenses are attached or removed...

Страница 65: ...tton swab to remove foreign objects from inside the camera when using a cotton swab be sure not to leave any threads behind If the watertight channel is cracked deformed or damaged consult a Nikon authorized service representative Be sure that the connector and battery chamber memory card slot covers are fully closed that the hand strap is not caught in either cover and that the latches and securi...

Страница 66: ... release button or the latches or security locks on the connector and battery chamber memory card slot covers Should you notice air escaping from around the lens mount or the connector and battery chamber memory card slot covers end the test and remove the camera from the water immediately air escaping from the pressure equalization vent and micro phone and speaker covers is normal and does not in...

Страница 67: ... Underwater Taking Pictures Underwater Press the power switch to turn the camera on Press the G button to display the menus then select Shooting mode highlight w creative mode and press J 0 27 Press 1 to display the creative menu Highlight Underwater and press J to display underwater pro cessing options ...

Страница 68: ...nd the rest of the way down to shoot The shutter will be released whether or not the camera is in focus Movies can be recorded using the movie record button Shutter release button Movie record button AUnderwater Mode The creative mode Underwater option automatically compensates for the blue cast in underwater lighting Colors can be pre viewed in the monitor and adjusted manu ally or using preset o...

Страница 69: ...with the creative mode Underwater option 0 66 Water currents can push the flash part way down causing vignetting 0 94 Tips and Tricks for Underwater Photography To control distortion when shooting underwater select On underwater for Auto distortion control in the shooting menu 0 99 This option is only available when a special purpose underwater lens is attached ASee Also The Underwater white balan...

Страница 70: ... during shooting or include the depth in the photo info recorded when a picture is taken Set the gauge to zero before entering the water 0 70 In the setup menu select Location data then highlight Record location data and press 2 Highlight Yes and press J In the setup menu select Altitude depth options then highlight Altim eter depth gauge and press 2 ...

Страница 71: ...ease button half way to exit the menus Press the button to display the depth gauge 0 25 AThe Depth Gauge The camera depth gauge is not intended as a replacement for specialized diving gauges the depths shown are approxima tions only The display will not show depths over 20 m 65 6 ft depths over 15 m 49 ft are shown in red ...

Страница 72: ... manually 3Set the depth gauge to zero In the setup menu select Altitude depth options then highlight Alt depth correction and press 2 Highlight Correct manually and press 2 Press 4 or 2 to highlight digits and press 1 or 3 to change Press J when changes are complete ASee Also For information on altitude and depth options see page 101 ...

Страница 73: ...re to remove the front cap from the lens and any water salt sand or other foreign matter from your hands or hair before proceeding Do not open the connector or battery chamber memory card slot cover until all foreign matter has been washed away and the camera is dry Be sure that the special purpose waterproof lens is attached and that connector and battery chamber memory card slot covers are close...

Страница 74: ...ing that no water or other foreign matter remains on the camera slowly open the connector and battery chamber memory card slot covers and remove any water droplets sand or other foreign matter from the interior with a soft dry cloth Dry the camera and lens barrel with a soft dry cloth Water fingerprints and other foreign matter on the front lens element should be removed immedi ately by gently wip...

Страница 75: ...s removed 1Remove the O ring After confirming that the lens and camera are dry detach the lens and gently wipe the lens O ring seal with a soft dry cloth to remove any foreign objects Note that there may still be water between the camera and the lens to prevent water falling onto the dust shield or lens when the lens is detached keep the camera flat and remove the lens slowly Lightly stretch the O...

Страница 76: ...ing Remove any foreign matter with a soft dry cloth taking care not to leave tissue or threads on the O ring Gently bend the O ring to check for cracking or other damage Use a blower or cotton swab to remove any foreign objects from the O ring guide Be sure to remove any threads left behind by the swab Place a bead of silicon grease in a plas tic bag and use your fingers to spread the grease throu...

Страница 77: ...ased before use and whenever the surface appears dry fail ure to observe this precaution could result in the O ring cracking and water entering the camera ASilicon Grease Coating the O ring with the supplied silicon grease prevents wear and ensures that the lens rotates smoothly Use only the supplied silicon grease or optional WP G1000 silicon grease 0 108 failure to observe this precaution could ...

Страница 78: ...ere with sound quality dry the covers with a soft dry cloth but do not insert sharp objects into the holes as this could damage the camera or make it vulnerable to leaks Do not dry the camera or lens by leaving it in direct sunlight or dry using hair dryers or other powered devices Failure to observe this precaution could damage the camera lens or O ring resulting in leaks Benzene thinner alcohol ...

Страница 79: ...ies Regardless of the scene selected with the camera movies are recorded in mode P shutter speed and aperture are controlled by the camera v Advanced movie mode 0 78 83 Programmed auto P Shutter speed and aperture are controlled by the camera Shutter priority auto S You choose the shutter speed the camera automati cally adjusts aperture for optimal exposure 0 53 Aperture priority auto A You choose...

Страница 80: ... of 16 9 1Turn the camera on 2Frame the opening shot Recording HD Movies Press the power switch to turn the camera on Frame the opening shot with your subject in the center of the display AThe 0 Icon A 0 icon indicates that movies can not be recorded ...

Страница 81: ...ses continuously The Movie sound options item in the movie menu offers microphone sensitivity and wind noise options 0 100 Movie record button Recording indicator Time elapsed Time available Press the movie record button again to end recording Recording will end automatically when the maximum length is reached the memory card is full the lens is removed or the camera becomes hot 0 18 Movie record ...

Страница 82: ...ring movie recording have an aspect ratio of 3 2 ATaking Photographs During Movie Recording Up to 20 photographs can be taken with each movie shot Please note that photographs can not be taken with slow motion movies AFocus Lock If Single AF is selected for Focus mode in the movie menu for advanced movie mode focus will lock while the shutter release button is pressed halfway 0 100 ...

Страница 83: ...se Pause playback Play J Resume playback when the movie is paused or during rewind advance Advance rewind Press 4 to rewind 2 to advance Speed increases with each press from 2 to 4 to 8 to 16 If playback is paused the movie rewinds or advances one frame at a time keep the button pressed for continuous rewind or advance Adjust volume X W Press X to increase volume W to decrease Return to full frame...

Страница 84: ...eleted movies can not be recovered ASee Also The Edit movie option in the playback menu can be used to trim unwanted footage from existing movies 0 98 Use the Movie settings option in the movie menu to choose the frame size and rate for HD movies 0 100 AThe C Button During movie playback and when playback is paused you can advance and rewind by holding the C button and tilting the camera left or r...

Страница 85: ...recorded at 400 fps and play back at about 30 fps 1Select v mode 2Select Slow motion Press 1 then highlight Slow motion and press J 3Frame the opening shot Recording Slow Motion Movies Press the G button to display the menus then select Shooting mode highlight v Advanced movie and press J 0 27 Frame the opening shot with your subject in the center of the display ...

Страница 86: ... time elapsed and the time available are displayed while record ing is in progress The camera focuses on the subject at the center of the dis play face detection 0 46 is not available and focus and exposure can not be adjusted Movie record button Recording indicator Time elapsed Time available Focus area ...

Страница 87: ...matically when the maximum length is reached the memory card is full the lens is removed or the camera becomes hot 0 18 Movie record button AMaximum Length Up to 3 seconds of footage can be recorded note that depending on memory card write speed shooting may end before this length is reached 0 113 ...

Страница 88: ...hutter speed available is 1 100 s at 50 Hz 1 60 s at 60 Hz flicker reduction is not available with slow motion movies Bright light sources may leave after images when the camera is panned Jagged edges color fringing moiré and bright spots may also appear When recording movies avoid pointing the camera at the sun or other strong light sources Failure to observe this precaution could result in damag...

Страница 89: ...ions 2Select a frame rate 3Compose the shot and start shooting Continuous Mode Press 4 C to display release mode options Highlight the desired frame rate and press J Frame rate is expressed in terms of the number of frames recorded per second fps choose from frame rates of approximately 5 15 30 and 60 fps 5 fps 15 fps 30 fps and 60 fps respectively The camera takes pictures while the shutter relea...

Страница 90: ...y card the mem ory card access lamp will light Depending on shooting conditions and memory card write speed recording may take some time If the battery is exhausted before all photographs are recorded the shutter release will be disabled and the remaining images transferred to the memory card Continuous shooting is not available in creative modes other than P S A M or 4 underwater 5 6 in best mome...

Страница 91: ...he camera on a sta ble level surface 4Frame the photograph and shoot Press the shutter release button half way to focus and then press the but ton the rest of the way down The self timer lamp will start to flash and a beep will begin to sound Two sec onds before the photo is taken the lamp will stop flashing and the beep ing will become more rapid Self Timer Modes Press 4 C to display release mode...

Страница 92: ...e In self timer mode start and stop the timer by pressing the movie record button instead of the shutter release button ARaising the Flash If additional lighting is required press the flash pop up button to raise the flash before shooting Shooting will be interrupted if the flash is raised while the timer is counting down ASee Also For information on controlling the beeps that sound when the self ...

Страница 93: ...uilt in Flash Press the flash pop up button to raise the flash Flash pop up button Press 3 N on the multi selector to display a list of flash modes then use the multi selector to highlight the desired mode and press J to select Charging begins when the flash is raised once charging is complete a flash ready indicator N will be dis played when the shutter release but ton is pressed halfway ...

Страница 94: ...ed slows automatically to capture background lighting at night or under low light Use when you want to cap ture both subject and background Available only in modes P A and 4 underwater 5 6 Nr rear curtain slow sync As for rear curtain sync below except that shutter speed slows automatically to capture back ground lighting at night or under low light Use when you want to capture both subject and ba...

Страница 95: ... not in use press it gently downward until the latch clicks into place Do not use force Failure to observe this precaution could result in prod uct malfunction APreventing the Built in Flash from Firing Lowering the flash prevents it firing Except in o night portrait mode or when HDR is disabled in m backlighting mode 0 57 the flash can also be turned off by selecting a flash mode of s off ...

Страница 96: ... hood some lenses may cause vignetting or obstruct the red eye reduction lamp interfering with red eye reduction The following illustrations show the effect of vignetting caused by shadows cast by the lens when the built in flash is used Shadow Shadow After using the built in flash in dusty or sandy locations remove any foreign matter from inside the flash compartment using a blower or if this fai...

Страница 97: ...through the lens is displayed you can choose the shooting mode by pressing the C button tilting the camera left or right to highlight the desired mode and releasing the button to select the highlighted option To exit without changing settings tilt the camera forward or back so that no option is highlighted when the C button is released The C Action Button ...

Страница 98: ...ton is pressed and then when the but ton is released return to thumbnail playback with the selected picture highlighted Tilt the camera sharply to jump ahead or back 10 pictures Dur ing movie playback you can press the C button and tilt the camera to advance or rewind 0 82 speed increases the more you tilt the camera When movie playback is paused you can press the C button and tilt the camera to a...

Страница 99: ...lay options in the Display menu to Hi and On respectively 0 100 but also increases the drain on the battery To exit without changing settings tilt the camera forward or back so that no option is highlighted when the C button is released DThe C Button Hold the camera securely when using the C button Controls other than the shutter release and C buttons and the power switch can not be used while the...

Страница 100: ...g playback DPOF print order Create digital print orders Protect Protect pictures from accidental deletion Rating Rate pictures D Lighting Brighten shadows in dark or back lit photos creating a retouched copy that is saved separately from the unmodified original Resize Create small copies of selected pictures Crop Create cropped copies of selected pictures Face priority zoom Choose whether 4 and 2 ...

Страница 101: ... shooting with special purpose waterproof lenses 0 67 Color space Choose a color space for new pictures Active D Lighting Avoid loss of detail in highlights and shadows HDR Enhance detail in highlights and shadows when photographing high contrast scenes with Backlighting selected in creative mode Long exposure NR Reduce noise in long time exposures Optical VR Adjust settings for 1 NIKKOR lenses wi...

Страница 102: ...d Face priority Turn face priority on or off Option Description Reset processing options Reset image processing options to their default values White balance Adjust settings for different types of lighting ISO sensitivity Control the camera s sensitivity to light Picture Control Choose how the camera processes pictures Custom Picture Control Create custom Picture Controls High ISO noise reduction ...

Страница 103: ...ogs from the memory card Compass correction Calibrate the built in electronic compass Altitude depth options Choose whether the camera reports altitude or depth calibrate the altimeter or depth gauge HDMI device control Choose whether remote controls for HDMI CEC devices to which the camera is connected can be used to operate the camera Flicker reduction Reduce flicker or banding Reset file number...

Страница 104: ...ail able click Region Selection to choose a different region and then choose the desired language region selection is not available in the European release 2Start the installer Click Install and follow the on screen instructions 3Exit the installer Click Yes Windows or OK Mac OS when installation is com plete The following software is installed ViewNX 2 Short Movie Creator 4Remove the installer CD...

Страница 105: ... or more 2 GB or more recommended Hard disk space A minimum of 1 GB available on the startup disk 3 GB or more recom mended Graphics Resolution 1024 768 pixels XGA or more 1280 1024pixelsormore recommended Color 24 bit color True Color or more Mac OS CPU Photos Intel Core or Xeon series Movies playback Core Duo 2 GHz or better Intel Core i5 or better recommended when viewing movies with a frame si...

Страница 106: ...2 is required to view Motion Snapshots saved using the File format NMS files option in the shooting menu 0 99 ASupported Operating Systems See the websites listed on page 19 for the latest information on sup ported operating systems ...

Страница 107: ...e connector cover and then connect the camera to the computer using the supplied USB cable do not use force or insert the connectors at an angle and then turn the camera on SDcardslot If your computer is equipped with an SD card slot the card can be inserted directly in the slot SD card reader Connect a card reader available separately from third party suppliers to the computer and insert the memo...

Страница 108: ...disconnect the USB cable If you are using a card reader or card slot choose the appropriate option in the com puter operating system to eject the removable disk corre sponding to the memory card and then remove the card from the card reader or card slot AWindows 7 If the following dialog is displayed select Nikon Transfer 2 as described below 1 Under Import pictures and videos click Change pro gra...

Страница 109: ...the Edit button in the toolbar Printing Pictures Click the Print button in the toolbar A dialog will be dis played allowing you to print pictures on a printer connected to the computer AStarting ViewNX 2 Manually Windows Double click the ViewNX 2 shortcut on the desk top MacOS Click the ViewNX 2 icon in the Dock AFor More Information Consult online help for more infor mation on using ViewNX 2 ...

Страница 110: ... 73 O ring protectors O Ring Protector PA N1000 Protects the O ring when a non waterproof 1 NIKKOR lens is attached 0 110 O ring removers O Ring Remover WP OR1000 Remove O rings 0 73 Silicon grease Silicon Grease WP G1000 Ensures that special purpose water proof lenses rotate freely during attachment and removal Power sources Rechargeable Li ion Battery EN EL20 0 31 32 Additional EN EL20 batteries...

Страница 111: ... the camera and smart devices running the Wireless Mobile Utility app Use the Wireless Mobile Utility to take pictures remotely or download existing pictures to the smart device AOptional Accessories Availability may vary with country or region See our website or bro chures for the latest information ...

Страница 112: ...he 1 NIKKOR VR 10 30mm f 3 5 5 6 shown in the illustrations below Use a soft cloth to remove any foreign matter from the inside of the protector before use and be care ful to prevent dust entering the camera or adhering to the O ring protector Remove therear lens cap Remove the camera body cap Remove the O ring protector from the body cap Place the O ring protector over the O ring ...

Страница 113: ...t be used when retracted To unlock and extend the lens readying the camera for use keep the retractable lens barrel button pressed q while rotating the zoom ring as shown w Mounting mark camera Mounting mark lens Keeping the mounting marks aligned position the lens on the camera Rotate the lens as shown until it clicks into place Zoom ring Retractable lens barrel button ...

Страница 114: ...cally when the retractable lens barrel lock is released in addition if the view through the lens is dis played or the monitor is off the camera will turn off when the lens barrel is locked in the case of 1 NIKKOR VR 10 30mm f 3 5 5 6 and 1 NIKKOR VR 30 110mm f 3 8 5 6 lenses firmware version 1 10 or later is required if locking the lens barrel is to turn the camera off when the monitor is off for ...

Страница 115: ...heck that any card readers or other devices with which the card will be used are SDHC compliant The camera supports UHS 1 3 Check that any card readers or other devices with which the card will be used are SDXC compliant The camera supports UHS 1 Other cards have not been tested For more details on the above cards please contact the manufacturer SD cards SDHC cards2 SDXC cards3 SanDisk 2 GB 1 4 GB...

Страница 116: ... and Cleaning Camera body Use a blower to remove dust and lint then wipe gently with a soft dry cloth After using the camera at the beach or sea side wipe off sand or salt with a cloth lightly dampened in distilled water and dry thoroughly Important Dust or other foreign matter inside the camera may cause damage not cov ered under warranty Lens Lenses are easily damaged Remove dust and lint with a...

Страница 117: ...or is easily damaged Under no circum stances should you exert pressure on the shield or poke it with clean ing tools These actions could scratch or otherwise damage the shield Turn the product off before removing or disconnecting the power source Do not unplug the product or remove the battery while the product is on or while images are being recorded or deleted Forcibly cutting power in these cir...

Страница 118: ...ction and has no effect on images recorded with the device Images in the monitor may be diffi cult to see in a bright light Do not apply pressure to the dis play as this could cause damage or malfunction Dust or lint on the display can be removed with a blower Stains can be removed by wiping lightly with a soft cloth or chamois leather Should the moni tor break care should be taken to avoid injury...

Страница 119: ...ed must be charged before use The internal temperature of the battery may rise while the battery is in use Attempting to charge the battery while the internal temperature is elevated will impair battery performance and the battery may not charge or charge only partially Wait for the battery to cool before charging Continuing to charge the battery after it is fully charged can impair battery perfor...

Страница 120: ...a stores pictures on SD SDHC and SDXC memory cards available separately Do not remove memory cards from the camera turn the camera off or remove or disconnect the power source during formatting or while data are being recorded deleted or copied to a computer Failure to observe these precau tions could result in loss of data or in damage to the camera or card Do not touch the card terminals with yo...

Страница 121: ...hutter release button The camera is connected to a computer 0 105 or television The camera turns off without warning The battery is low 0 24 31 The display has turned off automatically to save power 0 46 The dis play can be reactivated by pressing the shutter release button The camera s internal temperature is high 0 18 122 Wait for the camera to cool before turning it on again Indicators are not ...

Страница 122: ...o is not recorded with slow motion movies 0 83 or Motion Snapshots Tall portrait orientation photos are displayed in wide landscape orientation Select On for Rotate tall 0 98 The photos were taken with Auto image rotation off 0 101 Camera was pointed up or down when the photo was taken Photo is displayed in image review Cannot hear movie sound Press the X button to raise the volume 0 81 If the cam...

Страница 123: ...h the lens barrel retracted Keeping the retractable lens barrel button pressed rotate the zoom ring to extend the lens Check lens Pictures can only be taken when a lens is attached Attach a lens The clock has been reset Set the camera clock No memory card Turn the camera off and confirm that the card is correctly inserted This memory card is not formatted Format the memory card Select Yes to forma...

Страница 124: ...file numbering and then either format the current memory card or insert a new memory card The movie record button cannot be used in this mode The movie record button can not be used in best moment capture or Motion Snapshot modes Photographs cannot be recorded in this mode The shutter release button can not be used to take photographs while a slow motion movie is being recorded The camera s intern...

Страница 125: ...e and all creative modes other than Easy panorama aspect ratio 3 2 4608 3072 3456 2304 2304 1536 Still images Normal panorama camera panned horizontally aspect ratio 120 23 4800 920 Still images Normal panorama camera panned vertically aspect ratio 8 25 1536 4800 Still images Wide panorama camera panned horizontally aspect ratio 240 23 9600 920 Still images Wide panorama camera panned vertically a...

Страница 126: ...geable Image File Format for Digital Still Cameras 2 3 PictBridge Shooting modes C auto w creative with a choice of the follow ing options P S A M 4 5 6 underwater j night landscape o night portrait m backlight ing p easy panorama q soft r miniature effect and s selective color u best moment capture t slow view and y Smart Photo Selector v advanced movie HD P S A M only and y slow motion z Motion ...

Страница 127: ...x ISO 160 6400 in steps of 1 EV auto ISO sensitiv ity control ISO 160 6400 160 3200 160 800 available user controlled when P S A M or underwater is selected in cre ative mode Active D Lighting On off Focus Autofocus Hybrid autofocus phase detection contrast detect AF AF assist illuminator Lens servo Autofocus AF Single AF AF S continuous AF AF C auto AF S AF C selection AF A full time AF AF F Manu...

Страница 128: ...ual with fine tuning Movie Metering TTL metering using image sensor Metering method Matrix Center weighted Meters 4 5 mm circle in center of frame Spot Meters 2 mm circle centered on selected focus area Frame size pixels recording rate HD movies aspect ratio 16 9 1920 1080 60i 59 94 fields s 1920 1080 30p 29 97 fps 1280 720 60p 59 94 fps 1280 720 30p 29 97 fps Slow motion movies aspect ratio 8 3 6...

Страница 129: ...y 500 4500 m 1640 14 760 ft Depth gauge Operating range approximately 0 20 m 0 65 6 ft Supported languages Arabic Bengali Bulgarian Chinese Simplified and Traditional Czech Danish Dutch English Finnish French German Greek Hindi Hungar ian Indonesian Italian Japanese Korean Mar athi Norwegian Persian Polish Portuguese European and Brazilian Romanian Russian Ser bian Spanish Swedish Tamil Telugu Tha...

Страница 130: ... result from any mistakes that this manual may contain Operating environment Temperature 10 C 40 C 14 F 104 F on land 0 C 40 C 32 F 104 F in water Humidity 85 or less no condensation Shock water and dust proofing Shockproof performance1 2 Has passed in house tests 3 to MIL STD 810F Method 516 5 Shock standard Waterproof performance2 In house tests have demonstrated JIS IEC Class 8 IPX8 waterproofi...

Страница 131: ...ng Diaphragm Fully automatic Aperture range 11 mm focal length f 3 5 16 27 5 mm focal length f 5 6 16 Electronic compass Electronic compass can be used when lens is attached to camera Filter attachment size 40 5 mm P 0 5 mm Shockproof performance Has passed in house tests to MIL STD 810F Method 516 5 Shock standard when attached to camera exterior deformation and surface dam age are not tested Wat...

Страница 132: ...onic compass Electronic compass can be used when lens is attached to camera Filter attachment size 40 5 mm P 0 5 mm Shockproof performance Has passed in house tests to MIL STD 810F Method 516 5 Shock standard when attached to camera exterior deformation and surface dam age are not tested Waterproof performance In house tests have demonstrated JIS IEC Class 8 IPX8 waterproofing Operating depth Maxi...

Страница 133: ...NIKKOR Lenses 1 NIKKOR AW 11 27 5mm f 3 5 5 6 1 NIKKOR AW 10mm f 2 8 Zoom ring Lens mounting mark CPU contacts Focal length mark Focal length scale Lens cap O ring seal Lens mounting mark CPU contacts Lens cap O ring seal ...

Страница 134: ...s and other accessories designated for use with this product When using an optional lens hood do not pick up or hold the lens or camera using only the hood Keep the CPU contacts and O ring seal clean and immediately remove any foreign matter with a blower Contact a Nikon authorized service representative should you notice that the O ring seal is cracked deformed or otherwise damaged Use a blower t...

Страница 135: ...reas exposed to spray wind sand or dust Immediately remove any water or other foreign matter from the lens and lens O ring seal with a clean soft dry cloth The amount of force needed to operate the zoom ring increases with depth Should the product leak cease use immediately dry the camera and lens and take them to a Nikon authorized service representative ASupplied Accessories 40 5 mm snap on Fron...

Страница 136: ... HDMI logo and High Definition Multimedia Interface are trademarks or registered trademarks of HDMI Licensing LLC All other trade names mentioned in this manual or the other documen tation provided with your Nikon product are trademarks or registered trademarks of their respective holders AFreeType License FreeType2 Portions of this software are copyright 2013 The FreeType Project http www freetyp...

Страница 137: ...flash fired with every other shot and the camera turned off and then on after every ten shots Value for movies obtained under the following test con ditions a series of 20 minute movies with a file size of up to 4 GB were recorded recording was only interrupted when tem perature warning was displayed The following can reduce battery life Keeping the shutter release button pressed halfway Repeated ...

Страница 138: ...ck zoom in button 44 W playback zoom out thumbnail button 44 display button 25 J OK button 22 60 C action button 95 feature 29 47 49 83 C continuous shooting self timer 87 89 N flash ready indicator 91 A AC adapter 108 Accessories 108 Advanced movie mode 29 77 83 Aperture 54 55 Aperture priority auto 50 54 77 Attaching the lens 33 110 Auto mode 28 40 Auto power off 46 Automatic scene selection 46 ...

Страница 139: ...napshot mode 27 Mount adapter 108 Movie record button 79 84 Movies 77 N Night landscape 46 50 Night portrait 46 51 Nikon Transfer 2 106 Non waterproof lenses 110 O O Ring 33 73 108 O ring protector 110 Outdoor display 97 P Playback 44 Portrait 46 Power connector 108 Power switch 36 Press the shutter release button all the way down 43 Press the shutter release button halfway 42 Programmed auto 50 5...

Страница 140: ...r 22 Standard Underwater mode 66 Strap for use exclusively on land 31 System requirements 103 T Temperature warnings 18 Theme 98 Time 37 Timer 89 U Underwater creative mode 50 66 USB 105 USB cable 105 V ViewNX 2 102 Volume 81 W Water and dust proofing 10 11 Waterproof lenses 33 129 130 Wireless mobile adapter 109 Z Zoom ring 41 111 131 ...

Страница 141: ...139 n ...

Страница 142: ...140 n ...

Страница 143: ......

Страница 144: ... 6MVA6011 01 No reproduction in any form of this manual in whole or in part except for brief quotation in critical articles or reviews may be made without written authorization from NIKON CORPORATION DIGITAL CAMERA User s Manual En ...

Отзывы: