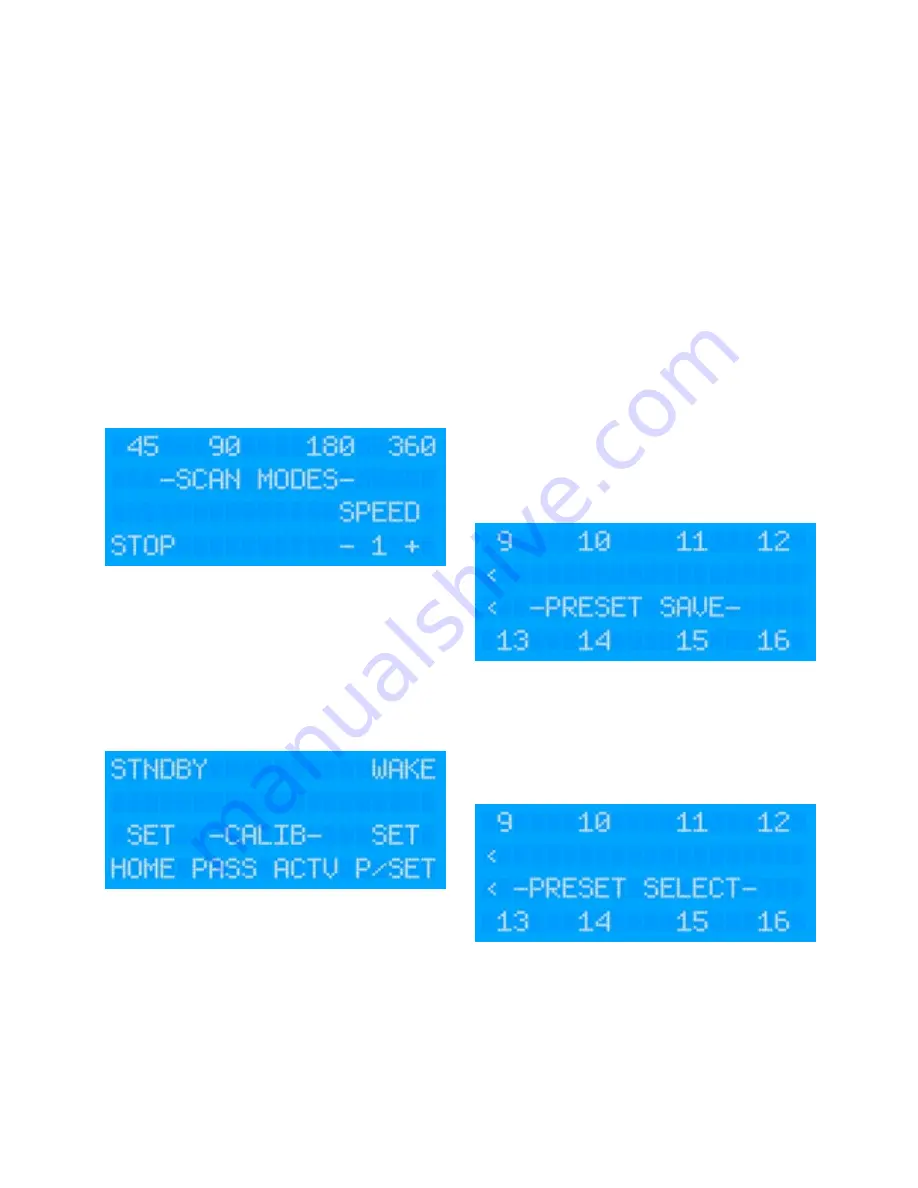
background image

Scans

The  camera  supports  4  different  Scan  Modes.  Once  activated, 
tilt  and  zoom  commands  are  still  accepted  by  the  camera  but 
you  will  not be  able  to pan  the  camera  until  the  Scan  has been 
Stopped:

45˚ Auto Scan

!

Camera  pans  back  and  forth  22.5˚  either  side  of  the 

!

centre point (the  position the  camera is facing  when  the 

!

scan is activated.

90˚ Auto Scan

!

Camera  pans  back  and  forth  45˚  either  side  of  the 

!

centre point (the  position the  camera is facing  when  the 

!

scan is activated.

180˚ Auto Scan

!

Camera  pans  back  and  forth  90˚  either  side  of  the 

!

centre point (the  position the  camera is facing  when  the 

!

scan is activated.

360˚ Auto Scan

!

Camera  pans continuously through 360˚, pausing every 

!

108˚. 

There  are  three  speed  controls  for  each  Scan.  Slow,  Medium 
and Fast.

A  command  is  also  available  to 

ʻ

Re-Centre

ʼ

  the  scan.  This can 

be found in the command list.

SET MENU

From  the  SET  menu,  user  presets and  a  home  position  can  be 
stored  and  the  camera  can  be  sent into  Standby  Mode  and  be 
told to Wake up from Standby mode.

Standby Mode

From  the  SET  menu,  select  STNDBY  to  send  the  camera  into 
Standby  Mode.  This  will  switch  off  the  video  feed  and  tilt  the 
camera  down  so  that  the  lens  windows  look  into  the  housing 
cradle  in  order  to  protect  the  front  face  of  the  camera.  To 
reawaken  the  camera,  select  the  WAKE  key.  This  switches on 
the video and sends the camera to the Home position.

User Presets

The  camera has a built  in memory that can  be used to  store up 
to  100  user 

ʻ

preset

ʼ

  positions.  A  preset  allows  you  to  move  the 

camera  to  a  favourite  or  important  position  and  learn  that 
position  so  that  the  camera  can  be  instructed  to  move  at  top 
speed  to  that  position  at the touch of a button. For example, you 
may  want  to  point  the  camera  so  that  it

ʼ

s facing  directly  aft  so 

you  can  take  a  look at  what

ʼ

s coming  up behind  you. By saving 

this  position  as a  Preset,  you can  send the  camera  back to  this 
position immediately by recalling the preset. Presets can also be 
used to form 

ʻ

Tours

ʼ

, where the  camera  can be instructed to step 

through  each  preset  within  the  Tour  in  sequence  with  a  pre-
determined dwell time between each position.

User  presets are  numbered  100-199. Usually the  controller  you 
are  using  will  have  the  ability  to  SET  a  Preset  to  learn  the 
position  and  then  CALL  a  Preset  to  send  the  camera  to  that 
position.  This  will  depend  on  the  model  of  controller  you  are 
using.  Consult  the  user  guide of  your  controller  for  details. The 
IRIS595  NightRunner  controller  allows  you  to  set  and  recall  16 
presets as described below:

Set Presets

To  set  a  user  preset,  first  move  the  camera  to  the  desired 
position.  Next,  from  the  SET  menu  select  PRESET.  A  list  of 
presets labelled 1~8 will  be  presented. For presets 9~16, nudge 
the  joystick  right.  Select  the  preset  number  you  wish  to  store. 
You  preset  will  now  be  saved  in  that  memory  position  and  you 
will be exited back to the Home screen.

Call Presets

From  the MENU  screen  select the PRESET  option. You will  now 
be  presented with  a list of  presets  1~8. For  presets 9~16  nudge 
the  joystick  right. Select  the  desired  preset  and the  camera  will 
move  at  full  speed  to  the  position  stored  in  memory.  If  there  is 
no  position  stored  in  memory  the  camera  will  not  respond.  To 
return to the Home screen nudge the joystick up.

System Presets

Certain  functions  of  the  camera  that  are  not  defined  by  the 
Pelco-D  Protocol  are  called  by  using  Presets.  A list  of  System 
Presets can be found later in this document.

V2.05 Iss 17-07-14: 15

Содержание IRIS295

Страница 1: ...V2 05 Iss 17 07 14 1 IRIS295 Installation Manual User Guide ...

Страница 2: ...ons USA Corporation or visit the following websites USA www bis doc gov UK www bis gov uk exportcontrol 1 03 Limited Warranty This product is warranted to be free from defects in materials or workmanship for one year from the date of purchase Upon registration of the product an additional 12 months warranty will be awarded FOC Within this period Iris Innovations will at its sole option repair or r...

Страница 3: ...iple Cameras Controllers 8 5 06 Power Connections 9 5 07 Extending Cable Length 9 5 08 Setting Camera Address Image Flip 9 5 09 Installation Considerations 9 5 10 Protocol Information 9 6 01 Hardware Installation 10 11 6 02 Breakout Balun 12 7 01 Powering Up 13 8 01 Controlling The Camera Overview 13 8 02 Setup Features 13 8 03 Auto Flip Feature 13 8 04 User Presets 13 8 05 System Presets 13 8 06 ...

Страница 4: ...Table of Contents Continued Section Page 13 01 Appendix A Dip Switch Settings 19 14 01 Appendix B Cabling Information 20 V2 05 Iss 17 07 14 4 ...

Страница 5: ...ating the camera or viewing the video input whilst the vessel is moving could cause a distraction and result in accidental collision resulting in property damage injury or death Iris Innovations cannot be held liable for any incidental special indirect or consequential damages whether resulting from the use misuse or inability to use this product CAUTION Switch Camera Off When Not in Use To prolon...

Страница 6: ...mera Please follow the information in this guide and keep in a safe place for future reference 3 02 Overview of Key Features Hereʼs a brief list os some of NightRunners Key Features 320 x 240 Vanadium Oxide Thermal Core 17µm Sensor Pitch 50mK NETD Thermal Sensitivity Hi Resolution 700TVL Daylight Camera Digital Zoom on both Thermal Daylight Cameras Single user selectable camera output Easy to inst...

Страница 7: ...s and poor camera control Below is an example of a system with 2 controllers and 4 cameras An IRISEXP0204 data expander has been used to manage the data cables and an IRIS604 Quad Video Switcher has been used to manage the four video feeds Systems can be expanded by using Serial Data Expanders to manage the control data and Video Distribution Amplifiers Video Switchers or Matrices to manage multip...

Страница 8: ...DIX B FOR FURTHER DETAILS 5 03 Video Connections NightRunnersʼ video output is a 1VP P Composite video signal compatible with most Multifunctional Displays MFDʼs and TVʼs via AV input The balun adapter features a male BNC connector for the video signal and NightRunner is supplied with a pre made 2 meter extension cable Iris supply a range of pre made extension cables if required alternatively iʼve...

Страница 9: ...ach camera must have itʼs own unique address so that only control data intended for that camera is received and processed by the camera If multiple cameras had the same address they would all move together when pan and tilt commands are transmitted To set the camera address remove the DIP switch cover plate on the base of the camera with a small cross head screw driver taking care not to loose the...

Страница 10: ...e onto which the camera is to be attached apply a bead of suitable silicone sealant around the edge of the plate to create a seal V2 05 Iss 17 07 14 10 Daylight Camera Lens Window Protective lens window for daylight camera Germanium Lens Window Protective lens window through which heat is conducted This is manufactured through a material called Germanium not glass Thermal Imaging cameras cannot ʻs...

Страница 11: ...to prevent water ingress through the screw holes and cable entry point 5 Pass your cable through the cable entry hole and connect to the base of the camera ensuring the waterproof back shell is fully tightened and not cross threaded 6 Position the camera as desired and fix into place with the 6 x 1 4 x3 4 fixing screws Loosely tighten each of the six screws so the camera is in the correct position...

Страница 12: ...tself is CAT5 cable with an additional 2 cores for power All the necessary connectors and adapters are provided to enable plug and play installation Option 2 Alternatively it might be possible to connect to a power source close to the end of the 20m CAT5 supplied In this instance use the extension kit for the video and data signals V2 05 Iss 17 07 14 12 Power Supply 2 1mm DC Barrel Connector RS485...

Страница 13: ...ently changing Video orientation can however easily be ʻflippedʼ as required with the IRIS595 or IRIS516 controller Set Home Position This feature lets you set the home position of the camera following install Usually this is aligned with the bow of the boat This calibrates the positional indicator with the direction of the camera 8 03 Auto Flip When the camera is tilted past its azimuth the Auto ...

Страница 14: ...If you need to change the image orientation select the FLIP option and you will be presented the screen below FLIP UP refers to the standard ʻdesktopʼ orientation The MIRROR option will flip the image horizontally useful when using the camera to look backwards FLIP DOWN refers to the camera in the hanging orientation Please Note Vertical FLIP Orientation can be permanently set via the DIP switches...

Страница 15: ...p speed to that position at the touch of a button For example you may want to point the camera so that itʼs facing directly aft so you can take a look at whatʼs coming up behind you By saving this position as a Preset you can send the camera back to this position immediately by recalling the preset Presets can also be used to form ʻToursʼ where the camera can be instructed to step through each pre...

Страница 16: ...t to ON the camera will read this position on boot up and set the orientation accordingly 10 03 Ground Loop Isolator For situations when the DC ground and Video Ground of your monitor are common the CAT5 Balun wiring method may introduce a ground loop onto the video which manifests as interference ghosting on the video image To counter this an in line Video Ground Loop Isolator is included with yo...

Страница 17: ...10 OFF ON OFF ON OFF OFF OFF OFF 11 ON ON OFF ON OFF OFF OFF OFF 12 OFF OFF ON ON OFF OFF OFF OFF 13 ON OFF ON ON OFF OFF OFF OFF 14 OFF ON ON ON OFF OFF OFF OFF 15 ON ON ON ON OFF OFF OFF OFF 16 OFF OFF OFF OFF ON OFF OFF OFF 17 ON OFF OFF OFF ON OFF OFF OFF 18 OFF ON OFF OFF ON OFF OFF OFF 19 ON ON OFF OFF ON OFF OFF OFF 20 OFF OFF ON OFF ON OFF OFF OFF 21 ON OFF ON OFF ON OFF OFF OFF 22 OFF ON ...

Страница 18: ...es 8 14µm Spectral Band Thermal Sensitivity 50mK 8 14µm Spectral Band Thermal Sensitivity 50mK Detection Recognition Range Thermal Human Target Detect 1000m Recognize 200m Vehicle Target Detect 2380m Recognize 500m Human Target Detect 1000m Recognize 200m Vehicle Target Detect 2380m Recognize 500m Video Format NTSC 480i 30HZ PAL 576i 25HZ Thermal Refresh Rate 60Hz 60Hz Thermal Palette Control Whit...

Страница 19: ...e of 1 when it is in the ON position switch 2 has the value of 2 switch 3 has the value of 4 switch 4 has the value of 8 and so on A table showing the correct address settings from Address 1 to Address 38 is provided as an example on page 17 Example 1 The example below shows the camera set to NTSC Bank 1 Switch 3 ON Image flip memory ON Bank 1 Switch 8 and address 5 Bank 2 switches 1 and 3 ie swit...

Страница 20: ...work If the supplied cable is not long enough contact your Iris dealer for information on our cable extension kits If you need to shorten the cable please ensure the correct termination polarity is observed as shown below Remember NightRunner has a Straight Thru CAT5 568B cable WARNING NEVER USE A CAT5 CROSS OVER CABLE AS THIS WILL CAUSE PERMANENT DAMAGE TO YOUR CAMERA AND IRIS595 CONTROLLER BOTH ...

Страница 21: ...NOTES V2 05 Iss 17 07 14 21 ...

Страница 22: ... www boat cameras com Iris Innovations Limited USA 1515 SE17th Street Suite A133 Fort Lauderdale Florida 33316 United States of America Tel 1 954 533 9381 email info boat cameras com web www boat cameras com V2 05 Iss 17 07 14 22 2013 Iris Innovations Limited All information correct at time of going to press Specifications are subject to change without prior notice E OE ...

Отзывы: