background image


Changing the Time and Date Displayed on the Recorded Files 

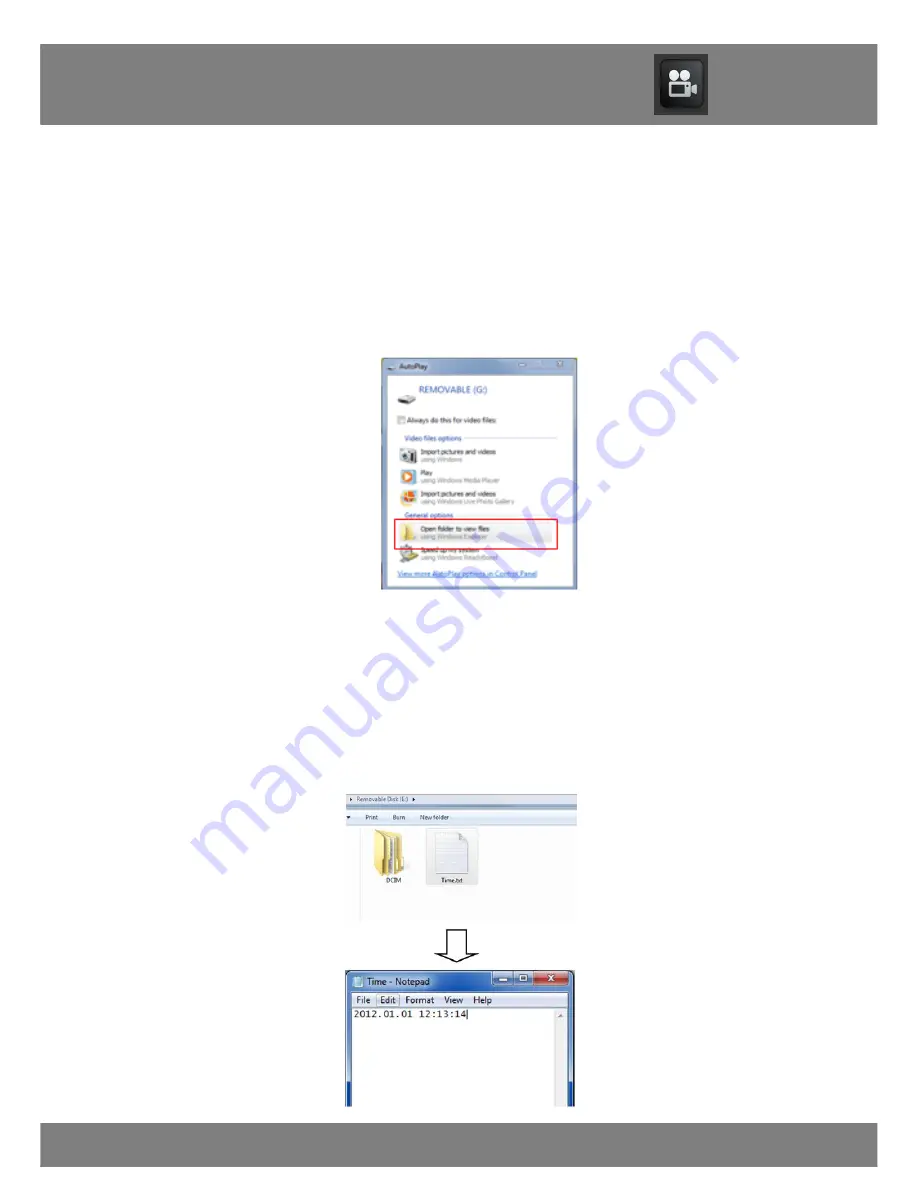
1.  To change the time and date on your video watch, 

connect it to your computer. 

2.  A window will pop-up once you have inserted the USB 

into the computer.    Click “Open folder to view files”. 


3.  Create a new text document, right click in the folder, left 

click “New” and then left click “Text Document”. Name the 

document 

“Time”.     

4.  Type in the date and time. The format of the time must be 

set in “YYYY.MM.DD HH:MM:SS” using Military Time.   


Chapter 6: Changing the Time and Date


Содержание CS-WATCH-4GB

Страница 1: ......

Страница 2: ......

Страница 3: ...ideo Watch 7 Chapter 6 Changing the Time and Date 8 Chapter 7 Recording a Video 10 Chapter 8 Taking a Picture 11 Chapter 9 Download Your Videos Pictures 12 Chapter 10 Warranty 14 Interactive How To vi...

Страница 4: ...here is no guarantee that interference will not occur in television reception which can be determined by turning the equipment off and on The user is encouraged to try and correct the interference by...

Страница 5: ...4 Your new Video Watch will contain the following items Video Watch with 4GB Built in Memory 1ft USB Cable User Manual Chapter 2 Package Contents...

Страница 6: ...IBM PCs or 100 Compatible Windows 2000 XP Vista 7 Mac OS 10 3 and above Available USB Port Chapter 3 System Requirements In order for your video watch to be water resistant please be ensure that all...

Страница 7: ...6 Chapter 4 Hardware Description...

Страница 8: ...hole on the video watch 2 Connect the other end of the USB cable to your computer The LED indicator will flash red while the video watch is charging 3 Once the video watch is completely charged the LE...

Страница 9: ...op up once you have inserted the USB into the computer Click Open folder to view files 3 Create a new text document right click in the folder left click New and then left click Text Document Name the...

Страница 10: ...ime Adjust Knob in the middle of the right side of the video watch 2 Gently pull the knob out The hands on the video watch s face will stop moving 3 Turn the knob to adjust the time 4 Push the knob ba...

Страница 11: ...utton once The LED indicator will turn red to indicate the video watch is recording 3 To stop recording press the Start Stop button once The LED indicator turns to green when recording stops Your vide...

Страница 12: ...ady for use 2 Press the Snapshot Button once The LED indicator will turn red for about a second and then turn back to green after a picture has been taken Your video watch will automatically shut down...

Страница 13: ...off the middle knob on the left side of the watch and plug the auxiliary end of the cable into the hole on the video watch 3 Connect the other end of the USB cable to your computer Your computer will...

Страница 14: ...an be found as Removable Disk under My computer Double click the icon to open the folder 6 All of the recorded files can be found within the drive that indicates your video watch Recorded files will b...

Страница 15: ...replacement Product or parts will be covered by the same warranty as the original Product through the expiration date of the original warranty period Exclusions This warranty does not apply to the fo...

Страница 16: ...the Product or for any delay in the performance of this warranty due to any cause beyond its control This warranty shall not apply to installation or the removal and reinstallation of products after r...

Страница 17: ...line no later than thirty 30 days after purchase at www NightOwlSP com in the warranty registration section or in any other matter described in the instructions TOLL FREE CUSTOMER SERVICE North Ameri...

Страница 18: ...17...

Отзывы: