background image

20 

2-light show 

In slave mode, 

 means the unit works as the master unit and 

 means 2-light 

show. In order to create a great light show, you can set 

 on the second unit to get 

contrast movement to each other, even if you have two units only. 


5.2 Easy Controller (by CA-8) 

The  easy  remote  control  is  used  only  in  master/slave  mode.  There  is  a 
terminator for connect the easy controller inside the fixture. By connecting 
the cable into DMX IN waterproof cable entry gland to the CA-8 terminator 
of the first fixture, you will find that the remote control on the first fixture will 
control all the other fixtures for Stand by, Function and Mode functions. 


5.3 DMX Controller  

Using universal DMX controller to control the units, you have to set DMX address from 1 to 
512 channel so that the units can receive DMX signal. 

Press the 

MENU

 button up to when the 

 is showing on the display. Pressing 

ENTER


button and the display will blink. Use 

DOWN

 and 

UP

 button to change the DMX512 

address. Once the address has been selected, press and keep 

ENTER

 button pressed up 

to when the display stops blinking or storing automatically 8 seconds later. To go back to 
the functions without any change press the

 MENU

 button again. If you use please refer to 

the following diagram to address your DMX512 channel for the first 4 /2 units.  
 
1 channel mode:    


3 channels mode:


Blackout 

Blackout the unit 

Function 

1. SynchroStrobe 
2. Asynchro Strobe 
3. Sound Strobe 

Select Show 
(Show 1-8) 

Select Speed 
4.  Slow 
5.  Middle 
6.  Fast 

Mode 

Sound/Strobe 
(LED OFF)


Show 
(LED ON) 

LED blinking 

21 

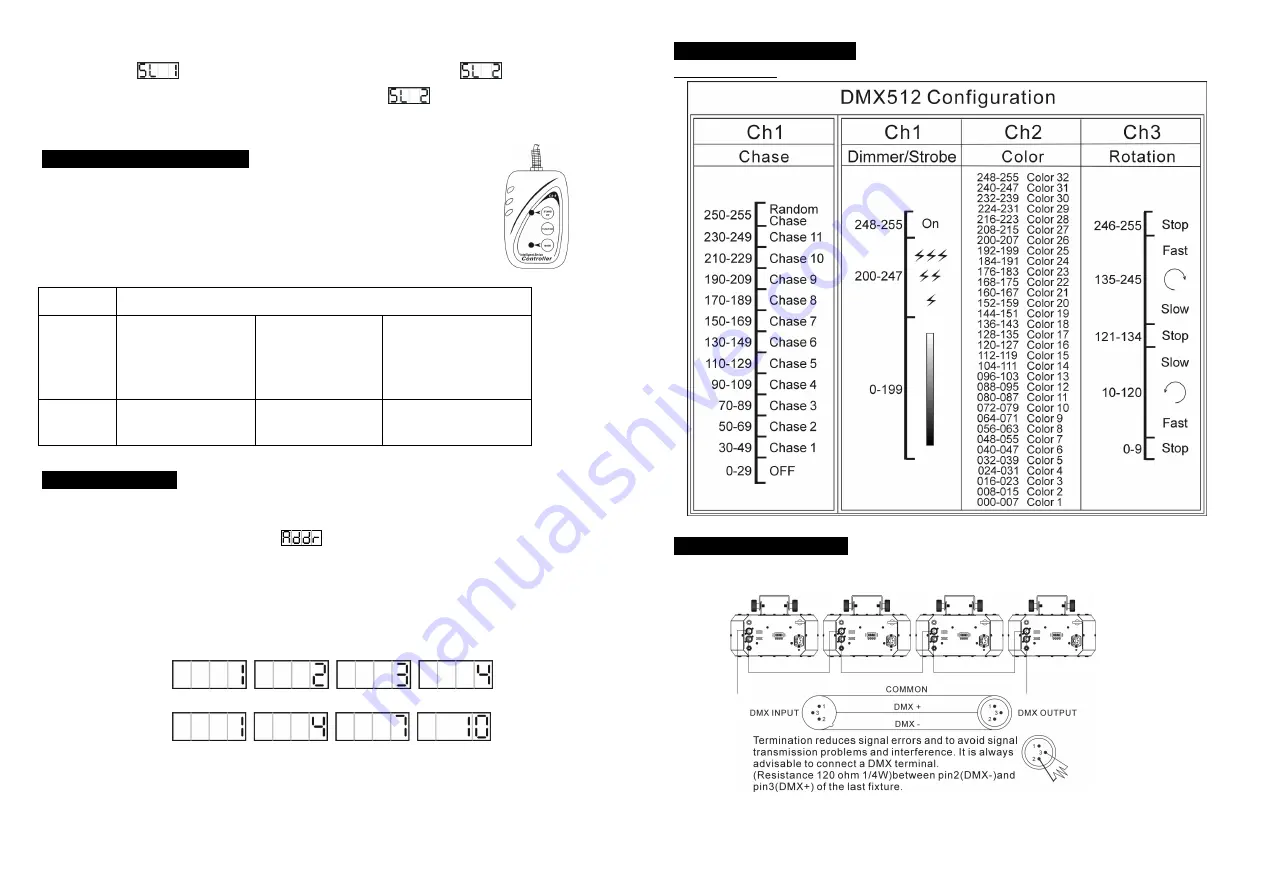
 6. DMX512 Configuration  

1 & 3-CH modes: 


 7. DMX512 Connections  

The DMX512 is widely used in intelligent lighting control, with a maximum of 512 channels.  


1.  Connect the fixture together in a “daisy chain” by XLR plug cable from the output of the 

fixture  to  the  input  of  the  next  fixture.  The  cable  cannot  be  branched  or  split  to  a  “Y” 

Содержание SPLENDOR LED

Страница 1: ...BLE DES MATIERES 1 Instructions de s curit 2 Caract ristiques techniques 3 Installation de l appareil 4 Fonctions principales 5 Fonctionnement de l appareil 5 1 Master Slave 5 2 Contr leur CA8 5 3 Con...

Страница 2: ...pareil et entra ner des dommages importants Il est IMPERATIF de ne jamais regarder directement la source lumineuse sous risque de graves s quelles oculaires 2 Caract ristiques techniques Equip de 2 x...

Страница 3: ...er sur le bouton ENTER Appuyez sur le bouton MENU si vous d sirez retourner toutes les fonctions principales sans avoir fait de s lection Le mode Show Appuyez sur le bouton MENU jusqu ce que s affiche...

Страница 4: ...bouton MENU si vous d sirez retourner toutes les fonctions principales sans avoir fait de s lection Remarque Ajustement de la position de d part Home Position Adjust Appuyer sur le bouton ENTER pendan...

Страница 5: ...sur le bouton MENU si vous d sirez retourner toutes les fonctions principales sans avoir fait de s lection Veuillez vous r f rer au tableau ci dessous pour r gler l adresse DMX des quatre premiers ap...

Страница 6: ...rit du signal DMX 3 Si vous rencontrez des probl mes avec le signal DMX mais de fa on intermittente v rifiez les connecteurs ou la carte lectronique de l appareil d faillant ainsi que de l appareil pr...

Страница 7: ...pack Do not touch any wire during operation and there might be a hazard of electric shock To prevent or reduce the risk of electrical shock or fire do not expose the fixture to rain or moisture The h...

Страница 8: ...d press ENTER button to setup or it will automatically return to the main functions without any change after idling 10 seconds Back to the functions without any change press MENU button The main funct...

Страница 9: ...est To go back to the functions press the MENU button 19 Fixture Hours Press the MENU button up to when the is blinking on the display Pressing ENTER button and the display will show the number of wor...

Страница 10: ...up to when the is showing on the display Pressing ENTER button and the display will blink Use DOWN and UP button to change the DMX512 address Once the address has been selected press and keep ENTER b...

Страница 11: ...k properly 2 If the DMX LED is on and no response to the channel check the address settings and DMX polarity 3 If you have intermittent DMX signal problems check the pins on connectors or on PCB of th...

Отзывы: