background image


55 


Português - 


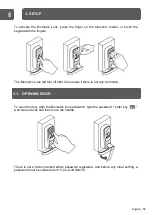
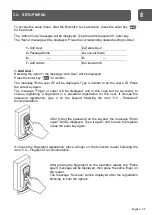
To access the setup menu, after the Biometric Lock activation, press the enter key 

“       ” 

for 5 seconds. 


The 

“Admin Code” message will be displayed. Type the admin pa enter key. 

The 

“Menu” message will be displayed. Press the corresponding desired setting number: 


1- 

Add User 


2- 

Delete User 


3- 

Passage Mode 


4- 

Lockout Mode 


5-                     

---


6-                      

---


7- 

Add Admin 


8- 

Clear Admin 


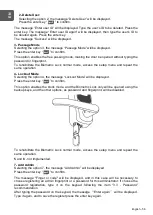
1- Add User:  

Selecting the option 1 the message 

“Add User” will be displayed. 

Press the enter key 

“        ” to confirm. 


The message "Enter user ID" will be displayed. Type a number 

to be the user’s ID. Press 

the enter key again.


The  message  "Finger  or  code"  will  be  displayed,  and  in  this  case  will  be  necessary  to 
choose  registering  a  fingerprint  or  a  password  registration  for  this  user.  If  choose  the 
password  registration,  type  it  on  the  keypad  following  the 

item  “3.3  -  Password” 

recommendation.


After  typing  the  password  on  the  keypad,  the  mess

age  “Enter 

again” will be displayed. Type it again, and to save the register 
press the enter key again.


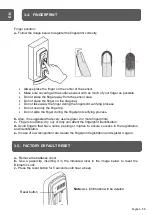
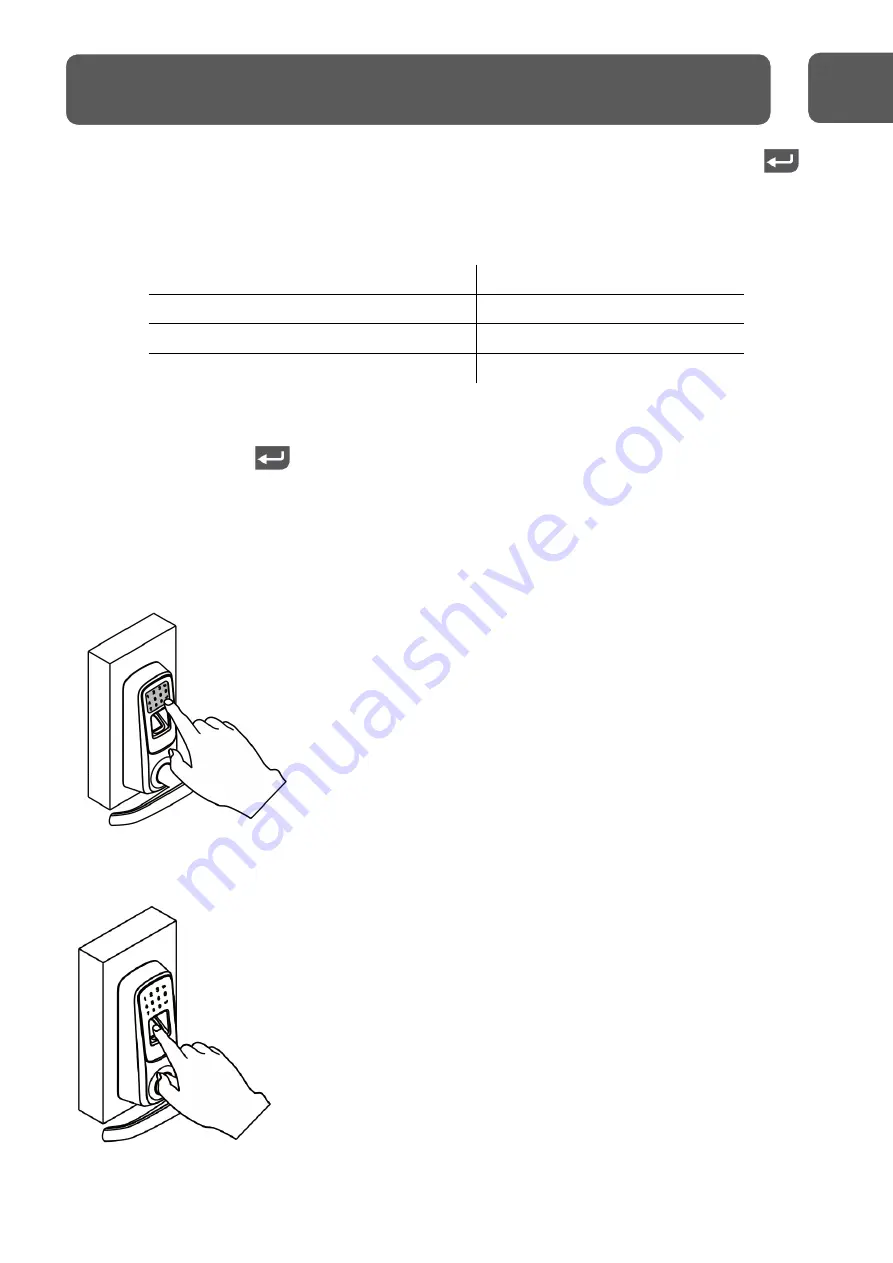
If  choose  the  fingerprint  registration,  place  a  finger  on  the  biometric  reader  following  the 
item “3.4 – Fingerprint” recommendation.


After  placing  the  fingerprint  on  the  biometric  reader,  the 

“Place 

again” message will be displayed, then place the same finger on 
the reader.


The  mess

age  “Success”  will  be  displayed  after  the  registration 

finishing, in both the options.


EN


3.2-  SETUP MENU  

English - 55 

Содержание LN-5000 UL3 BT

Страница 1: ...echadura Biom trica LN 5000 UL3 BT PT Instru es e advert ncias para a instala o e uso ES Instrucciones y advertencias para la instalaci n y el uso EN Instructions and warnings for installation and use...

Страница 2: ...OP ES DE INSTALA O 6 1 1 2 FURA O 6 1 2 TRINCO E CONTRA TESTA 8 1 3 FECHADURA EXTERNA 9 1 4 FECHADURA INTERNA 10 1 5 INSTALA O DA MA ANETA 14 2 ESPECIFICA O T CNICA 15 3 PROGRAMA O 16 3 1 ABERTURA DA...

Страница 3: ...obtenha acesso contanto que a senha correta esteja incorporada entre os n meros digitados evitando assim que algu m roube a senha enquanto espia o usu rio Chaves reserva para a abertura da Fechadura B...

Страница 4: ...4 Portugu s PT LAYOUT FECHADURA EXTERNA LAYOUT FECHADURA INTERNA...

Страница 5: ...icar trancado para o lado de fora N O insira as pilhas antes da instala o da fechadura Se a Fechadura Biom trica foi instalada em outra porta antes reinicie a mesma para o padr o de f brica antes de i...

Страница 6: ...furar a porta seguindo as dimens es especificadas anteriormente no item 1 1 b Fa a um furo no batente da porta seguindo as mesmas dimens es de altura com rela o ao piso e seguindo as dimens es da con...

Страница 7: ...parafusos internos e Se a espessura da porta for superior a 16 5 42mm ser necess rio inserir a mola fornecida na parte posterior da fechadura interna conforme indicado na imagem a seguir PT c Antes de...

Страница 8: ...ontra testa no batente da porta Parafuso A ngulo que faceia com o batente Para ajuste do comprimento do trinco desloque o miolo para a dimens o desejada NOTA Este ngulo sempre voltado para o lado da f...

Страница 9: ...ugu s a Posicione a fechadura externa do lado de fora da porta encaixando a nos orif cios do trinco e da porta Passe o cabo abaixo do parafuso e do orif cio conforme indicado abaixo 1 3 FECHADURA EXTE...

Страница 10: ...u s a Instale a placa de montagem interna no lado de dentro da porta Fixe a placa na porta e na fechadura externa usando os parafusos tipo B Passe o cabo atrav s do orif cio 1 4 FECHADURA INTERNA PT P...

Страница 11: ...11 Portugu s Insira o no eixo da fechadura Eixo girat rio PT b Insira o eixo girat rio atrav s da placa de montagem interna conforme indica o na imagem a seguir...

Страница 12: ...a parte posterior da fechadura interna Pressione o conector firmemente usando os polegares at ficar completamente encaixado d Fixe a fechadura interna utilizando os parafusos que foram removidos anter...

Страница 13: ...13 Portugu s Parafuso E PT e Insira as 3 pilhas alcalinas Em seguida encaixe a tampa da bateria e parafuse a...

Страница 14: ...Se o movimento n o for suave reveja as etapas anteriores para garantir a instala o adequada c Se as ma anetas forem instaladas na dire o errada ser necess rio remov las e reinstal las Para remov las i...

Страница 15: ...entifica o 0 5 segundos FRR Taxa de rejei o falsa 0 001 FAR Taxa de aceita o falsa 0 00001 Finaliza o Prata Escovada Bronze Envelhecido Metal Brilhante dourado Material do Case Liga de Zinco Forte Imp...

Страница 16: ...segundos se n o houver nenhum comando Para abrir a porta ap s a ativa o da fechadura digite a senha tecla enter aguarde 2 segundos e ent o gire a ma aneta N o h uma senha administradora cadastrada por...

Страница 17: ...nsagem Enter user ID Digite um n mero para ser o ID do usu rio Pressione a tecla enter novamente A mensagem Finger or code ser exibida e neste caso ser necess rio optar por cadastrar uma digital ou um...

Страница 18: ...em Lockout Mode Pressione a tecla enter para confirmar Est op o habilita o modo bloqueio onde a fechadura poder ser aberta apenas usando as chaves reservas e as demais op es como senha e leitura biom...

Страница 19: ...dora na leitora biom trica Pressione a tecla enter para confirmar Para adicionar um novo usu rio administrador siga o procedimento descrito no item e Add Admin A Fechadura Biom trica suporta senhas de...

Страница 20: ...tal b Tamb m se recomenda que cada usu rio cadastre 2 ou mais digitais c Dedos muito midos secos oleosos ou sujos podem afetar a identifica o da digital d Evite dedos que tenham calos descama o ou les...

Страница 21: ...OPCIONES DE INSTALACI N 25 1 1 2 PERFORACI N 25 1 2 PESTILLO Y CERRADERO 27 1 3 CERRADURA EXTERIOR 28 1 4 CERRADURA INTERIOR 29 1 5 INSTALACI N DE LA MANIJA 33 2 ESPECIFICACI N T CNICA 34 3 CONFIGURA...

Страница 22: ...pre y cuando la contrase a correcta est incorporada entre los n meros introducidos evitando as que alguien robe la contrase a mientras esp a al usuario Llaves reserva para la apertura de la cerradura...

Страница 23: ...POSICI N DE LA CERRADURA INTERIOR Teclado t ctil Lector biom trico Pantalla de mensaje Bot n de reinicio Teclado t ctil Tecla de retroceso Tecla Enter Compartimiento de apertura con llave reserva Cubi...

Страница 24: ...fuera NO introduzca las pilas antes de instalar la cerradura Si la Cerradura Biom trica se ha instalado en otra puerta antes vuelva a la configuraci n predeterminada de f brica antes de instalar en l...

Страница 25: ...especificadas anteriormente en el tem 1 1 b Haga un agujero en el marco de la puerta siguiendo las mismas dimensiones de altura con respecto al piso y siguiendo las dimensiones del cerradero para gar...

Страница 26: ...e Si el grosor de la puerta es superior a 16 5 42mm ser necesario insertar el muelle suministrado en la parte posterior de la cerradura interna como se indica en la siguiente imagen c Antes de instal...

Страница 27: ...arco de la puerta Tornillo A ngulo que hace frente con la jamba de la puerta Para ajustar la longitud del pestillo despl cese el n cleo a la dimensi n deseada NOTA Este ngulo siempre orientado hacia e...

Страница 28: ...cerradura externa en el exterior de la puerta encaj ndola en los orificios del pestillo y de la puerta Pase el cable debajo del tornillo y del orificio como se indica en la siguiente imagen 1 3 CERRAD...

Страница 29: ...la placa de montaje interna en el interior de la puerta Fije la placa en la puerta y en la cerradura externa usando los tornillos tipo B Pase el cable a trav s del orificio 1 4 CERRADURA INTERIOR ES...

Страница 30: ...30 Portugu s Eje de rotaci n ES b Inserte el eje de rotaci n a trav s de la placa de montaje interna como se indica en la siguiente imagen Inserte en el eje de la cerradura Espa ol 30...

Страница 31: ...osterior de la cerradura interna Presione firmemente el conector con los pulgares hasta que est completamente conectado d Fije la cerradura interna utilizando los tornillos que fueran quitados anterio...

Страница 32: ...32 Portugu s Tornillo E ES e Inserte las 3 pilas alcalinas A continuaci n encaje la cubierta de la bater a y atorn llela Espa ol 32...

Страница 33: ...l movimiento no es suave revise los pasos anteriores para garantizar la instalaci n adecuada c Si las manijas fueran instaladas en la direcci n equivocada es necesario extraerlas y volver a instalarla...

Страница 34: ...nce envejecido metal brillante dorado Material del case Aleaci n fuerte de zinc Impermeable Si ndice de protecci n IP65 Voltaje de operaci n 4 5V 3 pilas x AA Manija reversible Si Dimensiones 3 5 x 6...

Страница 35: ...ning n comando Para abrir la puerta despu s de la activaci n de la cerradura introduzca la contrase a tecla enter espere dos segundos y entonces gire la manija No hay una contrase a administradora re...

Страница 36: ...un n mero para ser el identificador de usuario Presione la tecla enter de nuevo El mensaje Finger or code aparecer y en este caso ser necesario optar por registrar una huella digital o una contrase a...

Страница 37: ...la tecla enter para confirmar Esta opci n habilita el modo de bloqueo donde la cerradura puede ser abierta s lo usando las llaves reservadas y las dem s opciones como contrase a y lectura biom trica q...

Страница 38: ...tor biom trico Presione la tecla enter para confirmar Para agregar un nuevo usuario de administrador siga el procedimiento descrito en el tem e Add Admin La Cerradura Biom trica soporta contrase as de...

Страница 39: ...a que cada usuario registre 2 o m s huellas digitales c Los dedos muy h medos secos aceitosos o sucios pueden afectar la identificaci n de la huella digital d Evite los dedos que tengan callos descama...

Страница 40: ...R 43 1 1 1 INSTALLATION OPTIONS 44 1 1 2 DRILLING 44 1 2 LATCH AND STRIKE PLATE 46 1 3 OUTSIDE LOCK 47 1 4 INSIDE LOCK 48 1 5 HANDLE DOOR INSTALLATTION 52 2 TECHNICAL SPECIFICATION 53 3 SETUP 54 3 1 O...

Страница 41: ...nd even so getting access as long as the correct password be typed between all the typed numbers avoiding that someone steal the password while spying the user Extra keys for the Biometric Lock openin...

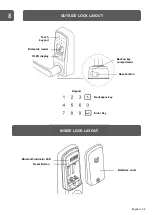
Страница 42: ...N OUTSIDE LOCK LAYOUT INSIDE LOCK LAYOUT Batteries cover Reset Button Bluetooth indicator LED Touch keypad Biometric reader OLED display Reset button Backup key compartment Keypad Enter Key Backspace...

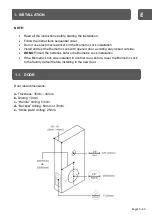
Страница 43: ...ned door avoiding stay locked outside DO NOT insert the batteries before the Biometric Lock installation If the Biometric Lock was installed in another door before reset the Biometric Lock to the fact...

Страница 44: ...owing the dimensions previously specified item 1 1 b Make a hole on the door jamb following the same height dimensions in relation to the floor and following the strike plate dimensions ensuring the l...

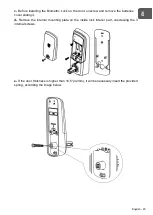
Страница 45: ...part unscrewing the 3 internal screws e If the door thickness is higher than 16 5 42mm it will be necessary insert the provided spring according the image below EN c Before installing the Biometric L...

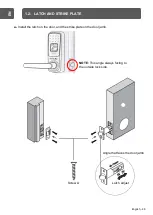
Страница 46: ...Install the latch on the door and the strike plate on the door jamb Screw A Angle that faces the door jamb Latch adjust NOTE This angle always facing to the outside lock side EN 1 2 LATCH AND STRIKE P...

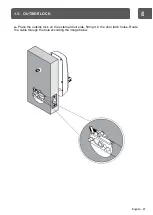
Страница 47: ...47 Portugu s a Place the outside lock on the external door side fitting it in the door latch holes Route the cable through the hole according the image below 1 3 OUTSIDE LOCK EN English 47...

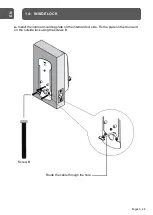
Страница 48: ...gu s a Install the internal mounting plate on the internal door side Fix the plate on the door and on the outside lock using the screws B Route the cable through the hole 1 4 INSIDE LOCK EN Screw B En...

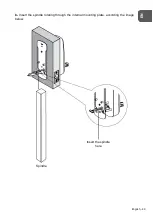
Страница 49: ...49 Portugu s Insert the spindle here Spindle EN b Insert the spindle rotating through the internal mounting plate according the image below English 49...

Страница 50: ...the cable in the inside lock posterior part Press the connector firmly using the thumbs until it fit completely d Fix the inside lock using the screws that were unscrewed previously Screw C Screw D C...

Страница 51: ...51 Portugu s Screw E EN e Insert the 3 alkaline batteries Then fix the batteries cover and screw it English 51...

Страница 52: ...obstructed If the movement is not soft review the previously steps to ensure the proper installation c If the handles were installed in the wrong direction it will be necessary remove and install the...

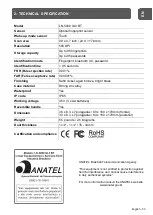
Страница 53: ...Case material Strong zinc alloy Waterproof Yes IP code IP65 Working voltage 4 5V 3 x AA batteries Reversible handle Yes Dimension 3 5 x 6 3 x 7 polegadas 89 x 160 x 178mm frontal 3 3 x 6 3 x 7 polega...

Страница 54: ...rn off after 20 seconds if there is not any command To open the door after the Biometric Lock activation type the password enter key wait two seconds and then move the handle There is not a factory de...

Страница 55: ...or code will be displayed and in this case will be necessary to choose registering a fingerprint or a password registration for this user If choose the password registration type it on the keypad fol...

Страница 56: ...y to confirm This option enables the block mode and the Biometric Lock only will be opened using the backup keys and the other options as password and fingerprint will be disabled To rehabilitate the...

Страница 57: ...place the admin fingerprint on the biometric reader Press the enter key to confirm To add a new admin user follow the described procedure in the e Add Admin item The passwords can have 4 8 digits For...

Страница 58: ...verifying process b Also it is suggested that every user register 2 or more fingerprints c Fingers too damp dry oily or dirty can affect the fingerprint identification d Avoid fingers that have callus...

Страница 59: ...59 Portugu s...
Страница 60: ...60 Portugu s Instalador Tel 1 Operadora Whatsapp Sim Si N o No Tel 2 Operadora Whatsapp Sim Si N o No www nice com br Play Store NiceBrasil...

Отзывы: