User manual
Maintenance
General
The hot water heater’s container is made of stainless
steel (SS 2326), and it has a rated pressure of 10 bar. Cut-
off pressure is 9 bar .
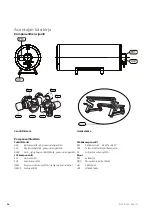
Safety valve
The safety valve (FL1) must be inspected regularly, about
4 times a year, to prevent clogging. The check is made
by turning the safety valve’s knob anticlockwise, water
should then flow through the overflow pipe. If this does
not happen then the safety valve is defective and must
be replaced.
The safety valve sometimes releases a little water after
hot water has been used. This discharge is caused by the
expansion of cold water entering the water heater, res-
ulting in a pressure increase, whereby the safety valve
opens.
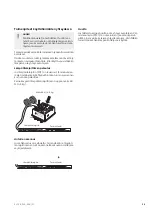
Emptying
1. Turn off the power to the water heater.
2. Shut off the cold water inlet with valve QM35).
3. Turn the mixer valve (FQ1) fully anticlockwise.
4. Open the safety valve (FL1), turn slowly anticlockwise
until it remains in the raised position. Draining is
through the safety valve overflow pipe.
5. When draining, air must be let into the system by
opening some hot water taps, preferably the closest
and lowest. If this is not sufficient, loosen a pipe
coupling (XL4) on the mixer valve.
6. For faster drainage loosen the plug (QM5) a couple
of turns. Some water may run out at the plug.
NOTE
Hot water may splash out of the vent screw hole
NOTE
Water may splash at the overflow pipe
NOTE
The overflow pipe must be connected to posi-
tion (XL48).
It can take a few minutes for draining to start. To speed
up draining, air can be introduced via the vent screw
(QM5).
Keep the valves' positions after the above actions until
the water heater is to be used again.
A small amount of water may remain at the bottom of
the water heater after completing the draining stages
described 1 – 6.
When installed in a location that is exposed to the risk
of frost, the water heater must be emptied whenever it
is not in operation. Freezing will result in the water
heater bursting.
15
EL 150, 230, 300 | GB


