background image

7

NHT 

iC3 ARC In-Ceiling Loudspeaker Installation Guide

Note: it’s ok to let the fiberglass insulation lay on the back of the speaker.

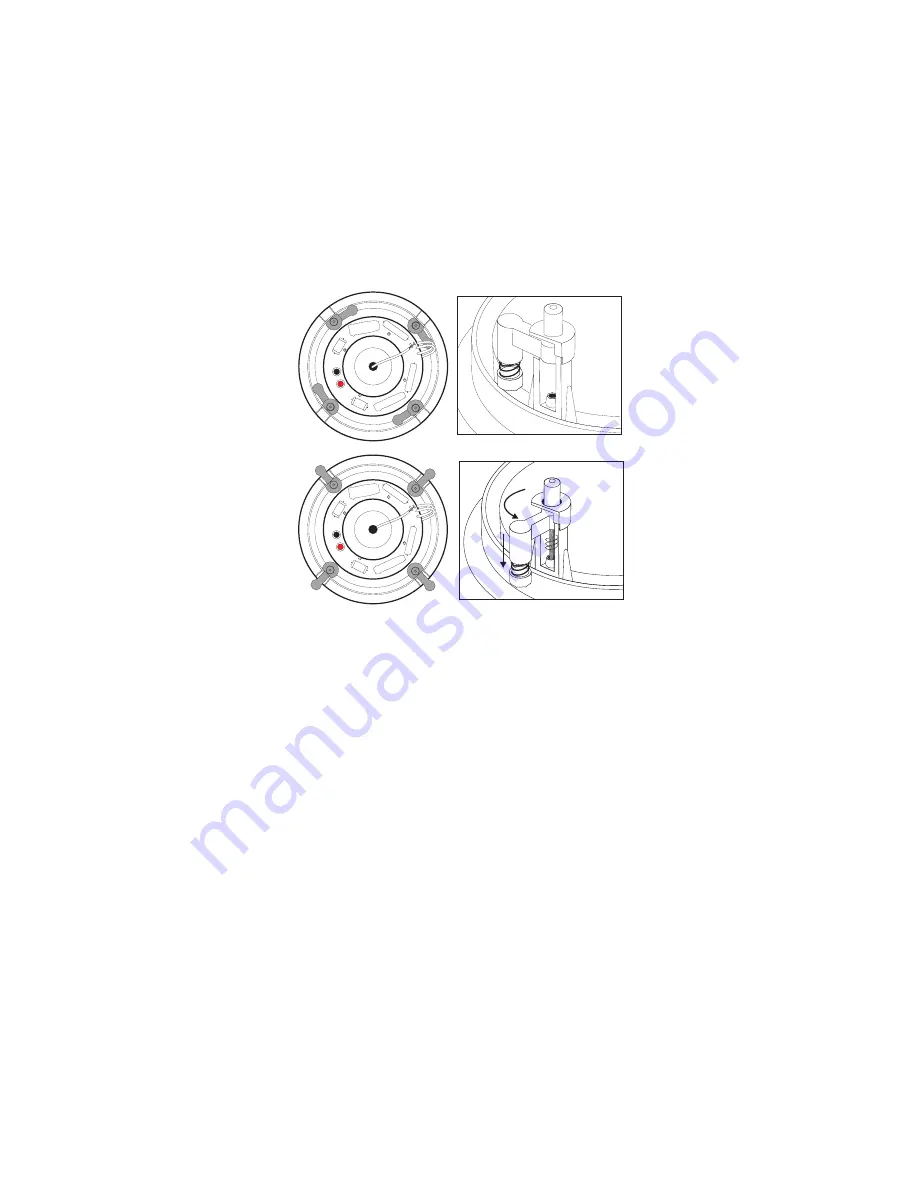
7. Begin to tighten the screws that at first rotate the dog-legs out 45˚ and then start to move downwards to clamp the ceiling and 

bracket.  Tighten the screws carefully but snugly, making sure to not over tighten, as this may compromise the fit of the speaker as-

sembly. The use of power screwdrivers is not recommended but if you must, set the toque ratchet setting at its least resistive posi-

tion and the speed very low. The speaker frame lip should rest flush and seal against the ceiling. The spring loaded mounting clamps 

provide tension once installed.

8. Once all the screws are snug and speaker secure, install the grill.  It uses magnets to attach to the speaker.  You will notice a 

gauzy-white cloth on the speaker side of the grill.  It’s called “scrim cloth” and helps hide the speaker’s silhouette from showing 

through the grill.  Do not remove this scrim under penalty of law!

Fig. 4

Installation: New Construction Continued....

Содержание iC2-ARC

Страница 1: ...nstallation New Construction ceilings not installed you see ceiling joists when you look up 7 Installation Existing Construction retrofitting finished ceilings 8 Painting 9 In Use 10 Optimizing Sonic...

Страница 2: ...ing www nhthifi com navigate to the Where to Buy section or visit www cedia org to find a CEDIA installation professional One last word of advice It is up to you to insure that the installer NHT refer...

Страница 3: ...or print to scale one of the images from our website full size if possible and tape to the ceiling maybe Kinko s will do this for you For more information about home theater speaker placement try Dolb...

Страница 4: ...g codes and best practices to be followed be sure you are familiar with them When drilling holes through wall studs or ceiling joists use a drill bit that is sharp wider than the speaker cable that wi...

Страница 5: ...nd caulking to air seal it and insure it will not vibrate rattle fall apart or come loose Make sure it is supported by the ceiling joists not the sheetrock 1 Once you ve selected the desired location...

Страница 6: ...g trim work is installed and the painting is complete but just before the carpet or flooring is installed install the speaker by first connecting the speaker wire to the spring posts on the back of th...

Страница 7: ...ers is not recommended but if you must set the toque ratchet setting at its least resistive posi tion and the speed very low The speaker frame lip should rest flush and seal against the ceiling The sp...

Страница 8: ...per backing board to spread the load as this type of construction will not support its weight You will not need the iCB6 pre construction bracket nor will you be able to install it if you wanted to Th...

Страница 9: ...ase by being sure the dog legs are rotated sideways like the speaker came packed so that the body of the speaker assembly can slide through the mounting bracket Exercise caution not to damage the driv...

Страница 10: ...sive caulk and extra screws when attaching the drywall to the joists around the speaker Additionally once the speaker cutout has been made in the drywall add a strip of a high quality non hardening co...

Страница 11: ...tact NHT by telephone go online at www nhthifi com and navigate to the Service Center area for more information Professional Specifications Average Impedance 8 Recommended Power 10 125W Max RMS Power...

Отзывы: