

6
1
2
3
4
5
8
7
Power button
Micro SD Card slot
Micro USB port
WPS button
Quick Installation Guide
1
2
3
1
Thank you for purchasing the new mobile hotspot
from Nexxt Solutions™. If any of the following items
are mismatched, missing or damaged, please contact
the merchant from whom you purchased the unit for
immediate replacement.
• 3G mobile hotspot
• Rechargeable 2000mAh battery
• Micro USB to USB charging cable
• Quick installation guide
• A compatible SIM card with mobile data service
• A computer with Windows®, Macintosh®,
or Linux-based operating system
• Internet Explorer 7, Firefox 12.0, Chrome 20.0,
or Safari
Locate the small groove on the top of the hotspot.
Gently pry open the back cover in order to remove it.
This device belongs to the new generation of portable
SIM based Wi-Fi hotspots. This device comes with a
built-in 3G modem and a 2000mAh battery making it
a true mobile solution. The rechargeable battery works
up to 6 hours or 72 hours in standby mode.
The hotspot operates under the HSPA+ protocol,
supporting download speeds of 21.6Mbps with up to
8 simultaneous users.
4
5
6
7
8
10
11
12
9
You must fully charge the battery prior to using the
hotspot for the first time.
Firmly insert the micro-USB end of the supplied charger
cable into the I/O port on the hotspot, and the other
end to an AC power adapter (faster way to charge),
power bank or to an available USB port on your
computer.
The new battery needs to be initially charged for at
least 5 hours.
Let the battery drain completely, before recharging it to
full capacity once again. Thereafter, allow the battery to
charge until the indicator meter on the screen is full.
The device can be used while it is charging.
Button
Press this button for 1 to 3 seconds to add new
wireless devices quickly and easily using Wi-Fi
Protected Setup (WPS)
Press this button for about 7 seconds to turn the
wireless feature on and off
Press this button for 1 to 2 seconds to turn the
OLED screen on and off
Press this button for 7 seconds to turn your device
on and off
Press this button with a needle or a sharp pointed tool
for 4 to 5 seconds to initialize the device
The device supports memory cards with a maximum
capacity of 32GB. Insert a user-supplied micro-SD
card in this slot, if desired
Description
WPS
button
Power
button
Micro SD
card slot
Use the included cable to connect to a powered USB
port to charge the device, or to access the
configuration utility.
Micro USB
connector
Reset
button
Function
The number of bars displayed reflects the signal
strength of your network. More bars indicate a
stronger signal. No bars represent no connection
to the network
H+: Currently connected to a HSPA+ mobile network
H: Currently connected to a HSPA mobile network
3G: Currently connected to a WCDMA mobile network
2G: Currently connected to a GPRS/EDGE network
: No network is active. When no SIM card is
detected by the device, the icon will also be
displayed on the screen
The icon indicates that your Wi-Fi network is
currently turned on
The number displayed next to this icon indicates how
many clients are currently using the Wi-Fi signal.
The device allows a maximum of 8 users to be
connected simultaneously to the network
Description
1
Signal
strength
2
Network
type
3
Wi-Fi and
clients
System requirements
Preliminary steps
Introduction
Before using your hotspot for the first time, you must
insert a SIM card. You need to have one available in
order to operate on a GSM network, known as Global
System for Mobile Communication. The installation
process is as follows:
Basic setup
Installing the battery, SD memory and SIM card
Charging your mobile device
This convenient OLED screen provides key information
about your device, such as network activity, signal
strength, current battery level and connection status,
all done in real time.
2. OLED screen
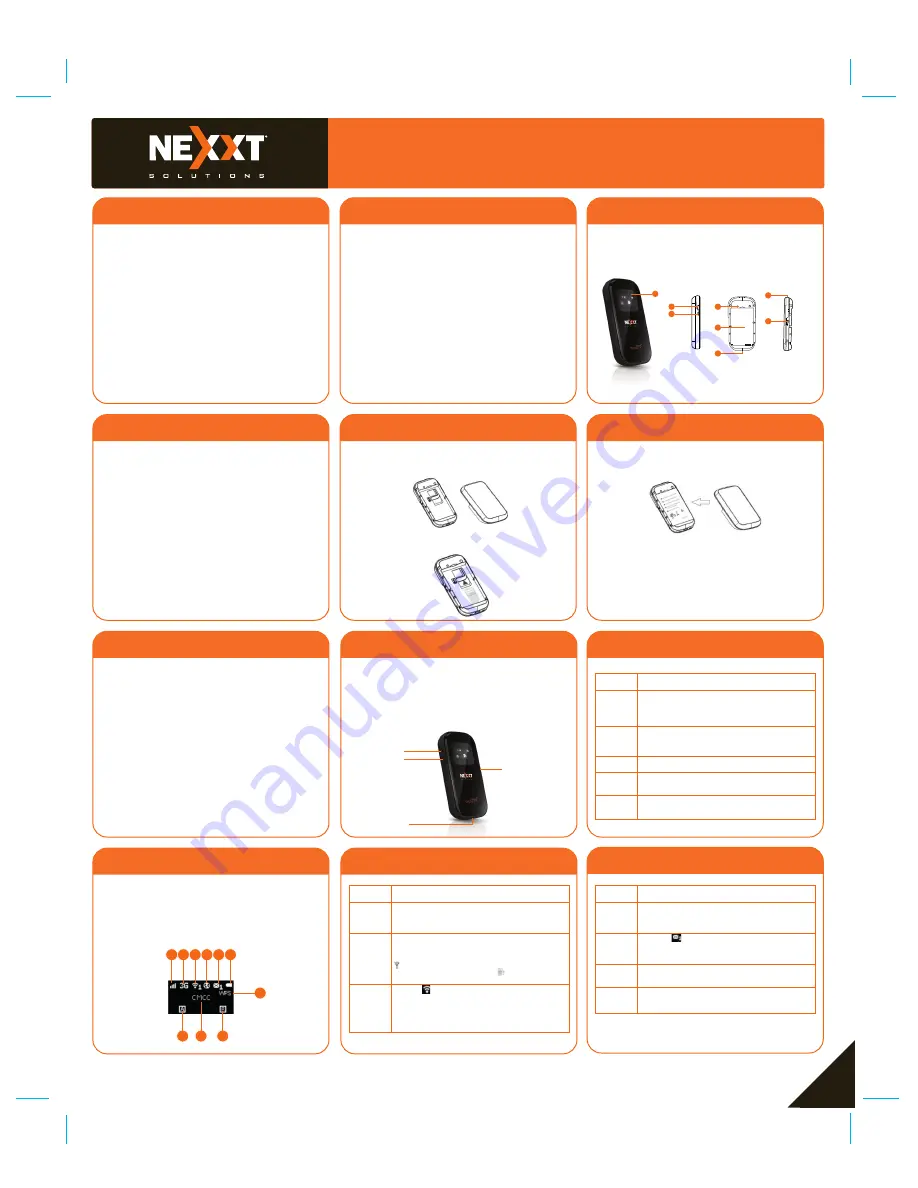
Side and back views
Front view
Product layout
•
•
•
•
This section describes the functions of the controls and
buttons, as well as the icons and parameters displayed
on the OLED screen.
Device operation
1. Hardware components
1. OLED screen
2. WPS button
3. Power button
4. Reset button
5. Battery compartment
6. Micro-USB charging port
7. Groove
8. Micro SD card slot
1.
Now, proceed with the battery installation by aligning
the contacts on the unit with the connectors inside
the compartment.
3.
Slide the micro-SD card (if you have one available) in
the corresponding memory slot located on the side,
as marked, also making sure the contacts of the
card are facing down.
Replace the hotspot cover by carefully pressing it
down until it locks in place.
4.
5.
Slide the SIM card in the slot inside the compartment,
as marked, making sure the contacts of the card are
facing down.
2.
Function
This icon is displayed when there is an active
internet connection
When the envelope icon is displayed, it means that
there are unread messages in the inbox. The number
indicates how many unread messages are currently
stored in this folder
This icon displays the amount of energy stored in the
battery. While charging, the animated icon and the
current battery level will be shown on the screen
Description
4
Internet
connection
status
5
SMS
6
Battery
status
Wi-Fi Protected Setup. When
WPS
is displayed,
it means that the device is ready for WPS association
with wireless clients
7
WPS
1 2 3
9
10
8
4 5 6
7


