background image


2.  Hold your tablet with two hands, align the connector and the two magnetic 

contacts on the keyboard to the jack and positioning slots at the bottom of the 
tablet.   

3.  As soon as the keyboard is connected to the tablet, it is ready for use. 
4.  You can rotate the tablet to overlap the keyboard as you do with a laptop.   


Note:   
1.This keyboard is a plug-and-play device; you can connect/disconnect it anytime.   
2. There is no notification or indication for the keyboard connection, except for 
appearance of the mouse icon (arrow) as you put your hand onto the touch area.   
3. When the tablet overlaps on the keyboard, the display will be turned off; as soon as 
it is erect, the display will be turned on again. 
4. Since the keyboard is powered by the tablet, it has no built-in battery inside.   


Warning:   

The maximum angle between the tablet and the keyboard is 120 degrees, so DO NOT 
rotate the tablet greater than that angle; otherwise, it may cause damage to the tablet 
and the keyboard. 

 
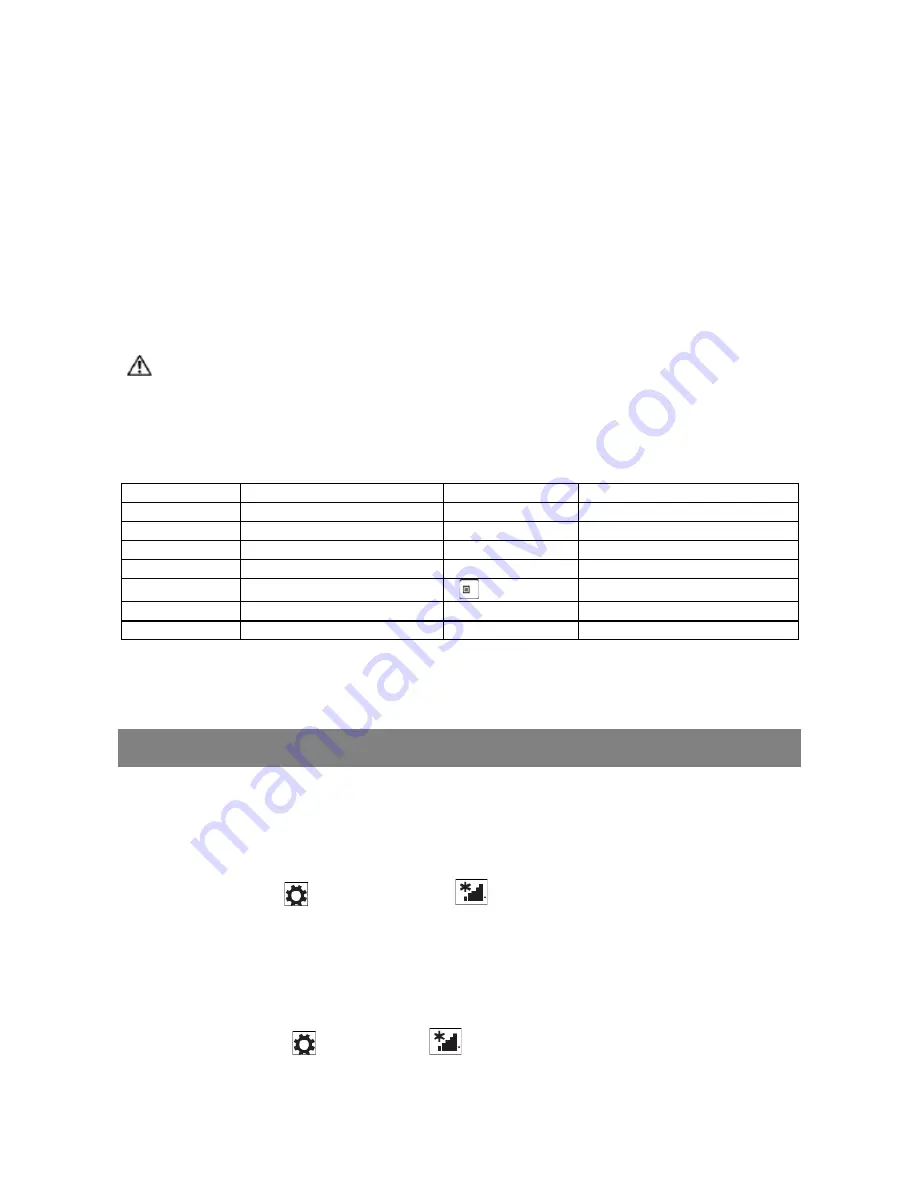
Instructions for using the cool function keys: 

FN+ESC 

Backlight 

FN+F9


Mute 

FN+F2 

Play/Pause 

FN+F10 

Vol- 

FN+F3 

Stop   

FN+F11 

Vol+ 

FN+F4 

Previous (Skip-)   

FN+F12 

Enable/Disable touchpad 

FN+F5 

Next (Skip+) 

FN+NumLk 

Lock/unlock numeric keys   

FN+F6 

Music Player   


Menu


Context menu   

FN+F7 

Mail 

FN+Up/Down 

Page Up/Down 

FN+F8 

Home Page   

FN+Left/Right 

Home/End 


To remove the keyboard from tablet, you need to push down the button at the top 
center of the keyboard with one hand, then lift it up with the other hand gently.


Basic Operation 

Wi-Fi Setting


Turning On/Off Wi-Fi: 

1.  Swipe-in from the right edge of the display to access Charms.   

2.  Touch 

Settings


→ Network icon

3.  Swipe 

Wi-Fi 

icon left or right to turn Wi-Fi on or off. 

Connecting to a network: 

1. 


Swipe-in from the right edge of the display to access Charms.   

2.    Touch 

Settings


→ Available

.


3.   Select an available network from the list and touch 

Connect

.


Содержание Flexx NXW116QC264

Страница 1: ...ost data caused by malfunction misuse modification of the device or battery replacement Do not attempt to disassemble repair or modify the product This will invalidate the warranty If the device will...

Страница 2: ...qualified personnel The exclamation point within an equilateral triangle is intended to alert the user to the presence of important operating and maintenance instructions in the literature accompanyi...

Страница 3: ...an can damage the ear of the use Do not use while operating a motorized vehicle It may create a traffic hazard and is illegal in many areas You should use extreme caution or temporarily discontinue us...

Страница 4: ...4 Table of Content Safety Precautions 1 Listening Cautions 3 Packing Contents 5 Features Functionality 5 Basic Connections 6 Basic Operation 9 Maintenance 13 Major Specifications 15 FCC Statement 15...

Страница 5: ......

Страница 6: ...is low 1 Plug the power adapter into the DC In socket 2 Connect the power adapter to an electrical outlet and charge the tablet until the battery is fully charged Caution 1 Charge the battery in an am...

Страница 7: ...ge of the display to access Charms 2 Touch Settings Power Shut down to turn off the tablet Turning On Off screen Usually user can press once the power button to turn on off the screen display Optional...

Страница 8: ...card slot Using Headphones You can connect a headset or headphones to the audio port of your tablet Warning Listening to loud music for an extended period of time can lead to hearing loss 1 Connect h...

Страница 9: ...d the keyboard is 120 degrees so DO NOT rotate the tablet greater than that angle otherwise it may cause damage to the tablet and the keyboard Instructions for using the cool function keys FN ESC Back...

Страница 10: ...item to perform further actions Drag 1 Touch and hold your finger on an item on the screen 2 Keeping your finger in contact with the display move your fingertip to the desired location 3 Take your fi...

Страница 11: ...1 Start screen displays a list of default and custom Live Tiles which act as a shortcut to Mail Windows Explorer Weather app Calendar Windows Store Internet Explorer and other installed apps Live Tile...

Страница 12: ...s and Settings options 2 From the Start screen swiping left until you reach the end of the tile view will bring up the Apps icon Touch Apps icon to show an alphabetical list of all apps installed on y...

Страница 13: ...nect your tablet to a USB storage device with a Micro USB to standard USB conversion cable then transfer files to or from the USB storage device 2 After transferring files use the Safely Remove Hardwa...

Страница 14: ...r you read the warning Note Apps installed from the Windows Store are automatically reinstalled after the refresh is complete Apps installed from sources other than the Windows Store are removed and h...

Страница 15: ...RSS Gen Issue 3 December 2010 CNR Gen 3e ditionD cembre 2010 English This device complies with Industry Canada licence exempt RSS standard s Operation is subject to the following two conditions 1 This...

Страница 16: ...ation between theequipment and receiver Connect the equipment into an outlet on a circuit different from that to which the receiver is connected Consult the dealer or an experienced radio TV technicia...

Страница 17: ...cet appareil que dans des climats temp r s Nous ne sommes pas tenus responsables des dommages ou des pertes de donn es caus s par la d faillance le mauvais usage ou la modification de l appareil ou le...

Страница 18: ...enlever le couvercle ou l arri re du fait de l absence de pi ces r parables par l utilisateur l int rieur Confier l entretien un technicien qualifi Le point d exclamation dans un triangle quilat ral a...

Страница 19: ...la pourrait cr er un risque d accident et cela est ill gal dans plusieurs r gions Vous devrez faire preuve d une grande prudence ou cesser temporairement l utilisation dans des situations potentiellem...

Страница 20: ...4 Table des mati res Contenu de l emballage 5 Caract ristiques et fonctionnalit s 5 Connexions de base 6 Fonctionnement de base 10 Entretien 14 Caract ristiques principales 16 D claration de la FCC 16...

Страница 21: ...e charge Indique l tat de charge de la batterie 3 Port HDMI Connecter le t l viseur HD via le un c ble HDMI en option pour changer l affichage un cran plus large 4 Port micro USB Connecter des p riph...

Страница 22: ...ette Appuyez pour allumer ou teindre l cran 15 Haut parleur Fournit une sortie audio Remarque 1 Les deux cameras ne prennent pas en charge le zoom et le suivi du visage 2 Le port Micro USB ne prend pa...

Страница 23: ...tenez le bouton marche arr t pendant 2 secondes pour allumer votre tablette L cran de verrouillage appara t 2 Glissez votre doigt du bas de l cran pour passer l cran de connexion puis entrez le mot de...

Страница 24: ...ne de notification dans le coin inf rieur droit de l cran Remarque Si vous ne voyez pas Retirer le p riph rique en toute s curit touchez Afficher les ic nes cach es pour afficher toutes les ic nes dan...

Страница 25: ...Ce clavier est un dispositif Plug and Play vous pouvez le brancher d brancher de la prise pour clavier tout moment 2 Il n y a aucune notification ou indication pour la connexion du clavier l exception...

Страница 26: ...uchez R glages Disponible 3 S lectionnez un r seau disponible dans la liste et appuyez sur Connecter Gestes Votre tablette dispose d un cran multi touch Vous pouvez toucher l cran pour faire fonctionn...

Страница 27: ...cher l cran avec deux doigts puis carter les doigts Agrandir la vue d une image ou d une page web Zoom arri re Toucher l cran avec deux doigts puis rapprocher les doigts R duire la vue d une image ou...

Страница 28: ...rect vos applications les plus r cemment utilis es e mails photos musique vid os contacts mises jour de sites de r seautage social et sites Web fr quemment consult s Vous pouvez pingler vos applicatio...

Страница 29: ...glisser lentement vers l int rieur partir du bord gauche de l cran pour afficher les vignettes des applications ouvertes 3 Faites glisser vers l int rieur et vers l ext rieur partir du bord gauche po...

Страница 30: ...image ci dessous pour r f rence Entretien Nettoyer votre tablette Attention Avant de nettoyer votre tablette d branchez tous les c bles et teignez la tablette Nettoyez votre tablette avec un chiffon d...

Страница 31: ...Une liste des applications supprim es pendant ce processus est cr e sur le bureau une fois le processus termin R initialiser votre tablette La r initialisation de votre tablette ram nera le syst me a...

Страница 32: ...mplies with Industry Canada licence exempt RSS standard s Operation is subject to the following two conditions 1 This device may not cause interference and 2 This device must accept any interference i...

Страница 33: ...nt dans une prise d un circuit d alimentation diff rent de celui auquel le r cepteur est connect Consulter le repr sentant ou un technicien radio t l vision exp riment pour obtenir de l aide L apparei...

Отзывы: