NextBase InCar Cam 3052 Lite Скачать руководство пользователя страница 7

5


INSTALLATION 

12-24V DC

The above diagram is for illustration purposes only.


1.  Open dust cover and insert a suitable memory card in to the device, taking care to follow correct orientation markings

(gold contacts facing the back of the device). Push the memory card until it clicks into place and close dust cover.

Do not remove or insert the memory card when the iN-CAR CAM is turned on. This may damage the memory card.

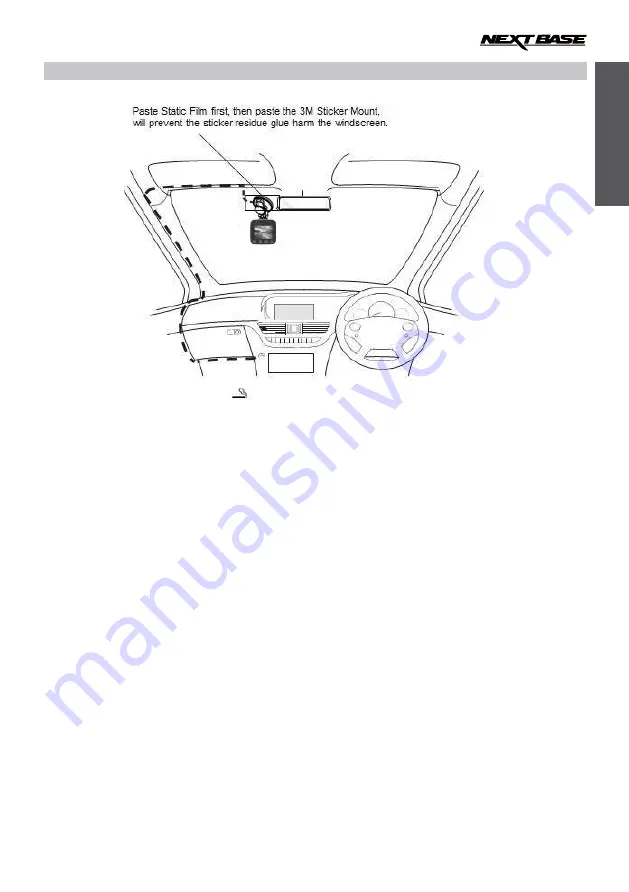
2.  Attach the device to the supplied windscreen mount, taking care the mount has stuck firmly into place.

3.  Remove the protective plastic film from the Static Film. Select required position for the windscreen mount and 

clean windscreen with a dry / clean cloth to achieve good contact between the glass and Static Film. While 

holding the Static Film onto the glass then remove the protective plastic film of the 3M Sticker Mount. Attach the 

mount to the Static Film.

Please ensure that once mounted the iN-CAR CAM is located within the area of the vehicles windscreen wipers to 

maintain a clear view during rainfall.

4.  The angle and position of the iN-CAR CAM can be adjusted by loosening the locking clamp and moving as required, 

remembering to re-tighten the clamp.

5.  Connect the car adaptor to micro-USB socket of the iN-CAR CAM and then plug the supplied car adaptor into the 

12-24 Vdc outlet of your vehicle. The device will automatically power on and start recording once power is available.

In some vehicles this will be when connections are made, for others the device will power on once the ignition has 

been turned on.

NOTE:


· Your iNCAR-CAM is shipped with the Screen Saver function set to Default OFF. This is for ease of initial setup. 

Once setup is complete, the screen saver should be set to 15 seconds, in order to blank the screen completely 

whilst driving. This avoids any potential distraction and may be a legal requirement in some countries.

· It is recommended to position your iNCAR-CAM on the passenger side of the car, behind the rear view mirror, as 

shown above. Whilst the camera needs to be located in a position within the wiper swept area, do not allow the 

camera to obstruct your vision of the road ahead. Recommended position is no more than 40mm within the wiper

swept area. Do NOT mount the camera directly in front of the driver.

· Do not place the iN-CAR CAM in such a way that it may interfere with the deployment of air bags or other safety 

equipment.

· Do not operate the unit while driving.

· To reduce the risk of theft, remove the unit and the mount from your vehicle, or position out of sight, before 

leaving your vehicle unattended.

· In vehicles where the 12V / 24V output remains on when ignition is turned off please disconnect the device when

not in use.

· The supplied car adaptor has a 4m long cable to allow cable to placed neatly within the vehicle.

· First time use of the device will require the Time and Date to be set. See Page

 8 

for details.

E

ng

lish

Содержание InCar Cam 3052 Lite

Страница 1: ......

Страница 2: ...To download more languages of instruction manual please visit www next base com PRODUCTS INCAR CAM 3052 DOWNLOAD ...

Страница 3: ...Unit has been exposed to rain or water The unit does not seem to operate normally The unit exhibits a marked changes in performance A Liquid Crystal Display LCD screen is a multilayer complex component containing 691 200 pixels Pixels can however fail during normal product life 1 pixel 0 00014 failure rate and one pixel failures per year of operation is considered normal and not a cause for concer...

Страница 4: ...er MicroSD Class 6 10 32GB SD Card Recommended Type 8 32GB Class 10 30mb s branded not supplied SD Card Recorded File Capacity based on default settings 8GB Micro SD 60mins of recording 16GB Micro SD 120mins of recording 32GB Micro SD 240mins of recording Recording Format MOV Wifi IEEE802 11b g n 2 4GHz Internal Battery Unit Dimensions Lithium ion 3 7V 150mAh approx 20mins recording time Battery d...

Страница 5: ...ing of the vista ahead G Sensor File Protection In the event of an impact the device will automatically protect the recording stopping the file from being over written Individual files can also be protected when viewed within playback mode Still Camera Take still images with a variety of options settings available Auto Shutdown Timer Select how long you would like the device to continue recording ...

Страница 6: ... BACK Press to open the Setup Menu Within MENU MODE press it to navigate up Long press to back to previous step 6 MODE DOWN Press to select Video Camera Video Playback Locked Event Photo Playback modes Within MENU MODE press it to navigate down 7 OK Press to start stop a recording or to confirm selection 9 SPEAKER 10 MICROPHONE 11 MOUNTING POINT Attached supplied windscreen mount here 12 LCD 13 LE...

Страница 7: ...l automatically power on and start recording once power is available In some vehicles this will be when connections are made for others the device will power on once the ignition has been turned on NOTE Your iNCAR CAM is shipped with the Screen Saver function set to Default OFF This is for ease of initial setup Once setup is complete the screen saver should be set to 15 seconds in order to blank t...

Страница 8: ...motion detection is switched on from within the menu 7 Wifi Icon Shows whether there is a smartphone link with the camera or not 8 Emergency Recording Icon The files record by Emergency Recording will not be auto removed by loop recording 9 Date Displays current date as set within the Setupmenu 10 Recording Time Displays the length of currentrecording The Video menu is accessed by using the MENU b...

Страница 9: ...when Motion Event worked Default Setting 1 Minutes 7 LDWS Lane Departure Warning System is function to warn the driver when the vehicle begins to move out of its lane Default Setting Off 8 FCWS ForwardCollisionWarning System is function to warn the drivewhen you are not maintaining a safe distance between your vehicle and the vehicle in front of you Default Setting Off 9 Language Set the language ...

Страница 10: ...e Play for Android smartphones Android version app tap the Right Top side button in the app main page can change language English e m i T e t a D 4 1 Adjust the date time as required t a m r o F e t a D 5 1 Adjust the sequence of Year Month Date Default Setting Year Month Date e t e l e D 6 1 Delete videos or photos file you recorded 17 Protect Setting videos or photos file to be protected file or...

Страница 11: ... smartphone the operation functions like Camera Control Camera Preview browser SD card contain and view download file 3 Open the app which you download for DVR3052 I can t hear sound of my record video when I open video in my computer The playback software can not decode sound of DVR3052 recorded file please try other playback software We suggest using GOM Player Or you can download NEXTBASE DVR P...

Отзывы: