background image

PHOTO MODE

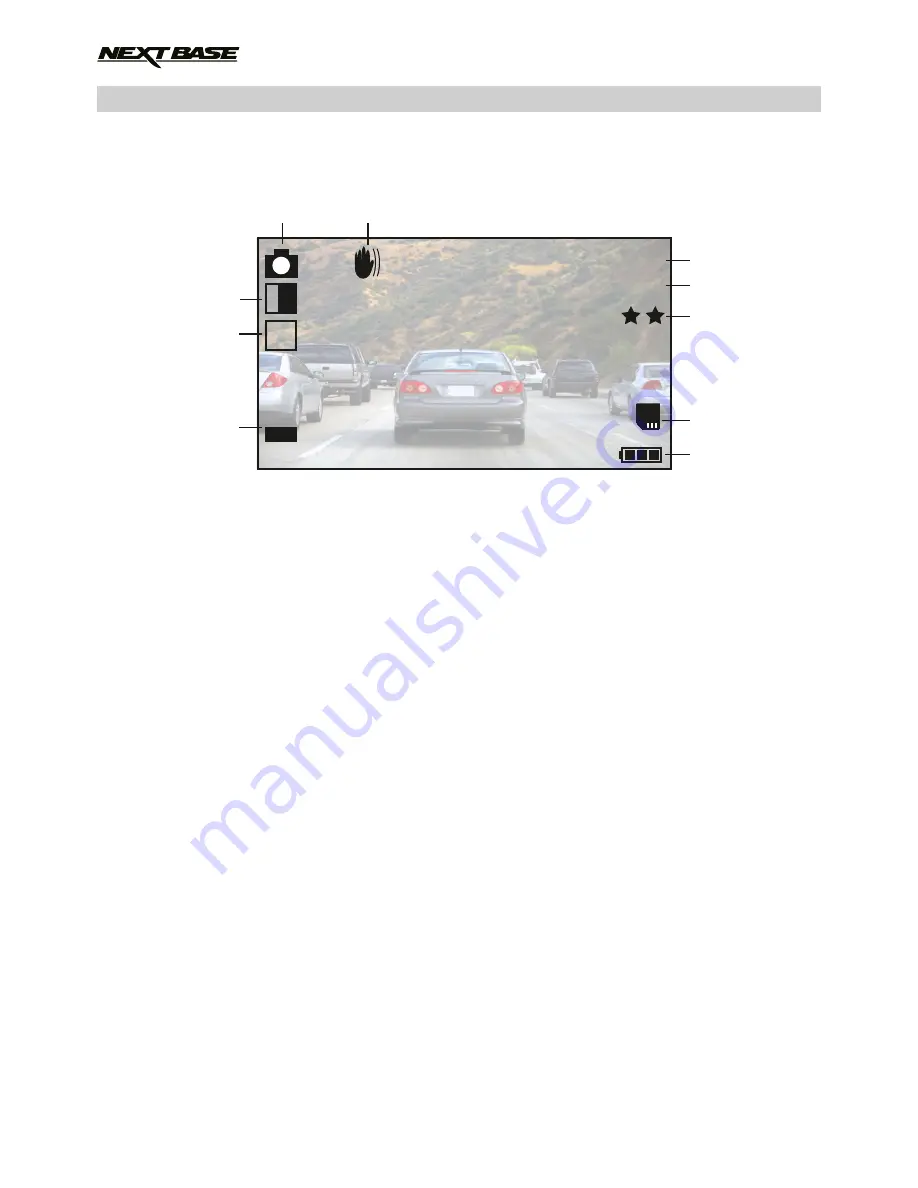
The key below explains the various information displayed on the screen when your iN-CAR CAM is in 
Photo mode, some icons will only be displayed once the relevant function has been selected within 
the Video menu, as described further down this page. 

The Photo menu is accessed by using the MENU button located on the rear of the iN-CAR CAM, 
use the UP and DOWN buttons to navigate through the Menu and press the OK button to enter the 
options screen. Select the required setting press OK to confirm, press MENU once more to exit the 
Photo Menu.

The default settings within the iN-CAR CAM have been set to allow you to use the iN-CAR CAM 
without the need to change any settings, however it is recommended that you explore these settings 
to familiarise yourself with the product and it’s capabilities.

Note:

- Within the SETUP menu which is accessed from within any mode by pressing the MENU button 
  twice, there is a ‘Default Setting’ option to allow you to reset the iN-CAR CAM to the factory defaults
  if required.

01234

5M

ISO

AUTO

0

+

-

AWB

5

3
4

6

7

1

2

10

9

8

Photo Mode Icon: Indicates the iN-CAR CAM is in Photo mode.
Anti-Shaking Icon: Displayed on screen when the Anti-Shaking enhancement has been enabled
from within the Photo menu.
Image Count: Displays number of images that can be stored on the memory card based on 
current image quality settings.
Resolution: Displays the current resolution as set within the Photo menu.
Quality: Displays the current image quality as set within the Photo menu.
Memory Card Icon: Icon will be marked with a red line when there is no memory card inserted.
Battery Indicator: Displays battery level, it is recommended to keep the car adaptor plugged in 
during use.
ISO Icon: Displays the current ISO setting as selected within the Photo menu.
White Balance Icon: Displays the current White Balance setting as selected within the Photo 
menu.
Exposure Icon: Displays current exposure setting as selected from within the Photo menu.

1.
2.

3. 


4. 
5.
6.
7.   

8.
9.

10. 

12

Содержание 302G Deluxe

Страница 1: ...Instruction Manual inc Driving Recorder Player Software Installation Guide...

Страница 2: ......

Страница 3: ...PLAYBACK MENUS AND SETTINGS VIDEO MODE PHOTO MODE PLAYBACK MODE SETUP MENU PC CONNECTION MASS STORAGE PC CAMERA VIDEO AUDIO OUTPUT HIGH DEFINITION OUTPUT STANDARD DEFINITION OUTPUT DRIVING RECORDER P...

Страница 4: ...be helpful should you encounter any operational problem 04 CAUTIONS ON USING THIS PRODUCT Ensure that the windscreen is free of dirt or grease before placing mount upon it Do not obscure the view of t...

Страница 5: ...low 2A Output 5Vdc 1M Pixel 1 000 000 Pixel 4G 120 F2 0 1440 x 1080 15fps 1280 x 720 30fps AVI 960 W X 240 H pixels x RGB 2 7 16 9 Full Size SDHC Class 6 10 32GB 8 32GB Class 10 30mb s branded not sup...

Страница 6: ...one Speaker Record audio to compliment the video recordings Automatic Start Stop Technology The iN CAR CAM senses power supplied to the cigarette power socket as soon as the vehicle ignition is turned...

Страница 7: ...UP Press to zoom in when in video photo modes and to navigate up within menus 12 DOWN Press to zoom out when in video photo modes and to navigate down within menus 13 MENU Press to open the Menu with...

Страница 8: ...ieve good contact between the glass and mount while pushing the suction cup onto the glass turn the locking wheel clockwise to secure the mount to the windscreen ensure placement of the GPS mount is s...

Страница 9: ...a Do NOT mount the camera directly in front of the driver Do not place the iN CAR CAM in such a way that it may interfere with the deployment of air bags or other safety equipment Do not operate the u...

Страница 10: ...Resolution Displays the current resolution as selected from within the Video menu Memory Card Icon Icon will be marked with a cross when there is no memory card inserted Battery Indicator Displays ba...

Страница 11: ...to exit the Video Menu The default settings within the iN CAR CAM have been set to allow you to use the iN CAR CAM without the need to change any settings however it is recommended that you explore th...

Страница 12: ...MENU button twice there is a Default Setting option to allow you to reset the iN CAR CAM to the factory defaults if required 01234 5M ISO AUTO 0 AWB 5 3 4 6 7 1 2 10 9 8 Photo Mode Icon Indicates the...

Страница 13: ...solution Displays the resolution that current video was recorded in Date Time Displays date and time of current file Note If the screen should blank during video playback then simply turn off the Scre...

Страница 14: ...ed automatically in order to make space for the new recordings any protected files are however not deleted The OFF setting is NOT preferred as this will result in massive file sizes which are then unm...

Страница 15: ...al 2 7 Exposure Select exposure used to adjust the amount of light received by the sensor Default Setting 0 2 8 ISO Adjust the ISO setting the brighter the conditions the lower the ISO required Defaul...

Страница 16: ...ction shut down the screen after a period of inactivity with options of 10 Seconds 30 Seconds and 2 Minutes Press any button to re activate the display Default Setting Off 4 4 IR LED s Turn on the IR...

Страница 17: ...lt in to your PC Note The iN CAR CAM is only compatible with the following Windows based operating systems XP VISTA Windows 7 and Windows 8 VIDEO AUDIO OUTPUT High Definition Output As you connect a H...

Страница 18: ...ows XP Vista Windows 7 Windows 8 Memory 1 GB RAM Storage 500Mb Internal hard drive space CD ROM Tray Slot Loader DVD CD RW Monitor Display 1024 x 766 Insert the supplied Driving Recorder Player disk i...

Страница 19: ...n the setup exe file and installation will begin with the window below opening Note On some older Windows XP computers you may be prompted to install Microsoft NET Framework This is normal and enables...

Страница 20: ...on Folder window will open as shown below Choose a destination folder should you not want files saved to the default folder within the Program Files directory Press Next to continue DRIVING RECORDER P...

Страница 21: ...DRIVING RECORDER PLAYER INSTALLATION CONTD 21 The Confirm Installation window will open as shown below Press Next to continue...

Страница 22: ...DRIVING RECORDER PLAYER INSTALLATION CONTD 22 The Installing Driving Recorder Player window will open as shown below...

Страница 23: ...pearance of the Driving Recorder Player may vary depending on which Windows operating system is being used GPS reception can be affected by many factors Heated front windscreens atmospheric conditions...

Страница 24: ...urrent file as a graph The three axis are colour coded for easy identification 5 File Details window File Name Seconds Longitude Latitude Speed The key below explains the various information displayed...

Страница 25: ...Stop current video note the video must be stopped before playback of another video file can begin Play Pause selected video Fast Forward current video in 4 second increments press again to return to n...

Страница 26: ...DCIM 10030101 press OK This will add the files within the selected folder to the File List window of the Driving Recorder Player see item 10 on pages 24 and 25 Playback Choose a video file to play do...

Страница 27: ...rding function to a smaller size Increase the size of the SD card Max 32GB Will only work with Windows PC s Restart the PC as this may be required for the necessary driver to be loaded correctly Disco...

Страница 28: ...The SD card has been formatted in another device and the Cluster Size is not compatible Simply use the MENU SETUP option to re format the SD card from within the iN CAR CAM Remove the SD Card and sli...

Страница 29: ...29 NOTES...

Страница 30: ...30 NOTES...

Страница 31: ......

Страница 32: ...NBDVR302G IM ENG A5 www nextbase co uk...

Отзывы: