background image


5

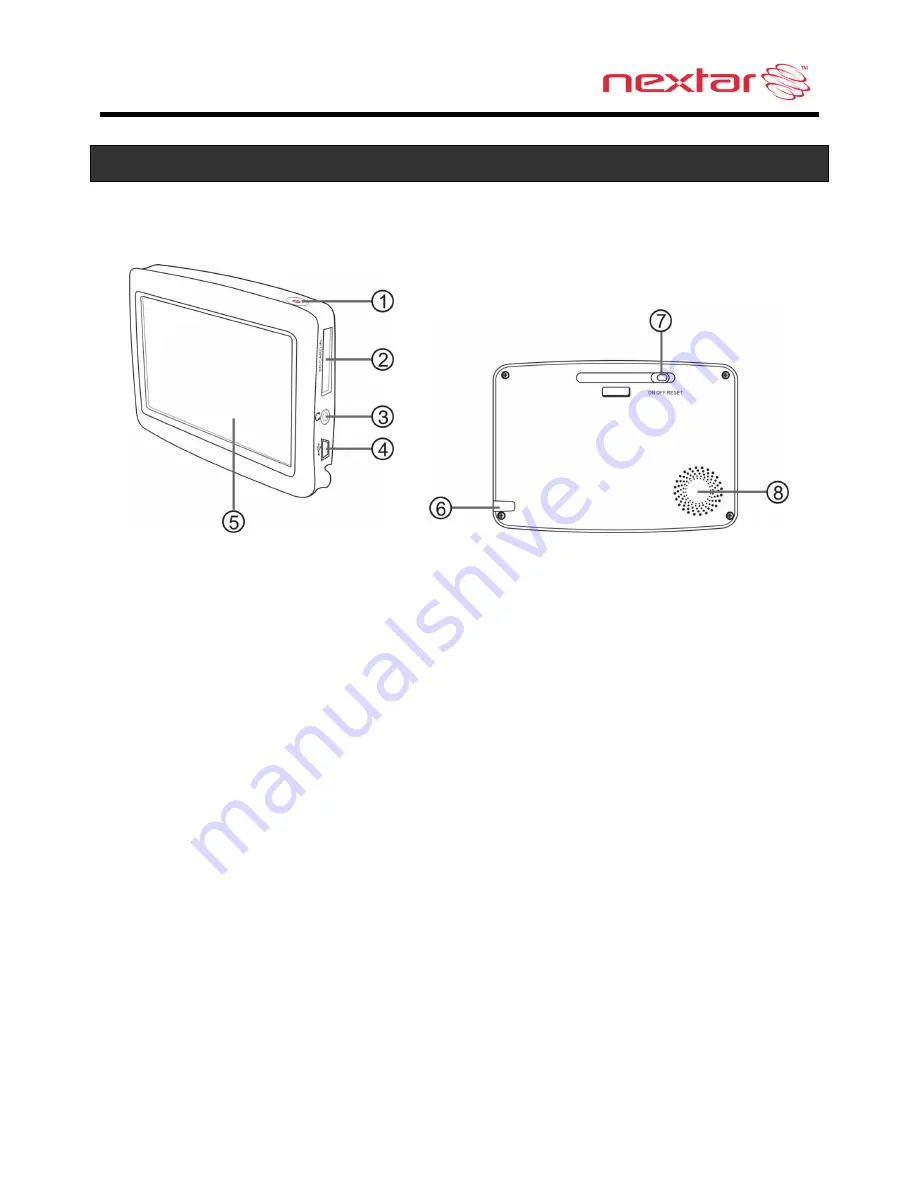
Main Unit 


1. POWER 

Button 

Press and hold for 2 seconds to enter or exit standby mode. 

2. Card 

Slot 

Insert the SD card into the slot. 
Used for Mapping Data card or user’s music or photo SD card 

3. Earphone 

Jack 

Connect user supplied earphone for private listening.   
When an earphone jack is plugged in, the speaker will be turned off automatically. 

4. USB 

Port 

Connect directly to the Power Adaptor to charge the unit. 

5. LCD 

Screen 

Tap the screen with a finger to select commands or use the included stylus 

6. Stylus 

7. 

ON/OFF RESET Switch 

Used to switch power on or off. 

8. Speaker 


Содержание 43NT

Страница 1: ......

Страница 2: ...e the vehicle in a safe manner Do not become distracted by the unit while driving The directions provided by the navigation unit are not guaranteed to be accurate in every situation Before following suggestions from the unit use your best judgment regarding the safety and legality of any action you take with your vehicle Use this GPS unit only as a navigational aid Do not attempt to use the unit f...

Страница 3: ...ng charged It may cause an electric shock or seriously damage your GPS Spilled beverages are a common problem in moving vehicles Do not locate liquid containers or items that can accumulate condensation such as cold beverages in a position where liquid can spill or drip on the GPS device Only use attachments accessories specified by the manufacturer Unplug this device during lightning storms or wh...

Страница 4: ...ned by turning the equipment off and on the user is encouraged to try to correct the interference by one or more of the following measures Reorient or relocate the receiving antenna Increase the separation between the equipment and the receiver Connect the equipment into an outlet on a circuit different from that to which the receiver is connected Consult the dealer or an experienced radio TV tech...

Страница 5: ...mpliance 3 Getting Familiar With Your Hardware Main Unit 5 Accessories 6 Power Adaptor 7 System Connections 8 Using the Mounting Bracket 9 Using Your Navigator General Setup 10 Playing Music 15 Photo Viewer 17 Service Support Troubleshooting 20 Specifications 22 Copyright 23 ...

Страница 6: ...SD card 3 Earphone Jack Connect user supplied earphone for private listening When an earphone jack is plugged in the speaker will be turned off automatically 4 USB Port Connect directly to the Power Adaptor to charge the unit 5 LCD Screen Tap the screen with a finger to select commands or use the included stylus 6 Stylus 7 ON OFF RESET Switch Used to switch power on or off 8 Speaker ...

Страница 7: ...ed With Your GPS Unit Instruction Manual Quick Start Guide Warranty Card Vehicle Power Adaptor Suction Cup Mounting Bracket Mounting Cradle Stylus Dashboard Mount Disk Mapping Data SD Card NOTE The SD card may be shipped installed in the GPS Unit ...

Страница 8: ...r portable GPS device comes with a built in rechargeable Lithium Ion battery Charge the battery fully before initial use Charging time is normally about 3 5 hours A fully charged battery delivers about 2 hours of use It is recommended to use the Power Adaptor while in the vehicle Working conditions and precautions for the rechargeable battery Battery should only be used and charged when temperatur...

Страница 9: ... correctly Important If you remove the SD Mapping Data Card to use the Music or Photo functions treat the Mapping Card very carefully to avoid damage or loss of data Connecting to Earphones You may connect earphones to the right side of the unit for private listening When earphones are connected the speaker will automatically turn off Note Overly loud volume could damage your hearing Turn down the...

Страница 10: ...e the unit gently pull the upper tab on the mount cradle away from the GPS body 3 Raise the suction cup lever see Arrow 2 press the suction cup to the windshield then press down on the suction cup lever to secure the bracket to the windshield 4 Lastly rotate the cradle to adjust the GPS unit to proper position Note Keep the suction cup and the interior of the windshield clean to ensure good adhesi...

Страница 11: ... EXIT a confirmation message appears Tap Exit in the confirmation message to return to the system main menu as shown below In the main menu there are four items for selecting Touch the corresponding item to enter Tap to enter the Navigator Tap to enter the MP3 Player Tap to enter the Photo Viewer Tap to enter the Setup menu ...

Страница 12: ...Setup menu the screen will display as below In the Setup menu tap to return to the main menu Language Tap in the Setup menu to enter Language setting menu for language selection as shown below Tap the buttons to select language Then tap to confirm or tap to cancel ...

Страница 13: ...er Time Zone Tap the buttons of Date group to change the corresponding date Tap the buttons of Time group to change the corresponding time Then tap to confirm or tap to cancel Brightness Tap in the Setup menu to enter Brightness setting menu for backlight adjustment as shown below Tap to darken or increase the brightness of the display After setting tap to confirm or tap to cancel ...

Страница 14: ...onfirm or tap to cancel Align Screen Tap in the Setup menu to align the screen as shown below Tap the center of the cross with your finger When the cross moves to another position tap and hold the center of the new target Repeat each time to complete the calibration process When tapping the screen on the final step the new settings will be stored and you are returned to the Display menu ...

Страница 15: ...s shown below The Power menu displays the unit s battery status The values are between 0 and 100 where 0 means the battery power has run out completely and 100 represents a full battery power When the battery is being charged the Battery Status will indicate Charging ...

Страница 16: ...ase take special care of the Mapping Data Card if you remove it to use the Music Player as the navigation function will not work without it Warning For your own safety do not use the earphones when driving To Load Your Music First load your MP3 or WMA formatted music onto your personal SD card Music files can be imported to your SD card on a PC using a variety of programs such as Windows Media Pla...

Страница 17: ...ge Tap toggle buttons to determine whether the player will repeat the songs in the play list or not Tap toggle buttons to determine whether or not to play the songs in the list randomly Tap to start the playback and return to Music Player as shown below Tap toggle button to pause or resume the playback Tap to go back to the previous song tap to skip to the next song Tap to decrease or increase the...

Страница 18: ...ing Data Card that comes with the device from the SD card slot on the side of the unit Then insert your SD card with your JPEG picture files Note Please take special care of the Mapping Data Card if you remove it to use the Photo Viewer as the navigation function will not work without it If the unit lags when reading JPEG files try using lower resolution files We suggest 640 x 480 pixel resolution...

Страница 19: ...elect it and then tap to display it Tap to return to the previous menu Tap to enter the Setting menu for setting the Slide Show When playing photos the Photo Viewer has following playback features Tap to go back to the previous photo tap to switch to the next photo Tap to rotate the photo Tap to zoom in or out of the photo Tap to play the photo in full screen mode double tap the screen again to re...

Страница 20: ... show on or off to determine whether or not to play photos in slide show mode When the slide show is on you can set the interval between two photos during slide show After setting tap to confirm or tap to cancel Next tap a photo in the photo list to open it When you tap the slide show will start To stop the slide show double tap the screen ...

Страница 21: ...er adaptor connection Note Some automobile accessory power jacks provide no power when the ignition is off Unit will not Power Up Weak battery Charge battery No Sound Volume may be turned down or muted Check volume and mute condition Screen is difficult to see Brightness may be turned down Adjust brightness of the LCD screen Unit may be inside a tunnel inside a building or tall buildings may obstr...

Страница 22: ...nstable Comes and goes System software fails to function after entering a command Turn the unit off and on again to reset using slide switch on rear Other possibilities Static or other external interference may cause the unit to function abnormally In order to recover normal status please unplug the power supply cord and then plug it into the outlet again to reset the unit If the problems still ex...

Страница 23: ...out notice TFT screen size 4 3 inches Frequency Response 20Hz 20kHz Audio Signal to noise Rate 65dB Audio distortion noise 20dB 1kHz Channel Separation 70dB 1kHz Dynamic Range 80dB 1kHz Power DC 5V Power Consumption 8W Dimensions 117mmX80mmX20mm L W D Weight About 0 17Kg ...

Страница 24: ...t represent the actual screen on production unit sold to consumers For instruction books information on this product its operation and accessories visit us on the web at www nextar com Or write to us at Nextar Inc 1661 Fairplex Drive La Verne CA 91750 USA All products distributed by Nextar Inc unless otherwise indicated Made in China 2009 Nextar Hong Kong Limited Nextar is a trademark and service ...

Отзывы: