DESCRIPTION:
AssemblyInstruction
8 of 12
3
4
P5--MKK1
861767 LOFT SINGLE CARCASS
5
+ +
fron
t
B
A
8x
+
++
1/2 TURN
CLOCKWISE.
1
2
Страница 1: ...sembly items cannot be returned once assembly is part or fully completed unless the item is found to be faulty Should you need to return the unassembled product please repack in the original packaging...
Страница 2: ...NSIONS APPROXIMATE ASSEMBLY TIME REQUIRED ASSEMBLY TOOLS REQUIRED ASSEMBLY SPACE FLOOR AREA 2 0 M x 2 0 M 1 5 hrs DESCRIPTION Assembly Instruction 861767 LOFT SINGLE CARCASS 2 of 12 436 mm 1775 mm 5 0...
Страница 3: ...ion 3 of 12 PARTS LIST NO PART LIST QTY 1 BOTTOM PANEL 2 PLINTH 3 LEFT SIDE PANEL 4 HORIZONTAL DIVIDER 5 TOP PANEL 6 BACK PANEL 7 RIGHT SIDE PANEL 8 SHELF 1 1 1 1 1 1 1 4 P5 MKK1 2 3 5 4 6 7 8 8 8 8 8...
Страница 4: ...16x BAG 1 SHELF SUPPORT 12x PLASTIC SUPPORT BAG 1 F 3x 3 0x20mm SCREW BAG 1 G 8x CAM COVER BAG 1 H 2x 1x 3 5x13mm 90x40x15mm SCREW BAG 3 BAG 3 MOUNTING BRACKET J I 1 2 WHEN CARCASS IS ASSEMBLED PLEASE...
Страница 5: ...ey will be placed in use to avoid moving the product unnecessarily once assembled 5 For the protection of your furniture particularly items of high gloss finish we recommend that the product is placed...
Страница 6: ...H HOLES CAM SCREWS WITH LOCKS 3 TO SECURE PANELS TURN CAM LOCKS 1 2 TURN CLOCKWISE 4 CAM SHOWN IN LOCKED POSITION PRESS IN CAM LOCKS ARROW ON CAM LOCK MUST FACE HOLE IN PANEL EDGE DO NOT INSERT DOWELS...
Страница 7: ...bly Instruction 7 of 12 2 P5 MKK1 861767 LOFT SINGLE CARCASS 1 7x A 4x B front 2 2 2 1 D C D D1 D2 E E1 C HINGES PLATE E FOR FIXING DOORS ARE INCLUDED WITH THE DOORS front E E1 6x 8x 1x 1x 3x 6x 3 A B...
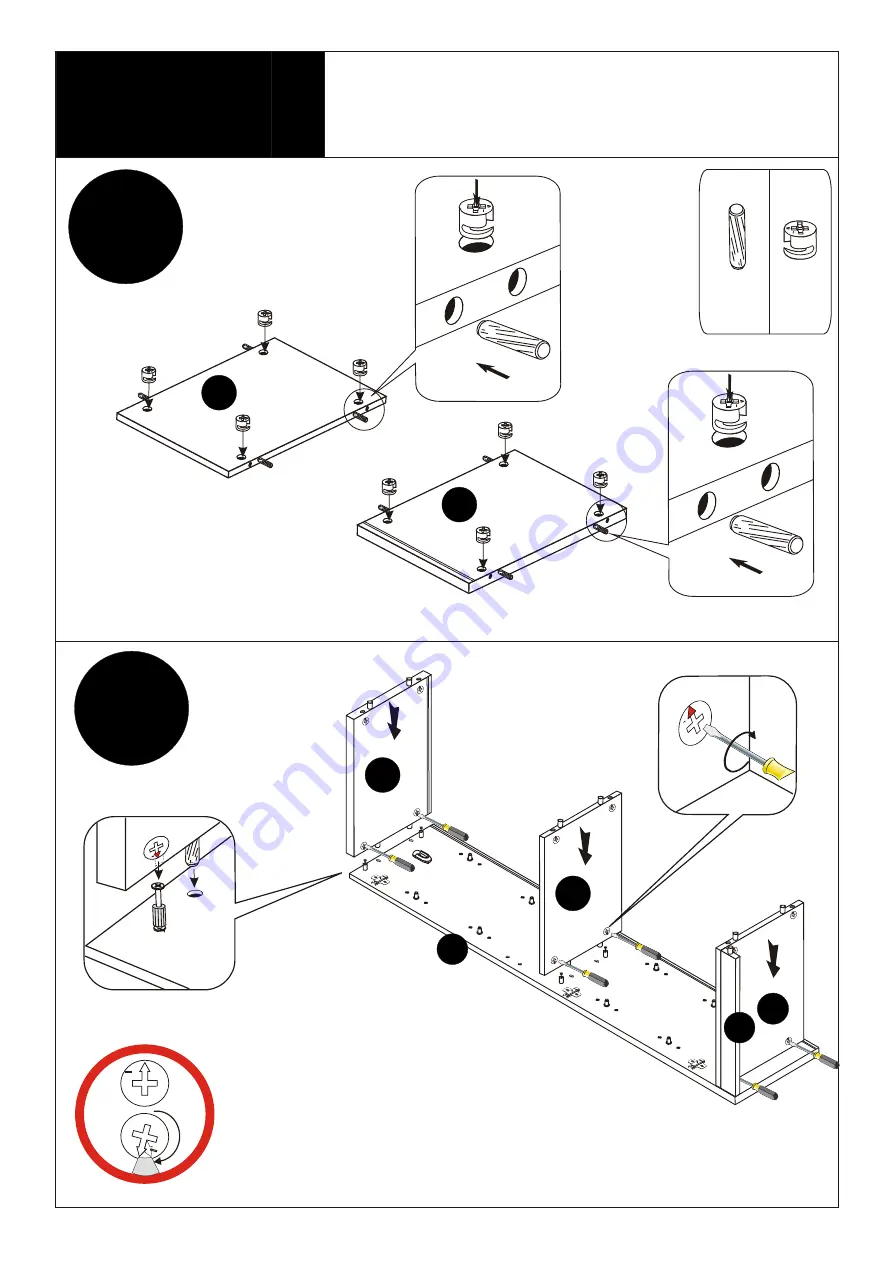
Страница 8: ...DESCRIPTION Assembly Instruction 8 of 12 3 4 P5 MKK1 861767 LOFT SINGLE CARCASS 5 front B A A 4 front 8x A 8x B B 1 2 TURN CLOCKWISE 1 5 2 3 4...
Страница 9: ...DESCRIPTION Assembly Instruction 9 of 12 5 6 P5 MKK1 861767 LOFT SINGLE CARCASS 5 1 2 3 4 6 D C D C 6x 8x 7 D1 D2 1x 1x D2 D1 option a...
Страница 10: ...DESCRIPTION Assembly Instruction 10 of 12 7 8 1 2 TURN CLOCKWISE P5 MKK1 861767 LOFT SINGLE CARCASS 5 1 2 4 6 7 12x F 3x G 11 o o 90 G q F 6 834 5mm...
Страница 11: ...ick work You must use fixing devices suitable for the type of wall you intend to mount this product to Please ensure that the head of any screw used has a diameter greater than the diameter of the mou...
Страница 12: ...rew A adjust gap with screw B and retighten screw A b Depth adjustment Loosen fixing screw A push hinge arm forwards or backwards re tighten screw A fix screw B with a 1 4 turn in clock wise direction...