937-426-2703
www.nexsens.com
2091 Exchange Court
Fairborn, Ohio 45324
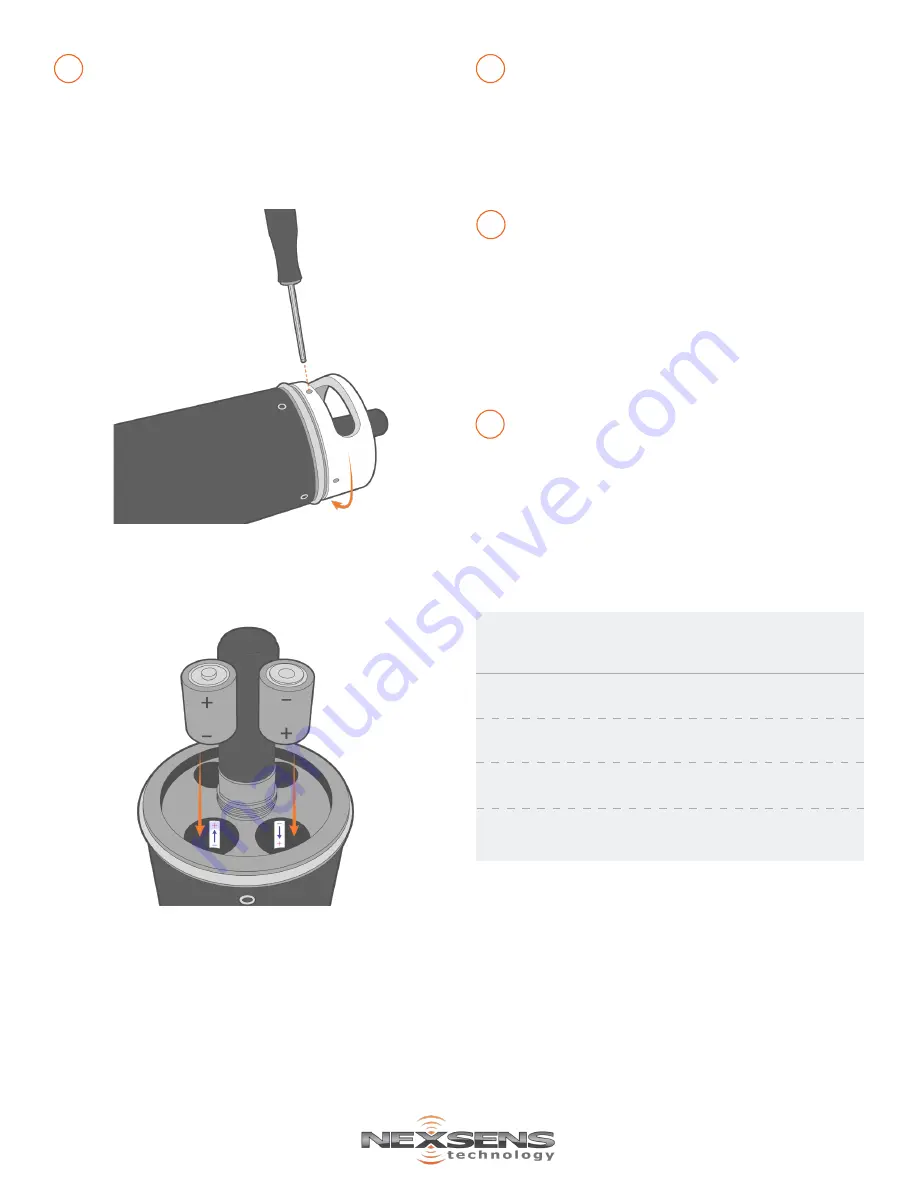
Remove the white battery lid using the included
3/16” hex driver and install the (16) D-cell alkaline
batteries.
a. Warning:
Ensure to follow the polarity labels
located inside each battery tube. Polarity for
all (4) batteries within each individual tube
should be in the same orientation.
8
Figure 2:
Remove the white battery lid.
Figure 3:
Install the (16) D-cell alkaline batteries.
Reinstall the white battery lid.
a. The device will beep once when the metal
plate on the bottom of the lid makes contact
with the batteries.
b. Fully thread on the battery lid until it is flush
with the top of the SDL tube.
9
For additional information, please reference the X2-SDL Resource Library on the NexSens Knowledge Base.
nexsens.com/x2sdlkb
Wait up to 60 seconds for the system to check
cellular coverage.
a. Two consecutive beeps = adequate signal
b. Three consecutive beeps = no signal
• If three beeps are heard, move the X2-SDL
into an area with strong cellular coverage.
• Check cellular coverage through CONNECT
using the link:
nexsens.com/x2apn
10
After 20 minutes, refresh WQData LIVE and
confirm all sensor parameters are shown and
valid sensor readings appear.
a. The device will beep for a duration of three
seconds when detection is complete.
11
Buzzer Event
When power is
applied
Beep Type
During telemetry
connection
Status
One short
beep
Two short
beeps
Three short
beeps
System boot
successful
Connection
successfully
established
No signal/connection
failed
During telemetry
connection
Buzzer Pattern Indicators
Table 1:
X2-SDL Buzzer Pattern Indicators.
During sensor
detection
Three second
beep duration
WQData LIVE
Setup
Successfully
1
1
WQData LIVE setup is automatically done after sensor
detection.


