background image

HDMI CONNECTIONS

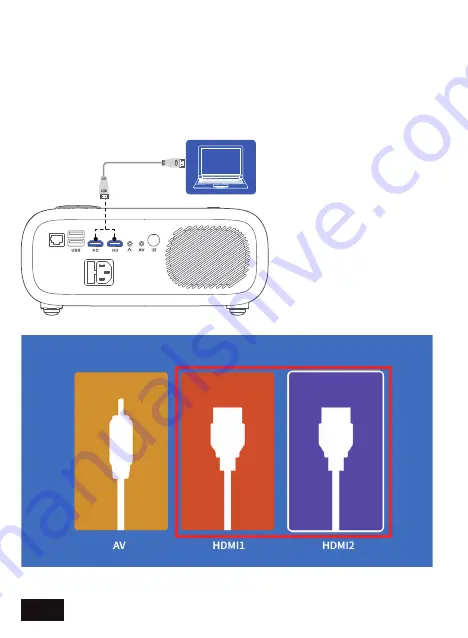
Plug an HDMI cable into the device you wish to connect to the 
projector, and then insert the other end of the HDMI cable into one 
of the HDMI ports as shown in the diagram below. Open the 
on-screen menu and select the 

HDMI

 source in the 

Source

 tab. This 

will allow you to display the screen of whatever device has been 
plugged in.

EN 11

Содержание PJ40

Страница 1: ...1080p LCD Projector PJ40 User Manual Scan the QR code or visit our link to download the latest manual or watch the installation video nexigo com manuals ...

Страница 2: ...TRANSLATIONS English 01 29 Deutsch 33 Français 37 Español 41 Italiano CONTENT ...

Страница 3: ...try leading one year manufacturer s warranty Make sure to register your purchase at nexigo com warranty within 14 days of the delivery date and we will extend your warranty coverage another year for a total of two years From all of us here at NexiGo we want to thank you for your trust in us We look forward to serving you again in the near future Sincerely The NexiGo Team CONTACT INFORMATION Websit...

Страница 4: ...on 7 OK Button 8 Left Right Up Down Buttons 9 Power Input Port 1 2 3 15 FRONT VIEW SIDE VIEW REAR VIEW BOTTOM VIEW 4 5 7 6 8 10 RJ45 Port 11 USB Input Ports 12 HDMI Input Ports 13 3 5mm Audio Jack 14 AV Input Port 15 IR Receiver 16 Manual Lift Stand 17 Feet Mounting Slots 17 16 17 9 10 11 12 13 15 14 EN 02 ...

Страница 5: ...wer Cable 1 x AV Cable 1 x User Manual 1 USB Inputs For a Hard Drive USB Drive iOS cable mirroring or charging USB devices 2 HDMI Inputs For a TV box TV stick or computer 3 3 5mm output for audio devices such as headphones or speakers 4 AV input for a DVD or VCD player CONNECTION INTRODUCTION 1 2 3 4 EN 03 ...

Страница 6: ... Short Press Displays the menu Input Source Long Press Displays the source selection bar Return Returns to the previous screen Home Returns to the home page Vol Increases the volume level Vol Decreases the volume level REMOTE CONTROL DIAGRAM AND FUNCTIONS Mute Power Switch OK Left Menu Short Press Input Source Long Press Vol Up Right Return Home Vol Down EN 04 ...

Страница 7: ...on Distance Projection Size Aspect Ratio Projection Ratio Power Input Integrated Watt Use Input Ports Output Port Speakers LCD LED 1920 x 1080 4096 x 2176 Local video playback Manual operation Automatic 4 72 30 18ft 50 300 in 16 9 4 3 1 47 1 AC 90 260V 160W HDMI x 2 USB x 2 AV x 1 3 5mm audio jack x 1 LAN Port RJ45 x 1 10W x 2 EN 05 ...

Страница 8: ...located Ensure the projector has sufficient room for adequate airflow The projector is designed to be installed in one of four layouts You can either hang the projector from the ceiling via mounting bracket not included or simply place it on a flat stable surface You may need to change the projection mode so the images display correctly Select Projection Mode under Settings Projection Projector Mo...

Страница 9: ...e power cord into a power outlet Note 1 A specific rear projection screen is required to use the rear projection function 2 Please remove the 4 feet at corners on the bottom of the projector for mounting on the ceiling EN 07 ...

Страница 10: ...variances of up to 3 from unit to unit The above data is for reference only Please use actual measurements when installing your device PROJECTOR DISTANCE SIZE FOCUS ADJUSTMENT Please use the Focus Adjustment Wheel to adjust the focus rotating it left or right until the image becomes clear If the image appears blurry rotate the knob in the opposite direction until the image clears up 300 4 72 6 50 ...

Страница 11: ... vertical keystone This section will show you how to connect the projector to other equipment MULTI MEDIA CONNECTIONS USB CONNECTIONS Insert your USB drive into the USB port shown in the diagram below In the on screen menu choose the type of content you want to open Office PPT Word Excel Movie Music Photo or Text EN 09 ...

Страница 12: ...EG BMP PNG MP4 MPEG MOV 3GPP 3GP DAT VOB MPG MPEG AVI MKV FLV RM RMVB ASF WMV Video Supported Formats Audio Picture Text MP3 AAC WAV MKA 3GP M4A OGG FLAC PCM TXT SRT SUB SMI Office ppt xlsx doc pdf EN 10 ...

Страница 13: ... the projector and then insert the other end of the HDMI cable into one of the HDMI ports as shown in the diagram below Open the on screen menu and select the HDMI source in the Source tab This will allow you to display the screen of whatever device has been plugged in EN 11 ...

Страница 14: ...er Connect the adapter to the projector as shown below and then connect the RCA plugs from the device to the RCA jacks on the adapter You can also just use a singular AV cable if this is an option for your device Once connected go into the on screen menu and select AV under Input Source as shown below EN 12 ...

Страница 15: ...3 5MM AUDIO CONNECTION To play sound from the source plug either headphones or speakers into the 3 5mm audio port as shown below EN 13 ...

Страница 16: ...ng Additionally there may be third party apps you can download to your Android device to provide Miracast functionality We cannot guarantee that this device will work as intended with all Android devices If you re having issues using Miracast check with your device s manufacturer for more information Devices with Miracast functionality can connect to the projector wirelessly Before starting the co...

Страница 17: ...EN 15 ...

Страница 18: ... Airplay Mirror from the options Go into the control center on the iOS device and click Screen Mirroring In the list of available mirroring devices select the device NexiGo PJ40 from the list The connection is now complete IOS CAST Share the screen of your iPhone iPad or MacBook wirelessly using AirPlay EN 16 ...

Страница 19: ... that has been completed go back to the Home page and select More and then DLNA from the list of options Then on the device you want to cast from open an app that supports casting ex YouTube and then tap the button on the app that allows you to cast Select NexiGo PJ40 from the list of options Press the play button on the video and it will now display the video via the projector EN 17 ...

Страница 20: ...SB wired connection Plug your iPhone or iPad into one of the USB ports on the projector Select Apple Cast from the Home page and then iOS Cable Cast After a moment the phone tablet will show a message asking Trust this device tap Trust to finish the connection EN 18 ...

Страница 21: ...SETTINGS MENU EN 19 ...

Страница 22: ...rojector to WiFi 1 In the on screen menu select Settings then select the Network option 2 Select your wireless network from the list as shown below to connect your projector to Wi Fi 3 Your projector is now ready for mirroring EN 20 ...

Страница 23: ... Settings then select the Bluetooth option 2 Turn on Bluetooth for the projector and the device you would like to connect to and then search the list below for the Bluetooth audio device to connect 3 Select that device and pair the two devices The Bluetooth connection should now be ready to use EN 21 ...

Страница 24: ...f four modes Standard Vivid Movie or Custom Custom mode enables custom settings for contrast brightness saturation etc FAN Adjust the fan speed of the projector the brightness will change slightly according to the fan speed EN 22 ...

Страница 25: ...g Rear Auto Keystone Turn the automatic vertical keystone correction on off Online Updates Check online for available updates to download the latest firmware Local Updates Update via a USB flash drive This would only be necessary if updating online doesn t work PROJECTION UPDATE SETTINGS EN 23 ...

Страница 26: ...projector until the update is complete Note Please do not attempt to use or turn off the projector during the update otherwise it could cause potential damage to the projector The projector will be reset after the software update is complete and all saved settings will be erased If you re having any issues with your updates please contact our customer service team at cs nexigo com SYSTEM SETTING A...

Страница 27: ...ter 2 Push down on the air filter cover to pop up the air filter Take the air filter out of the projector Factory data reset Reset the projector to factory default 3 Gently remove the dust using a soft brush such as a paintbrush Note Do not rinse the air filter in water or use any detergent or solvent to clean it 4 Place the air filter back in the projector as shown Push it down and hold until it c...

Страница 28: ...rvice this product yourself Please contact the manufacturer directly if you have any issues to exercise your warranty 4 Do not modify this equipment 5 Avoid dropping or throwing the projector 6 Do not face the projector lens to the sun 7 Use only the provided power cable 8 Do not place the projector on an uneven or unstable surface or one that is subject to vibration 9 Do not place this device nea...

Страница 29: ... Safe Operational Parameters Operating temperature between 41 F 5 C and 95 F 35 C Operating humidity between 30 and 90 Any changes or modifications not expressly approved by the party responsible for compliance could void the user s authority to operate the equipment This device complies with Part 15 of the FCC Rules Operation is subject to the following two conditions 1 this device may not cause ...

Страница 30: ...orrect the interference by one or more of the following measures Reorient or relocate the receiving antenna Increase the separation between the equipment and receiver Connect the equipment into an outlet on a circuit different from that to which the receiver is connected Consult the dealer or an experienced radio TV technician for help This equipment complies with FCC radiation exposure limits set...

Страница 31: ... Taste 8 Links Rechts Auf Ab Taste 9 Stromanschlussbuchse 1 2 3 15 VORDERANSICHT SEITENANSICHT RÜCKANSICHT UNTERSICHT 4 5 7 6 8 10 RJ45 Eingang 11 USB Eingang 12 HDMI Eingang 13 3 5 mm Audiobuchse 14 AV Eingangsanschluss 15 IR Empfänger 16 Manueller Hubständer 17 Füße Montageschlitze 17 16 17 9 10 11 12 13 15 14 DE 29 ...

Страница 32: ...l 1 x AV Kabel 1 x Gebrauchsanweisung EINFÜHRUNG ZUM ANSCHLUSS 1 2 3 4 1 USB Eingänge Für eine Festplatte ein USB Laufwerk iOS Kabelspiegelung oder das Aufladen von USB Geräten 2 HDMI Eingänge Für eine TV Box einen TV Stick oder einen Computer 3 3 5 mm Ausgang für Audiogeräte wie Kopfhörer oder Lautsprecher 4 AV Eingang für einen DVD oder VCD Player DE 30 ...

Страница 33: ...erade befindet Menü Kurzer Druck Anzeige des Menüs Eingabe Langes Drücken Anzeige der Quellenauswahlleiste Zurück Rückkehr zum letzten Bildschirm Home Kehrt zur Homepage zurück Vol Erhöhung des Lautstärkepegels Vol Verringerung des Lautstärkepegels DIAGRAMM UND FUNKTIONEN DER FERNBEDIENUNG Netzschalter OK Links Menü Kurzer Druck Eingabe Langes Drücken Vol Auf Rechts Zurück Home Vol Ab Stummschalte...

Страница 34: ...Bitte scannen Sie den unten stehenden QR Code um die komplette Bedienungsanleitung herunterzuladen DE 32 ...

Страница 35: ...on de OK 8 Gauche Droite Haut Bas 9 Prise d entrée d alimentation 1 2 3 15 VUE DE FACE VUE DE CÔTÉ VUE ARRIÈRE VUE DE DESSOUS 17 16 17 9 10 11 12 13 15 14 4 5 7 6 8 10 Port d entrée RJ45 11 Port d entrée USB 12 Port d entrée HDMI 13 Prise Audio de 3 5 mm 14 Prise audio du port d entrée AV 15 IR Récepteur 16 Support de levage manuel 17 Pieds fentes de montage FR 33 ...

Страница 36: ...nuel de l utilisateur 1 Entrées USB pour un disque dur une clé USB la mise en miroir d un câble iOS ou le chargement de périphériques USB 2 Entrées HDMI Pour un boîtier TV une clé TV ou un ordinateur 3 Sortie 3 5 mm pour les appareils audio tels que les écouteurs ou les haut parleurs 4 Entrée AV pour un lecteur DVD ou VCD INTRODUCTION À LA CONNEXION 1 2 3 4 FR 34 ...

Страница 37: ... optuon sur lequel votre curseur se trouve actuellement Menu Pression Courte affiche le menu D entrée Appui Long affiche la barre de sélection de la source Retour Retourne au dernier écran Accueil retour à la page d accueil Vol Augmente le niveau de volume Vol Diminue le niveau de volume Muet Interrupteur d alimentation OK Gauche Menu Pression Courte D entrée Appui Long Vol Haut Droite Retour Accu...

Страница 38: ...Veuillez scanner le code QR ci dessous pour télécharger le manuel d utilisation complet FR 36 ...

Страница 39: ... Botón de OK 8 Lzquierda Derecha Arriba Abajo 9 Conector de entrada de alimentación 1 2 3 15 VISTA FRONTAL VISTA LATERAL VISTA TRASERA VISTA INFERIOR 4 5 7 6 8 10 Puerto de entrada RJ45 11 Puerto de entrada USB 12 Puerto de entrada HDMI 13 Connector de Audio de 3 5 mm 14 Puerto de entrada AV 15 Receptor IR 16 Soporte de elevación manual 17 Patas Ranuras de montaje ES 37 ...

Страница 40: ...le AV 1 x Manual de usuario 1 Entradas USB para un disco duro unidad USB duplicación de cable iOS o carga de dispositivos USB 2 Entradas HDMI para una caja de TV un dispositivo de TV o una computadora 3 Salida de 3 5 mm para dispositivos de audio como auriculares o altavoces 4 Entrada AV para un reproductor de DVD o VCD INTRODUCCIÓN A LA CONEXIÓN 1 2 3 4 ES 38 ...

Страница 41: ...la opción en la que se encuentra el cursor Menú Pulsación Corta Muestra el menú Entrada Pulsación Larga Muestra la barra de selección de la fuente Volver Vuelve a la última pantalla Inicio Vuelve a la página de inicio Vol Aumenta el nivel de volumen Vol Disminuye el nivel de volumen Silencio Interruptor de encendido OK Izquierda Menú Pulsación Corta Entrada Pulsación Larga Vol Arriba Derecha Volve...

Страница 42: ...Escanee el código QR a continuación para descargar el manual de usuario completo ES 40 ...

Страница 43: ...di OK 8 Sinistra Destra Su Giù 9 Ingresso per l alimentazione Jack 1 2 3 15 VISTA FRONTALE VISTA LATERALE RETROVISORE VISTA DAL BASSO 9 10 11 12 13 15 14 17 16 17 4 5 7 6 8 10 Porta d ingresso RJ45 11 Porta d ingresso USB 12 Porta d ingresso HDMI 13 Jack Audio da 3 5 mm 14 Porta d Ingresso AV 15 Ricevitore IR 16 Cavalletto di sollevamento manuale 17 Piedini Slot di montaggio IT 41 ...

Страница 44: ...Manuale d Utente 1 Entradas USB para un disco duro unidad USB duplicación de cable iOS o carga de dispositivos USB 2 Entradas HDMI para una caja de TV un dispositivo de TV o una computadora 3 Salida de 3 5 mm para dispositivos de audio como auriculares o altavoces 4 Entrada AV para un reproductor de DVD o VCD INTRODUZIONE ALLA CONNESSIONE 1 2 3 4 IT 42 ...

Страница 45: ...ui si trova attualmente il cursore Menu Pressione Breve Visualizzare il menu Ingresso Pressione Prolungata Visualizzare la barra di selezione della sorgente Ritornare Ritornare all ultima schermata Home Ritorna alla home page Vol Aumentare il livello del volume Vol Diminuire il livello del volume Muto Interruttore di Alimentazione OK Sinistra Menu Pressione Breve Ingresso Pressione Prolungata Vol ...

Страница 46: ...Si prega di scansionare il codice QR qui sotto per scaricare il manuale utente completo IT 44 ...

Страница 47: ...Register to get EXTRA ONE YEAR warranty Only valid in registering within 14 days of product delivery Get in touch with FREE online services facebook com letsnexigo nexigo com warranty ...

Отзывы: