background image

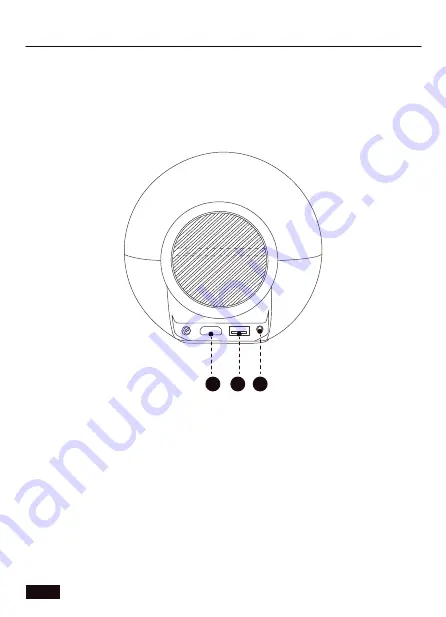
INTRODUZIONE ALLA CONNESSIONE

1. Ingresso HDMI per TV box, chiavetta TV o computer.
2. Ingresso USB per un disco rigido, un'unità USB o per caricare un 
dispositivo USB.
3. Uscita da 3,5 mm per dispositivi audio come cuffie e 
altoparlanti.

1

2

3

1 x Mini LCD Proiettore                             1 x Cavo di Alimentazione                        
1 x Manuale d‘Utente                                1 x Kit di pulizia
1 x Telecomando (Richiede 2 batterie AAA, non incluse)

US 01

IT 55

Содержание PJ06

Страница 1: ...Mini LCD Projector PJ06 User Manual Scan the QR code or visit our link to download the latest manual or watch the installation video nexigo com manuals FOCUS ...

Страница 2: ......

Страница 3: ...CONTENT TRANSLATIONS English 01 17 Deutsch 21 Français 25 Español 29 Italiano ...

Страница 4: ...ding one year manufacturer s warranty Make sure to register your purchase at nexigo com warranty within 14 days of the delivery date and we will extend your warranty coverage another year for a total of two years From all of us here at NexiGo we want to thank you for your trust in us We look forward to serving you again in the near future Sincerely The NexiGo Team CONTACT INFORMATION Website www n...

Страница 5: ...Power Input Jack 2 HDMI Input Port 3 USB Input Port 4 3 5mm Audio Jack TOP 5 Lens 6 Focus Adjustment Knob 7 Right 8 OK Press once Power Switch Press and hold 9 Down 10 Left 11 Return 9 8 7 10 11 1 2 3 4 5 6 US 01 US 01 US 01 EN 02 ...

Страница 6: ...les audio on and off 3 Rewind Go backward in the video audio 4 Play Pause Toggles video pause and play 5 Fast Forward Skips forward or moves quickly through video audio 6 Left Right Up Down Navigates through the onscreen display 7 OK Selects the current option 8 Menu Displays the menu 9 Return Returns to the previous screen 10 Signal Source Displays the source selection menu 11 Vol Increases the v...

Страница 7: ...ON INTRODUCTION 1 HDMI input for a TV box TV stick or computer 2 USB input for a Hard Drive USB Drive or charging a USB device 3 3 5mm output for Audio Devices such as headphones and speakers 1 2 3 US 01 EN 04 ...

Страница 8: ...Ratio Power Input LCD 1280 x 720 DC 19V 2 5A Light Source LED 4 3 16 9 Aspect Ratio 1 4 1 Projection Size 24 118 inches Projection Distance 2 62 11 48 ft Integrated Watt Use Output Port Speaker 48W 3 5mm audio jack x 1 3W x 1 Input Port HDMI x 1 USB x 1 US 01 EN 05 ...

Страница 9: ...r from the ceiling via a standard 1 4 mounting bracket sold separately or simply place it on a stable surface You may need to change the projection mode so the images display correctly Select Projection Mode under Setting Picture Setting then choose your preferred projection mode see below The size shape and position of your screen Location of a suitable power outlet Ensure the projector has suffi...

Страница 10: ...hold the Power Switch to turn on the projector Press the Power Switch to turn off the projector Alternatively press the Power Switch on the remote to turn the projector on or off Projection Mode Normal Front Normal Front Normal Back Invert Front Invert Back OK US 01 EN 07 ...

Страница 11: ...ROJECTOR DISTANCE SIZE FOCUS ADJUSTMENT Please use the Focus Adjustment Knob to adjust the focus rotating it left or right until the image becomes clear and sharp If the image appears blurry rotate the knob in the opposite direction until the image clears up USB CONNECTIONS Insert your USB drive into the USB port shown in the diagram below In the on screen menu choose the type of content you want ...

Страница 12: ...vie Music Photo TEXT DIVX RM 3GP AVI MKV FLV MOV MP4 MPG VOB MPG RMVB RM MP3 AAC WAV LOAS PCM OGG FLAC AC3 Audio Format Multi media Supported Format Photo Format Video Format Text Format JPEG BMP PNG TXT US 01 EN 09 ...

Страница 13: ... and then insert the other end of the HDMI cable into the HDMI port as shown in the diagram below Open the on screen menu and select the HDMI source in the Input Source tab This will allow you to display the screen of whatever device has been plugged in Input Source Media HDMI US 01 EN 10 ...

Страница 14: ... CONNECTION To play sound from the source plug either headphones or speakers into the 3 5mm audio port as shown below Picture Setting System Setting Other Setting Projection Mode Image Scaling Color Range Aspect Ratio Picture Mode US 01 EN 11 ...

Страница 15: ...odes Standard Dynamic Mild or User User mode enables custom settings for contrast brightness color and sharpness OSD Language Choose the language used in the projector menus Software Update USB Update the software version on the projector 1 Please check nexigo com support periodically for new firmware downloads 2 Download the latest firmware to a USB flash drive then insert the flash drive into a ...

Страница 16: ...ary if instructed to do so by the NexiGo technical support team The projector will reset after the software updates and all saved settings will be erased Restore Factory Default Reset the projector to factory default settings Sleep Timer Set the time duration for the projector to shut down automatically OSD Timer Set the time duration for the OSD menu to switch to the home page automatically Pictu...

Страница 17: ...e user s authority to operate the equipment This device complies with Part 15 of the FCC Rules Operation is subject to the following two conditions 1 this device may not cause harmful interference and 2 this device must accept any interference received including interference that may cause undesired operation US 01 EN 14 ...

Страница 18: ...in death Do not attempt to service this product yourself Please contact the manufacturer directly if you have any issues to exercise your warranty 4 Do not modify this equipment 5 Avoid dropping or throwing the projector 6 Do not face the projector lens to the sun 7 Use only the provided power cable 8 Do not place the projector on an uneven or unstable surface or one that is subject to vibration 9...

Страница 19: ...may be damaged by liquids Keep liquids away from the unit to prevent damage Liquid damages are not covered by the warranty 16 If the projector is unused for a prolonged period of time unplug it from the power source 17 If there are any mechanical issues with the projector please contact NexiGo Support to exercise the warranty Do not attempt to repair the item yourself 18 Safe Operational Parameter...

Страница 20: ...manschlussbuchse 2 HDMI Eingang 3 USB Eingang 4 3 5 mm Audiobuchse DER TEIL OBEN 5 Objektiv 6 Fokus Einstellungsknopf 7 Rechts 8 OK Einmal drücken Netzschalter Drücken und halten 9 Runter 10 Links 11 Zurück 9 8 7 10 11 1 2 3 4 5 6 US 01 DE 17 ...

Страница 21: ...alten 3 Zurückspulen Gehen Sie im Video Audio zurück 4 Pause Umschalten zwischen Videopause und Fortsetzung 5 Schneller Vorlauf Springt vorwärts oder bewegt sich schnell durch Video Audio 6 Links Rechts Auf Ab Zum Bewegen des Cursors auf dem Bildschirm Anzeige 7 OK Auswahl der Option auf der sich der Cursor gerade befindet 8 Menü Anzeige des Menüs 9 Zurück Rückkehr zum letzten Bildschirm 10 Signal...

Страница 22: ...LUSS 1 HDMI Eingang für TV Box TV Stick oder Computer 2 USB Eingang für eine Festplatte ein USB Laufwerk oder zum Aufladen eines USB Geräts 3 3 5 mm Ausgang für Audiogeräte wie Kopfhörer und Lautsprecher 1 2 3 US 01 DE 19 ...

Страница 23: ... Montagehalterung NICHT IM LIEFERUMFANG an der Decke aufhängen oder ihn einfach auf eine stabile Oberfläche stellen Gegebenenfalls müssen Sie den Projektionsmodus ändern damit die Bilder richtig projiziert werden Wählen Sie unter der Registerkarte Einstellungen die Option Projektionsmodus und wählen Sie dann den entsprechenden Projektionsmodus für Ihre Bedürfnisse Größe Form und Position des Bilds...

Страница 24: ...rojektor einzuschalten Drücken Sie den Netzschalter um den Projektor auszuschalten Alternativ können Sie den Netzschalter auf der Fernbedienung drücken um den Projektor ein oder auszuschalten Rückprojektion Projektionsverfahren Projektionsverfahren Aufprojektion Hängende Rückprojektion Hängende Aufprojektion US 01 DE 21 ...

Страница 25: ...hren Sie wie Sie den Projektor mit anderen Geräten verbinden können ABSTAND UND GRÖßE DES PROJEKTORS FOKUS EINSTELLUNG Bitte verwenden Sie den Fokuseinstellknopf um den Fokus einzustellen Drehen Sie den Knopf nach links oder rechts bis das Bild klar ist Wenn das Bild nicht klar ist und stattdessen unschärf er wird drehen Sie den Knopf in die entgegengesetzte Richtung bis das Bild klarer wird FOCU ...

Страница 26: ...CHLÜSSE Stecken Sie Ihr USB Laufwerk in den im folgenden Diagramm gezeigten USB Anschluss Wählen Sie im Menü auf dem Bildschirm die Registerkarte Multimedia Wählen Sie dann den Inhalt den Sie anzeigen möchten Film Musik Bilder Doc US 01 DE 23 ...

Страница 27: ...DMI VERBINDUNGEN Stecken Sie ein HDMI Kabel in das Gerät das Sie an den Projektor anschließen möchten und stecken Sie dann das andere Ende des HDMI Kabels in den in der folgenden Abbildung gezeigten HDMI Anschluss Öffnen Sie das Bildschirmmenü und wählen Sie die HDMI Quelle auf der Registerkarte Signalquelle Nun können Sie den Bildschirm des angeschlossenen Geräts anzeigen US 01 DE 24 ...

Страница 28: ... 5 MM AUDIO VERBINDUNGEN Um Ton von der Quelle wiederzugeben schließen Sie entweder Kopfhörer oder Lautsprecher an den 3 5 mm Audioanschluss an wie unten gezeigt Signalquelle Multimedia HDMI US 01 DE 25 ...

Страница 29: ...nverhältnis gibt die Größe eines Bildes durch seine Breite und Höhe an Übliche Seitenverhältnisse sind 4 3 und 16 9 Bildmodus Wählen Sie einen von vier Modi aus Standard Dynamisch Mild oder Benutzer Der Benutzermodus ermöglicht benutzerdefinierte Einstellungen für Kontrast Helligkeit Farbe und Schärfe MENÜS FÜR EINSTELLUNG BILDSCHIRM EINSTELLUNGEN Bildschirm Einstellungen Systemeinstellung Andere ...

Страница 30: ... Sie Einstellung Systemeinstellung Software Aktualisierung 4 Die Software lässt sich automatisch aktualisieren Versuchen Sie nicht den Projektor zu benutzen bevor die Aktualisierung abgeschlossen ist Hinweis Alle aktuellen Lieferungen auf dem Markt sind mit der neuesten Firmware ausgestattet Sie müssen diese nicht aktualisieren Der Projektor wird nach der Softwareaktualisierung zurückgesetzt alle ...

Страница 31: ... Standby Betrieb Zur Einstellung eines Timers mit dem der Projektor automatisch ausgeschaltet wird ANDERE EINSTELLUNG OSD Timer Legen Sie die Zeitdauer für das automatische Umschalten des OSD Menüs auf die Startseite fest OSD Timer Bildschirm Einstellungen Systemeinstellung Andere Einstellung US 01 DE 28 ...

Страница 32: ...rt d entrée HDMI 3 Port d entrée USB 4 Prise Audio de 3 5 mm LA PARTIE AU DESSUS 5 Lentille 6 Bouton de réglage de la mise au point 7 Droite 8 OK Appuyez une fois Interrupteur d alimentation Appuyez et maintenez 9 Bas 10 Gauche 11 Retour 9 8 7 10 11 1 2 3 4 5 6 US 01 FR 29 ...

Страница 33: ...dio 3 Rembobiner Revenir en arrière dans la vidéo l audio 4 Pause Rctive la pause vidéo et continue 5 Avance rapide saute vers l avant ou se déplace rapidement dans la vidéo l audio 6 Gauche Droite Haut Bas Déplace le curseur dans l écran affichage 7 OK Sélectionne l optuon sur lequel votre curseur se trouve actuellement 8 Menu affiche le menu 9 Retour Retourne au dernier écran 10 Source du signal...

Страница 34: ... HDMI pour un boîtier TV une clé TV ou un ordinateur 2 Entrée USB pour un disque dur une clé USB ou le chargement d un périphérique USB 3 Sortie 3 5 mm pour les appareils audio tels que les écouteurs et les haut parleurs 1 2 3 US 01 FR 31 ...

Страница 35: ...dre le projecteur au plafond via un support de montage spécial NON INCLUS ou simplement le placer sur une surface stable Vous devrez peut être changer le mode de projection pour que les images se projettent correctement Sélectionnez Mode de projection sous l onglet Réglage puis choisissez le mode de projection correspondant à vos besoins La taille la forme et la position de votre écran Emplacement...

Страница 36: ...enez le enfoncé pour allumer le projecteur Appuyez sur l interrupteur d alimentation pour éteindre le projecteur Vous pouvez également appuyer sur l interrupteur d alimentation de la télécommande pour allumer ou éteindre le projecteur Méthode de projection Normal Front Normal Front Normal Back Invert Front Invert Back US 01 FR 33 ...

Страница 37: ... CONNEXIONS MULTIMÉDIAS Cette section vous indique comment connecter le projecteur à d autres équipements DISTANCE ET TAILLE DU PROJECTEUR RÉGLAGE DE MISE AU POINT Utilisez le bouton de réglage de la mise au point pour régler la mise au point tourner le bouton vers la gauche ou la droite jusqu à ce que l image soit claire Si l image ne s efface pas et devient plus floue tournez le bouton dans la d...

Страница 38: ...c CONNEXIONS USB Insérez votre clé USB dans le port USB indiqué dans le schéma ci dessous Dans le menu à l écran sélectionnez l onglet Multimédia Choisissez ensuite le contenu que vous voulez afficher Film Musique Photo Doc US 01 FR 35 ...

Страница 39: ... CONNEXIONS HDMI Branchez un câble HDMI dans l appareil que vous souhaitez connecter au projecteur puis insérez l autre extrémité du câble HDMI dans le port HDMI illustré dans le schéma ci dessous Ouvrez le menu à l écran et sélectionnez la source HDMI dans l onglet Source de signal Cela vous permettra ensuite d afficher l écran de n importe quel appareil qui a été branché US 01 FR 36 ...

Страница 40: ...CONNEXIONS AUDIO DE 3 5 MM Pour lire le son de la source branchez des écouteurs ou des haut parleurs dans le port audio 3 5 mm comme indiqué ci dessous Source de signal Multimédia HDMI US 01 FR 37 ...

Страница 41: ...jets affichés à l écran Gamme de couleurs Ajustez la plage de couleurs du projecteur Mode proportionnel Le rapport d aspect est une figure qui identifie la taille d une image par sa largeur et sa hauteur Les rapports d aspect communs sont 4 3 et 16 9 Mode Image Sélectionnez l un des quatre modes Standard Dynamique Doux ou Utilisateur Le mode utilisateur permet des réglages personnalisés pour le co...

Страница 42: ...e menu à l écran sélectionnez Régler Réglage système Mise à niveau du logiciel 4 Le logiciel sera mis à jour automatiquement n essayez pas d utiliser le projecteur tant que la mise à jour n est pas terminée Remarque Tous les envois courants sur le marché sont livrés avec le firmware le plus récent vous n avez pas à le mettre à jour Le projecteur sera réinitialisé après les mises à jour logicielles ...

Страница 43: ...to Permet de régler une minuterie pour mettre le projecteur hors tension automatiquement Minuterie OSD Réglage d image Réglage système Autre paramètre AUTRE PARAMÈTRE Minuterie OSD Définissez la durée pendant laquelle le menu OSD passe automatiquement à la page d accueil US 01 FR 40 ...

Страница 44: ...Puerto de entrada HDMI 3 Puerto de entrada USB 4 Connector de Audio de 3 5 mm LA PARTE DE ARRIBA 5 Lente 6 Perilla de ajuste de enfoque 7 Derecha 8 OK Presiona una vez Interruptor de encendido Presione y mantenga 9 Abajo 10 Lzquierda 11 Volver 9 8 7 10 11 1 2 3 4 5 6 US 01 ES 41 ...

Страница 45: ...ctiva el audio 3 Rebobinar retroceder en el video audio 4 Pausa Activa la pausa y la continuación del vídeo 5 Avance rápido Salta hacia adelante o se mueve rápidamente a través del video audio 6 Izquierda Derecha Arriba Abajo Mueve el cursor en la pantalla pantalla 7 OK Selecciona la opción en la que se encuentra el cursor 8 Menú Muestra el menú 9 Volver Vuelve a la última pantalla 10 Fuente de la...

Страница 46: ...ada HDMI para una caja de TV dispositivo de TV o computadora 2 Entrada USB para un disco duro una unidad USB o para cargar un dispositivo USB 3 Salida de 3 5 mm para dispositivos de audio como auriculares y altavoces 1 2 3 US 01 ES 43 ...

Страница 47: ...e colocarlo sobre una superficie estable Es posible que tenga que cambiar el modo de proyección para que las imágenes se proyecten correctamente Seleccione el Modo de Proyección en la pestaña de Configuración y luego elija el modo de proyección correspondiente a sus necesidades El tamaño la forma y la posición de su pantalla La ubicación de una toma de corriente adecuada Asegúrese de que el proyec...

Страница 48: ... encendido para encender el proyector Presione el interruptor de encendido para apagar el proyector Alternativamente presione el interruptor de encendido en el control remoto para encender o apagar el proyector Modo de proyección Frente normales Frente normales Volver normales Frente Invertir invertir Volver US 01 ES 45 ...

Страница 49: ... CONEXIONES DE MULTIMEDIA Esta sección le guía sobre cómo conectar el proyector con otros equipos DISTANCIA Y TAMAÑO DEL PROYECTOR AJUSTE DEL ENFOQUE Utilice el botón de ajuste de enfoque para ajustar el enfoque gire el botón a la izquierda o a la derecha hasta que la imagen sea clara Si la imagen no se aclara y por el contrario se vuelve más borrosa gire el botón en la dirección opuesta hasta que...

Страница 50: ...EXIONES CON USB Inserte su unidad USB en el puerto USB que se muestra en el siguiente diagrama En el menú en pantalla seleccione la pestaña Multimedia A continuación elija el contenido que desea visualizar Película Música Imagen Documento US 01 ES 47 ...

Страница 51: ... PNG TXT CONEXIONES HDMI Enchufe un cable HDMI en el dispositivo que desee conectar al proyector y a continuación inserte el otro extremo del cable HDMI en el puerto HDMI que se muestra en el siguiente diagrama Abra el menú en pantalla y seleccione la fuente HDMI en la pestaña Fuente de señal Esto le permitirá mostrar la pantalla de cualquier dispositivo que se haya conectado US 01 ES 48 ...

Страница 52: ...IONES DE AUDIO DE 3 5 MM Para reproducir el sonido de la fuente conecte los auriculares o los altavoces al puerto de audio de 3 5 mm como se muestra a continuación Fuente de señal Multimedia HDMI US 01 ES 49 ...

Страница 53: ...na cifra que identifica el tamaño de una imagen por su anchura y altura Las relaciones de aspecto más comunes son 4 3 y 16 9 Modo de imagen Seleccione uno de los cuatro modos Estándar Dinámico Suave o Usuario El modo de usuario permite configuraciones personalizadas de contraste brillo color y nitidez MENÚS DE CONFIGURAR CONFIGURAR DE PANTALLA Configurar de Pantalla Configurar de sistema Otro ajus...

Страница 54: ... menú en pantalla seleccione Configurar Configurar de sistema Actualización de software 4 El software se actualizará automáticamente por favor no intente utilizar el proyector hasta que se complete la actualización Nota Todos los envíos actuales del mercado vienen con el último firmware no es necesario actualizarlo El proyector se reiniciará después de la actualización del software todos los ajuste...

Страница 55: ...omática Permite establecer un temporizador para que el proyector se apague automáticamente OTRO AJUSTE Temporizador OSD establezca la duración del tiempo para que el menú OSD cambie automáticamente a la página de inicio Configurar de Pantalla Configurar de sistema Otro ajuste Temporizador OSD US 01 ES 52 ...

Страница 56: ...d ingresso HDMI 3 Porta d ingresso USB 4 Jack Audio da 3 5 mm LA PARTE SOPRA 5 Obiettivo 6 Manopola di regolazione della messa a fuoco 7 Destra 8 OK Premere una volta Interruttore di Alimentazione Premere e tenere premuto 9 Giù 10 Sinistra 11 Ritornare 9 8 7 10 11 1 2 3 4 5 6 US 01 IT 53 ...

Страница 57: ...vvolgi Rtorna indietro nel video audio 4 Pausa Mettere in pausa e continuare il video 5 Avanzamento rapido Salta in avanti o si sposta rapidamente attraverso video audio 6 Sinistra Destra Su Giù postare il cursore nello schermo display 7 OK Selezionare l opzione su cui si trova attualmente il cursore 8 Menu Visualizzare il menu 9 Ritornare Ritornare all ultima schermata 10 Fonte del Segnale Visual...

Страница 58: ...SSIONE 1 Ingresso HDMI per TV box chiavetta TV o computer 2 Ingresso USB per un disco rigido un unità USB o per caricare un dispositivo USB 3 Uscita da 3 5 mm per dispositivi audio come cuffie e altoparlanti 1 2 3 US 01 IT 55 ...

Страница 59: ...io NON INCLUSA o semplicemente posizionarlo su una superficie stabile Potrebbe essere necessario cambiare la modalità di proiezione in modo che le immagini vengano proiettate correttamente Selezionare Modalità di Proiezione nella Scheda Impostazioni poi scegliere la modalità di proiezione corrispondente alle tue esigenze Le dimensioni la forma e la posizione dello schermo La posizione di una presa...

Страница 60: ...ntazione per spegnere il proiettore In alternativa premere l interruttore di alimentazione sul telecomando per accendere o spegnere il proiettore Modo di proiezione Installazione facciale proiezione anteriore Installazione facciale proiezione anteriore Installazione facciale proiezione posteriore Installazione sospesa proiezione anteriore Installazione sospesa proiezione posteriore US 01 IT 57 ...

Страница 61: ...ezione vi guida su come collegare il proiettore con altre apparecchiature DISTANZA E DIMENSIONI DEL PROIETTORE REGOLAZIONE DELLA MESSA A FUOCO Si prega di utilizzare la manopola di regolazione della messa a fuoco per regolare la messa a fuoco ruotare la manopola a sinistra o a destra fino a quando l immagine è chiara Se l immagine non è chiara e diventa invece più sfocata ruotare la manopola nella...

Страница 62: ...File CONNESSIONI USB Inserisci l unità USB nella porta USB mostrata nel diagramma seguente Nel menu sullo schermo selezionare la scheda Multimedia Poi scegliere il contenuto che volete visualizzare Film Musica Foto File US 01 IT 59 ...

Страница 63: ...XT CONNESSIONI HDMI Inserire un cavo HDMI nel dispositivo che volete collegare al proiettore e poi inserire l altra estremità del cavo HDMI nella porta HDMI mostrata nel diagramma sottostante Aprire il menu sullo schermo e selezionare la sorgente HDMI nella scheda Fonte del segnale Questo vi permetterà di visualizzare lo schermo di qualsiasi dispositivo sia stato collegato US 01 IT 60 ...

Страница 64: ...CONNESSIONI AUDIO DA 3 5 MM Per riprodurre l audio dalla sorgente collega le cuffie o gli altoparlanti alla porta audio da 3 5 mm come mostrato di seguito Fonte del segnale Multimedia HDMI US 01 IT 61 ...

Страница 65: ...dentifica la dimensione di un immagine in base alla sua larghezza e altezza Le proporzioni comuni sono 4 3 e 16 9 Modalità immagine selezionare una delle quattro modalità Standard Dinamica Lieve o Utente La modalità utente consente impostazioni personalizzate per contrasto luminosità colore e nitidezza MENU DELLE IMPOSTAZIONE IMPOSTAZIONE DELL IMMAGINE Impostazione dell immagine Impostazione del s...

Страница 66: ...selezionare Impostazione Impostazione del sistema Aggiornamento software 4 Il software verrà aggiornato automaticamente non tentare di utilizzare il proiettore fino al completamento dell aggiornamento Nota Tutte le attuali spedizioni sul mercato sono dotate dell ultimo firmware non è necessario aggiornarlo Il proiettore sarà resettato dopo gli aggiornamenti del software tutte le impostazioni salvat...

Страница 67: ...utospegnimento Permettere di impostare un timer per spegnere automaticamente il proiettore ALTRE IMPOSTAZIONI Timer OSD consente di impostare la durata del menu OSD per passare automaticamente alla home page Impostazione dell immagine Impostazione del sistema Altre impostazioni Timer OSD US 01 IT 64 ...

Страница 68: ...Register to get EXTRA ONE YEAR warranty Only valid in registering within 14 days of product delivery Get in touch with FREE online services facebook com letsnexigo nexigo com warranty ...

Отзывы: