


Copyright © 2012 NEXCOM International Co., Ltd. All rights reserved
14
VMC 3000/4000 Series User Manual
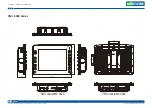
Chapter 1: Product Introduction
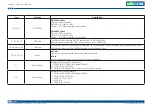
Item
Function
Description
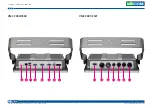
1
Antenna Holes
The 2 external antenna mounting holes are used to mount and connect the antenna to a WLAN module and Bluetooth
module.
2
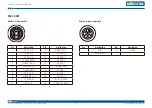
Antenna Holes
The external antenna mounting holes are used to mount and connect the antenna to a WWAN module.
3
Power Key
•
When the ignition is from “low” to “high”, VMC will turn on automatically.
•
When the ignition is “high”, press the power button 5sec to turn on/off VMC.
•
When the ignition is from “high” to “low”, VMC will turn off automatically.
•
When the ignition is “low”, pressing the power button will not turn on VMC.
•
When you press it for 1 second, the display will turn on/off.
4
Volume Key
Audio volume can be adjusted in 10 levels using the buttons.
5
Brightness Control
Key
There are two modes for Brightness Control: Manual Mode and Auto Mode.
The Manual Mode is via brightness control key to adjust the
LCD brightness, it can be adjusted in 10 levels using the “+” or “-” buttons.
6
Light Sensor
Light sensors can adjust a display’s backlight, which improves the power savings and optimizing the display’s viewability.
7
Warning Indicator
When ambient temperature is over 50°C, the warning indicator will be red.
8
Function Key
There are five buttons and 10 function keys on the VMC3000 series.
The first stage is F1~F5, second stage is F6~F10. When you press the shift key, the shift key will turn blue lights, the
function key will be changed to the second stage.
9
Speaker
VMC3000 includes the dual speaker, the specification is 2W/ 4
Ω
.
10
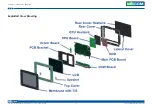
VESA Mounting Hole There are VESA mounting hole of 75 x 75 and 100 x 100 on the rear cover.
11
U-Shaped Mounting The optional U-shaped mounting kit.
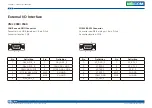
12, 20,
27, 35
Power Input
Connector
9 ~ 36VDC power Input.
13, 21,
34, 41
SMBus, 5V/12V
Power Output
SMBus, power output from vehicle power 5V@1A & 12V@1A DC output.
14, 26,
40
COM1
DB9 RS-232 connector with either 0, 5 or 12V on pin 9 for external devices.
15
COM2
DB9 RS-232 connector.


