background image

Copyright © 2012 NEXCOM International Co., Ltd. All Rights Reserved.

14

NDiS B322 User Manual

Chapter 3: System Setup

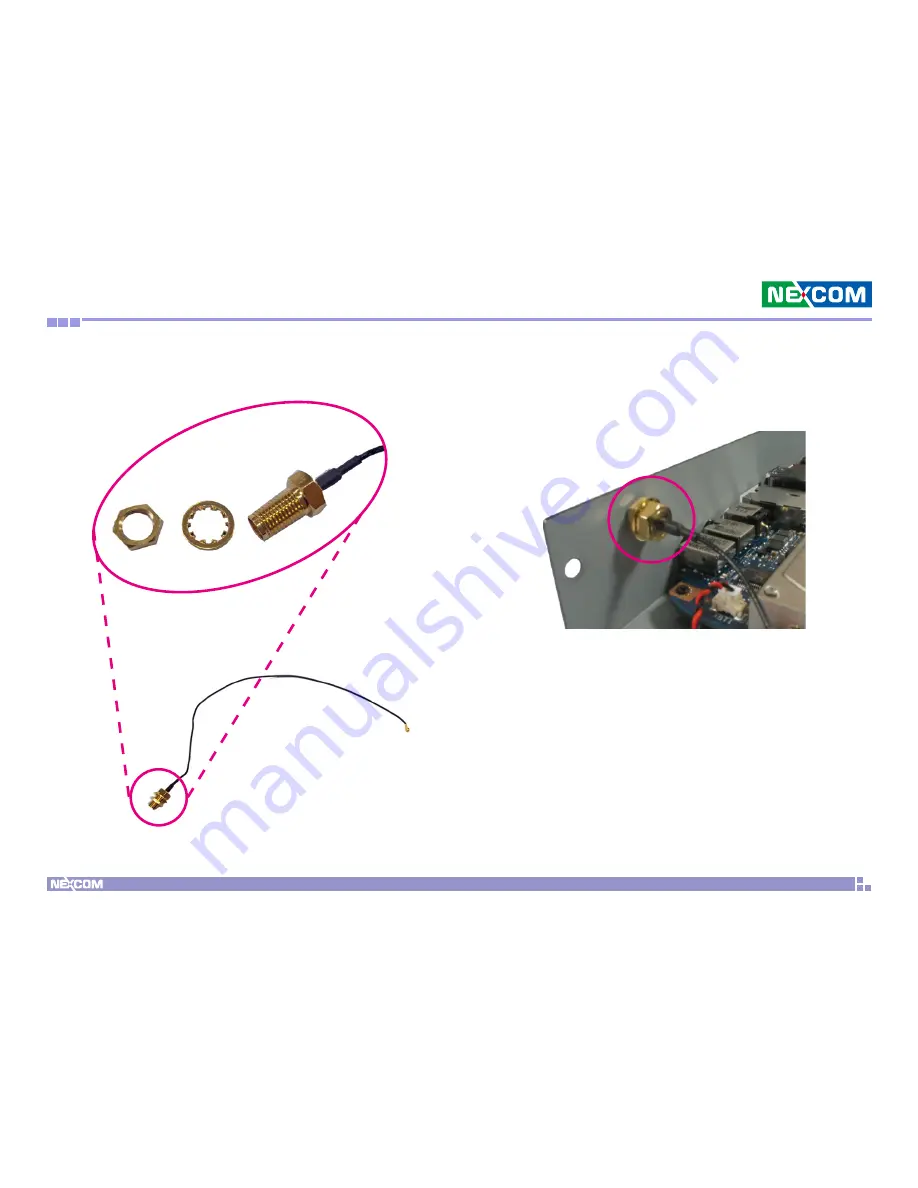
5. Insert the 2 rings (ring 1 then ring 2) into the WiFi antenna jack.

Ring2

Ring1

6. Now mount the WiFi antenna jack to the WiFi antenna hole located at 

the rear panel of the chassis then tighten the rings.

Содержание NDiS B322

Страница 1: ...NEXCOM International Co Ltd NEXCOM International Co Ltd Published January 2013 www nexcom com Multi Media Solutions Digital Signage Platform NDiS B322 User Manual ...

Страница 2: ...l Service Contact Information x Package Contents xii Ordering Information xiii Chapter 1 Product Introduction Overview 1 Key Features 1 Hardware Specifications 2 Mechanical Dimensions 3 Chapter 2 Hardware Functionality Front Panel 4 Rear Panel 4 Chapter 3 System Setup Removing the Chassis Cover 5 Installing a DIMM 6 Installing a SATA Hard Drive 8 Installing a Wireless LAN Module 12 Installing the ...

Страница 3: ...NEXCOM International Co Ltd All other product names mentioned herein are registered trademarks of their respective owners Regulatory Compliance Statements This section provides the FCC compliance statement for Class B devices and describes how to keep the system CE compliant Declaration of Conformity FCC This equipment has been tested and verified to comply with the limits for a Class B digital de...

Страница 4: ...nd Polybrominated diphenyl Ethers PBDE 0 1 or 1 000ppm In order to meet the RoHS compliant directives NEXCOM has established an engineering and manufacturing task force to implement the introduction of green products The task force will ensure that we follow the standard NEXCOM development procedure and that all the new RoHS components and new manufacturing processes maintain the highest industry ...

Страница 5: ...ective products making sure it is durable enough to be resistant against further damage and deterioration during transportation In case of damages occurred during transportation the repair is treated as Out of Warranty Any products returned by NEXCOM to other locations besides the customers site will bear an extra charge and will be billed to the customer Repair Service Charges for Out of Warranty...

Страница 6: ...nd power supply are inconsistent with these instructions or the instructions for accessory modules contact the supplier to find out how you can ensure that your computer meets safety and regulatory requirements Cautions Electrostatic discharge ESD can damage system components Do the described procedures only at an ESD workstation If no such station is available you can provide some ESD protection ...

Страница 7: ...e the soft metal or plastic parts of the connectors Safety Information Before installing and using the device note the following precautions Read all instructions carefully Do not place the unit on an unstable surface cart or stand Follow all warnings and cautions in this manual When replacing parts ensure that your service technician uses parts specified by the manufacturer Avoid using the system...

Страница 8: ...the voltage and current rating marked on the product 10 All cautions and warnings on the equipment should be noted 11 If the equipment is not used for a long time disconnect it from the power source to avoid damage by transient overvoltage 12 Never pour any liquid into an opening This may cause fire or electrical shock 13 Never open the equipment For safety reasons the equipment should be opened o...

Страница 9: ...ersion application software etc A complete description of the problem The exact wordings of the error messages Warning 1 Handling the unit carry the unit with both hands and handle it with care 2 Maintenance to keep the unit clean use only approved cleaning products or clean with a dry cloth 3 CompactFlash Turn off the unit s power before inserting or removing a CompactFlash storage card Conventio...

Страница 10: ...com www nexcom jp com China NEXCOM China 2F Block 4 Venus Plaza Building 21 ZhongGuanCun Software Park No 8 Dongbeiwang West Road Haidian District Beijing 100193 China Tel 86 10 8282 5880 Fax 86 10 8282 5955 Email sales nexcom cn www nexcom cn Shanghai Office Room 1505 Greenland He Chuang Bldg No 450 Caoyang Rd Shanghai 200062 China Tel 86 21 6150 8008 Fax 86 21 3251 6358 Email sales nexcom cn www...

Страница 11: ... 40 90 31 01 Email sales fr nexcom eu www nexcom eu Germany NEXCOM GmbH Leopoldstraße Business Centre Leopoldstraße 244 80807 Munich Germany Tel 49 89 208039 278 Fax 49 89 208039 279 Email sales de nexcom eu www nexcom eu Italy NEXCOM ITALIA S r l Via Gaudenzio Ferrari 29 21047 Saronno VA Italia Tel 39 02 9628 0333 Fax 39 02 9286 9215 Email nexcomitalia nexcom eu www nexcomitalia it United Kingdom...

Страница 12: ...0222A0435X00 NDiS166 Wall Mount Bracket VER A CHYUAN JYH 2 2 50311F0019X00 H Flat Head Screw Long FEI F3x4 iso NI 4 3 50311F0102X00 H Round Head Screw Long FEI P6 32Tx 1 4 SW7 0 8 4 4 50311F0122X00 H I Head Screw Long FEI I 2 6ISO 4 5 5043330394X00 NDiS125 L HDD Bracket R VER A CHYUAN JYH 1 6 5043330395X00 NDiS125 L HDD Bracket L VER A CHYUAN JYH 1 7 5044440031X00 Rubber Foot KANG YANG RF20 5 4P 4...

Страница 13: ...l Co Ltd All Rights Reserved xiii NDiS B322 User Manual Preface Ordering Information The following information below provides ordering information for NDiS B322 NDiS B322 P N 10W00B32200X0 Intel Celeron Processor 847 Dual Core 1 1G 17W ...

Страница 14: ...nsumption Compact and fanless Intel HD Graphics USB3 0 support Overview Powered by Intel Celeron processors 847 processor NDiS B322 can handle very rich multimedia contents With Intel Celeron processor low power consumption feature NDiS B322 supports display output by VGA and HDMI ports NDiS B322 is ideal as entry level digital signage player for advertising hospitality and brand promotion applica...

Страница 15: ... USB3 0 1x USB2 0 I O Interface Rear 19V DC Power in 1x VGA 2x USB 2 0 1x RJ45 with LEDs for 10 100 1000Mbps Ethernet 1x Audio out 1x HDMI 1x Mic in Storage Device 1 x 2 5 SATA HDD Bay Dimensions 250 mm W x 194 mm D x 40 mm H 9 9 x 7 6 x 1 6 w o mounting bracket Power Supply 1x External 65W AC DC power adapter Expansion 1x Half Mini PCI E interface 802 11 b g n WLAN module optional Environment Ope...

Страница 16: ...Copyright 2012 NEXCOM International Co Ltd All Rights Reserved 3 NDiS B322 User Manual Chapter 1 Product Introduction Mechanical Dimensions 250 00 284 40 40 00 46 60 194 20 ...

Страница 17: ...td All Rights Reserved 4 NDiS B322 User Manual Chapter 2 Hardware Functionality Chapter 2 Hardware Functionality Front Panel Rear Panel USB 2 0 Line out LAN DC Input HDMI VGA USB 2 0 USB 3 0 Power Switch Line in TV Tuner Antenna WiFi Antenna ...

Страница 18: ...ing the Chassis Cover Prior to removing the chassis cover make sure the unit s power is off and disconnected from the power source to prevent electric shock or system damage 1 The screws on the bottom of cover are used to secure the cover to the chassis Remove these screws and put them in a safe place for later use CAUTION CAUTION CAUTION ...

Страница 19: ...rved 6 NDiS B322 User Manual Chapter 3 System Setup Installing a DIMM 1 Locate for the DIMM socket on the board DIMM sockets 2 Push the ejector tabs which are at the ends of the socket outward This indicates that the socket is unlocked Ejector tab Ejector tab ...

Страница 20: ...gned with the key on the socket The key ensures the module can be plugged into the socket in only one direction Notch Key 4 Insert the module into the socket Apply firm even pressure to each end of the module until it slips down into the socket The contact fingers on the edge of the module will almost completely disappear inside the socket The ejector tabs at the ends of the socket will automatica...

Страница 21: ... Setup Installing a SATA Hard Drive 1 The drive bracket included in the package is used to hold a SATA hard drive 2 Place the SATA hard drive onto the drive bracket Align the mounting holes that are on the sides of the SATA drive with the mounting holes on the drive bracket SATA Hard Drive Drive Bracket ...

Страница 22: ...national Co Ltd All Rights Reserved 9 NDiS B322 User Manual Chapter 3 System Setup 3 Use the provided screws to secure the SATA drive in place 4 Secure the SATA Drive with the provided mounting screw Mounting Studs Mounting Screw ...

Страница 23: ...apter 3 System Setup 5 The mounting holes on the drive bracket and chassis are used to secure hard drive to the chassis 6 Locate the SATA connector and the SATA power connector on the SATA drive SATA Data Connector SATA Power Connector SATA Power Connector SATA Data Connector Mounting Holes ...

Страница 24: ...td All Rights Reserved 11 NDiS B322 User Manual Chapter 3 System Setup 7 Align the mounting holes of the drive bracket with the mounting studs on the board then use the provided mounting screws to secure the hard drive in place Mounting Screw ...

Страница 25: ...nmount Mounting Screws Unplug Power Connector Release VGA Connector Copper Post Unplug USB Connector Installing a Wireless LAN Module 1 Unmount screws and unplug connectors on the board 2 Remove the motherboard from chassis and locate the Mini PCI Express slot on the back of the motherboard Mini PCI Express Slot ...

Страница 26: ...I Express slot at a 45 degree angle until the gold plated connector on the edge of the module completely disappears inside the slot 4 Press down the module and fasten a screw into the mounting hole to secure it Then attach one end of the RF cable onto the WiFi module WiFi Module RF Cable WiFi Antenna Jack RF Cable Attached to the Module Mounting Screw ...

Страница 27: ...eserved 14 NDiS B322 User Manual Chapter 3 System Setup 5 Insert the 2 rings ring 1 then ring 2 into the WiFi antenna jack Ring2 Ring1 6 Now mount the WiFi antenna jack to the WiFi antenna hole located at the rear panel of the chassis then tighten the rings ...

Страница 28: ...nal Co Ltd All Rights Reserved 15 NDiS B322 User Manual Chapter 3 System Setup 7 The photo below shows the WiFi antenna jack attached at the rear panel of the chassis 8 Now connect an external antenna to the WiFi antenna jack Antenna ...

Страница 29: ...nvenient and economical way of mounting the system on the wall 1 Loosen the two mounting screws on the bottom of the the system as circled below Screw locations 2 Once the screws are removed align the mounting holes on the wallmount brackets to the screw locations circled below then use the provided mounting screws to mount the brackets in place Wallmount brackets Mounting screws ...

Страница 30: ... values found in CMOS With easy to use pull down menus you can configure such items as Hard drives diskette drives and peripherals Video display type and display options Password protection from unauthorized use Power management features The settings made in the setup program affect how the computer per forms It is important therefore first to try to understand all the Setup options and second to ...

Страница 31: ...ter Setup Another way to enter Setup is to power on the computer and waits for the following message during the POST TO ENTER SETUP BEFORE BOOT PRESS CTRL ALT ESC Press the Del key to enter Setup Legends Key Function Right and Left arrows Moves the highlight left or right to select a menu Up and Down arrows Moves the highlight up or down between sub menus or fields Esc Exits to the BIOS Setup Util...

Страница 32: ...ry size The BIOS automatically detects the information in this section System Time The time format is hour minute second The time is based on the 24 hour military time clock For example 1 p m is 13 00 00 Hour displays hours from 00 to 23 Minute displays minutes from 00 to 59 Second dis plays seconds from 00 to 59 System Date The date format is day month date year Day displays a day from Sunday to ...

Страница 33: ...n CPU Configuration This section is used to view detailed CPU specifications and configure the CPU SATA Configuration This section is used menu to change and or set the configuration of the SATA devices installed in the system USB Configuration This section is used to enable or disable the USB controller Hardware Health Configuration This section is used to configure the hardware monitoring events...

Страница 34: ...on The items in this menu allow you to set or change the configurations for the SATA Controller Mode Settings SATA Mode AHCI Mode 1st Drive While entering setup BIOS auto detects the presence of IDE devices This displays the status of auto detection of IDE devices Select Screen Select Item F1 General Help F10 Save and Exit ESC Exit CPU Configuration CORE Count Manufacturer Intel R Atom TM CPU D510...

Страница 35: ... C Copyright 1985 2010 American Megatrends Inc BIOS SETUP UTILITY USB Configuration Select Screen Select Item Change Option F1 General Help F10 Save and Exit ESC Exit USB Configuration USB 2 0 Controller Enabled 2 0 Options Enabled 2 0 Disabled 1 1 USB 2 0 Controller This field is used to enable or disable the Enhanced Host Controller Inter face USB 2 0 ...

Страница 36: ...ESC Exit Hardware Health Configuration CPU Fan Check CPU Q Fan Control Full Speed Offset CPU Temperature Tcontrol Offset Fan Auto Mode Start Speed Temp CPU Fan Speed Fan1 Speed VCore Voltage 3 3V Voltage 5V Voltage Enabled Disable to detect Fan fault Disabled Enabled 55 43 C 86 C 40 C Show Speed 3924 RPM 1 056 V 3 324 V 5 070 V Tcontrol Offset Displays the Tcontrol offset temperature Fan Auto Mode...

Страница 37: ...settings Onboard LAN Device This field is used to enable or disable the onboard LAN device Onboard LAN Boot ROM This field is used to enable or disable the onboard LAN Boot ROM Onboard VGA Config Select Screen Select Item Change Option F1 General Help F10 Save and Exit ESC Exit Onboard VGA Config iGPU Frame Buffer Size DVMT Mode Select DVMT FIXED Memory iGPU Frame Buffer Size Select the amount of ...

Страница 38: ...wer Settings ACPI Configuration APM Configuration Setion for Advanced ACPI Configuration ACPI Configuration The ACPI configuration menu configures the Advanced Configuration and Power Interface options APM Configuration The APM configuration menu allows the Advanced Power Management options to be configured ACPI Configuration Suspend Mode Selects the ACPI state to be used for system suspend S1 POS...

Страница 39: ...o the LAN card or PCI card will cause the system to wake up AC Power Loss Power Off When power returns after an AC power failure the system s power is off You must press the Power button to power on the system Power On When power returns after an AC power failure the system will automati cally power on Last State When power returns after an AC power failure the system will return to the state wher...

Страница 40: ... Enter 2 Type your password in the dialog box then press Enter You are lim ited to eight letters numbers 3 Press Enter to confirm the new password 4 When the Password Installed dialog box appears select OK To change the password repeat the same steps above To clear the password select Change Supervisor Password then press Enter The Password Uninstalled dialog box will appear Change User Password T...

Страница 41: ...o Sub Screen F1 General Help F10 Save and Exit ESC Exit Root Settings Boot Settings Configuration Boot Device Priority Hard Disk Drives Configure Settings dur ing System Boot Boot Settings Configuration Configuration settings during system boot Boot Device Priority Use the Boot Device Priority options to select the order of the devices the system boots from Hard Disk Drives Use the Hard Disk Drive...

Страница 42: ...em Quick Boot When enabled the BIOS will shorten or skip some check items during POST This will decrease the time needed to boot the system Quiet Boot When enabled the BIOS will display the OEM logo instead of POST mes sage during POST Bootup Num Lock This allows you to determine the default state of the numeric keypad By default the system boots up with NumLock on wherein the function of the nume...

Страница 43: ...it ESC Exit Boot Device Priority 1st Boot Device Specifies the boot sequence form the available devices A device enclosed in parenthes is has been disabled in the corresponding type menu SATA PM ST9160314A 1st Boot Device Specifies the boot sequence from the available devices A device enclosed in parenthesis has been disabled in the corresponding type menu Hard Disk Drives Select Screen Select Ite...

Страница 44: ...tion Save Changes and Exit To save the changes and exit the Setup utility select this field then press Enter A dialog box will appear Confirm by selecting Yes You can also press F10 to save and exit Setup Discard Changes and Exit To exit the Setup utility without saving the changes select this field then press Enter You may be prompted to confirm again before exiting You can also press ESC to exit...

Отзывы: