background image

Copyright © 2021 NEXCOM International Co., Ltd. All Rights Reserved.

1

DFA1163 User Manual 

Chapter 1: Product Introduction

C

haPter

 1: P

roduCt

 I

ntroduCtIon

Key Features


Intel Atom

®

 processor C3000R


2 x DDR4 ECC RDIMM/UDIMM


1 x 10GbE SFP+ port


12 x RJ45 ports (with optional PoE+ support)

Overview


Supports Wi-Fi 6


Supports 4G LTE and 5G FR1 SA/NSA modes


Supports 5G FR2 NSA mode (DFA 1163M only)


Supports TSN (DFA 1163M only)

Содержание DFA1163

Страница 1: ...NEXCOM International Co Ltd NEXCOM International Co Ltd Published October 2021 www nexcom com Network and Communication Solutions Desktop Fixed Wireless Access Appliance DFA1163 User Manual ...

Страница 2: ...kage Contents Cont xiv Package Contents xv Ordering Information xvi Chapter 1 Product Introduction Overview 1 Key Features 1 Hardware Specifications 2 Knowing Your DFA1163 3 Front Panel 3 Rear Panel 4 Mechanical Dimensions 5 Chapter 2 Jumpers and Connectors Before You Begin 6 Precautions 6 Jumper Settings 7 Locations of the Jumpers and Connectors 8 Jumpers 9 RTC Clear 9 PMC Clear 9 Connector Pin D...

Страница 3: ...ing the Chassis Cover 19 Installing a DIMM Memory Module 21 Installing the M 2 Module 22 Installing Both the 5G and Wi Fi Module 23 Chapter 4 BIOS Setup About BIOS Setup 26 When to Configure the BIOS 26 Default Configuration 27 Entering Setup 27 Legends 27 BIOS Setup Utility 29 Main 29 Advanced 30 Intel RC Setup 40 Security 49 Boot 49 Save Exit 50 ...

Страница 4: ...XCOM International Co Ltd All other product names mentioned herein are registered trademarks of their respective owners Regulatory Compliance Statements This section provides the FCC compliance statement for Class B devices and describes how to keep the system CE compliant Declaration of Conformity FCC This equipment has been tested and verified to comply with the limits for a Class B digital devi...

Страница 5: ...Polybrominated diphenyl Ethers PBDE 0 1 or 1 000ppm In order to meet the RoHS compliant directives NEXCOM has established an engineering and manufacturing task force in to implement the introduction of green products The task force will ensure that we follow the standard NEXCOM development procedure and that all the new RoHS components and new manufacturing processes maintain the highest industry ...

Страница 6: ...ective products making sure it is durable enough to be resistant against further damage and deterioration during transportation In case of damages occurred during transportation the repair is treated as Out of Warranty Any products returned by NEXCOM to other locations besides the customers site will bear an extra charge and will be billed to the customer Repair Service Charges for Out of Warranty...

Страница 7: ...nd power supply are inconsistent with these instructions or the instructions for accessory modules contact the supplier to find out how you can ensure that your computer meets safety and regulatory requirements Cautions Electrostatic discharge ESD can damage system components Do the described procedures only at an ESD workstation If no such station is available you can provide some ESD protection ...

Страница 8: ... the soft metal or plastic parts of the connectors Safety Information Before installing and using the device note the following precautions Read all instructions carefully Do not place the unit on an unstable surface cart or stand Follow all warnings and cautions in this manual When replacing parts ensure that your service technician uses parts specified by the manufacturer Avoid using the system ...

Страница 9: ...uipment For safety reasons the equipment should be opened only by skilled person 14 If one of the following situations arises get the equipment checked by service personnel a The power cord or plug is damaged b Liquid has penetrated into the equipment c The equipment has been exposed to moisture d The equipment does not work well or you cannot get it to work according to the user s manual e The eq...

Страница 10: ...on of the installed software operating system version application software etc A complete description of the problem The exact wordings of the error messages Warning 1 Handling the unit carry the unit with both hands and handle it with care 2 Maintenance to keep the unit clean use only approved cleaning products or clean with a dry cloth Conventions Used in this Manual Warning Information about ce...

Страница 11: ...ung Office 16F No 250 Sec 2 Chongde Rd Beitun Dist Taichung City 406 R O C Tel 886 4 2249 1179 Fax 886 4 2249 1172 Email sales nexcom com tw www nexcom com tw NexCOBOT Taiwan Co Ltd 13F No 916 Chung Cheng Rd ZhongHe District New Taipei City 23586 Taiwan R O C Tel 886 2 8226 7796 Fax 886 2 8226 7792 Email sales nexcom com tw www nexcom com tw GreenBase Technology Corp 13F No 922 Chung Cheng Rd Zhon...

Страница 12: ...ngzun Plaza Bldg 1 No 609 Yunlin East Rd Shanghai 200062 China Tel 86 21 5278 5868 Fax 86 21 3251 6358 Email sales nexcom cn www nexcom cn NEXCOM Surveillance Technology Corp Floor 5 Building C ZhenHan Industrial Zone GanKeng Community Buji Street LongGang District ShenZhen 518112 China Tel 86 755 8364 7768 Fax 86 755 8364 7738 Email steveyang nexcom com tw www nexcom cn NEXCOM United System Servi...

Страница 13: ...112X00 Copper Post Long Fei Copper Post 8x5xM3 With Male Female Female 8mmx Male 5mmxM3 5 11 5044440031X00 Rubber Foot Kang Yang RF20 5 4P 19 8x18x5 0mm 4 12 50501A1295X00 N Chassis for DFA1163M VER A CHYUAN JYH 254x226x44mm SGCC T 0 8mm Painting PANTONE 8403C 1 13 5050200114X00 Fan for vDNA1160 VER A SUN TAI AD204020MBPA08 40x40x20mm 8000RPM 12V 2510 4Pin L 100mm 2 14 5060200394X00 Thermal Pad fo...

Страница 14: ...ng Fei P3x6L P3x6 iso SW6x0 5 NI 6 31 50311F0111X00 H Flat Head Screw Long Fei F3x5ISO Nylok Black F3x5 Black Nylok 15 32 50311F0144X00 I Head Screw Long Fei M3x4mm NI Nylok 4 33 50311F0162X00 H Round Head Screw GW Washer Long Fei P4x8 iso w NI 1 34 50311F0181X00 H P Head Screw Long Fei M3X8L Nilok 5 35 50311F0245X00 Flat Head Screw Long Fei F4X8L Tap Cut Black 8 36 50311T0050X00 I Head Screw Long...

Страница 15: ...GX5000 Switch PCB VER A YI GIA 333x264x82mm B Flute 14kg 1 49 60111A0457X00 Outside Carton for NPA 1610 M B3 VER A YI GIA O D 380x320x232mm AB Flute 18kg 1 50 6012200052X00 PE Zipper Bag 8 炎洲 印刷由任袋8號 170x240mm w China RoHS Symbol 1 51 6012200062X00 PE Bag for DNA730 840 Panadvance 350x330mm T 0 08mm With RoHS Symbol 1 52 6013301556X00 EPE for DFA1163 VER A SENTENEL 304x198x101mm 2 53 6019900289X00...

Страница 16: ...63 P N 10FA0116300X0 Intel Atom Processor C3558R BGA type 4 cores 2 4 GHz 2 x DDR4 2400 DIMM ECC memory max 64 GB DFA 1163A P N 10FA0116301X0 Intel Atom Processor C3758R BGA type 8 cores 2 4 GHz 2 x DDR4 2400 DIMM ECC memory max 64 GB DFA 1163M P N 10FA0116302X0 Intel Atom Processor C3758R BGA type 8 cores 2 4 GHz 2 x DDR4 2400 DIMM ECC memory max 64 GB TSN support 5G FR1 FR2 support ...

Страница 17: ...Introduction Chapter 1 Product Introduction Key Features Intel Atom processor C3000R 2 x DDR4 ECC RDIMM UDIMM 1 x 10GbE SFP port 12 x RJ45 ports with optional PoE support Overview Supports Wi Fi 6 Supports 4G LTE and 5G FR1 SA NSA modes Supports 5G FR2 NSA mode DFA 1163M only Supports TSN DFA 1163M only ...

Страница 18: ... x USB 3 0 connector combined with RJ45 management port 1 x Dual Micro SIM slot 2 x 2 5GbE RJ45 ports ports with optional PoE support 2 x 1GbE RJ45 ports ports with optional PoE support 8 x 1GbE RJ45 Switch ports with optional PoE support 1 x 1GbE SFP port 1 x 10GbE SFP port 2 x Fixed smart fans 2 x Power inlets 1 x 12V 1 x 54V 6 x Antenna holes 4 x for 4G LTE 5G antennas 2 x for Wi Fi 6 antennas ...

Страница 19: ...hernet activity Link activity Green for link Flashing green for activity GbE speed Green for 1G Amber for 100M Off for 10M 2 5GbE Green for 2 5G Amber for 1G Off for 100M 10M SFP Green for 1G Off for others SFP Green for 10G Off for others LED Indicators PWR PoE0 PoE1 PoE2 5G LTE WLAN SSD MGMT Power LED Green for on Red for off PoE0 2 Green for active Off for inactive 5G LTE Green for module insta...

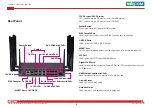
Страница 20: ...g a DC power cord For PoE Power Button Press to power on or power off the system RJ45 Console Port Used to connect to devices with RJ45 type console connection USB 3 0 Ports Used to connect USB 3 0 2 0 devices MGMT Port For the remote management and configuration of a networking device SFP Port Used to connect SFP transceivers modules Gigabit PoE Ports Used to connect the system to Powered Device ...

Страница 21: ...Copyright 2021 NEXCOM International Co Ltd All Rights Reserved 5 DFA1163 User Manual Chapter 1 Product Introduction Mechanical Dimensions DFA 1163 226 254 44 44 ...

Страница 22: ...self before touching any internal components by touching a metal object Static electricity can damage many of the electronic components Humid environments tend to have less static electricity than dry environments A grounding strap is warranted whenever danger of static electricity exists Precautions Computer components and electronic circuit boards can be damaged by discharges of static electrici...

Страница 23: ... jumpers ensure that the jumper caps are placed on the correct pins When the jumper cap is placed on both pins the jumper is short If you remove the jumper cap or place the jumper cap on just one pin the jumper is open Refer to the illustrations below for examples of what the 2 pin and 3 pin jumpers look like when they are short on and open off Two Pin Jumpers Open Left and Short Right Three Pin J...

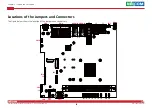
Страница 24: ...ights Reserved 8 DFA1163 User Manual Chapter 2 Jumpers and Connectors Locations of the Jumpers and Connectors The figure below shows the location of the jumpers and connectors CN7 SW2 CN11 J4 CN9 J5 J9 JP10 JP5 CN10 CN8 CN4 CON1 CON2 J3 J2 J1 SW1 CN1 ...

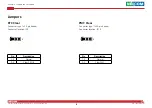
Страница 25: ...User Manual Chapter 2 Jumpers and Connectors Jumpers RTC Clear Connector type 1x3 3 pin header Connector location JP9 Pin Description 1 2 Normal 2 3 Clear CMOS PMC Clear Connector type 1x3 3 pin header Connector location JP10 Pin Description 1 2 Normal 2 3 Clear PMC 1 3 1 3 ...

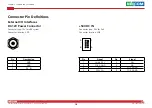
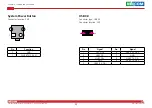
Страница 26: ...nnector Pin Definitions External I O Interfaces DC 12V Power Connector Connector type 12V for x86 system Connector location CN1 Pin Description 1 GND 2 GND 3 DC_IN 54V DC IN Connector type 54V for PoE Connector location CN8 Pin Signal Pin Signal 1 Vmain_54V 5 NA 2 POE_AGND 6 NA 3 NA 7 POE_AGND 4 P54V_PG 8 POE_AGND 4 1 5 8 ...

Страница 27: ...apter 2 Jumpers and Connectors 1 2 Pin Function 2 GND 1 PWR_BTN_CAL_N System Power Button Connector location SW1 USB 3 0 Connector type USB 3 0 Connector location CN7 Pin Signal Pin Signal 1 P5V_USB 6 USB3_RX_D0 2 USB2_P0 7 GND 3 USB2_P0 8 USB3_TX_D0 4 GND 9 USB3_TX_D0 5 USB3_RX_D0 1 9 5 4 ...

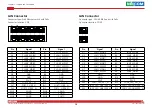
Страница 28: ..._MDI3N B8 P_LAN1_MDI3N A9 GND B9 GND A10 GND B10 GND AL4 P3V3 BL4 P3V3 AL3 PORT2_ACT_N BL3 PORT1_ACT_N AL1 PORT2_L100_N BL1 PORT1_L100_N AL2 PORT2_L1000_N BL2 PORT1_L1000_N MH1 CGND MH4 CGND MH2 CGND MH5 CGND MH3 CGND MH6 CGND Pin Signal Pin Signal A1 LAN1_MDIN0 B1 LAN2_MDIN0 A2 LAN1_MDIP0 B2 LAN2_MDIP0 A3 LAN1_MDIN1 B3 LAN2_MDIN1 A4 LAN1_MDIP1 B4 LAN2_MDIP1 A5 LAN1_MDIN2 B5 LAN2_MDIN2 A6 LAN1_MDI...

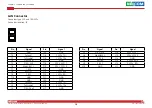
Страница 29: ... _TD T3 TxDisable1 T18 1_SFP _TD T4 P10G_Sda1 T17 GND T5 P10G_Scl1 T16 3P3V_SFP1_T T6 ModABS1_L T15 3P3V_SFP1_R T7 1_RS0 T14 GND T8 RxLOS1 T13 1_SFP _RD T9 1_RS1 T12 1_SFP _RD T10 GND T11 GND L1 GND L20 GND L2 TxFault2 L19 2_SFP _TD L3 TxDisable2 L18 2_SFP _TD L4 P10G_Sda2 L17 GND Pin Signal Pin Signal L5 P10G_Scl2 L16 3P3V_SFP2_T L6 ModABS2_L L15 3P3V_SFP2_R L7 2_RS0 L14 GND L8 RxLOS2 L13 2_SFP _...

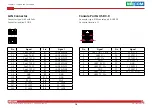
Страница 30: ...N2 A6 Port3_TX2P B6 LAN2_MDIP2 A7 Port3_TX3N B7 LAN2_MDIN3 A8 Port3_TX3P B8 LAN2_MDIP3 A9 GND B9 GND A10 GND B10 GND AL4 P3V3 BL4 P3V3 AL3 P1_LED2 BL3 P3_LED2 AL1 P1_LED1 BL1 P3_LED1 AL2 P1_LED0 BL2 P3_LED0 Console Port USB 3 0 Connector type RJ45 console port USB 3 0 Connector location J1 Pin Signal Pin Signal 1 USB_PORT1_VBUS P1 SP_RTS1_R 2 USB2_P1 P2 SP_DTR1_R 3 USB2_P1 P3 SP_TXD1_R 4 GND P4 SP...

Страница 31: ...45 management port USB 3 0 Connector location J2 Pin Signal Pin Signal 1 USB_PORT2_VBUS 11 LAN3_TX0P 2 USB2_P2 12 LAN3_TX0N 3 USB2_P2 13 LAN3_TX1P 4 GND 14 LAN3_TX1N 5 USB3_RX_D2 15 LAN3_TX2P 6 USB3_RX_D2 16 LAN3_TX2N 7 GND 17 LAN3_TX3P 8 USB3_TX_D2 18 LAN3_TX3N 9 USB3_TX_D2 L1 LAN3_LED_LINK100 L3 LAN3_LED_ACT L2 LAN3_LED_LINK1G L4 P3V3_STBY 1 9 5 4 8 1 ...

Страница 32: ...r Connector type 1x4 4 pin header Connector location CN9 CN10 Pin Description 1 GND 2 P12V 3 TACH 4 PWM GPIO Connector type 2x5 10 pin header Connector location JP5 Pin Signal Pin Signal 1 P5V 6 SIO_GPOUT2 2 GND 7 SIO_GPIN3 3 SIO_GPIN1 8 SIO_GPOUT3 4 SIO_GPOUT1 9 SIO_GPIN4 5 SIO_GPIN2 10 SIO_GPOUT4 1 4 1 9 2 10 Internal Connectors ...

Страница 33: ...Manual Chapter 2 Jumpers and Connectors TPM Connector type 2x7 14 pin header Connector location TPM Pin Signal Pin Signal 1 GND 8 LPC_LAD3 2 LPC_CLKOUT1_BK 9 GND 3 NC 10 LPC_LAD0 4 LPC_FRAME_N 11 LPC_SERIRQ 5 LPC_LAD2 12 P3V3 6 CPLD_TPM_PLTRST_N 13 GND 7 LPC_LAD1 14 GND 1 13 2 14 ...

Страница 34: ...B 3 0 x3 M 2 3080 M Key for WiFi M 2 2280 M Key PCIe3 x4 PCIe3 x2 1x USB3 0 1x USB2 0 M 2 3042 3052 B Key for 5G LTE uSIM TPM 2 0 Header Super IO NCT6683D RJ45 Console Power Button PCIe3 x1 PoE1 PoE2 PoE0 PCIe3 x2 12C 2x PCIe3 x1 2x 5GMII MDC MDIO 1x SFI 1x SFI Intel I211 MGMT Port Microsemi PD69104 Microsemi PD69104 CPLD LED Control Microsemi PD69104 2x Intel I225 2x 2 5GbE with PoE Marvell 88E15...

Страница 35: ... CAUTION CAUTION Prior to removing the chassis cover make sure the unit s power is off and disconnected from the power sources to prevent electric shock or system damage Screws on the bottom 1 The screws on the bottom and sides of the cover are used to secure the cover to the chassis Remove these screws and put them in a safe place for later use Screws on the sides ...

Страница 36: ...Copyright 2021 NEXCOM International Co Ltd All Rights Reserved 20 DFA1163 User Manual Chapter 3 System Setup 2 With the screws removed gently slide the cover outwards then lift up the cover to remove it ...

Страница 37: ...et on the motherboard and push the ejector tabs which are at the ends of the socket outward This indicates that the socket is unlocked DIMM Sockets 2 Seat the module vertically pressing it down firmly until it is completely seated in the socket The ejector tabs at the ends of the socket will automatically snap into the locked position to hold the module in place ...

Страница 38: ... into the M 2 slot at a 45 degrees angle until the gold plated connector on the edge of the module completely disappears inside the slot Push the M 2 module down and fasten the M 2 mounting screw into the mounting hole to secure the module Installing the M 2 Module 1 Locate the M 2 slot on the motherboard M 2 Mounting Screw M 2 Slot ...

Страница 39: ...d Wi Fi Module 1 Locate the 5G slot on the motherboard 2 Insert the 5G module into the 5G slot at a 45 degrees angle until the gold plated connector on the edge of the module completely disappears inside the slot Push the 5G module down and fasten the mounting screw into the mounting hole to secure the module Mounting Screw 5G Module ...

Страница 40: ...ed 24 DFA1163 User Manual Chapter 3 System Setup 3 Take out the thermal pad from the accessory bad and remove the release paper on both sides of the thermal pad Fix the thermal pad in the center of the module 4 Locate the Wi Fi slot on the motherboard Wi Fi Slot ...

Страница 41: ...apter 3 System Setup 5 Insert the Wi Fi module into the Wi Fi slot at a 45 degrees angle until the gold plated connector on the edge of the module completely disappears inside the slot Push the Wi Fi module down and fasten a Wi Fi mounting screw into the mounting hole to secure the module ...

Страница 42: ... configured with the values found in CMOS With easy to use pull down menus you can configure such items as Hard drives diskette drives and peripherals Video display type and display options Password protection from unauthorized use Power management features The settings made in the setup program affect how the computer performs It is important therefore first to try to understand all the setup opt...

Страница 43: ...ed the error will be reported in one of two different ways If the error occurs before the display device is initialized a series of beeps will be transmitted If the error occurs after the display device is initialized the screen will display the error message Powering on the computer and immediately pressing allows you to enter Setup Legends Key Function Moves the highlight left or right to select...

Страница 44: ...up screen it indicates that there are more available fields not shown on the screen Use the up and down arrow keys to scroll through all the available fields Submenu When appears on the left of a particular field it indicates that a submenu which contains additional options are available for that field To display the submenu move the highlight to that field and press ...

Страница 45: ... Save Exit ESC Exit Set the Date Use Tab to switch between Date elements Default Ranges Year 2005 2099 Months 1 12 Days dependent on month BIOS Information BIOS Vendor Core Version Compliancy Project Version Build Date and Time Access Level Memory Information Total Memory System Date System Time American Megatrends 5 13 UEFI 2 6 PI 1 4 G158T 0 41 x64 07 22 2021 09 35 43 Administrator 4096 MB DDR4 ...

Страница 46: ...use the system to malfunction Trusted Computing This section is used to configure Trusted Platform Module TPM settings Advanced Version 2 19 1266 Copyright C 2021 American Megatrends Inc Aptio Setup Utility Copyright C 2021 American Megatrends Inc Select Screen Select Item Enter Select Change Opt F1 General Help F2 Previous Values F3 Optimized Defaults F4 Save Exit ESC Exit Enables or Disables BIO...

Страница 47: ... version NCT6683D Super IO Configuration This section is used to configure the serial port of the super IO Super IO Chip Displays the Super I O chip used on the board Serial Port 1 Configuration Configures the IO IRQ settings of serial port 1 Advanced Version 2 19 1266 Copyright C 2021 American Megatrends Inc Aptio Setup Utility Copyright C 2021 American Megatrends Inc Select Screen Select Item En...

Страница 48: ...Auto Hardware Monitor This section is used to monitor hardware status such as temperature fan speed and voltages CPU Temperature Detects and displays the current CPU temperature System Temperature 1 and System Temperature 2 Detects and displays the current temperature of the system CN9 Fan Speed and CN10 Fan Speed Detects and displays the fan speed of CN4 and CN5 CPU VCORE to P12V Detects and disp...

Страница 49: ...rection Settings Advanced Version 2 19 1266 Copyright C 2021 American Megatrends Inc Aptio Setup Utility Copyright C 2021 American Megatrends Inc Select Screen Select Item Enter Select Change Opt F1 General Help F2 Previous Values F3 Optimized Defaults F4 Save Exit ESC Exit Emulation ANSI Extended ASCII char set VT100 ASCII char set VT100 Extends VT100 to support color function keys etc VT UTF8 Us...

Страница 50: ...ure the terminal data Resolution 100x31 Enables or disables extended terminal resolution Putty Keypad Selects the Putty keyboard emulation type PCI Subsystem Settings This section is used to configure the PCI PCI Latency Timer Configures the length of time allowed for the PCI device to control the bus before another takes over VGA Palette Snoop Enables or disables the VGA palette registers snoopin...

Страница 51: ...Select Screen Select Item Enter Select Change Opt F1 General Help F2 Previous Values F3 Optimized Defaults F4 Save Exit ESC Exit Enables or Disables PCI Express Device Relaxed Ordering PCI Express Device Register Settings Relaxed Ordering Extended Tag No Snoop Maximum Payload Maximum Read Request PCI Express Link Register Settings ASPM Support WARNING Enabling ASPM may cause some PCI E devices to ...

Страница 52: ...Selects the timeout period of link training in microseconds Unpopulated Links Enables or disables unpopulated PCI Express links PCI Express GEN 2 Settings Advanced Version 2 19 1266 Copyright C 2021 American Megatrends Inc Aptio Setup Utility Copyright C 2021 American Megatrends Inc Select Screen Select Item Enter Select Change Opt F1 General Help F2 Previous Values F3 Optimized Defaults F4 Save E...

Страница 53: ...2 19 1266 Copyright C 2021 American Megatrends Inc Aptio Setup Utility Copyright C 2021 American Megatrends Inc Select Screen Select Item Enter Select Change Opt F1 General Help F2 Previous Values F3 Optimized Defaults F4 Save Exit ESC Exit Enable Disable CSM Support Compatibility Support Module Configuration CSM Support CSM16 Module Version GateA20 Active Option ROM Messages INT19 Trap Response O...

Страница 54: ...tion for legacy PCI devices SDIO Configuration This section is used to configure the SDIO access mode Advanced Version 2 19 1266 Copyright C 2021 American Megatrends Inc Aptio Setup Utility Copyright C 2021 American Megatrends Inc Select Screen Select Item Enter Select Change Opt F1 General Help F2 Previous Values F3 Optimized Defaults F4 Save Exit ESC Exit SDIO Configuration SDIO Access Mode Mass...

Страница 55: ...lation Mass Storage Devices KingstomDataTraveler 19 Enabled Enabled Enabled Enabled Auto Legacy USB Support Enable Enables Legacy USB Auto Disables support for Legacy when no USB devices are connected Disable Keeps USB devices available only for EFI applications XHCI Hand off This is a workaround for OSs that does not support XHCI hand off The XHCI ownership change should be claimed by the XHCI dr...

Страница 56: ...evious Values F3 Optimized Defaults F4 Save Exit ESC Exit Enable Disable EIST GV3 and TM1 must be enabled for TM2 to be available GV3 must be enabled for Turbo Auto Enable for B0 CPU stepping all others disabled change setting to override Processor Configuration Processor ID 000506F1 Processor Frequency 2 400GHz CPU BCLK Frequency 100MHz L1 Cache RAM 56KB L2 Cache RAM 2048KB Processor Version Inte...

Страница 57: ...disables Intel AES NI support Save Exit Advanced IntelRCSetup Security Boot Main Version 2 19 1266 Copyright C 2021 American Megatrends Inc Aptio Setup Utility Copyright C 2021 American Megatrends Inc Select Screen Select Item Enter Select Change Opt F1 General Help F2 Previous Values F3 Optimized Defaults F4 Save Exit ESC Exit DDR memory frequency DDR4 up to DDR 2666 DDR3 up to DDR 1867 North Bri...

Страница 58: ...A Config VT d Enabled SSA Config VT d Enables or disables Intel VT d technology South Bridge Chipset Configuration State After G3 Configures which state to use when power is re applied after a power failure G3 state Save Exit Advanced IntelRCSetup Security Boot Main Version 2 19 1266 Copyright C 2021 American Megatrends Inc Aptio Setup Utility Copyright C 2021 American Megatrends Inc Select Screen...

Страница 59: ...c Select Screen Select Item Enter Select Change Opt F1 General Help F2 Previous Values F3 Optimized Defaults F4 Save Exit ESC Exit USB super speed configuration USB SS Configuration USB HS Configuration USB SS Configuration Port 0 to Port 3 Enters the sub menu for port 0 port 1 port 2 and port 3 configuration Save Exit Advanced IntelRCSetup Security Boot Main Version 2 19 1266 Copyright C 2021 Ame...

Страница 60: ...r Enables or disables the USB Physical Connector physical port Once disabled any USB devices plugged into the connector will not be detected by BIOS or OS USB SS Port 1 Save Exit Advanced IntelRCSetup Security Boot Main Version 2 19 1266 Copyright C 2021 American Megatrends Inc Aptio Setup Utility Copyright C 2021 American Megatrends Inc Select Screen Select Item Enter Select Change Opt F1 General...

Страница 61: ...r Enables or disables the USB Physical Connector physical port Once disabled any USB devices plugged into the connector will not be detected by BIOS or OS USB SS Port 3 Save Exit Advanced IntelRCSetup Security Boot Main Version 2 19 1266 Copyright C 2021 American Megatrends Inc Aptio Setup Utility Copyright C 2021 American Megatrends Inc Select Screen Select Item Enter Select Change Opt F1 General...

Страница 62: ...nfiguration Port 0 Port 1 Port 2 Port 3 USB HS Port 0 Save Exit Advanced IntelRCSetup Security Boot Main Version 2 19 1266 Copyright C 2021 American Megatrends Inc Aptio Setup Utility Copyright C 2021 American Megatrends Inc Select Screen Select Item Enter Select Change Opt F1 General Help F2 Previous Values F3 Optimized Defaults F4 Save Exit ESC Exit Enable Disable this USB Physical Connector phy...

Страница 63: ...r Enables or disables the USB Physical Connector physical port Once disabled any USB devices plugged into the connector will not be detected by BIOS or OS USB HS Port 2 Save Exit Advanced IntelRCSetup Security Boot Main Version 2 19 1266 Copyright C 2021 American Megatrends Inc Aptio Setup Utility Copyright C 2021 American Megatrends Inc Select Screen Select Item Enter Select Change Opt F1 General...

Страница 64: ...ical Connector Enables or disables the USB Physical Connector physical port Once disabled any USB devices plugged into the connector will not be detected by BIOS or OS IQAT Configuration Save Exit Advanced IntelRCSetup Security Boot Main Version 2 19 1266 Copyright C 2021 American Megatrends Inc Aptio Setup Utility Copyright C 2021 American Megatrends Inc Select Screen Select Item Enter Select Cha...

Страница 65: ...35 0xFFFF denotes indefinite waiting Bootup NumLock State This allows you to determine the default state of the numeric keypad By default the system boots up with NumLock on wherein the function of the numeric keypad is the number keys When set to Off the function of the numeric keypad is the arrow keys Save Exit Version 2 19 1266 Copyright C 2021 American Megatrends Inc Aptio Setup Utility Copyri...

Страница 66: ...o exit the Setup utility and reset without saving the changes select this field then press Enter You may be prompted to confirm again before exiting Restore Defaults To restore the BIOS to default settings select this field then press Enter A dialog box will appear Confirm by selecting Yes Save Exit Advanced IntelRCSetup Security Boot Main Version 2 19 1266 Copyright C 2021 American Megatrends Inc...

Страница 67: ...l Chapter 4 BIOS Setup Boot Override To bypass the boot sequence from the Boot Option List and boot from a particular device select the desired device and press Enter Launch EFI Shell from filesystem device To launch EFI shell from a filesystem device select this field and press Enter ...

Отзывы: