


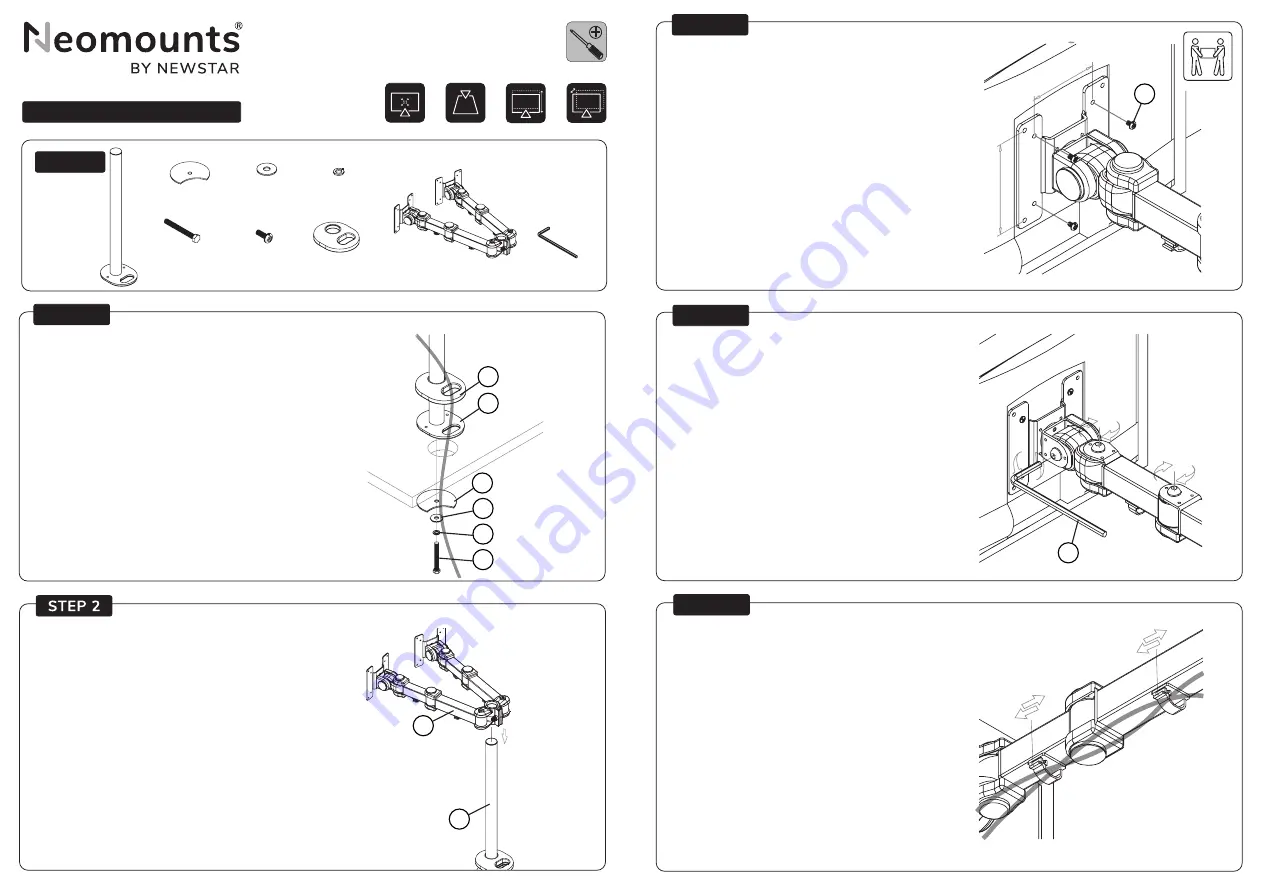
Attach the arm to the rod, adjust height and tighten
Bevestig de arm aan de stang, stel de juiste hoogte in en draai vast
Befestigung des Arms an der Stange, Höhe einstellen und fi xieren
Attachez le bras à la tige, réglez la hauteur et fi xer
Collegare il braccio all’asta, regolazione dell’altezza e stringere
Conecte el brazo a la barra, ajuste altura y apretar
Anexar o braço para a haste, ajuste altura e aperte
Przymocuj ramię do rurki, regulacja wysokości i dokręcić
EN
NL
DE
FR
IT
ES
PT
PL
PARTS
FPMA-D960DG
Screen size
VESA
Weight capacity
Tilt
Swivel
Rotate
Height
Depth
Gas spring
Curved screen compatible
Quick-release VESA
Top-fix clamp
180° lock system
Handlebar
Crossbar
Cable management
Screen size
VESA
Weight capacity
Tilt
Swivel
Rotate
Height
Depth
Gas spring
Curved screen compatible
Quick-release VESA
Top-fix clamp
180° lock system
Handlebar
Crossbar
Cable management
0-8 kg |
0-17,6 lbs (2x)
A. (x1)
Screen size
VESA
Weight capacity
Tilt
Swivel
Rotate
Height
Depth
Gas spring
Curved screen compatible
Quick-release VESA
Top-fix clamp
180° lock system
Handlebar
Crossbar
Cable management
Screen size
VESA
Weight capacity
Tilt
Swivel
Rotate
Height
Depth
Gas spring
Curved screen compatible
Quick-release VESA
Top-fix clamp
180° lock system
Handlebar
Crossbar
Cable management
75x75 -
100x100 mm
STEP 3
OPTION
STEP 4
Attach the screen onto the bracket and secure it
Bevestig het scherm aan de steun en zet vast
Bevestigen und sichern Sie den Bildschirm an der Halterung
Accrochez l’écran sur le cadre et fi xez-le
Appendere lo schermo sulla staffa e fi ssarlo
Cuelgue la pantalla en el soporte y asegúrela
Pendure a tela no suporte e prenda-a
Zawieś monitor na wsporniku i zabezpiecz go
EN
NL
DE
FR
IT
ES
PT
PL
Adjust the torques
Stel het koppel in
Einstellen des Drehmoments
Réglagez les couples
Regolazione della coppia
Ajuste el tornillo
Ajustar os parafusos
Dostsosuj siłę docisku regulacji obrotu monitora
EN
NL
DE
FR
IT
ES
PT
PL
Run cable through the cable cover and adjust the mount to your
desired position
Leid de kabel(s) door de kabelgoot en stel de steun in op de
gewenste positie
Kabel durch die Kabelabdeckung führen und positionieren der
Halterung in der gewünschten Position
Positionnez vos câbles dans les chemins prévus à cet effet et
ajustez le support à la position souhaitée
Far passare il cavo attraverso la copertura del cavo e regolare il
supporto nella posizione desiderata
Pase el (los) cable (s) a través de la bandeja para cables y
establecer el soporte en la posición deseada
Passe o cabo pela tampa do cabo e ajuste o suporte na posição
desejada
Przeprowadź kabel przez osłonę kabla i dostosuj pozycję
uchwytu do twoich wymagań
EN
NL
DE
FR
IT
ES
PT
PL
EN
NL
DE
FR
IT
ES
PT
PL
STEP 1
lnstall the grommet through the desk
Installeer de doorvoer in het bureau
Montage der Tülle durch den Schreibtisch
lnstallez l’oeillet à travers Ie bureau
lnstalla l’occhiello attraverso la scrivania
lnstale la arandela en la mesa
lnstale o anel através da mesa
Zainstaluj przelotk<, przez biurko
H. (x1)
I. (x1)
Screen size
VESA
Weight capacity
Tilt
Swivel
Rotate
Height
Depth
Gas spring
Curved screen compatible
Quick-release VESA
Top-fix clamp
180° lock system
Handlebar
Crossbar
Cable management
Screen size
VESA
Weight capacity
Tilt
Swivel
Rotate
Height
Depth
Gas spring
Curved screen compatible
Quick-release VESA
Top-fix clamp
180° lock system
Handlebar
Crossbar
Cable management
0-45 cm
75 mm
100 mm
Screen size
VESA
Weight capacity
Tilt
Swivel
Rotate
Height
Depth
Gas spring
Curved screen compatible
Quick-release VESA
Top-fix clamp
180° lock system
Handlebar
Crossbar
Cable management
Screen size
VESA
Weight capacity
Tilt
Swivel
Rotate
Height
Depth
Gas spring
Curved screen compatible
Quick-release VESA
Top-fix clamp
180° lock system
Handlebar
Crossbar
Cable management
10-43 cm
A
G
A
B
C
D
E
H
B. (x1)
C. 3/8”
(x1)
D. 3/8”
(x1)
E. 3/8”x3”
(x1)
F. M4x10
(x8)
G. (x1)
Tool
Pencil
Drill
Tape measure
F
I
Содержание Neomounts FPMA-D960DG
Страница 3: ......


