NewLine TRUTOUCH VN Series Скачать руководство пользователя страница 18

X

N Service Manual 

Problem #

9

: Noise image or colour distortion

Step 1: If only 

the 

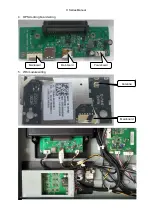
OPS source has this issue, replace the OPS docking board or HDMI cable that


goes 

between 

the 

OPS docking board and 

the 

Mainboard.

Step 2: If all source

s, 

includ

ing

 Android

,

 ha

ve

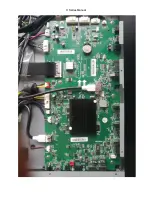
 this issue, replace the Mainboard, T-CON board

and


LVDS cable one by one. 

Step 3: Replace optical bonding module. 

Problem #1

0

: Flicker screen

Step 1: Replace Mainboard. 

Step 2: Replace T-CON board and clean the FFC cable of T-CON. 

Step 3: Replace optical bonding module. 

Problem #1

1

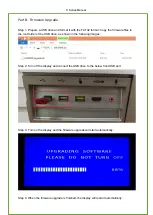
: Stuck on splash logo

, can’t enter into homepage

Step 1: Reload FW for mainboard. 

Step 2: If it 

does 

not work, replace Mainboard.

Problem #1

2

: Broken sound or sound popping

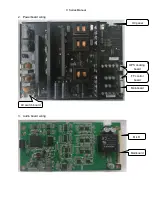
Step 1: It should be a speaker issue, replace the speaker. 
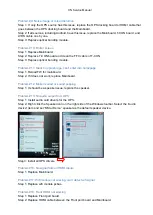
Problem #1

3

: No audio output from OPS

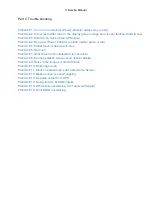
Step 1: Install audio card driver

for 

the 

OPS.

Step 2: Right click 

the 

Speaker icon 

o

n the right side of 

the 

Windows toolba

r.


S

elect the “Audio

device” item

 and 

set “MStar Demo” speaker as 

the 

default speaker device.

Step 3: Install all OPS driver

s

.

Problem #1

6

: No signal from all HDMI input

s

Step 1: Replace Mainboard. 

Problem #1

7

: Wifi module not working, can’t detect wifi signal

Step 1: Replace wifi module pcbas. 

Problem #

18

: Front HDMI not working

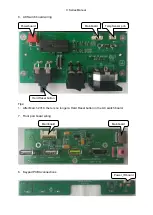
Step 1: Replace Front port board. 

Step 2: Replace HDMI cable between 

the 

Front port board and Mainboard.

Содержание TRUTOUCH VN Series

Страница 1: ...X Series Service Manual...

Страница 2: ...is essential that all components be replaced with authorized components recommended in this manual to prevent shock fire or any other hazards 3 Please do not modify the original mechanical or electri...

Страница 3: ...art A PCBA Overviews OPS Dock board Mainboard Power board TempSensor T con board Audio board Wifi module Front port board Keypad board Power_IR board AC board TP control board R Micphone L Micphone To...

Страница 4: ...1 Mainboard wiring AC board Front port board FF control board Powerboard T Con board T Con board Front port board Power_IR board 5 6SHDNHU OPS docking board Audio board OPS docking board Top Bottom C...

Страница 5: ...X Series Manual...

Страница 6: ...X Series Manual 2 Powerboard wiring 3 Audio board wiring OC panel OPS docking board FF control board Mainboard AC switch board Mainboard Mic R...

Страница 7: ...X Series Manual 4 OPS docking board wiring 5 Wifi module wiring Mainboard Mainboard Powreboard Mainboard Antenna...

Страница 8: ...wiring Tips 1 After March 2018 there is no longer a Hard Reset button in the AC switch board 7 Front port board wiring 8 Keypad PCBA connections Powerboard Mainboard TempSensor pcb Hard Reset button M...

Страница 9: ...X Series Manual 9 Power_IR board wiring 10 TempSensor PCBA wiring AC switch board Keypad board Mainboard...

Страница 10: ...X Series Manual 11 FlatFrog Touch Panel Control board wiring 12 T CON board wiring Powerboard Mainboard Mainboard TP PCBA TP PCBA Mainboard Mainboard...

Страница 11: ...X Series Manual...

Страница 12: ...X Series Manual 13 Micphone pcba L R wiring 14 Camera module wiring Mainboard L Microphone Mainboard R Microphone...

Страница 13: ...X Series Manual...

Страница 14: ...e files to the root folder of the USB drive as shown in the following images Step 2 Turn off the display and connect the USB drive to the below front USB port Step 3 Turn on the display and the firmwa...

Страница 15: ...X Series Manual Step 5 On the first boot up after the firmware upgrade it will stay on the X Series splash logo for about 3 minutes Step 6 Go to settings menu to check the firmware version is correct...

Страница 16: ...Problem 5 Partial touch or dead touch area Problem 6 No touch Problem 7 Ghost touch or the calibration is inaccurate Problem 8 No image Black screen even no faint display Problem 9 Noise in the image...

Страница 17: ...nk even no red colour Step 1 Replace the Powerboard Step 2 Replace the AC relay control board Step 3 Replace the Mainboard Problem 5 Partial touch or dead touch area Step 1 Refer to Part B to test the...

Страница 18: ...nto homepage Step 1 Reload FW for mainboard Step 2 If it does not work replace Mainboard Problem 12 Broken sound or sound popping Step 1 It should be a speaker issue replace the speaker Problem 13 No...

Страница 19: ...XN Service Manual Thank you for reading For more info please contact the manufacturer or authorized agent...

Отзывы: